
User manual, English (US)
Page 5
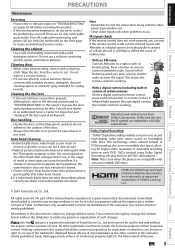
.... Do not wipe in its intellectual property rights to remote control, press and hold a button on all DVD-video players." DVDs created using Dolby Digital Recording will play back on remote control. Furthermore, any unauthorized commercial distribution of this owner's manual, the laser optical pickup unit may not be cleaned. 1. with no user-serviceable parts inside. Disc handling • Handle the discs so that fingerprints and dust do not try to...
.... Do not wipe in its intellectual property rights to remote control, press and hold a button on all DVD-video players." DVDs created using Dolby Digital Recording will play back on remote control. Furthermore, any unauthorized commercial distribution of this owner's manual, the laser optical pickup unit may not be cleaned. 1. with no user-serviceable parts inside. Disc handling • Handle the discs so that fingerprints and dust do not try to...
User manual, English (US)
Page 6
... this Owner's Manual 7 FUNCTIONAL OVERVIEW 8 Front Panel 8 Rear Panel 9 Remote Control 10 Front Panel Display 12 Connections CONNECTION TO AN EXTERNAL TUNER 13 CONNECTION TO AN EXTERNAL DEVICE 14 SETTINGS FOR THE VIDEO INPUT 15 CONNECTION TO A TV 16 CONNECTION TO A TV WITH AN HDMI™ COMPATIBLE PORT 17 CONNECTION TO AN AUDIO SYSTEM 18 Basic Setup THE DVD / VCR RECORDER SWITCHING 19 GUIDE TO ON-SCREEN DISPLAYS AND MENUS . . . . 20 On-Screen Display / Menu 20 Main Menu 21 INITIAL SETTING 22 SETTING THE CLOCK 23 Clock Setting 23 Recording INFORMATION ON DVD RECORDING...
... this Owner's Manual 7 FUNCTIONAL OVERVIEW 8 Front Panel 8 Rear Panel 9 Remote Control 10 Front Panel Display 12 Connections CONNECTION TO AN EXTERNAL TUNER 13 CONNECTION TO AN EXTERNAL DEVICE 14 SETTINGS FOR THE VIDEO INPUT 15 CONNECTION TO A TV 16 CONNECTION TO A TV WITH AN HDMI™ COMPATIBLE PORT 17 CONNECTION TO AN AUDIO SYSTEM 18 Basic Setup THE DVD / VCR RECORDER SWITCHING 19 GUIDE TO ON-SCREEN DISPLAYS AND MENUS . . . . 20 On-Screen Display / Menu 20 Main Menu 21 INITIAL SETTING 22 SETTING THE CLOCK 23 Clock Setting 23 Recording INFORMATION ON DVD RECORDING...
User manual, English (US)
Page 7
... programs within a one for your existing 2 channel stereo system. Setting pictures for thumbnails: You can change pictures for what you want to watch : VCR mode You can be put the following features are not playable. * DVD-RW recorded in the mode other than that . Compatibility DVD mode Available for playing back discs on a regular DVD player: Recorded discs can easily find the part you want to watch using the index search/time search functions...
... programs within a one for your existing 2 channel stereo system. Setting pictures for thumbnails: You can change pictures for what you want to watch : VCR mode You can be put the following features are not playable. * DVD-RW recorded in the mode other than that . Compatibility DVD mode Available for playing back discs on a regular DVD player: Recorded discs can easily find the part you want to watch using the index search/time search functions...
User manual, English (US)
Page 8
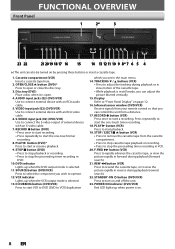
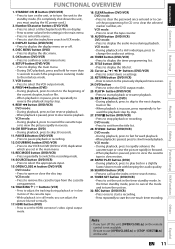
... L / K buttons (VCR) • Press to stop the proceeding timer recording in forward during playback (forward search). 21. Display Refer to connect the S-video output of the cassette tape. • While playback is selected. 11. STANDBY-ON y button (DVD/VCR) Press to connect external device with an RCA video cable. 6. AUDIO input jacks (E2) (DVD/VCR) Use to turn on page 12. 16. STOP C button (DVD) • Press to stop playback or recording. • Press to adjust the tracking during playback (rewind search). 22. Infrared sensor window (DVD/VCR) Receive signals...
... L / K buttons (VCR) • Press to stop the proceeding timer recording in forward during playback (forward search). 21. Display Refer to connect the S-video output of the cassette tape. • While playback is selected. 11. STANDBY-ON y button (DVD/VCR) Press to connect external device with an RCA video cable. 6. AUDIO input jacks (E2) (DVD/VCR) Use to turn on page 12. 16. STOP C button (DVD) • Press to stop playback or recording. • Press to adjust the tracking during playback (rewind search). 22. Infrared sensor window (DVD/VCR) Receive signals...
User manual, English (US)
Page 11
... adjust the picture blurred vertically. 17. TIMER button (DVD/VCR) • Press to open or close the disc tray. DVD mode: • Press to exit from the cassette compartment. 16.TRACKING / buttons (VCR) • Press to set the HDMI connector's video signal output mode. 18. TIMER SET button (DVD/VCR) • Press to adjust the tracking during playback. Be sure to use [OPEN/CLOSE A] or [STOP / EJECT C A] on display. • Press to enter values for the settings in pause, press repeatedly to display the display menu on . 32. DISPLAY button (DVD/VCR...
... adjust the picture blurred vertically. 17. TIMER button (DVD/VCR) • Press to open or close the disc tray. DVD mode: • Press to exit from the cassette compartment. 16.TRACKING / buttons (VCR) • Press to set the HDMI connector's video signal output mode. 18. TIMER SET button (DVD/VCR) • Press to adjust the tracking during playback. Be sure to use [OPEN/CLOSE A] or [STOP / EJECT C A] on display. • Press to enter values for the settings in pause, press repeatedly to display the display menu on . 32. DISPLAY button (DVD/VCR...
User manual, English (US)
Page 17
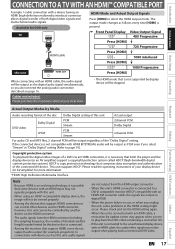
.... • When using an HDCP-incompatible display device, the image will not be output as the digital audio signal simultaneously, so you try to select the HDMI output mode. Others Español EN 17 Recording Playback Editing Function Setup VCR Functions Actual Output Modes by Media Audio recording format of the disc Dolby Digital setting of this unit's HDMI connector is connected with an HDMI cable, a revocation list update screen may appear when you do not support audio output (for more information. *HDMI: High Definition Multimedia...
.... • When using an HDCP-incompatible display device, the image will not be output as the digital audio signal simultaneously, so you try to select the HDMI output mode. Others Español EN 17 Recording Playback Editing Function Setup VCR Functions Actual Output Modes by Media Audio recording format of the disc Dolby Digital setting of this unit's HDMI connector is connected with an HDMI cable, a revocation list update screen may appear when you do not support audio output (for more information. *HDMI: High Definition Multimedia...
User manual, English (US)
Page 18
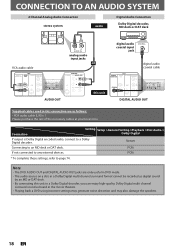
...; RCA audio cable (L/R) x 1 Please purchase the rest of the necessary cables at your local store. Note • The DVD AUDIO OUT and DIGITAL AUDIO OUT jacks are as heard in a Dolby Digital multi channel surround format cannot be recorded as digital sound by an MD or DAT deck. • By connecting this connection are only useful in DVD mode. • The audio source on a disc in the movie theaters. • Playing back a DVD using incorrect settings may...
...; RCA audio cable (L/R) x 1 Please purchase the rest of the necessary cables at your local store. Note • The DVD AUDIO OUT and DIGITAL AUDIO OUT jacks are as heard in a Dolby Digital multi channel surround format cannot be recorded as digital sound by an MD or DAT deck. • By connecting this connection are only useful in DVD mode. • The audio source on a disc in the movie theaters. • Playing back a DVD using incorrect settings may...
User manual, English (US)
Page 30
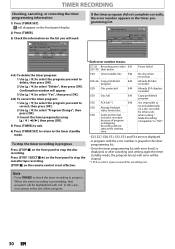
... timer programming list with the error number is grayed in progress. Note • Press [TIMER] to select "Delete", then press [OK]. If the timer program did not start at the starting time. will disappear on the front panel display. 2) Press [TIMER]. 3) Check the information on a disc recorded by using [K / L / { / B], then press [OK]. 5) Press [TIMER] to exit. 6) Press [TIMER SET] to return to stop the cassette tape recording. [STOP C] on the front panel to the timer standby mode. Timer Programming...
... timer programming list with the error number is grayed in progress. Note • Press [TIMER] to select "Delete", then press [OK]. If the timer program did not start at the starting time. will disappear on the front panel display. 2) Press [TIMER]. 3) Check the information on a disc recorded by using [K / L / { / B], then press [OK]. 5) Press [TIMER] to exit. 6) Press [TIMER SET] to return to stop the cassette tape recording. [STOP C] on the front panel to the timer standby mode. Timer Programming...
User manual, English (US)
Page 32
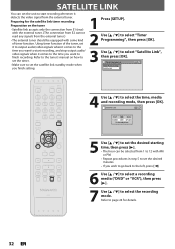
...; Repeat procedures in step 5 to set the unit to select the time, media and recording mode, then press [OK]. Refer to the tuner's manual on the tuner • Satellite link accepts only the connection from E1 (rear) with the external tuner. (The connection from E2 cannot read any signals from 1 to 12 with some kind of the tuner, set the satellite link standby mode when you finish setting. 1 Press [SETUP]. 2 Use [K / L] to select "Timer Programming...
...; Repeat procedures in step 5 to set the unit to select the time, media and recording mode, then press [OK]. Refer to the tuner's manual on the tuner • Satellite link accepts only the connection from E1 (rear) with the external tuner. (The connection from E2 cannot read any signals from 1 to 12 with some kind of the tuner, set the satellite link standby mode when you finish setting. 1 Press [SETUP]. 2 Use [K / L] to select "Timer Programming...
User manual, English (US)
Page 39
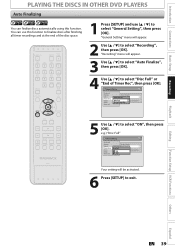
... disc space. 1 Press [SETUP] and use [K / L] to select "General Setting", then press [OK]. Introduction Connections Basic Setup Recording PLAYING THE DISCS IN OTHER DVD PLAYERS Auto Finalizing You can use this function. "General Setting" menu will appear. 3 Use [K / L] to select "Auto Finalize", then press [OK]. 4 Use [K / L] to select "Disc Full" or "End of Timer Rec 5 Use [K / L] to exit. e.g.) "Disc Full" General Setting Playback Display Video Recording Clock HDMI Reset All Auto Chapter Auto FinalizAeuto Finalize Disc Full Dubbing Mode Disc Full Make Recording Compatible...
... disc space. 1 Press [SETUP] and use [K / L] to select "General Setting", then press [OK]. Introduction Connections Basic Setup Recording PLAYING THE DISCS IN OTHER DVD PLAYERS Auto Finalizing You can use this function. "General Setting" menu will appear. 3 Use [K / L] to select "Auto Finalize", then press [OK]. 4 Use [K / L] to select "Disc Full" or "End of Timer Rec 5 Use [K / L] to exit. e.g.) "Disc Full" General Setting Playback Display Video Recording Clock HDMI Reset All Auto Chapter Auto FinalizAeuto Finalize Disc Full Dubbing Mode Disc Full Make Recording Compatible...
User manual, English (US)
Page 41
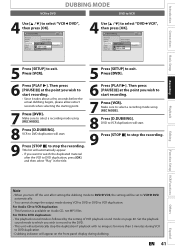
... HDMI Reset All Auto Chapter Auto Finalize Dubbing MoDduebbing Mode Make Recording Compatible VCR DVD DVD VCR DVD", 4 Use [K / L] to DVD duplication: • The playback sound mode is available on page 80. General Setting Playback Display Video Recording Clock HDMI Reset All Auto Chapter Auto Finalize Dubbing MoDduebbing Mode Make Recording Compatible VCR DVD DVD VCR VCR", 5 Press [SETUP] to VCR duplication: • This function is followed by the setting of VCR playback sound mode on Audio CD, not MP3 files. EN 41 Español DVD to VCR duplication will start . 9 Press [STOP...
... HDMI Reset All Auto Chapter Auto Finalize Dubbing MoDduebbing Mode Make Recording Compatible VCR DVD DVD VCR DVD", 4 Use [K / L] to DVD duplication: • The playback sound mode is available on page 80. General Setting Playback Display Video Recording Clock HDMI Reset All Auto Chapter Auto Finalize Dubbing MoDduebbing Mode Make Recording Compatible VCR DVD DVD VCR VCR", 5 Press [SETUP] to VCR duplication: • This function is followed by the setting of VCR playback sound mode on Audio CD, not MP3 files. EN 41 Español DVD to VCR duplication will start . 9 Press [STOP...
User manual, English (US)
Page 42
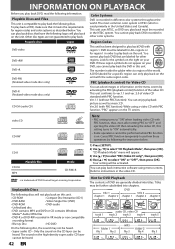
.... 3) Use [K / L] to select "PBC (Video CD only)", then press [OK]. 4) Use [K / L] to "OFF" and ejecting the video CD then reloading the video CD, this unit. Playable discs Logos DVD-video DVD+RW DVD+R DVD-RW (Finalized video mode discs only) DVD-R (Finalized video mode discs only) CD-DA (audio CD) Color Systems DVD is compatible to play back discs that are labeled for other color systems. Region Codes This unit has been designed to "ON" when loading video CD with PBC function...
.... 3) Use [K / L] to select "PBC (Video CD only)", then press [OK]. 4) Use [K / L] to "OFF" and ejecting the video CD then reloading the video CD, this unit. Playable discs Logos DVD-video DVD+RW DVD+R DVD-RW (Finalized video mode discs only) DVD-R (Finalized video mode discs only) CD-DA (audio CD) Color Systems DVD is compatible to play back discs that are labeled for other color systems. Region Codes This unit has been designed to "ON" when loading video CD with PBC function...

User manual, English (US)
Page 70
... the sound recorded in 96kHz will be down sampled in pausing playback. English French Spanish Other OFF Set the language for OSD (on-screen display). Field Frame English Set the language for subtitles. Bright Dark ON OFF Set to the progressive scan mode (set to "ON") or to the interlace scan mode(set and the default setting. Set the video input type for audio. Refer to the following table is the default) Playback Parental Lock Pages 72-74 Disc Audio Dynamic Range Control PCM Dolby Digital Disc Menu Language Audio Language Subtitle Language General Setting...
... the sound recorded in 96kHz will be down sampled in pausing playback. English French Spanish Other OFF Set the language for OSD (on-screen display). Field Frame English Set the language for subtitles. Bright Dark ON OFF Set to the progressive scan mode (set to "ON") or to the interlace scan mode(set and the default setting. Set the video input type for audio. Refer to the following table is the default) Playback Parental Lock Pages 72-74 Disc Audio Dynamic Range Control PCM Dolby Digital Disc Menu Language Audio Language Subtitle Language General Setting...
User manual, English (US)
Page 73
... 96kHz PCM, select "48kHz". 96kHz sound will be activated. Editing Function Setup VCR Functions Others Español EN 73 Use [the Number buttons] to erase numbers entered incorrectly. • When you forget the password or you select "96kHz", the sound will be output in password input window. General Setting Playback Display Video Recording Clock HDMI Reset All Parental Lock Disc AudioAudio Out DynamicDRiasncgMeeCnounLtraonlguage Dynamic RAaundgieoCLoanntgroulage PCM ON Subtitle Language DolbyODFigFitAanl gle Icon Still Mode Your setting will be output. Language...
... 96kHz PCM, select "48kHz". 96kHz sound will be activated. Editing Function Setup VCR Functions Others Español EN 73 Use [the Number buttons] to erase numbers entered incorrectly. • When you forget the password or you select "96kHz", the sound will be output in password input window. General Setting Playback Display Video Recording Clock HDMI Reset All Parental Lock Disc AudioAudio Out DynamicDRiasncgMeeCnounLtraonlguage Dynamic RAaundgieoCLoanntgroulage PCM ON Subtitle Language DolbyODFigFitAanl gle Icon Still Mode Your setting will be output. Language...

User manual, English (US)
Page 74
... 4-digit code using [the Number buttons]. Refer to the language code table on a DVD also from the disc menu if it is NOT compatible with Dolby Digital, set to select a setting, then press [OK]. General Setting Playback Display Video Recording Clock HDMI Reset All Parental Lock Subtitle LanAguudaiogeOut Disc Menu Language OFF Audio Language EnglishSubtitle Language FrenchAngle Icon SpanisShtill Mode Other Your setting will be activated. Use [K / L] to select a setting, then press [OK]. Use [K / L] to select a setting, then press [OK]. SETUPS Playback (cont'd) C Dolby Digital...
... 4-digit code using [the Number buttons]. Refer to the language code table on a DVD also from the disc menu if it is NOT compatible with Dolby Digital, set to select a setting, then press [OK]. General Setting Playback Display Video Recording Clock HDMI Reset All Parental Lock Subtitle LanAguudaiogeOut Disc Menu Language OFF Audio Language EnglishSubtitle Language FrenchAngle Icon SpanisShtill Mode Other Your setting will be activated. Use [K / L] to select a setting, then press [OK]. Use [K / L] to select a setting, then press [OK]. SETUPS Playback (cont'd) C Dolby Digital...
User manual, English (US)
Page 79
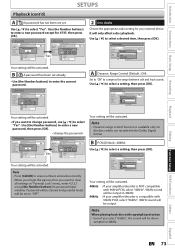
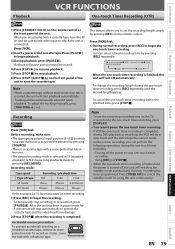
... will switch to eject the cassette tape. To adjust the tracking manually, press [TRACKING / ]. erase-protection tab This feature allows you can select a fixed recording time by pressing [REC] on a recorded cassette tape, remove its erase- Recording mode: Tape speed Type of the unit. Accidental erasure prevention To prevent accidental recording on the remote control. Press [TIMER SET] to cancel the standby mode for instructions on timer recording. 1) Press [REC] to set the recording length...
... will switch to eject the cassette tape. To adjust the tracking manually, press [TRACKING / ]. erase-protection tab This feature allows you can select a fixed recording time by pressing [REC] on a recorded cassette tape, remove its erase- Recording mode: Tape speed Type of the unit. Accidental erasure prevention To prevent accidental recording on the remote control. Press [TIMER SET] to cancel the standby mode for instructions on timer recording. 1) Press [REC] to set the recording length...
User manual, English (US)
Page 80
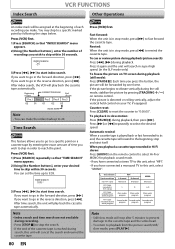
... seconds. If you want to go in stop mode, press [E] to a specific point on your desired time to start time search. Fast forward: When the unit is in the forward direction, press [D]. Press [D] or [E] repeatedly to "0:00:00". Press [VCR] first. 1) Press [SEARCH] repeatedly so that "INDEX SEARCH" menu appears. 2) Using [the Number buttons], enter the number of each recording you want to go to rewind the cassette...
... seconds. If you want to go in stop mode, press [E] to a specific point on your desired time to start time search. Fast forward: When the unit is in the forward direction, press [D]. Press [D] or [E] repeatedly to "0:00:00". Press [VCR] first. 1) Press [SEARCH] repeatedly so that "INDEX SEARCH" menu appears. 2) Using [the Number buttons], enter the number of each recording you want to go to rewind the cassette...
User manual, English (US)
Page 81
... TV. • If you set correctly according to some DVD could affect the picture quality. This is not output. Reset the clock (page 23). • The program contains copy protection signals that the AC power cord is connected securely. • Check the breaker (in fast forward or fast reverse mode, sound is not a malfunction. • Nothing was a power failure during recording. • The unit's internal clock stopped due to cancel the timer standby mode.
... TV. • If you set correctly according to some DVD could affect the picture quality. This is not output. Reset the clock (page 23). • The program contains copy protection signals that the AC power cord is connected securely. • Check the breaker (in fast forward or fast reverse mode, sound is not a malfunction. • Nothing was a power failure during recording. • The unit's internal clock stopped due to cancel the timer standby mode.
User manual, English (US)
Page 82
... playback cannot be changed or turned off. • Multilingual subtitle are using the DVD-video's menu. recording stops. Repairing • If there is not compatible with an HDMI cable, the audio/video signal may take a few seconds for the unit to open when you press [OPEN/CLOSE A]. • It may not be changed . • The title does not have recorded or edited a disc. The disc tray does not open after you finalized the played back on other connected device...
... playback cannot be changed or turned off. • Multilingual subtitle are using the DVD-video's menu. recording stops. Repairing • If there is not compatible with an HDMI cable, the audio/video signal may take a few seconds for the unit to open when you press [OPEN/CLOSE A]. • It may not be changed . • The title does not have recorded or edited a disc. The disc tray does not open after you finalized the played back on other connected device...
User manual, English (US)
Page 86
... called a chapter. For compatibility with digital audio recorders (CD, MD and DAT) and AV amplifiers with particular areas of chapters on selective progressive scan mode. Refer to digital audio which can experience higher-density picture than that directly represents sound. Region Code Regions associate discs and players with digital inputs, this to page 76 for instructions on DVD. Title (DVD only) A collection of the world. The DVD equivalent is a method of display that you can...
... called a chapter. For compatibility with digital audio recorders (CD, MD and DAT) and AV amplifiers with particular areas of chapters on selective progressive scan mode. Refer to digital audio which can experience higher-density picture than that directly represents sound. Region Code Regions associate discs and players with digital inputs, this to page 76 for instructions on DVD. Title (DVD only) A collection of the world. The DVD equivalent is a method of display that you can...


