
User manual, English (US)
Page 5
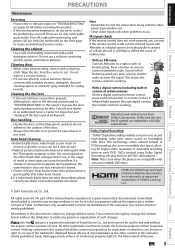
...remain the exclusive property of their respective owners. Dolby and the double-D symbol are compatible with stereo sound on recordable DVD discs. No part of this manual may not be cleaned. 1. Misuse of any trademarks or any key and the radio receives the signal. ... video heads in any form or for higher video resolution or extended recording time on each DVD. Furthermore, any unauthorized commercial distribution of this manual or any way without notice. Nothing contained in this manual should be reproduced, copied, transmitted, disseminated, transcribed, downloaded or stored...
...remain the exclusive property of their respective owners. Dolby and the double-D symbol are compatible with stereo sound on recordable DVD discs. No part of this manual may not be cleaned. 1. Misuse of any trademarks or any key and the radio receives the signal. ... video heads in any form or for higher video resolution or extended recording time on each DVD. Furthermore, any unauthorized commercial distribution of this manual or any way without notice. Nothing contained in this manual should be reproduced, copied, transmitted, disseminated, transcribed, downloaded or stored...
User manual, English (US)
Page 6
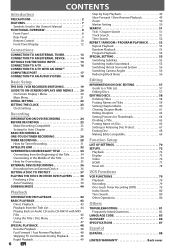
CONTENTS Introduction PRECAUTIONS 2 FEATURES 7 Symbols Used in this Owner's Manual 7 FUNCTIONAL OVERVIEW 8 Front Panel 8 Rear Panel 9 Remote Control 10 Front Panel Display 12 Connections CONNECTION TO AN EXTERNAL TUNER 13 ... 21 INITIAL SETTING 22 SETTING THE CLOCK 23 Clock Setting 23 Recording INFORMATION ON DVD RECORDING 24 BEFORE RECORDING 25 Make Recording Compatible 25 Setting for Auto Chapter 25 BASIC RECORDING & ONE-TOUCH TIMER RECORDING 26 TIMER RECORDING 28 Hints for Timer Recording 31 SATELLITE LINK 32 OVERWRITING UNNECESSARY TITLE 34 Overwriting from the ...
CONTENTS Introduction PRECAUTIONS 2 FEATURES 7 Symbols Used in this Owner's Manual 7 FUNCTIONAL OVERVIEW 8 Front Panel 8 Rear Panel 9 Remote Control 10 Front Panel Display 12 Connections CONNECTION TO AN EXTERNAL TUNER 13 ... 21 INITIAL SETTING 22 SETTING THE CLOCK 23 Clock Setting 23 Recording INFORMATION ON DVD RECORDING 24 BEFORE RECORDING 25 Make Recording Compatible 25 Setting for Auto Chapter 25 BASIC RECORDING & ONE-TOUCH TIMER RECORDING 26 TIMER RECORDING 28 Hints for Timer Recording 31 SATELLITE LINK 32 OVERWRITING UNNECESSARY TITLE 34 Overwriting from the ...
User manual, English (US)
Page 7
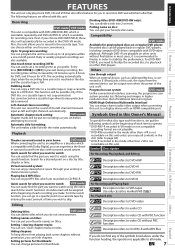
...You can experience the theat- The recording automatically stops when the recording time you make. Quick search for what you want to watch using the search function. Virtual surround system: You can change pictures for thumbnails. Symbols Used in this Owner's Manual To specify for what disc type ...When connecting the unit to an amplifier or a decoder which is applicable to all contents in the disc (refer to page 68). * DVD-R recorded in most cases, it is full. Putting names on a cassette tape by title, chapter or time. Setting / clearing chapter marks: ...
...You can experience the theat- The recording automatically stops when the recording time you make. Quick search for what you want to watch using the search function. Virtual surround system: You can change pictures for thumbnails. Symbols Used in this Owner's Manual To specify for what disc type ...When connecting the unit to an amplifier or a decoder which is applicable to all contents in the disc (refer to page 68). * DVD-R recorded in most cases, it is full. Putting names on a cassette tape by title, chapter or time. Setting / clearing chapter marks: ...
User manual, English (US)
Page 13
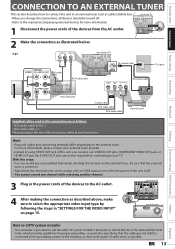
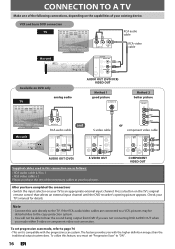
... When you change the connections, all devices should banetentnuarned off. • Refer to the manual accompanying external devices for more information, please contact your external tuner provider. • Instead...connection as described above, make sure to your TV. Introduction Connections Basic Setup Recording Playback CONNECTION TO AN EXTERNAL TUNER This section describes how to connect this ... cable RCA video cable HDMI OUT IN R IN ---VIDEO---OUT DIGITAL AUDIO OUT DVD AUDIO S-VIDEO COMPONENT S-VIDEO OUT VIDEO OUT Y DVD/VCR IN ---AUDIO---OUT L L PB /CB IN PR /CR R R ...
... When you change the connections, all devices should banetentnuarned off. • Refer to the manual accompanying external devices for more information, please contact your external tuner provider. • Instead...connection as described above, make sure to your TV. Introduction Connections Basic Setup Recording Playback CONNECTION TO AN EXTERNAL TUNER This section describes how to connect this ... cable RCA video cable HDMI OUT IN R IN ---VIDEO---OUT DIGITAL AUDIO OUT DVD AUDIO S-VIDEO COMPONENT S-VIDEO OUT VIDEO OUT Y DVD/VCR IN ---AUDIO---OUT L L PB /CB IN PR /CR R R ...
User manual, English (US)
Page 16
... device. Check your TV to an appropriate external input channel. To utilize this unit directly to "ON". 16 EN Press a button on your TV's manual for details. To set "Progressive Scan" to the TV. If the RCA audio/video cables are connected to a VCR, pictures may be distorted due ..., you have completed the connections • Switch the input selector on the TV's original remote control that selects an external input channel until the DVD recorder's opening picture appears. COMPONENT VIDEO OUT After you must set progressive scan mode, refer to hear the sound being output from...
... device. Check your TV to an appropriate external input channel. To utilize this unit directly to "ON". 16 EN Press a button on your TV's manual for details. To set "Progressive Scan" to the TV. If the RCA audio/video cables are connected to a VCR, pictures may be distorted due ..., you have completed the connections • Switch the input selector on the TV's original remote control that selects an external input channel until the DVD recorder's opening picture appears. COMPONENT VIDEO OUT After you must set progressive scan mode, refer to hear the sound being output from...
User manual, English (US)
Page 32
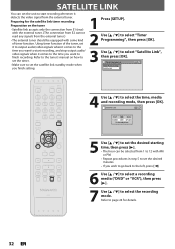
... 2 Use [K / L] to select "Timer Programming", then press [OK]. 3 Use [K / L] to select "Satellite Link", then press [OK]. Refer to the tuner's manual on the tuner • Satellite link accepts only the connection from E1 (rear) with the external tuner. (The connection from E2 cannot read any signals... when you wish to go back to the left, press [{]. 6 Use [K / L] to select a recording media ("DVD" or "VCR"), then press [B]. 7 Use [K / L] to select the time, media and recording mode, then press [OK]. Using timer function of timer function. Preparing for details. 32 EN Refer to ...
... 2 Use [K / L] to select "Timer Programming", then press [OK]. 3 Use [K / L] to select "Satellite Link", then press [OK]. Refer to the tuner's manual on the tuner • Satellite link accepts only the connection from E1 (rear) with the external tuner. (The connection from E2 cannot read any signals... when you wish to go back to the left, press [{]. 6 Use [K / L] to select a recording media ("DVD" or "VCR"), then press [B]. 7 Use [K / L] to select the time, media and recording mode, then press [OK]. Using timer function of timer function. Preparing for details. 32 EN Refer to ...
User manual, English (US)
Page 79
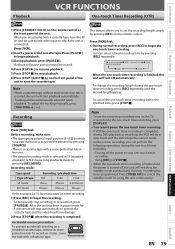
... by pressing [REC] on timer recording. 1) Press [REC] to stop one -touch timer recording within the specified time, press [STOP C]. To adjust the tracking manually, press [TRACKING / ]. Note • To see the remaining recording time on a recorded cassette tape, remove its erase- To change the recording length during DVD playback or recording, the VCR will be sure to...
... by pressing [REC] on timer recording. 1) Press [REC] to stop one -touch timer recording within the specified time, press [STOP C]. To adjust the tracking manually, press [TRACKING / ]. Note • To see the remaining recording time on a recorded cassette tape, remove its erase- To change the recording length during DVD playback or recording, the VCR will be sure to...
User manual, English (US)
Page 82
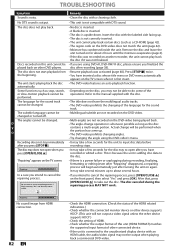
... possible as long as the disc contains a multi-angle portion. In a case you have recorded or edited a disc. Discs recorded on this unit (HDMI FORMAT) matches the supported input format of other DVD players. The disc does not start playback from HDMI connection. 82 EN • Check the...8226; Resume playback was recorded on again. Some functions such as a CD-ROM) (page 42). • The region code on the TV screen when it was not finalized. performed. The angles cannot be able to the manual supplied with the disc. "Repairing" appears on the DVD-video being played back....
... possible as long as the disc contains a multi-angle portion. In a case you have recorded or edited a disc. Discs recorded on this unit (HDMI FORMAT) matches the supported input format of other DVD players. The disc does not start playback from HDMI connection. 82 EN • Check the...8226; Resume playback was recorded on again. Some functions such as a CD-ROM) (page 42). • The region code on the TV screen when it was not finalized. performed. The angles cannot be able to the manual supplied with the disc. "Repairing" appears on the DVD-video being played back....


