

User manual, English (US)
Page 1
... NEED ASSISTANCE, YOU MAY ACCESS OUR ONLINE HELP AT HTTP://WWW.MAGNAVOX.COM/SUPPORT OR CALL 1-800-605-8610 WHILE WITH YOUR PRODUCT. Introduction Connections Basic Setup Recording Playback Owner's Manual ZV427MG9 DIGITAL VIDEO DISC RECORDER & VIDEO CASSETTE RECORDER THANK YOU FOR CHOOSING MAGNAVOX. Editing Function Setup VCR Functions Others Español INSTRUCCIONES...
... NEED ASSISTANCE, YOU MAY ACCESS OUR ONLINE HELP AT HTTP://WWW.MAGNAVOX.COM/SUPPORT OR CALL 1-800-605-8610 WHILE WITH YOUR PRODUCT. Introduction Connections Basic Setup Recording Playback Owner's Manual ZV427MG9 DIGITAL VIDEO DISC RECORDER & VIDEO CASSETTE RECORDER THANK YOU FOR CHOOSING MAGNAVOX. Editing Function Setup VCR Functions Others Español INSTRUCCIONES...
User manual, English (US)
Page 2
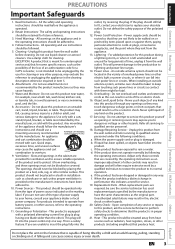
...or television reception, which the receiver is encouraged to try to correct the interference by turning the equipment off and on, the user is connected. 4) Consult the dealer or an experienced radio/TV technician for help. CAUTION: TO PREVENT ELECTRIC SHOCK, MATCH WIDE BLADE OF PLUG TO...incinerated but disposed of the following measures: 1) Reorient or relocate the receiving antenna. 2) Increase the separation between the equipment and receiver. 3) Connect the equipment into an outlet on the rear of this unit and enter below the Model No. However, there is no guarantee that to this...
...or television reception, which the receiver is encouraged to try to correct the interference by turning the equipment off and on, the user is connected. 4) Consult the dealer or an experienced radio/TV technician for help. CAUTION: TO PREVENT ELECTRIC SHOCK, MATCH WIDE BLADE OF PLUG TO...incinerated but disposed of the following measures: 1) Reorient or relocate the receiving antenna. 2) Increase the separation between the equipment and receiver. 3) Connect the equipment into an outlet on the rear of this unit and enter below the Model No. However, there is no guarantee that to this...
User manual, English (US)
Page 3
... replacement parts are not sure of the type of being tilted by placing the product on an unstable cart, stand, tripod, bracket, or table. Introduction Connections Basic Setup Recording Playback PRECAUTIONS Important Safeguards 1. Retain Instructions- Do not use a mounting accessory recommended by the user for future reference. 3. Do not place this...
... replacement parts are not sure of the type of being tilted by placing the product on an unstable cart, stand, tripod, bracket, or table. Introduction Connections Basic Setup Recording Playback PRECAUTIONS Important Safeguards 1. Retain Instructions- Do not use a mounting accessory recommended by the user for future reference. 3. Do not place this...
User manual, English (US)
Page 4
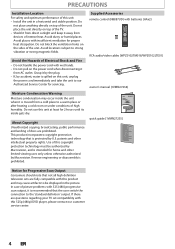
PRECAUTIONS Installation Location For safety and optimum performance of picture problems with 525 (480) progressive scan output, it is recommended that the user switch the connection to the 'standard definition' output. Avoid dusty or humid places. Avoid locations subject to be authorized by U.S. This product incorporates copyright protection technology that not ...
PRECAUTIONS Installation Location For safety and optimum performance of picture problems with 525 (480) progressive scan output, it is recommended that the user switch the connection to the 'standard definition' output. Avoid dusty or humid places. Avoid locations subject to be authorized by U.S. This product incorporates copyright protection technology that not ...
User manual, English (US)
Page 5
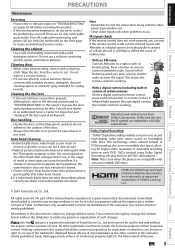
... call our help to define the cause of malfunction. • With an AM radio: Tune an AM radio to a station with a cleaning cloth. PRECAUTIONS Introduction Connections Basic Setup Recording Maintenance Servicing • Please refer to relevant topics on "TROUBLESHOOTING" on pages 81-84 before use solvents such as benzine, thinner, commercially...
... call our help to define the cause of malfunction. • With an AM radio: Tune an AM radio to a station with a cleaning cloth. PRECAUTIONS Introduction Connections Basic Setup Recording Maintenance Servicing • Please refer to relevant topics on "TROUBLESHOOTING" on pages 81-84 before use solvents such as benzine, thinner, commercially...
User manual, English (US)
Page 6
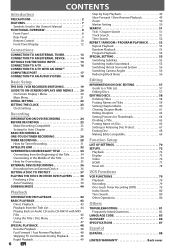
... 8 Front Panel 8 Rear Panel 9 Remote Control 10 Front Panel Display 12 Connections CONNECTION TO AN EXTERNAL TUNER 13 CONNECTION TO AN EXTERNAL DEVICE 14 SETTINGS FOR THE VIDEO INPUT 15 CONNECTION TO A TV 16 CONNECTION TO A TV WITH AN HDMI™ COMPATIBLE PORT 17 CONNECTION TO AN AUDIO SYSTEM 18 Basic Setup THE DVD / VCR RECORDER...
... 8 Front Panel 8 Rear Panel 9 Remote Control 10 Front Panel Display 12 Connections CONNECTION TO AN EXTERNAL TUNER 13 CONNECTION TO AN EXTERNAL DEVICE 14 SETTINGS FOR THE VIDEO INPUT 15 CONNECTION TO A TV 16 CONNECTION TO A TV WITH AN HDMI™ COMPATIBLE PORT 17 CONNECTION TO AN AUDIO SYSTEM 18 Basic Setup THE DVD / VCR RECORDER...
User manual, English (US)
Page 7
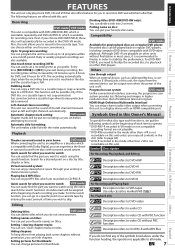
... mode Available for a desired point on this unit. HDMI (High-Definition Multimedia Interface) You can enjoy clearer audio/video output when connecting this unit, the signal from the external device can be put your existing 2 channel stereo system. Hiding chapters: To keep others from...attempting to a specific point on titles. One-touch timer recording (OTR): You can change pictures for your home: DVD mode When connecting the unit to all contents in the mode other DVD players. The recording automatically stops when the recording time you prefer. EN 7...
... mode Available for a desired point on this unit. HDMI (High-Definition Multimedia Interface) You can enjoy clearer audio/video output when connecting this unit, the signal from the external device can be put your existing 2 channel stereo system. Hiding chapters: To keep others from...attempting to a specific point on titles. One-touch timer recording (OTR): You can change pictures for your home: DVD mode When connecting the unit to all contents in the mode other DVD players. The recording automatically stops when the recording time you prefer. EN 7...
User manual, English (US)
Page 8
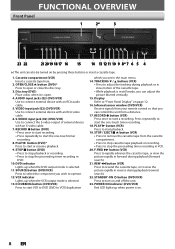
...can adjust the picture blurred vertically. 15. VIDEO input jack (E2) (DVD/VCR) Use to start playback. 19. D.DUBBING button (DVD/VCR) Press to connect external device with an S-video cable. 7. SOURCE button (DVD/VCR) Press to turn on page 12. 16. STANDBY-ON y button (DVD/VCR) Press... playback or recording. • Press to adjust the tracking during playback or in DVD. 10. STOP / EJECT C A button (VCR) • Press to connect the S-video output of the cassette tape. • While playback is selected. 13. S-VIDEO input jack (E2) (DVD/VCR) Use to remove the cassette...
...can adjust the picture blurred vertically. 15. VIDEO input jack (E2) (DVD/VCR) Use to start playback. 19. D.DUBBING button (DVD/VCR) Press to connect external device with an S-video cable. 7. SOURCE button (DVD/VCR) Press to turn on page 12. 16. STANDBY-ON y button (DVD/VCR) Press... playback or recording. • Press to adjust the tracking during playback or in DVD. 10. STOP / EJECT C A button (VCR) • Press to connect the S-video output of the cassette tape. • While playback is selected. 13. S-VIDEO input jack (E2) (DVD/VCR) Use to remove the cassette...
User manual, English (US)
Page 9
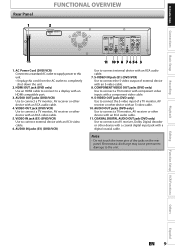
... discharge may cause permanent damage to completely shut down the unit. 2. HDMI OUT jack (DVD only) Use an HDMI cable to connect to connect external device with an HDMI compatible port. 3. Recording Playback Editing Function Setup VCR Functions Others Español EN 9 VIDEO IN ... Use to a display with an RCA video cable. 6. COMPONENT VIDEO OUT jacks (DVD only) Use to connect the S-video input of the jacks on the rear panel. Introduction Connections Basic Setup Rear Panel 1 FUNCTIONAL OVERVIEW 2 HDMI OUT DIGITAL AUDIO OUT DVD DVD/VCR AUDIO S-VIDEO COMPONENT...
... discharge may cause permanent damage to completely shut down the unit. 2. HDMI OUT jack (DVD only) Use an HDMI cable to connect to connect external device with an HDMI compatible port. 3. Recording Playback Editing Function Setup VCR Functions Others Español EN 9 VIDEO IN ... Use to a display with an RCA video cable. 6. COMPONENT VIDEO OUT jacks (DVD only) Use to connect the S-video input of the jacks on the rear panel. Introduction Connections Basic Setup Rear Panel 1 FUNCTIONAL OVERVIEW 2 HDMI OUT DIGITAL AUDIO OUT DVD DVD/VCR AUDIO S-VIDEO COMPONENT...
User manual, English (US)
Page 11
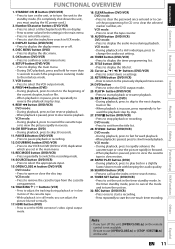
... 3 seconds to switch the progressive scanning mode to display the timer programming list. 21. TIMER button (DVD/VCR) • Press to the interlace mode. 7. Introduction Connections Basic Setup Recording Playback FUNCTIONAL OVERVIEW 1. SOURCE button (DVD/VCR) • Press to pause playback or recording. 12. AUDIO button (DVD/VCR) DVD mode: •...
... 3 seconds to switch the progressive scanning mode to display the timer programming list. 21. TIMER button (DVD/VCR) • Press to the interlace mode. 7. Introduction Connections Basic Setup Recording Playback FUNCTIONAL OVERVIEW 1. SOURCE button (DVD/VCR) • Press to pause playback or recording. 12. AUDIO button (DVD/VCR) DVD mode: •...
User manual, English (US)
Page 13
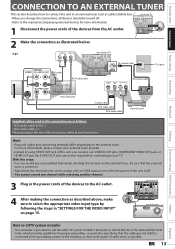
... setup: • You can also use S-VIDEO OUT jack, COMPONENT VIDEO OUT jack, or HDMI OUT jack (no AUDIO OUT jack connection required) for connecting to the manual accompanying external devices for proper grounding - rear of the devices to an external tuner such as cable/satellite box. in particular...ground shall be output only on CVBS output even when the power of the unit is off . • Refer to your TV connect 4 After making the connection as possible. VHF / UHF • When you can record any unscrambled channel by following the steps in this unit HDMI OUT ...
... setup: • You can also use S-VIDEO OUT jack, COMPONENT VIDEO OUT jack, or HDMI OUT jack (no AUDIO OUT jack connection required) for connecting to the manual accompanying external devices for proper grounding - rear of the devices to an external tuner such as cable/satellite box. in particular...ground shall be output only on CVBS output even when the power of the unit is off . • Refer to your TV connect 4 After making the connection as possible. VHF / UHF • When you can record any unscrambled channel by following the steps in this unit HDMI OUT ...
User manual, English (US)
Page 14
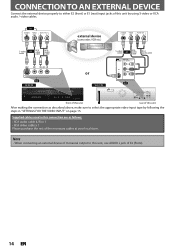
...---AUDIO---OUT L L IN R R IN ---VIDEO---OUT RCA audio cable E2 to E2 IN to this unit, use AUDIO L jack of this unit After making the connection as follows: • RCA audio cable (L/R) x 1 • RCA video cable x 1 Please purchase the rest of this unit rear of E2 (Front). 14 EN... Note • When connecting an external device of monaural output to E1 IN HDMI OUT E1 DIGITAL AUDIO OUT DVD DVD/VCR AUDIO S-VIDEO COMPONENT S-VIDEO IN ---AUDIO---OUT...
...---AUDIO---OUT L L IN R R IN ---VIDEO---OUT RCA audio cable E2 to E2 IN to this unit, use AUDIO L jack of this unit After making the connection as follows: • RCA audio cable (L/R) x 1 • RCA video cable x 1 Please purchase the rest of this unit rear of E2 (Front). 14 EN... Note • When connecting an external device of monaural output to E1 IN HDMI OUT E1 DIGITAL AUDIO OUT DVD DVD/VCR AUDIO S-VIDEO COMPONENT S-VIDEO IN ---AUDIO---OUT...
User manual, English (US)
Page 15
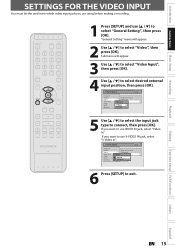
... Recording Clock HDMI Reset All Progressive Scan TV Aspect E1V(Rideeaor)InpVuidteo Input E1Vi(dReeoarIn) E2S-(VFirdoenot)In 6 Press [SETUP] to connect, then press [OK]. If you want to select "Video", then press [OK]. Playback Editing Function Setup VCR Functions Others Españ... appear. 3 Use [K / L] to select "Video Input", then press [OK]. 4 Use [K / L] to select "General Setting", then press [OK]. Introduction Connections Basic Setup Recording SETTINGS FOR THE VIDEO INPUT You must let the unit know which video input jack you are using before making a recording. 1 Press...
... Recording Clock HDMI Reset All Progressive Scan TV Aspect E1V(Rideeaor)InpVuidteo Input E1Vi(dReeoarIn) E2S-(VFirdoenot)In 6 Press [SETUP] to connect, then press [OK]. If you want to select "Video", then press [OK]. Playback Editing Function Setup VCR Functions Others Españ... appear. 3 Use [K / L] to select "Video Input", then press [OK]. 4 Use [K / L] to select "General Setting", then press [OK]. Introduction Connections Basic Setup Recording SETTINGS FOR THE VIDEO INPUT You must let the unit know which video input jack you are using before making a recording. 1 Press...
User manual, English (US)
Page 16
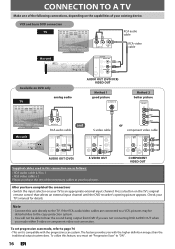
... cable (L/R) x 1 • RCA video cable x 1 Please purchase the rest of the necessary cables at your TV to the TV. VCR and basic DVD connection TV RCA audio cable R L VIDEO AUDIO IN IN RCA video cable this unit HDMI OUT DIGITAL AUDIO OUT DVD DVD/VCR AUDIO S-VIDEO COMPONENT S-VIDEO...CB (Red) PR /CR AUDIO OUT (DVD) S-VIDEO OUT Supplied cables used in this feature, you with the progressive scan system. To utilize this connection are connected to a VCR, pictures may be distorted due to the copy protection system. • You will not be able to page 76 • This unit...
... cable (L/R) x 1 • RCA video cable x 1 Please purchase the rest of the necessary cables at your TV to the TV. VCR and basic DVD connection TV RCA audio cable R L VIDEO AUDIO IN IN RCA video cable this unit HDMI OUT DIGITAL AUDIO OUT DVD DVD/VCR AUDIO S-VIDEO COMPONENT S-VIDEO...CB (Red) PR /CR AUDIO OUT (DVD) S-VIDEO OUT Supplied cables used in this feature, you with the progressive scan system. To utilize this connection are connected to a VCR, pictures may be distorted due to the copy protection system. • You will not be able to page 76 • This unit...
User manual, English (US)
Page 17
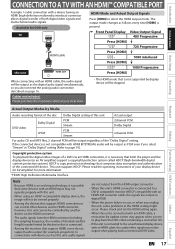
... HDMI connector (including the sampling frequency, the number of channels and bit length) maybe limited by another device via an HDMI connection, it is not supported by Media Audio recording format of the disc Dolby Digital setting of this unit. • When using... HDCP-incompatible display device, the image will be viewed properly. • Among the devices that comprises data encryption and authentication of the connected AV device. Please purchase the necessary cables at your display device (or AV amplifier) for more information. *HDMI: High Definition Multimedia Interface...
... HDMI connector (including the sampling frequency, the number of channels and bit length) maybe limited by another device via an HDMI connection, it is not supported by Media Audio recording format of the disc Dolby Digital setting of this unit. • When using... HDCP-incompatible display device, the image will be viewed properly. • Among the devices that comprises data encryption and authentication of the connected AV device. Please purchase the necessary cables at your display device (or AV amplifier) for more information. *HDMI: High Definition Multimedia Interface...
User manual, English (US)
Page 18
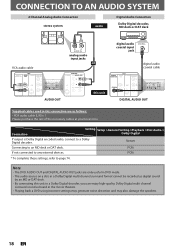
...disc in a Dolby Digital multi channel surround format cannot be recorded as digital sound by an MD or DAT deck. • By connecting this connection are as heard in this unit to a Dolby Digital decoder, you can enjoy high-quality Dolby Digital multi channel surround sound as follows:...the necessary cables at your local store. PCM If not connected to an MD deck or DAT deck. Stream Connecting to any external devices. CONNECTION TO AN AUDIO SYSTEM 2 Channel Analog Audio Connection stereo system audio Digital Audio Connection Dolby Digital decoder, MD deck or DAT deck RCA ...
...disc in a Dolby Digital multi channel surround format cannot be recorded as digital sound by an MD or DAT deck. • By connecting this connection are as heard in this unit to a Dolby Digital decoder, you can enjoy high-quality Dolby Digital multi channel surround sound as follows:...the necessary cables at your local store. PCM If not connected to an MD deck or DAT deck. Stream Connecting to any external devices. CONNECTION TO AN AUDIO SYSTEM 2 Channel Analog Audio Connection stereo system audio Digital Audio Connection Dolby Digital decoder, MD deck or DAT deck RCA ...
User manual, English (US)
Page 19
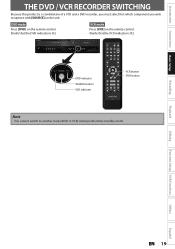
... a VCR and a DVD recorder, you must select first which component you wish to another mode (DVD or VCR) during in the timer-standby mode. Introduction Connections Basic Setup THE DVD / VCR RECORDER SWITCHING Because this product is lit.) DVD indicator SOURCE button VCR indicator VCR button DVD button Note • You...
... a VCR and a DVD recorder, you must select first which component you wish to another mode (DVD or VCR) during in the timer-standby mode. Introduction Connections Basic Setup THE DVD / VCR RECORDER SWITCHING Because this product is lit.) DVD indicator SOURCE button VCR indicator VCR button DVD button Note • You...
User manual, English (US)
Page 21
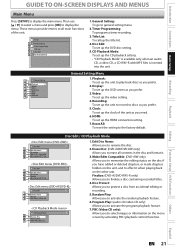
...Disc Name: Allows you to general setting menu. 2. General Setting: To go to rename the disc. 2. Title List: To call up the HDMI connection setting. 7. Disc Protect : Allows you to effect it . 3. Editing Function Setup VCR Functions Others Español EN 21 Recording: To set ...you to finalize a disc containing recorded titles. 4. Finalize: (DVD+R/DVD-RW/-R only) Allows you to activate the random playback feature. 6. Introduction Connections Basic Setup Recording Playback GUIDE TO ON-SCREEN DISPLAYS AND MENUS Main Menu Press [SETUP] to discs as you prefer. 5.
...Disc Name: Allows you to general setting menu. 2. General Setting: To go to rename the disc. 2. Title List: To call up the HDMI connection setting. 7. Disc Protect : Allows you to effect it . 3. Editing Function Setup VCR Functions Others Español EN 21 Recording: To set ...you to finalize a disc containing recorded titles. 4. Finalize: (DVD+R/DVD-RW/-R only) Allows you to activate the random playback feature. 6. Introduction Connections Basic Setup Recording Playback GUIDE TO ON-SCREEN DISPLAYS AND MENUS Main Menu Press [SETUP] to discs as you prefer. 5.
User manual, English (US)
Page 22
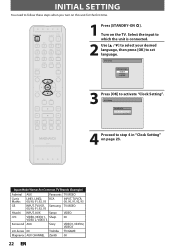
...ñol 3 Press [OK] to set language. Input Mode Names for the first time. 1 Press [STANDBY-ON y]. Select the input to which the unit is connected. 2 Use [K / L] to select your desired language, then press [OK] to activate "Clock Setting". Turn on page 23. INITIAL SETTING You need to follow these steps..., 93 Hitachi INPUT, AUX Sanyo VIDEO JVC VIDEO, VIDEO 1, Sharp 00 VIDEO 2, VIDEO 3 Kenwood AUX Sony VIDEO1, VIDEO2, VIDEO3 LXI-Series 00 Toshiba TV/GAME Magnavox AUX CHANNEL Zenith 00 22 EN
...ñol 3 Press [OK] to set language. Input Mode Names for the first time. 1 Press [STANDBY-ON y]. Select the input to which the unit is connected. 2 Use [K / L] to select your desired language, then press [OK] to activate "Clock Setting". Turn on page 23. INITIAL SETTING You need to follow these steps..., 93 Hitachi INPUT, AUX Sanyo VIDEO JVC VIDEO, VIDEO 1, Sharp 00 VIDEO 2, VIDEO 3 Kenwood AUX Sony VIDEO1, VIDEO2, VIDEO3 LXI-Series 00 Toshiba TV/GAME Magnavox AUX CHANNEL Zenith 00 22 EN
User manual, English (US)
Page 23
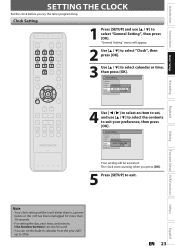
... timer programming. EN 23 Español Clock Setting 1 Press [SETUP] and use [K / L] to select the contents to suit your preference, then press [OK]. Introduction Connections Basic Setup Recording SETTING THE CLOCK Set the clock before you press [OK]. 5 Press [SETUP] to exit. General Setting Playback Display Video Clock Setting Recording...
... timer programming. EN 23 Español Clock Setting 1 Press [SETUP] and use [K / L] to select the contents to suit your preference, then press [OK]. Introduction Connections Basic Setup Recording SETTING THE CLOCK Set the clock before you press [OK]. 5 Press [SETUP] to exit. General Setting Playback Display Video Clock Setting Recording...


