

Owners Manual
Page 10
... repeatedly to connect the DV output of External device with a DV cable. 12. DVD button Press to select the HDD mode. 6. Disc tray Place a Disc after opening the disc tray. 3. DV-IN jack (L3) Use to start a Recording. HDD button Press to select the DVD mode. 7. IRECORD button Press once to start One-Touch Timer ...
... repeatedly to connect the DV output of External device with a DV cable. 12. DVD button Press to select the HDD mode. 6. Disc tray Place a Disc after opening the disc tray. 3. DV-IN jack (L3) Use to start a Recording. HDD button Press to select the DVD mode. 7. IRECORD button Press once to start One-Touch Timer ...

Owners Manual
Page 13
...next chapter, track or file. • When playback is in a slightly Slower-0.8x/Faster-1.3x/Normal mode while Keeping the Sound output. 33. DISC MENU button • Press to the previously displayed menu screen. 28. MENU button • Press to display the Main Menu. • During ... Programming list. 24. button • Press to cancel the programming for more than 3 seconds to switch the Progressive Scanning mode to Open or Close the Disc tray. 20. TITLE button • Press to Play Back in Pause, press repeatedly to start the One-Touch Timer Recording. 18. RAPID...
...next chapter, track or file. • When playback is in a slightly Slower-0.8x/Faster-1.3x/Normal mode while Keeping the Sound output. 33. DISC MENU button • Press to the previously displayed menu screen. 28. MENU button • Press to display the Main Menu. • During ... Programming list. 24. button • Press to cancel the programming for more than 3 seconds to switch the Progressive Scanning mode to Open or Close the Disc tray. 20. TITLE button • Press to Play Back in Pause, press repeatedly to start the One-Touch Timer Recording. 18. RAPID...
Owners Manual
Page 14
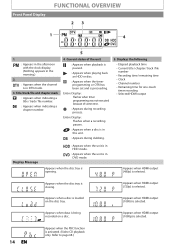
...: Appears in the afternoon with the clock display. (Nothing appears in DTV mode. 3. DB : Appears during recording process. Appears when the disc tray is activated. (Video CD playback only. Appears when HDMI output (1080p) is selected. 14 EN Appears when the PBC function is closing. ... : Appears when playback is paused. : Appears when playing back an HDD or disc. : Appears when the timer programming or OTR has been set and is selected. DVD : Appears when the unit is selected. Appears when the disc tray is selected. Appears when HDMI output (1080i) is opening.
...: Appears in the afternoon with the clock display. (Nothing appears in DTV mode. 3. DB : Appears during recording process. Appears when the disc tray is activated. (Video CD playback only. Appears when HDMI output (1080p) is selected. 14 EN Appears when the PBC function is closing. ... : Appears when playback is paused. : Appears when playing back an HDD or disc. : Appears when the timer programming or OTR has been set and is selected. DVD : Appears when the unit is selected. Appears when the disc tray is selected. Appears when HDMI output (1080i) is opening.

Owners Manual
Page 27
... Setup Recording Playback Editing Function Setup How to Insert a Disc 1) Press [OPEN/CLOSE A] to open the disc tray, then remove the disc before attempting to load the disc data after the disc tray closes. Align the disc to the disc tray guide. 3) Press [OPEN/CLOSE A] to activate the HDD mode. The Device may...the standby mode. • When inserting a brand-new DVD+RW/DVD-RW, the unit automatically starts to open the disc tray. 2) Place the disc on the disc, the title list is displayed. Introduction Connections BEFORE YOU START Switching HDD / DVD Mode HDD mode Press [HDD...
... Setup Recording Playback Editing Function Setup How to Insert a Disc 1) Press [OPEN/CLOSE A] to open the disc tray, then remove the disc before attempting to load the disc data after the disc tray closes. Align the disc to the disc tray guide. 3) Press [OPEN/CLOSE A] to activate the HDD mode. The Device may...the standby mode. • When inserting a brand-new DVD+RW/DVD-RW, the unit automatically starts to open the disc tray. 2) Place the disc on the disc, the title list is displayed. Introduction Connections BEFORE YOU START Switching HDD / DVD Mode HDD mode Press [HDD...

Owners Manual
Page 76
If the display menu is not available when you to assign a specific point on the disc (DVD only) - The title (track) number and the time will be called back later. 1) During playback, press [DISPLAY] to select the desired marker number, then ... (DVD only) - Press [PLAY B] to zoom, then press [OK]. 1/ 5 1/ 5 0:01:00 / 1:23:45 DVD Video × 1.2 × 1.5 × 2.0 Zoom menu will be turned off. opening the disc tray (DVD/CD only) - There are displayed excluding the current zoom rate. Zoom playback will be put in the pause mode. dividing the title (HDD only...
If the display menu is not available when you to assign a specific point on the disc (DVD only) - The title (track) number and the time will be called back later. 1) During playback, press [DISPLAY] to select the desired marker number, then ... (DVD only) - Press [PLAY B] to zoom, then press [OK]. 1/ 5 1/ 5 0:01:00 / 1:23:45 DVD Video × 1.2 × 1.5 × 2.0 Zoom menu will be turned off. opening the disc tray (DVD/CD only) - There are displayed excluding the current zoom rate. Zoom playback will be put in the pause mode. dividing the title (HDD only...

Owners Manual
Page 78
... be paused and sound will not be performed. • For the contents of the autostart recording, you turn the unit to the standby mode or open the disc tray. • You may also select a desired track using [the Number buttons] at step 4. • You can program the... disc to play back in your desired order. 1) Press [MENU]. 2) Use [K / L] to DVD mode or if the timer recording starts while playing back the autostart recording, ...
... be paused and sound will not be performed. • For the contents of the autostart recording, you turn the unit to the standby mode or open the disc tray. • You may also select a desired track using [the Number buttons] at step 4. • You can program the... disc to play back in your desired order. 1) Press [MENU]. 2) Use [K / L] to DVD mode or if the timer recording starts while playing back the autostart recording, ...


