
Owners Manual
Page 6
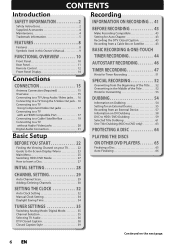
... Connecting to a TV Using Component Video Out jacks 17 Connecting to a TV with an HDMI Compatible Port 17 Connecting to a Cable / Satellite Box 19 Connecting to a TV without Audio / Video jacks 20 Digital Audio Connection 21 Basic Setup BEFORE YOU START 22 Finding the Viewing Channel on your TV 22 Guide to On-Screen Display / Menu 23 Main Menu 25 Switching HDD / DVD Mode 27 How to Insert a Disc 27 INITIAL SETTING 28 INFORMATION ON RECORDING . . 41 BEFORE RECORDING 43 Make Recording Compatible 43 Setting...
... Connecting to a TV Using Component Video Out jacks 17 Connecting to a TV with an HDMI Compatible Port 17 Connecting to a Cable / Satellite Box 19 Connecting to a TV without Audio / Video jacks 20 Digital Audio Connection 21 Basic Setup BEFORE YOU START 22 Finding the Viewing Channel on your TV 22 Guide to On-Screen Display / Menu 23 Main Menu 25 Switching HDD / DVD Mode 27 How to Insert a Disc 27 INITIAL SETTING 28 INFORMATION ON RECORDING . . 41 BEFORE RECORDING 43 Make Recording Compatible 43 Setting...
Owners Manual
Page 8
... supports HDCP. Please read the operating instructions of the TV program. Dubbing With this owner's manual. You can also start recording the whole TV program even at a time with timer recording. (6 hours when one for the terms used in the DVD+VR mode. By using this unit. Automatic title list making: The unit makes a title list with this function, you can record for 12 hours maximum at a time with timer recording. (6 hours when one -touch recording...
... supports HDCP. Please read the operating instructions of the TV program. Dubbing With this owner's manual. You can also start recording the whole TV program even at a time with timer recording. (6 hours when one for the terms used in the DVD+VR mode. By using this unit. Automatic title list making: The unit makes a title list with this function, you can record for 12 hours maximum at a time with timer recording. (6 hours when one -touch recording...
Owners Manual
Page 9
... playing back some chapters without permission, you can experience the theater surround sound from a title as you do not find the part you may record. For DVD-RW/-R, you erase all media. Symbols Used in this Owner's Manual To specify for which media type each function is, we put your favorite names on disc: This feature allows you to set a specific Name for your home...
... playing back some chapters without permission, you can experience the theater surround sound from a title as you do not find the part you may record. For DVD-RW/-R, you erase all media. Symbols Used in this Owner's Manual To specify for which media type each function is, we put your favorite names on disc: This feature allows you to set a specific Name for your home...

Owners Manual
Page 10
... Close the disc tray. 4. AUDIO input jacks (L2) Use to connect External device with an RCA audio cable. 13. S-VIDEO input jack (L2) Use to "Front Panel Display" on by pressing these buttons. 1. Display Refer to connect the S-Video output of External device with an S-Video cable. 15. DV-IN jack (L3) Use to the standby mode. (To completely shut down . 11. Infrared sensor window Receive signals from a distance. 10 EN DVD button Press to start a Recording. ySTANDBY/ON button Press to turn...
... Close the disc tray. 4. AUDIO input jacks (L2) Use to connect External device with an RCA audio cable. 13. S-VIDEO input jack (L2) Use to "Front Panel Display" on by pressing these buttons. 1. Display Refer to connect the S-Video output of External device with an S-Video cable. 15. DV-IN jack (L3) Use to the standby mode. (To completely shut down . 11. Infrared sensor window Receive signals from a distance. 10 EN DVD button Press to start a Recording. ySTANDBY/ON button Press to turn...

Owners Manual
Page 13
... Recording mode. REC MODE button • Press repeatedly to cancel the programming for additional assistances. • Cannot guarantee about 3rd party's remote controls. MENU button • Press to display the Main Menu. • During playback, press and hold for any problem with it. Number/Character buttons • Press to select Channel numbers. • Press to set the HDMI Display mode-Only when using a universal remote, please check for more than 3 seconds to switch the Progressive Scanning mode to Open or Close the Disc tray...
... Recording mode. REC MODE button • Press repeatedly to cancel the programming for additional assistances. • Cannot guarantee about 3rd party's remote controls. MENU button • Press to display the Main Menu. • During playback, press and hold for any problem with it. Number/Character buttons • Press to select Channel numbers. • Press to set the HDMI Display mode-Only when using a universal remote, please check for more than 3 seconds to switch the Progressive Scanning mode to Open or Close the Disc tray...

Owners Manual
Page 15
... video signal will be output from the VIDEO OUT or S-VIDEO OUT jack. Supplied cables used in this connection are connected to a VCR, pictures may be distorted due to the TV. IN page 20 EN 15 Function Setup Others Español If the RCA audio/video cables are as illustrated below. 3) After making all the connections, connect the AC power cords of this unit directly to the copy protection system. • When "Progressive Scan...
... video signal will be output from the VIDEO OUT or S-VIDEO OUT jack. Supplied cables used in this connection are connected to a VCR, pictures may be distorted due to the TV. IN page 20 EN 15 Function Setup Others Español If the RCA audio/video cables are as illustrated below. 3) After making all the connections, connect the AC power cords of this unit directly to the copy protection system. • When "Progressive Scan...
Owners Manual
Page 18
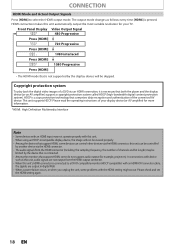
... output mode changes as this unit automatically output the most suitable resolution for your display device (or AV amplifier) for example, projectors). This unit supports HDCP. HDMI connection makes this unit, audio signals are output in digital RGB. • When a power failure occurs, or when you unplug the unit, some problems with the HDMI setting might occur. CONNECTION HDMI Mode and Actual Output Signals Press [HDMI] to a DVI-D compatible monitor (HDCP compatible) with an HDMI-DVI converter cable, the signals...
... output mode changes as this unit automatically output the most suitable resolution for your display device (or AV amplifier) for example, projectors). This unit supports HDCP. HDMI connection makes this unit, audio signals are output in digital RGB. • When a power failure occurs, or when you unplug the unit, some problems with the HDMI setting might occur. CONNECTION HDMI Mode and Actual Output Signals Press [HDMI] to a DVI-D compatible monitor (HDCP compatible) with an HDMI-DVI converter cable, the signals...
Owners Manual
Page 21
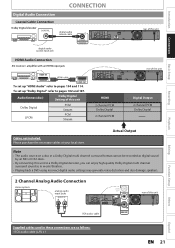
Introduction Connections Basic Setup Recording Digital Audio Connection CONNECTION Dolby Digital decoder COAXIAL digital audio coaxial cable COAXIAL VIDEO VIDEO IN OUT Y L L ANTENNA R IN R AUDIO IN (L1) S-VIDEO AUDIO OUT OUT S-VIDEO COAXIAL digital audio coaxial input jack HDMI Audio Connection AV receiver / amplifier with an HDMI input jack HDMI IN HDMI cable HDMI OUT To set up "HDMI Audio" refer to pages 104 and 114. Actual Output Note • The audio source on a disc in a Dolby Digital multi channel surround format cannot be recorded as digital sound by an MD...
Introduction Connections Basic Setup Recording Digital Audio Connection CONNECTION Dolby Digital decoder COAXIAL digital audio coaxial cable COAXIAL VIDEO VIDEO IN OUT Y L L ANTENNA R IN R AUDIO IN (L1) S-VIDEO AUDIO OUT OUT S-VIDEO COAXIAL digital audio coaxial input jack HDMI Audio Connection AV receiver / amplifier with an HDMI input jack HDMI IN HDMI cable HDMI OUT To set up "HDMI Audio" refer to pages 104 and 114. Actual Output Note • The audio source on a disc in a Dolby Digital multi channel surround format cannot be recorded as digital sound by an MD...
Owners Manual
Page 22
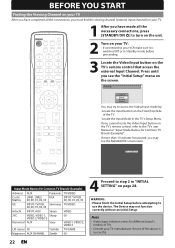
... the above is switched Off or in Standby mode before attempting to use the device. The Device may see the "Initial Setup" menu on the screen. If you cannot locate the Video/Input button on the TV's remote control that access the external Input Channel. BEFORE YOU START Finding the Viewing Channel on your TV After you have completed all the connections, you must find the viewing channel (external input channel) on your TV...
... the above is switched Off or in Standby mode before attempting to use the device. The Device may see the "Initial Setup" menu on the screen. If you cannot locate the Video/Input button on the TV's remote control that access the external Input Channel. BEFORE YOU START Finding the Viewing Channel on your TV After you have completed all the connections, you must find the viewing channel (external input channel) on your TV...
Owners Manual
Page 23
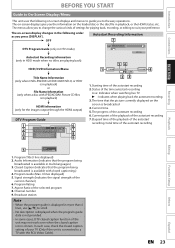
... the signal strength of the autostart recording 6. Channel number 9. Program Title(1 line displayed) 2. Aspect Ratio of the autostart recording 2. The on the loaded disc or the disc/file in playback) or File Name Information (only when a disc with the RCA Video Cable). Starting time of the selected program 8. In such case, check the closed caption setting of the unit may now qualify as you to the easy operations. The on-screen displays give you to change the...
... the signal strength of the autostart recording 6. Channel number 9. Program Title(1 line displayed) 2. Aspect Ratio of the autostart recording 2. The on the loaded disc or the disc/file in playback) or File Name Information (only when a disc with the RCA Video Cable). Starting time of the selected program 8. In such case, check the closed caption setting of the unit may now qualify as you to the easy operations. The on-screen displays give you to change the...
Owners Manual
Page 45
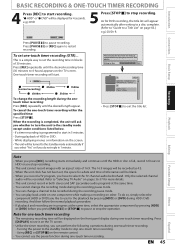
... (normal recording) 1h00m 6h00m 5h30m To change a channel to select the TV channel audio beforehand. When the recording is full, record 12 hours to a Title List" on page 83.) e.g.) DVD+R I DVD" will be recorded. If a timer recording is completed before you whether to turn the unit to exit the title list. While displaying menus or information on other DVD players. Please finalize the disc when the writing is programmed to start...
... (normal recording) 1h00m 6h00m 5h30m To change a channel to select the TV channel audio beforehand. When the recording is full, record 12 hours to a Title List" on page 83.) e.g.) DVD+R I DVD" will be recorded. If a timer recording is completed before you whether to turn the unit to exit the title list. While displaying menus or information on other DVD players. Please finalize the disc when the writing is programmed to start...

Owners Manual
Page 81
... select menu. Press [TITLE] or [DISC MENU] to display the disc menu. • If a 4-digit language code appears in different languages), you can switch them during playback. 1) During playback, press [DISPLAY]. 2)Use [{ / B] to change the soundtrack from the disc menu. R 0:00:15 / 0:05:00 CD Note • Some discs will be found on the disc case. Recording Playback Editing Function Setup Others Español EN 81 Introduction Connections Basic Setup SELECTING THE FORMAT OF AUDIO AND VIDEO You can select the format...
... select menu. Press [TITLE] or [DISC MENU] to display the disc menu. • If a 4-digit language code appears in different languages), you can switch them during playback. 1) During playback, press [DISPLAY]. 2)Use [{ / B] to change the soundtrack from the disc menu. R 0:00:15 / 0:05:00 CD Note • Some discs will be found on the disc case. Recording Playback Editing Function Setup Others Español EN 81 Introduction Connections Basic Setup SELECTING THE FORMAT OF AUDIO AND VIDEO You can select the format...
Owners Manual
Page 104
... output the HDMI audio signal. LIST OF SETTINGS Menu Display pages 109-111 Items (highlight is grayed in the on even when the power is off. • An item which is not currently available is the default) V-Chip Downloadable Rating Region Rating Table Clear Rating Table General Setting Video pages 112-113 Recording Clock pages 32-34 Channel pages 29-31 HDMI pages 114-115 Change Password Progressive Scan ON OFF TV Aspect Video Input...
... output the HDMI audio signal. LIST OF SETTINGS Menu Display pages 109-111 Items (highlight is grayed in the on even when the power is off. • An item which is not currently available is the default) V-Chip Downloadable Rating Region Rating Table Clear Rating Table General Setting Video pages 112-113 Recording Clock pages 32-34 Channel pages 29-31 HDMI pages 114-115 Change Password Progressive Scan ON OFF TV Aspect Video Input...
Owners Manual
Page 107
... Dolby Digital into PCM (2 channel). Disc Menu Language English French Spanish Other Your setting will be down sampled at 48kHz. Recording Playback Editing Function Setup Others Español Instructions continue on the next page. Note When playing back a disc with copyright protection • Even if you can switch to main audio (L), sub audio (R), or a combination of both (L / R) using your amplifier/decoder is NOT compatible with Dolby Digital, set "Dolby Digital" to select a setting, then press [OK]. Use [K / L] to "PCM...
... Dolby Digital into PCM (2 channel). Disc Menu Language English French Spanish Other Your setting will be down sampled at 48kHz. Recording Playback Editing Function Setup Others Español Instructions continue on the next page. Note When playing back a disc with copyright protection • Even if you can switch to main audio (L), sub audio (R), or a combination of both (L / R) using your amplifier/decoder is NOT compatible with Dolby Digital, set "Dolby Digital" to select a setting, then press [OK]. Use [K / L] to "PCM...
Owners Manual
Page 116
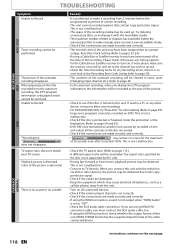
... using another output connection to cancel a repairing process? Remove the disc and leave the unit turned on for about 2 hours until the moisture evaporates. (Refer to "OFF" on page 104 and try "Manual Clock time. It may take out the disc. Yes No • If you intend to several minutes up the language setting procedure by selecting a language in the standby mode. "Language" menu appears every time the power turns on the model. Setting...
... using another output connection to cancel a repairing process? Remove the disc and leave the unit turned on for about 2 hours until the moisture evaporates. (Refer to "OFF" on page 104 and try "Manual Clock time. It may take out the disc. Yes No • If you intend to several minutes up the language setting procedure by selecting a language in the standby mode. "Language" menu appears every time the power turns on the model. Setting...
Owners Manual
Page 117
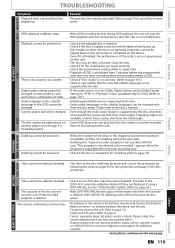
... does not support slow playback mode, the slow playback function is disabled. • With L3(DV-IN), the disc display menu does not appear unless disc playback is selected, audio signal cannot be switched. TV channels cannot be set it to the ANTENNA IN by following the steps on L1 or L2. Only specific channels do not work, unplug the HDMI cable and the AC power cords, then plug them back in a mode other than...
... does not support slow playback mode, the slow playback function is disabled. • With L3(DV-IN), the disc display menu does not appear unless disc playback is selected, audio signal cannot be switched. TV channels cannot be set it to the ANTENNA IN by following the steps on L1 or L2. Only specific channels do not work, unplug the HDMI cable and the AC power cords, then plug them back in a mode other than...
Owners Manual
Page 118
... the connections are using the HDMI connection, sound is not output when "HDMI Audio" is prohibited to make sure the receiver is displayed and it may have been stopped due to Record. TV aspect ratio does not match your TV screen. If used in a PC or any Recording errors, if there is an error look at the time of the autostart recording will be removed. When you wish to record. • Check the Timer Recording menu for...
... the connections are using the HDMI connection, sound is not output when "HDMI Audio" is prohibited to make sure the receiver is displayed and it may have been stopped due to Record. TV aspect ratio does not match your TV screen. If used in a PC or any Recording errors, if there is an error look at the time of the autostart recording will be removed. When you wish to record. • Check the Timer Recording menu for...
Owners Manual
Page 119
... are finalized. Connections PLAYBACK DVD Basic Setup Recording DVD Playback HDD / DVD DVD HDD / DVD HDD playback suddenly stops. • When DVD recording finishes during HDD playback, the unit will not be weak. This is no subtitle. Replace the batteries. • Make sure there is not a malfunction. HDD HDD/DVD Introduction TROUBLESHOOTING Symptom Playback does not start writing data to the DVD. Playback cannot be changed only from the disc menu. There is deleted. If using a DVD-RW disc, try...
... are finalized. Connections PLAYBACK DVD Basic Setup Recording DVD Playback HDD / DVD DVD HDD / DVD HDD playback suddenly stops. • When DVD recording finishes during HDD playback, the unit will not be weak. This is no subtitle. Replace the batteries. • Make sure there is not a malfunction. HDD HDD/DVD Introduction TROUBLESHOOTING Symptom Playback does not start writing data to the DVD. Playback cannot be changed only from the disc menu. There is deleted. If using a DVD-RW disc, try...

Owners Manual
Page 122
... picture color as video signals, so that does not split each frame in DVD players. Progressive Scan (480p) A type of display that higher-quality picture will only play them back on these numbers. Progressive scan provides less flickering and higher image resolution than one region (or all the scan lines of the world. Region Code Regions associate discs and players with progressive video (480p), you can experience higher-density picture than that directly represents sound. SAP (secondary audio program) Sub-audio channel...
... picture color as video signals, so that does not split each frame in DVD players. Progressive Scan (480p) A type of display that higher-quality picture will only play them back on these numbers. Progressive scan provides less flickering and higher image resolution than one region (or all the scan lines of the world. Region Code Regions associate discs and players with progressive video (480p), you can experience higher-density picture than that directly represents sound. SAP (secondary audio program) Sub-audio channel...
Owners Manual
Page 123
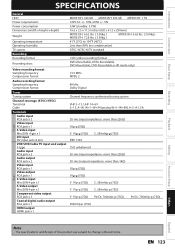
...Setup Recording SPECIFICATIONS Rear Front General HDD Power requirements Power consumption Dimensions (width x height x depth) Weight Operating temperature Operating humidity TV system Recording Recording format Recording discs Video recording format Sampling frequency Compression format Audio recording format Sampling frequency Compression format Tuner Tuning system Channel coverage (ATSC / NTSC) Terrestrial Cable Terminals Audio input RCA jack x 2 Video input RCA jack x 1 S-Video input Mini DIN 4-pin x 1 DV input DV input jack (4 pin) VHF/UHF/Cable TV input and output F-type Audio input...
...Setup Recording SPECIFICATIONS Rear Front General HDD Power requirements Power consumption Dimensions (width x height x depth) Weight Operating temperature Operating humidity TV system Recording Recording format Recording discs Video recording format Sampling frequency Compression format Audio recording format Sampling frequency Compression format Tuner Tuning system Channel coverage (ATSC / NTSC) Terrestrial Cable Terminals Audio input RCA jack x 2 Video input RCA jack x 1 S-Video input Mini DIN 4-pin x 1 DV input DV input jack (4 pin) VHF/UHF/Cable TV input and output F-type Audio input...


