User Guide
Page 8
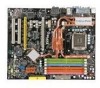
... ...2-10 Back Panel ...2-11 Connectors ...2-13 Jumper ...2-20 Button ...2-21 Slots ...2-22 LED Status Indicators 2-24 Chapter 3 BIOS Setup 3-1 Entering Setup ...3-2 The Main Menu ...3-4 Standard CMOS Features 3-6 Advanced BIOS Features 3-9 Integrated Peripherals 3-12 Power Management Setup 3-14 PNP/PCI Configurations 3-17 H/W Monitor ...3-19 Cell Menu ...3-20 Load Fail-Safe/ Optimized Defaults...
... ...2-10 Back Panel ...2-11 Connectors ...2-13 Jumper ...2-20 Button ...2-21 Slots ...2-22 LED Status Indicators 2-24 Chapter 3 BIOS Setup 3-1 Entering Setup ...3-2 The Main Menu ...3-4 Standard CMOS Features 3-6 Advanced BIOS Features 3-9 Integrated Peripherals 3-12 Power Management Setup 3-14 PNP/PCI Configurations 3-17 H/W Monitor ...3-19 Cell Menu ...3-20 Load Fail-Safe/ Optimized Defaults...
User Guide
Page 35
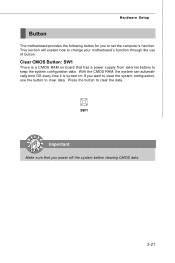
...keep the system configuration data. With the CMOS RAM, the system can automatically boot OS every time it is a CMOS RAM on . If you want to clear data. Press the button to set the computer's function. Hardware Setup Button The motherboard provides the following button for you to clear... the data. This section will explain how to change your motherboard's function through the use...
...keep the system configuration data. With the CMOS RAM, the system can automatically boot OS every time it is a CMOS RAM on . If you want to clear data. Press the button to set the computer's function. Hardware Setup Button The motherboard provides the following button for you to clear... the data. This section will explain how to change your motherboard's function through the use...
User Guide
Page 42
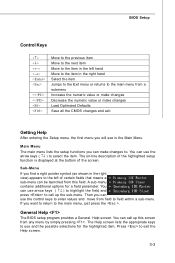
... the numeric value or make changes to. Press to the main menu, just press the . You can make changes Load Optimized Defaults Save all the CMOS changes and exit Getting Help After entering the Setup menu, the first menu you find a right pointer symbol (as shown in the right view) appears...
... the numeric value or make changes to. Press to the main menu, just press the . You can make changes Load Optimized Defaults Save all the CMOS changes and exit Getting Help After entering the Setup menu, the first menu you find a right pointer symbol (as shown in the right view) appears...
User Guide
Page 43
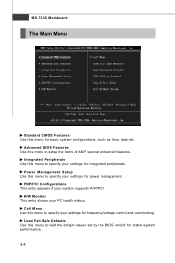
... PnP/PCI. Power Management Setup Use this menu to specify your settings for frequency/voltage control and overclocking. MS-7338 Mainboard The Main Menu Standard CMOS Features Use this menu to specify your settings for integrated peripherals. Integrated Peripherals Use this menu for basic system configurations, such as time, date etc...
... PnP/PCI. Power Management Setup Use this menu to specify your settings for frequency/voltage control and overclocking. MS-7338 Mainboard The Main Menu Standard CMOS Features Use this menu to specify your settings for integrated peripherals. Integrated Peripherals Use this menu for basic system configurations, such as time, date etc...
User Guide
Page 44
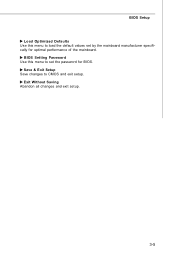
Save & Exit Setup Save changes to set by the mainboard manufacturer specifically for BIOS. Exit Without Saving Abandon all changes and exit setup. 3-5 BIOS Setting Password Use this menu to load the default values set the password for optimal performance of the mainboard. BIOS Setup Load Optimized Defaults Use this menu to CMOS and exit setup.
Save & Exit Setup Save changes to set by the mainboard manufacturer specifically for BIOS. Exit Without Saving Abandon all changes and exit setup. 3-5 BIOS Setting Password Use this menu to load the default values set the password for optimal performance of the mainboard. BIOS Setup Load Optimized Defaults Use this menu to CMOS and exit setup.
User Guide
Page 45
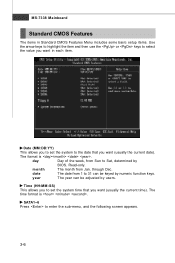
... by numeric function keys. The time format is . Date (MM:DD:YY) This allows you to set the system time that you want in Standard CMOS Features Menu includes some basic setup items. Use the arrow keys to highlight the item and then use the or keys to select the value... can be adjusted by users. Read-only. SATA1~6 Press to enter the sub-menu, and the following screen appears. 3-6 through Dec. MS-7338 Mainboard Standard CMOS Features The items in each item.
... by numeric function keys. The time format is . Date (MM:DD:YY) This allows you to set the system time that you want in Standard CMOS Features Menu includes some basic setup items. Use the arrow keys to highlight the item and then use the or keys to select the value... can be adjusted by users. Read-only. SATA1~6 Press to enter the sub-menu, and the following screen appears. 3-6 through Dec. MS-7338 Mainboard Standard CMOS Features The items in each item.
User Guide
Page 64
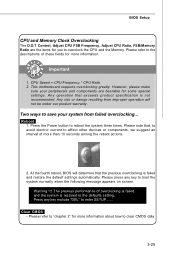
... and the system is failed and restore the default settings automatically. Please note that exceeds product specification is not recommended. Clear CMOS - This motherboard supports overclocking greatly. Any operation that , to avoid electric current to affect other devices or components, we suggest an interval ... components are the items for more information about how to enter SETUP....... Reboot 1. Please press any key exclude "DEL" to clear CMOS data. 3-25 BIOS Setup CPU and Memory Clock Overclocking The D.O.T Control, Adjust CPU FSB Frequency, Adjust CPU Ratio, FSB/Memory ...
... and the system is failed and restore the default settings automatically. Please note that exceeds product specification is not recommended. Clear CMOS - This motherboard supports overclocking greatly. Any operation that , to avoid electric current to affect other devices or components, we suggest an interval ... components are the items for more information about how to enter SETUP....... Reboot 1. Please press any key exclude "DEL" to clear CMOS data. 3-25 BIOS Setup CPU and Memory Clock Overclocking The D.O.T Control, Adjust CPU FSB Frequency, Adjust CPU Ratio, FSB/Memory ...
User Guide
Page 66
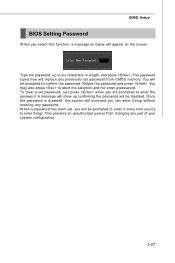
... password. The password typed now will boot and you are prompted to abort the selection and not enter a password. This prevents an unauthorized person from CMOS memory.
... password. The password typed now will boot and you are prompted to abort the selection and not enter a password. This prevents an unauthorized person from CMOS memory.


