User Guide
Page 2
... Alternatively, please try the following help resources for FAQ, technical guide, BIOS updates, driver updates, and other countries. Trademarks All trademarks are under continual improvement and we reserve ... trademark of its contents. Revision History Revision V1.0 Revision History First release for P35 Date June 2007 Technical Support If a problem arises with your place of Microsoft ... and OS®/2 are registered trademarks or trademarks of American Megatrends Inc. Visit the MSI website for further guidance. NVIDIA, the NVIDIA logo, DualNet, and nForce are registered ...
... Alternatively, please try the following help resources for FAQ, technical guide, BIOS updates, driver updates, and other countries. Trademarks All trademarks are under continual improvement and we reserve ... trademark of its contents. Revision History Revision V1.0 Revision History First release for P35 Date June 2007 Technical Support If a problem arises with your place of Microsoft ... and OS®/2 are registered trademarks or trademarks of American Megatrends Inc. Visit the MSI website for further guidance. NVIDIA, the NVIDIA logo, DualNet, and nForce are registered ...
User Guide
Page 8
... H/W Monitor ...3-19 Cell Menu ...3-20 Load Fail-Safe/ Optimized Defaults 3-26 BIOS Setting Password 3-27 Realtek ALC888/888T Audio Appendix A A-1 Installing the Realtek HD Audio Driver A-2 Software Configuration A-4 Hardware Setup A-18 viii Getting Started 1-1 Mainboard Specifications 1-2 Mainboard Layout 1-4 Packing Checklist 1-5 Chapter 2.
... H/W Monitor ...3-19 Cell Menu ...3-20 Load Fail-Safe/ Optimized Defaults 3-26 BIOS Setting Password 3-27 Realtek ALC888/888T Audio Appendix A A-1 Installing the Realtek HD Audio Driver A-2 Software Configuration A-4 Hardware Setup A-18 viii Getting Started 1-1 Mainboard Specifications 1-2 Mainboard Layout 1-4 Packing Checklist 1-5 Chapter 2.
User Guide
Page 9
Appendix B Dual Core Center B-1 Activating Dual Core Center B-2 Main ...B-2 DOT (Dynamic OverClocking B-5 Clock ...B-6 Voltage ...B-7 FAN Speed ...B-8 Temperature ...B-9 User Profile ...B-10 Appendix C Intel ICH9R SATA RAID C-1 ICH9R Introduction C-2 BIOS Configuration C-3 Installing Driver ...C-9 Installing Software C-11 RAID Migration Instructions C-15 Degraded RAID Array C-22 ix
Appendix B Dual Core Center B-1 Activating Dual Core Center B-2 Main ...B-2 DOT (Dynamic OverClocking B-5 Clock ...B-6 Voltage ...B-7 FAN Speed ...B-8 Temperature ...B-9 User Profile ...B-10 Appendix C Intel ICH9R SATA RAID C-1 ICH9R Introduction C-2 BIOS Configuration C-3 Installing Driver ...C-9 Installing Software C-11 RAID Migration Instructions C-15 Degraded RAID Array C-22 ix
User Guide
Page 14
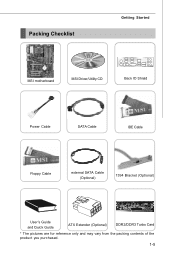
Packing Checklist Getting Started MSI motherboard MSI Driver/Utility CD Back IO Shield Power Cable SATA Cable IDE Cable Floppy Cable external SATA Cable (Optional) 1394 Bracket (Optional) User's Guide and Quick Guide ATX Extender (Optional) DDR2/DDR3 Turbo Card * The pictures are for reference only and may vary from the packing contents of the product you purchased. 1-5
Packing Checklist Getting Started MSI motherboard MSI Driver/Utility CD Back IO Shield Power Cable SATA Cable IDE Cable Floppy Cable external SATA Cable (Optional) 1394 Bracket (Optional) User's Guide and Quick Guide ATX Extender (Optional) DDR2/DDR3 Turbo Card * The pictures are for reference only and may vary from the packing contents of the product you purchased. 1-5

User Guide
Page 54
... initialize the VGA card. Resume From S3 By PS/2 Keyboard This setting determines whether the system will be shut off. Therefore, if the VGA driver of the PS/2 keyboard is not detected for more than four seconds, the computer is set to RAM) sleep state. Settings are : [On/ Off] The ...
... initialize the VGA card. Resume From S3 By PS/2 Keyboard This setting determines whether the system will be shut off. Therefore, if the VGA driver of the PS/2 keyboard is not detected for more than four seconds, the computer is set to RAM) sleep state. Settings are : [On/ Off] The ...
User Guide
Page 68
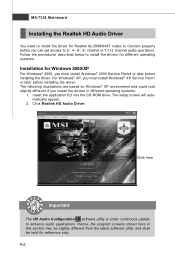
...automatically appear. 2. The following illustrations are based on W indows® XP environment and could look slightly different if you install the drivers in this section may be slightly different from the latest software utility and shall be held for reference only. Click here Important The .... Installation for Windows 2000/XP For W indows® 2000, you must install W indows® XP Service Pack1 or later before installing the driver. Insert the application CD into the CD-ROM drive. a A-2 Hence, the program screens shown here in different operating systems. 1. MS-7338 ...
...automatically appear. 2. The following illustrations are based on W indows® XP environment and could look slightly different if you install the drivers in this section may be slightly different from the latest software utility and shall be held for reference only. Click here Important The .... Installation for Windows 2000/XP For W indows® 2000, you must install W indows® XP Service Pack1 or later before installing the driver. Insert the application CD into the CD-ROM drive. a A-2 Hence, the program screens shown here in different operating systems. 1. MS-7338 ...

User Guide
Page 69
Click Next to restart the system. Click Finish to install the Realtek High Definition Audio Driver. 4. Click here Select this option Click here A-3 Realtek ALC888/888T Audio 3.
Click Next to restart the system. Click Finish to install the Realtek High Definition Audio Driver. 4. Click here Select this option Click here A-3 Realtek ALC888/888T Audio 3.
User Guide
Page 70
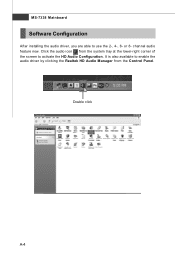
It is also available to use the 2-, 4-, 6- MS-7338 Mainboard Software Configuration After installing the audio driver, you are able to enable the audio driver by clicking the Realtek HD Audio M anager from the system tray at the lower-right corner of the screen to activate the HD Audio Configuration. Double click a A-4 channel audio feature now. Click the audio icon from the Control Panel. or 8-
It is also available to use the 2-, 4-, 6- MS-7338 Mainboard Software Configuration After installing the audio driver, you are able to enable the audio driver by clicking the Realtek HD Audio M anager from the system tray at the lower-right corner of the screen to activate the HD Audio Configuration. Double click a A-4 channel audio feature now. Click the audio icon from the Control Panel. or 8-
User Guide
Page 84
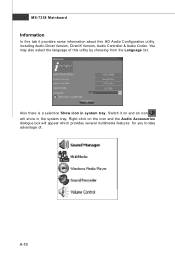
You may also select the language of . Switch it provides some information about this HD Audio Configuration utility, including Audio Driver Version, DirectX Version, Audio Controller & Audio Codec. Right-click on and an icon will appear which provides several multimedia features for you to take advantage of this utility by choosing from the Language list. a A-18 Also there is a selection Show icon in the system tray. MS-7338 Mainboard Information In this tab it on the icon and the Audio Accessories dialogue box will show in system tray.
You may also select the language of . Switch it provides some information about this HD Audio Configuration utility, including Audio Driver Version, DirectX Version, Audio Controller & Audio Codec. Right-click on and an icon will appear which provides several multimedia features for you to take advantage of this utility by choosing from the Language list. a A-18 Also there is a selection Show icon in the system tray. MS-7338 Mainboard Information In this tab it on the icon and the Audio Accessories dialogue box will show in system tray.

User Guide
Page 88
MS-7338 Mainboard n 8-Channel Mode for 8-Speaker Output 1 4 2 5 3 6 8-Channel Analog Audio Output 1 Line In 2 Line Out (Front channels) 3 MIC 4 Line Out (Rear channels) 5 Line Out (Center and Subwoofer channel) 6 Line Out (Side channels) Important To enable 7.1 channel audio-out function on Vista operating system, you have to install the Realtek Audio Driver. a A-22 Or, the mainboard will support 5.1 channel audio-out only.
MS-7338 Mainboard n 8-Channel Mode for 8-Speaker Output 1 4 2 5 3 6 8-Channel Analog Audio Output 1 Line In 2 Line Out (Front channels) 3 MIC 4 Line Out (Rear channels) 5 Line Out (Center and Subwoofer channel) 6 Line Out (Side channels) Important To enable 7.1 channel audio-out function on Vista operating system, you have to install the Realtek Audio Driver. a A-22 Or, the mainboard will support 5.1 channel audio-out only.

User Guide
Page 91
... the Dynamic Overclocking Technology. B-3 Dual Core Center Main Before using this utility. MB Click MB button to install with the version 8.26 or newer driver)/ V046 or V060 graphics card can activate the full function of this utility, we have to remind you install a graphics card of other brand, ...only hardware status of the MSI mainboard would be available. If you : only when installing the MSI V044 (V044 has to read current GPU temperature, GPU clock and memory clock of mainboard will show below . DOT...
... the Dynamic Overclocking Technology. B-3 Dual Core Center Main Before using this utility. MB Click MB button to install with the version 8.26 or newer driver)/ V046 or V060 graphics card can activate the full function of this utility, we have to remind you install a graphics card of other brand, ...only hardware status of the MSI mainboard would be available. If you : only when installing the MSI V044 (V044 has to read current GPU temperature, GPU clock and memory clock of mainboard will show below . DOT...
User Guide
Page 102
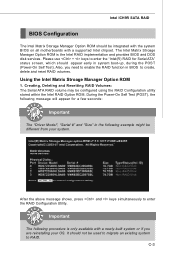
...boot-up, during the POST (Power-On Self Test). Please use + keys to enter the "Intel(R) RAID for a few seconds: Important The "Driver Model", "Serial #" and "Size" in the following procedure is the Intel RAID implementation and provides BIOS and DOS disk services. Intel ICH9R SATA ...Test (POST), the following message will appear for Serial ATA" status screen, which should not be integrated with the system BIOS on all motherboards with a newly-built system or if you need to enter the RAID Configuration Utility. Creating, Deleting and Resetting RAID Volumes: The Serial ATA...
...boot-up, during the POST (Power-On Self Test). Please use + keys to enter the "Intel(R) RAID for a few seconds: Important The "Driver Model", "Serial #" and "Size" in the following procedure is the Intel RAID implementation and provides BIOS and DOS disk services. Intel ICH9R SATA ...Test (POST), the following message will appear for Serial ATA" status screen, which should not be integrated with the system BIOS on all motherboards with a newly-built system or if you need to enter the RAID Configuration Utility. Creating, Deleting and Resetting RAID Volumes: The Serial ATA...
User Guide
Page 108
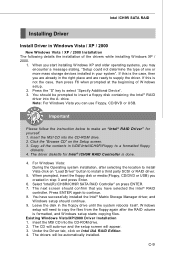
...the RAID volume is formatted, and W indows setup starts copying files. † Existing Windows Vista/XP/2000 Driver Installation 1. You have selected the Intel® RAID controller. Insert the MSI CD into the A: drive. W hen you start installing Windows XP and older operating systems, you can use... the floppy drive until the system reboots itself. Under the Driver tab, click on the Setup screen. 3. You should be automatically installed. Important Please follow the instruction below to a formatted floppy d is done. 4. Insert the MSI CD into the CD-ROM drive. 2. Press ENTER again ...
...the RAID volume is formatted, and W indows setup starts copying files. † Existing Windows Vista/XP/2000 Driver Installation 1. You have selected the Intel® RAID controller. Insert the MSI CD into the A: drive. W hen you start installing Windows XP and older operating systems, you can use... the floppy drive until the system reboots itself. Under the Driver tab, click on the Setup screen. 3. You should be automatically installed. Important Please follow the instruction below to a formatted floppy d is done. 4. Insert the MSI CD into the CD-ROM drive. 2. Press ENTER again ...
User Guide
Page 109
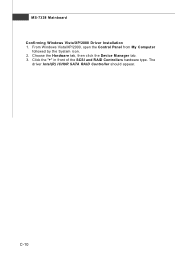
C-10 The driver Intel(R) ICH9R SATA RAID Controller should appear. From W indows Vista/XP/2000, open the Control Panel from My Computer followed by the System icon. 2. Click the "+" in front of the SCSI and RAID Controllers hardware type. Choose the Hardware tab, then click the Device M anager tab. 3. MS-7338 Mainboard † Confirming Windows Vista/XP/2000 Driver Installation 1.
C-10 The driver Intel(R) ICH9R SATA RAID Controller should appear. From W indows Vista/XP/2000, open the Control Panel from My Computer followed by the System icon. 2. Click the "+" in front of the SCSI and RAID Controllers hardware type. Choose the Hardware tab, then click the Device M anager tab. 3. MS-7338 Mainboard † Confirming Windows Vista/XP/2000 Driver Installation 1.
User Guide
Page 110
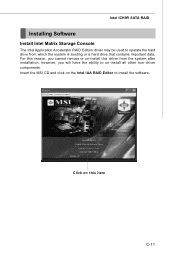
however, you cannot remove or un-install this item C-11 Insert the MSI CD and click on this driver from which the system is booting or a hard drive that contains important data. Click on the Intel IAA RAID Editor to install the software. Intel ICH9R SATA RAID Installing Software Install Intel Matrix Storage Console The Intel Application Accelerator RAID Edition driver may be used to operate the hard drive from the system after installation; For this reason, you will have the ability to un-install all other non-driver components.
however, you cannot remove or un-install this item C-11 Insert the MSI CD and click on this driver from which the system is booting or a hard drive that contains important data. Click on the Intel IAA RAID Editor to install the software. Intel ICH9R SATA RAID Installing Software Install Intel Matrix Storage Console The Intel Application Accelerator RAID Edition driver may be used to operate the hard drive from the system after installation; For this reason, you will have the ability to un-install all other non-driver components.
User Guide
Page 114
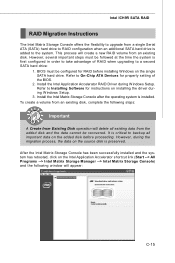
However, several important steps must be configured for RAID before proceeding. BIOS must be recovered. Install the Intel Application Accelerator RAID Driver during the migration process, the data on the source disk is installed. To create a volume from the added disk and the ...single Serial ATA (SATA) hard drive to RAID configuration when an additional SATA hard drive is critical to backup all important data on installing the driver during W indows Setup. 3. After the Intel Matrix Storage Console has been successfully installed and the system has rebooted, click on the single SATA...
However, several important steps must be configured for RAID before proceeding. BIOS must be recovered. Install the Intel Application Accelerator RAID Driver during the migration process, the data on the source disk is installed. To create a volume from the added disk and the ...single Serial ATA (SATA) hard drive to RAID configuration when an additional SATA hard drive is critical to backup all important data on installing the driver during W indows Setup. 3. After the Intel Matrix Storage Console has been successfully installed and the system has rebooted, click on the single SATA...


