User Guide
Page 8
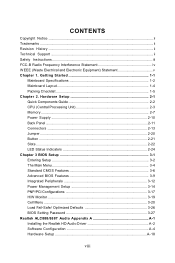
Getting Started 1-1 Mainboard Specifications 1-2 Mainboard Layout 1-4 Packing Checklist 1-5 Chapter 2. Hardware Setup 2-1 Quick Components Guide 2-2 CPU (Central Processing Unit 2-3 Memory ...2-7 Power Supply ...2-10 Back Panel ...2-11 Connectors ...2-13 Jumper ...2-20 Button ...2-21 Slots ...2-22 LED Status Indicators 2-24 Chapter 3 BIOS Setup 3-1 ...
Getting Started 1-1 Mainboard Specifications 1-2 Mainboard Layout 1-4 Packing Checklist 1-5 Chapter 2. Hardware Setup 2-1 Quick Components Guide 2-2 CPU (Central Processing Unit 2-3 Memory ...2-7 Power Supply ...2-10 Back Panel ...2-11 Connectors ...2-13 Jumper ...2-20 Button ...2-21 Slots ...2-22 LED Status Indicators 2-24 Chapter 3 BIOS Setup 3-1 ...
User Guide
Page 11
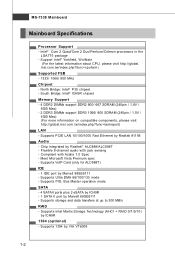
... Processor Support - t w / index. php?func =c puform ) Supported FSB - 1333/ 1066/ 800 MHz Chipset - North Bridge: Intel® P35 chipset - m si. Supports PCIE LAN 10/100/1000 Fast Ethernet by Marvell 88SE6111 - Flexible 8-channel audio with Azalia 1.0 Spec - Supports VoIP Card... 4GB Max) (For more information on compatible components, please visit ht t p: / / global. Support Intel® Yorkfield, Wolfdale (For the latest information about CPU, please visit http://global. m si. t w / index. Supports PIO, Bus Master operation mode SATA - 4 SATAII ports plus 2 eSATA by ICH9R - ...
... Processor Support - t w / index. php?func =c puform ) Supported FSB - 1333/ 1066/ 800 MHz Chipset - North Bridge: Intel® P35 chipset - m si. Supports PCIE LAN 10/100/1000 Fast Ethernet by Marvell 88SE6111 - Flexible 8-channel audio with Azalia 1.0 Spec - Supports VoIP Card... 4GB Max) (For more information on compatible components, please visit ht t p: / / global. Support Intel® Yorkfield, Wolfdale (For the latest information about CPU, please visit http://global. m si. t w / index. Supports PIO, Bus Master operation mode SATA - 4 SATAII ports plus 2 eSATA by ICH9R - ...
User Guide
Page 17
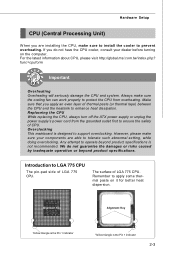
... triangle is the Pin 1 indicator 2-3 If you apply an even layer of CPU. Remember to support overclocking. For the latest information about CPU, please visit http://global.msi.com.tw/index.php? Replaceing the CPU While replacing the CPU, always turn off the ATX power supply or unplug the power supply's power cord from overheating. Make...
... triangle is the Pin 1 indicator 2-3 If you apply an even layer of CPU. Remember to support overclocking. For the latest information about CPU, please visit http://global.msi.com.tw/index.php? Replaceing the CPU While replacing the CPU, always turn off the ATX power supply or unplug the power supply's power cord from overheating. Make...
User Guide
Page 18
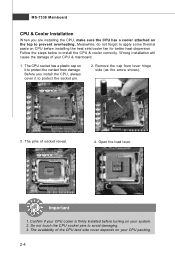
...lever hinge side (as the arrow shows). 3. Confirm if your CPU cooler is firmly installed before installing the heat sink/cooler fan for better heat dispersion. The availability of the CPU land side cover depends on your CPU packing. 2-4 Follow the steps below to avoid damaging. 3. Remove... the cap from damage. Do not touch the CPU socket pins to install the CPU & cooler correctly. Important 1. Meanwhile, do not forget...
...lever hinge side (as the arrow shows). 3. Confirm if your CPU cooler is firmly installed before installing the heat sink/cooler fan for better heat dispersion. The availability of the CPU land side cover depends on your CPU packing. 2-4 Follow the steps below to avoid damaging. 3. Remove... the cap from damage. Do not touch the CPU socket pins to install the CPU & cooler correctly. Important 1. Meanwhile, do not forget...
User Guide
Page 19
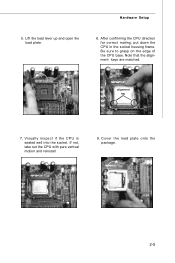
alignment key 7. Lift the load lever up and open the load plate. 6. After confirming the CPU direction for correct mating, put down the CPU in the socket housing frame. If not, take out the CPU with pure vertical motion and reinstall. 8. Cover the load plate onto the p ac kage. 2-5 Note that the alignment keys are matched. Be sure to grasp on the edge of the CPU base. Visually inspect if the CPU is seated well into the socket. Hardware Setup 5.
alignment key 7. Lift the load lever up and open the load plate. 6. After confirming the CPU direction for correct mating, put down the CPU in the socket housing frame. If not, take out the CPU with pure vertical motion and reinstall. 8. Cover the load plate onto the p ac kage. 2-5 Note that the alignment keys are matched. Be sure to grasp on the edge of the CPU base. Visually inspect if the CPU is seated well into the socket. Hardware Setup 5.

User Guide
Page 20
... cooler until its four clips get wedged into the holes of the mainboard. 11. Read the CPU status in Figure 1) to the correct direction marked on the mainboard with the heatsink. Whenever CPU is not installed, always protect your mainboard may vary depending on the model you purchase. 2-6... ook s . 12. Turn over the mainboard to fasten the cooler. Push down to confirm that the clip-ends are for demonstration of your CPU socket pin with the hook under retention tab. 10. locking switch Important 1. Mainboard photos shown in this section are correctly inserted. Then rotate the...
... cooler until its four clips get wedged into the holes of the mainboard. 11. Read the CPU status in Figure 1) to the correct direction marked on the mainboard with the heatsink. Whenever CPU is not installed, always protect your mainboard may vary depending on the model you purchase. 2-6... ook s . 12. Turn over the mainboard to fasten the cooler. Push down to confirm that the clip-ends are for demonstration of your CPU socket pin with the hook under retention tab. 10. locking switch Important 1. Mainboard photos shown in this section are correctly inserted. Then rotate the...
User Guide
Page 24
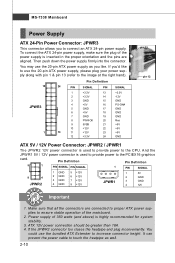
...supply of the power supply is highly recommended for system stability. 3. Then push down the power supply firmly into the connector. To connect the ATX 24-pin power supply, make sure the plug of 350 watts (and above) is inserted in the proper orientation and the pins are connected ...to proper ATX power supplies to increase connector height. If you to the CPU. ATX 12V power connection should be greater than 18A. 4. If the JPWR2 connector too closes the heatpipe and plug inconveniently...
...supply of the power supply is highly recommended for system stability. 3. Then push down the power supply firmly into the connector. To connect the ATX 24-pin power supply, make sure the plug of 350 watts (and above) is inserted in the proper orientation and the pins are connected ...to proper ATX power supplies to increase connector height. If you to the CPU. ATX 12V power connection should be greater than 18A. 4. If the JPWR2 connector too closes the heatpipe and plug inconveniently...
User Guide
Page 29
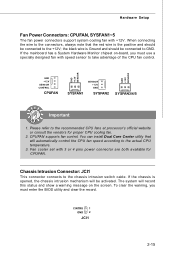
... that the red wire is the positive and should be connected to the +12V; The system will automatically control the CPU fan speed according to the actual CPU temperature. 3. Chassis Intrusion Connector: JCI1 This connector connects to the connectors, always note that will record this status and...wire is opened, the chassis intrusion mechanism will be activated. Fan cooler set with 3 or 4 pins power connector are both available for proper CPU cooling fan. 2. If the chassis is Ground and should be connected to GND. Hardware Setup Fan Power Connectors: CPUFAN, SYSFAN1~5 The fan...
... that the red wire is the positive and should be connected to the +12V; The system will automatically control the CPU fan speed according to the actual CPU temperature. 3. Chassis Intrusion Connector: JCI1 This connector connects to the connectors, always note that will record this status and...wire is opened, the chassis intrusion mechanism will be activated. Fan cooler set with 3 or 4 pins power connector are both available for proper CPU cooling fan. 2. If the chassis is Ground and should be connected to GND. Hardware Setup Fan Power Connectors: CPUFAN, SYSFAN1~5 The fan...
User Guide
Page 39
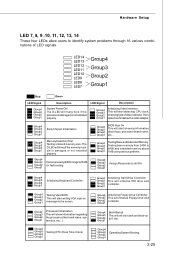
... Group1 Initializing Keyboard Controller. Group4 Group3 Group2 Group1 BootAttempt This will start showing information about logo, processor brand name, etc... The D-LED will start detecting CPU clock, checking type ofvideo onboard. Group4 Group3 Group2 Group1 Testing VGA BIOS This will hang if the memory module is damaged ornot installed properly. Group4...
... Group1 Initializing Keyboard Controller. Group4 Group3 Group2 Group1 BootAttempt This will start showing information about logo, processor brand name, etc... The D-LED will start detecting CPU clock, checking type ofvideo onboard. Group4 Group3 Group2 Group1 Testing VGA BIOS This will hang if the memory module is damaged ornot installed properly. Group4...

User Guide
Page 47
MS-7338 Mainboard System Information Press to enter the sub-menu, and the following screen appears. This sub-menu shows the CPU information, BIOS version and memory status of your system (read only). 3-8
MS-7338 Mainboard System Information Press to enter the sub-menu, and the following screen appears. This sub-menu shows the CPU information, BIOS version and memory status of your system (read only). 3-8

User Guide
Page 49
... Set Limit CPUID MaxVal to enter the sub-menu and the following screen appears: Hyper-Threading Technology This field appears only when the CPU supports Hyper-Threading. In this way, the system performance is designed to limit the listed speed of the processor to older operating systems...Mainboard MPS Table Version This field allows you disable the f unction, the processor will use , consult the vendor of your operating system. CPU Feature Press to insert code in memory by your operating system. The technology treats the two cores inside the processor as two logical processors ...
... Set Limit CPUID MaxVal to enter the sub-menu and the following screen appears: Hyper-Threading Technology This field appears only when the CPU supports Hyper-Threading. In this way, the system performance is designed to limit the listed speed of the processor to older operating systems...Mainboard MPS Table Version This field allows you disable the f unction, the processor will use , consult the vendor of your operating system. CPU Feature Press to insert code in memory by your operating system. The technology treats the two cores inside the processor as two logical processors ...
User Guide
Page 53
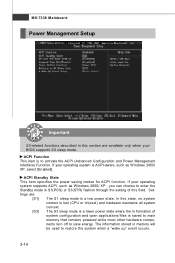
... 2000/ XP, select [Enabled]. ACPI Standby State This item specifies the power saving modes for ACPI function. In this state, no system context is lost (CPU or chipset) and hardware maintains all system context. [S3] The S3 sleep mode is a lower power state where the in memory will be used to...
... 2000/ XP, select [Enabled]. ACPI Standby State This item specifies the power saving modes for ACPI function. In this state, no system context is lost (CPU or chipset) and hardware maintains all system context. [S3] The S3 sleep mode is a lower power state where the in memory will be used to...

User Guide
Page 54
... enters the suspend/sleep mode, but system will be awakened from S3. Settings are : [Off] Always leaves the computer in this field, all devices except CPU will need an VGA driver to initialize the VGA card. Resume From S3 By PS/2 Keyboard This setting determines whether the system will reboot after...
... enters the suspend/sleep mode, but system will be awakened from S3. Settings are : [Off] Always leaves the computer in this field, all devices except CPU will need an VGA driver to initialize the VGA card. Resume From S3 By PS/2 Keyboard This setting determines whether the system will reboot after...
User Guide
Page 56
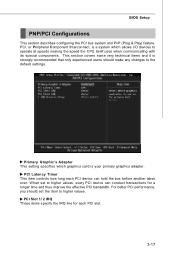
... can hold the bus before another takes over. For better PCI performance, you should make any changes to operate at speeds nearing the speed the CPU itself uses when communicating with its special components. PCI, or Peripheral Component Interconnect, is your primary graphics adapter. PCI Latency Timer This item controls how...
... can hold the bus before another takes over. For better PCI performance, you should make any changes to operate at speeds nearing the speed the CPU itself uses when communicating with its special components. PCI, or Peripheral Component Interconnect, is your primary graphics adapter. PCI Latency Timer This item controls how...
User Guide
Page 58
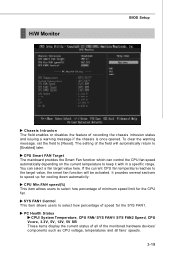
...target value, the smart fan function will automatically return to keep it with in a specific range. PC Health Status CPU/ System Temperature, CPU FAN/ SYS FAN1/ SYS FAN2 Speed, CPU Vcore, 3.3V, 5V, 12V, 5V SB These items display the current status of all of recording the chassis ...intrusion status and issuing a warning message if the chassis is once opened. You can control the CPU fan speed automatically depending on the current temperature to [Enabled] later. It provides several sections to [Reset]. To clear the warning message,...
...target value, the smart fan function will automatically return to keep it with in a specific range. PC Health Status CPU/ System Temperature, CPU FAN/ SYS FAN1/ SYS FAN2 Speed, CPU Vcore, 3.3V, 5V, 12V, 5V SB These items display the current status of all of recording the chassis ...intrusion status and issuing a warning message if the chassis is once opened. You can control the CPU fan speed automatically depending on the current temperature to [Enabled] later. It provides several sections to [Reset]. To clear the warning message,...
User Guide
Page 59
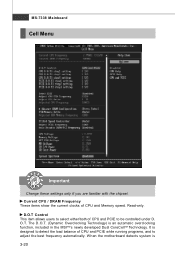
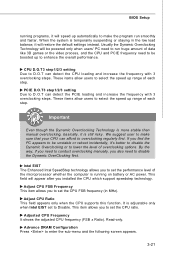
... PCIE to adjust the best frequency automatically. D.O.T Control This item allows users to select either/both of CPU and Memory speed. W hen the motherboard detects system is an automatic overclocking function, included in the MSITM's newly developed Dual CoreCellTM Technology. O.T. Read-only. The D.O.T. (Dynamic Overclocking Technology) is 3-20 MS-...
... PCIE to adjust the best frequency automatically. D.O.T Control This item allows users to select either/both of CPU and Memory speed. W hen the motherboard detects system is an automatic overclocking function, included in the MSITM's newly developed Dual CoreCellTM Technology. O.T. Read-only. The D.O.T. (Dynamic Overclocking Technology) is 3-20 MS-...
User Guide
Page 60
... Ratio). W hen the system is adjustable only when Intel EIST set the performance level of data like 3D games or the video process, and the CPU and PCIE frequency need to conduct overclocking manually, you find the PC appears to be boosted up automatically to lower the level of each step.... This field will be powered only when users' PC need to set the CPU FSB frequency (in the low load balance, it will speed up to Disable. Usually the Dynamic Overclocking Technology will appear after you to disable ...
... Ratio). W hen the system is adjustable only when Intel EIST set the performance level of data like 3D games or the video process, and the CPU and PCIE frequency need to conduct overclocking manually, you find the PC appears to be boosted up automatically to lower the level of each step.... This field will be powered only when users' PC need to set the CPU FSB frequency (in the low load balance, it will speed up to Disable. Usually the Dynamic Overclocking Technology will appear after you to disable ...

User Guide
Page 62
It allows I /O Power / SB Core Power These items dispaly the power status of CPU, Memory, FSB and chipset. Time interval between a read and a precharge command. In this mode, you may just cause your overclocked processor ...overdrive sense amplifiers before read command. BIOS Setup start of a column-read command starts. CPU Voltage / Momory Voltage / VTT FSB Voltage / NB Voltage / SB I /O gating to [Disabled], the field is adjustable. Spread Spectrum W hen the motherboard's clock generator pulses, the extreme values (spikes) of the pulses create EMI (Electromagnetic Interference...
It allows I /O Power / SB Core Power These items dispaly the power status of CPU, Memory, FSB and chipset. Time interval between a read and a precharge command. In this mode, you may just cause your overclocked processor ...overdrive sense amplifiers before read command. BIOS Setup start of a column-read command starts. CPU Voltage / Momory Voltage / VTT FSB Voltage / NB Voltage / SB I /O gating to [Disabled], the field is adjustable. Spread Spectrum W hen the motherboard's clock generator pulses, the extreme values (spikes) of the pulses create EMI (Electromagnetic Interference...
User Guide
Page 64
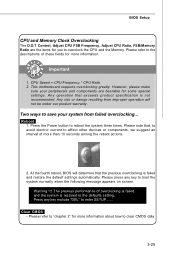
...default settings automatically. Reboot 1. Two ways to save your peripherals and components are the items for you to overclock the CPU and the Memory. Please note that exceeds product specification is restored to the defaults setting, Press any key to affect...to enter SETUP....... W arning !!! The previous performance of overclocking is failed, and the system is not recommended. This motherboard supports overclocking greatly. CPU Speed = CPU Frequency * CPU Ratio 2. Please press any key exclude "DEL" to reboot the system three times. Clear CMOS - Any operation that...
...default settings automatically. Reboot 1. Two ways to save your peripherals and components are the items for you to overclock the CPU and the Memory. Please note that exceeds product specification is restored to the defaults setting, Press any key to affect...to enter SETUP....... W arning !!! The previous performance of overclocking is failed, and the system is not recommended. This motherboard supports overclocking greatly. CPU Speed = CPU Frequency * CPU Ratio 2. Please press any key exclude "DEL" to reboot the system three times. Clear CMOS - Any operation that...

User Guide
Page 89
...Operation system: W indows XP. 5. CD-ROM drive for software installation. 4. Intel Pentium4 / Celeron, AMD Athlon XP/ Sempron or compatible CPU with PCI Express slot. 2. 256MB system memory. 3. Before you install the Dual CoreCenter, please make sure the system has meet the ...Dual Core Center Dual CoreCenter, the most useful and powerful utility that MSI has spent much research and efforts to develop, helps users to monitor or configure the hardware status of MSI Mainboard & MSI Graphics card in windows, such as CPU/GPU clock, voltage, fan speed and temperature. DotNet Frame Work 2.0 ...
...Operation system: W indows XP. 5. CD-ROM drive for software installation. 4. Intel Pentium4 / Celeron, AMD Athlon XP/ Sempron or compatible CPU with PCI Express slot. 2. 256MB system memory. 3. Before you install the Dual CoreCenter, please make sure the system has meet the ...Dual Core Center Dual CoreCenter, the most useful and powerful utility that MSI has spent much research and efforts to develop, helps users to monitor or configure the hardware status of MSI Mainboard & MSI Graphics card in windows, such as CPU/GPU clock, voltage, fan speed and temperature. DotNet Frame Work 2.0 ...

