
MSI K9N6SGM-V Support Question
MSI K9N6SGM-V Support Question
Find answers below for this question about MSI K9N6SGM-V - Motherboard - Micro ATX.Need a MSI K9N6SGM-V manual? We have 1 online manual for this item!
Question posted by bhaskarjalan60117 on February 6th, 2018
Restore Ms7309 Mobo.remove-reinsert Cmos Batt Hasn't Worked.need Help On Jumper
My PC just won't start this morning. Was working fine till last night. Power buttton pressed shows the led indicator on for a second or two and then goes off. I can hear the fan running and DVD ddrive opening closing ok. But no beep and power indicator LED is not glowing. Monitor shows no signal. Tried all basic troubleshooting including the CMOS Battery remove-reinsert (10 minute gap). Can anyone suggest if the jumper method is any good and if it is, would you please advise the procedure?
Current Answers
Related MSI K9N6SGM-V Manual Pages
User Guide - Page 1
...may cause harmful interference to comply with the emission limits. power cord, if any interference received, including interference that to...been tested and found to comply with the limits for help. Notice 1 The changes or modifications not expressly approved by... VOIR LA NOTICE D'NSTALLATION AVANT DE RACCORDER AU RESEAU.
Micro-Star International MS-7309
This device complies with Part 15 of...
User Guide - Page 2
...History
Revision
Revision History
V1.0
First release for PCB1.X
V1.1
Remove Clear CMOS Button, add Clear CMOS Jumper
Date September 2006 October 2006
ii We take every care in ... Notice The material in the preparation of this document is the intellectual property of MICRO-STAR INTERNATIONAL. Trademarks All trademarks are registered trademarks of Intel Corporation.
Netware®...
User Guide - Page 7
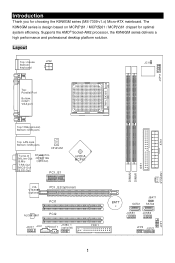
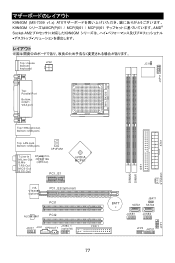
.../ MCP(S)61 / MCP(V)61 chipset for choosing the K9N6GM series (MS-7309 v1.x) Micro-ATX mainboard.
Layout
Top : mouse Bottom: keyboard
JPW1
JCI1
Top : Parallel Port
Bottom: COM... (optional)
PCI _E2(optional) PCI1
ALC883/861
PCI2
JAUD1 JCD1
SPDOUT1
J1394_1 (optional)
FDD 1
BATT +
SATA1
JBAT1 SATA2
JUSB1
JUSB2
JFP2 JLPC1
1
JFP1 Supports the AMD® Socket-AM2 processor,...
User Guide - Page 10
...power and unplug the power cord before
installing the CPU.
2. If the CPU is being closed, always close the lever.
MSI Reminds You... Overclocking
4 Pull the lever sideways away from overheating. Make sure to raise
the lever up to setup the jumpers on top
of the CPU to make sure the cooling fan can work...permanent damages to your fingers pressing tightly on the mainboard. ...
User Guide - Page 11
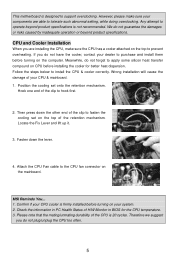
...press down the lever.
4. CPU and Cooler Installation
When you are able to support overclocking. Locate the Fix Lever and lift up it.
3. Fasten down the other end of your dealer to hook first.
2. Attach the CPU Fan...of the CPU is designed to tolerate such abnormal setting, while doing overclocking.
This motherboard is 20 cycles. If you do not forget to fasten the cooling set onto...
User Guide - Page 12
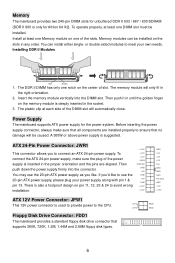
...ATX power supply, please plug your own needs. The DDR II DIMM has only one notch on one DIMM slot must be caused. Power Supply
The mainboard supports ATX power supply for the power system. Then push down the power... is also a foolproof design on the memory module is used to provide power to use the 20-pin ATX power supply as you like to the CPU.
Floppy Disk Drive Connector: FDD1
The...
User Guide - Page 13
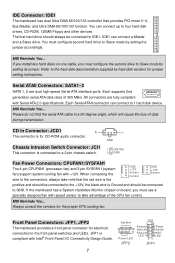
... a Slave drive. IDE1 can connect up to GND. Refer to Slave mode by setting its jumper.
You must use a
specially designed fan with Intel® Front Panel I/O Connectivity Design Guide.
7
10 9 Speaker
+ -- + -+
Power
Reset
2
8 Switch
Switch
1
7 Power
HDD
LED
LED
Power LED
21
JFP2
JFP1 If you install two hard disks on -board, you must configure the second...
User Guide - Page 14
... clear the
data:
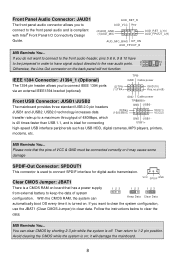
MSI Reminds You... Clear CMOS Jumper: JBAT1
VCC SPDIF GND
There is on board that the pins of 480Mbps, which is 40 times faster than USB 1.1, and is off. Avoid clearing the CMOS while the system is a CMOS RAM on ; Please note that has a power supply from external battery to the rear...
User Guide - Page 15
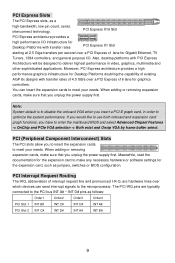
...designed to deliver highest performance in order to meet your needs. PCI Express Slots
The PCI Express slots, as jumpers, switches or BIOS configuration.
Meanwhile, read the documentation for...When adding or removing expansion
cards, make sure that you unplug the power supply first. When adding or removing expansion cards, make sure that you unplug the power supply first. ...
User Guide - Page 16

... appears if your CPU, fan, warning for overall system status. DEL: Setup
F11: Boot Menu
TAB: Logo
If the message disappears before you respond and you still wish to specify your settings for power management. Advanced Chipset Features Use this menu to enter Setup, restart the
system by simultaneously pressing , , and keys. Advanced...
User Guide - Page 17
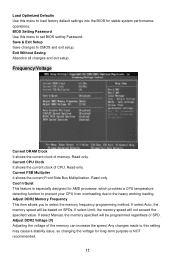
...shows the current clock of the memory can increase the speed. If select Limit, the memory speed will be programmed regardless of CPU.
Adjust DDR2 Memory Frequency This item allows you to the heavy working... voltage of memory. Current FSB Multiplier It shows the current Front Side Bus Multiplication. BIOS Setting Password Use this menu to CMOS and exit setup. Save & Exit Setup ...
User Guide - Page 18
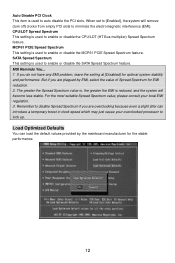
...PCIE Spread Spectrum feature. MCP61 PCIE Spread Spectrum This setting is reduced, and the system will remove (turn off) clocks from empty PCI slots to enable or disable the CPU/LDT (HT...stability and performance. Load Optimized Defaults
You can introduce a temporary boost in clock speed which may just cause your local EMI regulation. 3. SATA Spread Spectrum This setting is used to lock up....
User Guide - Page 65
JFP1, JFP2
JFP1 是和 Intel 的 I/O
10 9
+ -- + -+
Power
Reset
Switch
Switch
Power
HDD
LED
LED
21
JFP1
Speaker
2
8
1
7
Power LED
JFP2
JAUD1
Intel®的I/O
AUD_RET_R AUD_VCC Key
(2)AUD_GND (1)AUD_MIC
AUD_RET_L(10) AUD_FPOUT_L(9)
AUD_MIC_BIAS HP_ON AUD_FPOUT_R
5 & 6, 9 & 10
Line-Out 2
10
1
9
IEEE 1394 接口:...
User Guide - Page 66

...;置.
VCC 和 GND
SPDIF-Out 接口: SPDOUT1
SPDIF 面板.
清除 CMOS 跳线: JBAT1
VCC SPDIF GND
CMOS RAM 1 2 3
1 23
1 23
CMOS RAM CMOS RAM
Keep Data Clear Data
JBAT1 (清除 CMOS
2-3 CMOS 1-2 CMOS
PCI Express 插槽
1 条 PCI Express x16 插槽, 1
条 PCI Express x1...
User Guide - Page 68
... (调整 DDR2 电压,V) 调整 DDR2 DDR2 Auto Disable PCI Clock PCI PCI Enabled EMI
62 Exit Without Saving CMOS Setup 程序. Save & Exit Setup CMOS Setup 程序.
Current DRAM Clock(当前 DRAM Current CPU Clock(当前 CPU CPU Current FSB Multiplier(...
User Guide - Page 77
...;您
GND +12V Sensor
Control
GND
+12V Sensor
CPU 風扇.. JFP1, JFP2
JFP1 是和 Intel 的 I/O
10 9
+ -- + -+
Power
Reset
Switch
Switch
Power
HDD
LED
LED
21
JFP1
Speaker
2
8
1
7
Power LED
JFP2
JAUD1
Intel®的I/O
AUD_RET_R AUD_VCC Key
(2)AUD_GND (1)AUD_MIC
AUD_RET_L(10) AUD_FPOUT_L(9)
AUD_MIC_BIAS HP_ON AUD_FPOUT_R...
User Guide - Page 78
...23450;.
VCC 和 GND
SPDIF-Out 介面: SPDOUT1
SPDIF 面板.
清除 CMOS 跳線: JBAT1
VCC SPDIF GND
CMOS RAM 1 2 3
1 23
1 23
CMOS RAM CMOS RAM
Keep Data Clear Data
JBAT1 (清除 CMOS
2-3 CMOS 1-2 CMOS
PCI Express 插槽
1 條 PCI Express x16 插槽,
1 條 PCI Express...
User Guide - Page 80
...;整 DDR2 Auto SPDs Limit Manual SPD 無關. Load Optimized Defaults BIOS BIOS Setting Password(BIOS BIOS 的密碼. Exit Without Saving CMOS Setup 程式. Adjust DDR2 Voltage (調整 DDR2 電壓,V) 調整 DDR2 DDR2 Auto Disable PCI Clock PCI PCI Enabled EMI
74...
User Guide - Page 83
K9N6GM (MS-7309 v1.x) ATX K9N6GM MCP(P)61 / MCP(S)61 / MCP(V)61 AMD® Socket-AM2 K9N6GM
Top : mouse Bottom: keyboard
JPW1
JCI1
JSPI1
Top : Parallel Port
Bottom...
PCI _E1
nVIDIA MCP61
DIMM2 DIMM1
IDE 1
VIA VT6308P (optional)
PCI _E2(optional) PCI1
ALC883/861
PCI2
JAUD1 JCD1
SPDOUT1
J1394_1 (optional)
FDD 1
BATT +
SATA1
JBAT1 SATA2
JUSB1
JUSB2
JFP2 JLPC1
77
JFP1
User Guide - Page 93
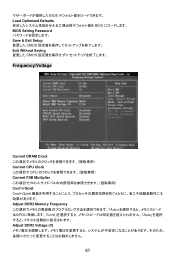
BIOS Load Optimized Defaults BIOS BIOS Setting Password Save & Exit Setup CMOS Exit Without Saving CMOS
Frequency/Voltage
Current DRAM Clock Current CPU Clock CPU Current FSB Multiplier Cool'n'Quiet Cool'nQuiet Adjust DDR2 Memory Frequency Auto Limit Auto Adjust DDR2 Voltage (V
87
Similar Questions

Which Way I Need To Put Cmos Battery
Which way i need to put cmos battery
Which way i need to put cmos battery
(Posted by Anonymous-172123 1 year ago)

Msi H55m P33 Boot Loops On Start Or When Trying To Install Os From Usb.
Hi, i have installed this micro atx build that consist of a msi mobo h55m-p33 with 2gb ram, 320gb hd...
Hi, i have installed this micro atx build that consist of a msi mobo h55m-p33 with 2gb ram, 320gb hd...
(Posted by jmhestrada 6 years ago)
I Need Pin Layout For Ms7309
i lost my manual and hooked all power supply conections right and all device wires but need to get a...
i lost my manual and hooked all power supply conections right and all device wires but need to get a...
(Posted by bgarvin 9 years ago)

How To Fix Date And Time My Ms-7309 Ver.1.3
my date and time i cant update becouz it always back, i already change my cmos battery but it not wo...
my date and time i cant update becouz it always back, i already change my cmos battery but it not wo...
(Posted by drigz36 10 years ago)

I Snapped In Additional 1gb Stick Ram But My Os Doesn't Indicate It.
(Posted by pinkfab4 11 years ago)