
User Guide
Page 3
Linksys is something you might need to do while using the IP Phone. Copyright © 2005 Cisco Systems, Inc. WARNING: This product contains chemicals, including lead, known to the State of California to these symbols, there are ...or warning and is provided with a figure number and description, like this Guide The User Guide to the Wireless-G IP Phone has been designed to make understanding networking with a reminder about something you with the IP Phone easier than ever. This question mark provides you should pay special attention to change without notice. Figure 0-1: Sample...
Linksys is something you might need to do while using the IP Phone. Copyright © 2005 Cisco Systems, Inc. WARNING: This product contains chemicals, including lead, known to the State of California to these symbols, there are ...or warning and is provided with a figure number and description, like this Guide The User Guide to the Wireless-G IP Phone has been designed to make understanding networking with a reminder about something you with the IP Phone easier than ever. This question mark provides you should pay special attention to change without notice. Figure 0-1: Sample...
User Guide
Page 5
... Panel The Front and Side Panels The Back Panel Chapter 3: Installing and Using the Wireless-G IP Phone Overview Inserting the Battery into the Wireless-G IP Phone Powering on the Wireless-G IP Phone Navigating the Wireless-G IP Phone Setting up the Wireless-G IP Phone Using the Wireless-G IP Phone Chapter 4: Configuring the Wireless-G IP Phone Instructions for Configuring the Wireless-G IP Phone Status Information Settings of Contents Chapter 1: Introduction Welcome What's in This User Guide?
... Panel The Front and Side Panels The Back Panel Chapter 3: Installing and Using the Wireless-G IP Phone Overview Inserting the Battery into the Wireless-G IP Phone Powering on the Wireless-G IP Phone Navigating the Wireless-G IP Phone Setting up the Wireless-G IP Phone Using the Wireless-G IP Phone Chapter 4: Configuring the Wireless-G IP Phone Instructions for Configuring the Wireless-G IP Phone Status Information Settings of Contents Chapter 1: Introduction Welcome What's in This User Guide?
User Guide
Page 6
Wireless-G IP Phone List of Figures Figure 2-1: Bottom Panel 3 Figure 3-20: Edit Outbound Proxy Port 18 Figure 2-2: Front Panel 4 Figure 3-21: Save Expire Time 18 Figure 2-3: Symbol Selection 5 Figure 3-22: Save Phone Number 19 Figure 2-4: Side Panel 6 Figure 3-23: Save User Name 19 Figure 2-5: Back Panel 6 Figure 3-24: Save Password 20 Figure 3-1: Press the Button...
Wireless-G IP Phone List of Figures Figure 2-1: Bottom Panel 3 Figure 3-20: Edit Outbound Proxy Port 18 Figure 2-2: Front Panel 4 Figure 3-21: Save Expire Time 18 Figure 2-3: Symbol Selection 5 Figure 3-22: Save Phone Number 19 Figure 2-4: Side Panel 6 Figure 3-23: Save User Name 19 Figure 2-5: Back Panel 6 Figure 3-24: Save Password 20 Figure 3-1: Press the Button...
User Guide
Page 7
... Key (for Secured Network) Figure 4-25: Enter WPA Key (for Secured Network) Figure 4-26: Connecting to Wireless Network Figure 4-27: Select Default Hotspot Figure 4-28: Detect Hotspot Figure 4-29: Connecting to Hotspot Figure 4-30: Getting IP Address Figure 4-31: Select IE Browser Figure 4-32: Wi-Fi Profiles Figure 4-33: Edit SSID Figure... NTP Server 40 Figure 4-60: Enter Name of NTP Server 41 Figure 4-61: Select Language 41 Figure 4-62: Language 41 Figure 4-63: Phone Password 41 Figure 4-64: Select Upgrade Wireless-G IP Phone 42 42 42 43 43 44 45 45 46 46 46 46 47 47 48 48 48 48 49 49 49 49...
... Key (for Secured Network) Figure 4-25: Enter WPA Key (for Secured Network) Figure 4-26: Connecting to Wireless Network Figure 4-27: Select Default Hotspot Figure 4-28: Detect Hotspot Figure 4-29: Connecting to Hotspot Figure 4-30: Getting IP Address Figure 4-31: Select IE Browser Figure 4-32: Wi-Fi Profiles Figure 4-33: Edit SSID Figure... NTP Server 40 Figure 4-60: Enter Name of NTP Server 41 Figure 4-61: Select Language 41 Figure 4-62: Language 41 Figure 4-63: Phone Password 41 Figure 4-64: Select Upgrade Wireless-G IP Phone 42 42 42 43 43 44 45 45 46 46 46 46 47 47 48 48 48 48 49 49 49 49...

User Guide
Page 8
Wireless-G IP Phone Figure 4-65: Edit Download URL 51 Figure 4-66: Upgrade in Progress 51 Figure 4-67: Upgrade Successful 51 Figure 4-68: Edit Proxy IP 52 Figure 4-69: Enter Proxy IP 52 Figure 4-70: Enter Register Proxy IP 52 Figure 4-71: Enter Register Proxy Port 52 Figure 4-72: Change Outbound Proxy IP... 53 Figure 4-73: Edit Outbound Proxy Port 53 Figure 4-74: Change Expire Time 53 Figure 4-75: Change Phone Number 53 Figure 4-76: Change User Name 54 Figure 4-77: Change Password 54 ...
Wireless-G IP Phone Figure 4-65: Edit Download URL 51 Figure 4-66: Upgrade in Progress 51 Figure 4-67: Upgrade Successful 51 Figure 4-68: Edit Proxy IP 52 Figure 4-69: Enter Proxy IP 52 Figure 4-70: Enter Register Proxy IP 52 Figure 4-71: Enter Register Proxy Port 52 Figure 4-72: Change Outbound Proxy IP... 53 Figure 4-73: Edit Outbound Proxy Port 53 Figure 4-74: Change Expire Time 53 Figure 4-75: Change Phone Number 53 Figure 4-76: Change User Name 54 Figure 4-77: Change Password 54 ...
User Guide
Page 9
... provider. Networks are useful in homes and offices, but also can share your Internet phone service provider. So, networks not only are useful tools for choosing the Linksys Wireless-G IP Phone. These instructions should be fun. It connects to get the most out of this User Guide. Use the instructions in your computer. network: a series...
... provider. Networks are useful in homes and offices, but also can share your Internet phone service provider. So, networks not only are useful tools for choosing the Linksys Wireless-G IP Phone. These instructions should be fun. It connects to get the most out of this User Guide. Use the instructions in your computer. network: a series...
User Guide
Page 10
Wireless-G IP Phone • Chapter 2: Getting to Know the Wireless-G IP Phone This chapter describes the physical features of the IP Phone. • Chapter 3: Installing and Using the Wireless-G IP Phone This chapter explains how to install the IP Phone and use it. • Chapter 4: Configuring the Wireless-G IP Phone This chapter discusses how to configure the IP Phone's settings. • Appendix A: Troubleshooting This appendix describes some potential problems...
Wireless-G IP Phone • Chapter 2: Getting to Know the Wireless-G IP Phone This chapter describes the physical features of the IP Phone. • Chapter 3: Installing and Using the Wireless-G IP Phone This chapter explains how to install the IP Phone and use it. • Chapter 4: Configuring the Wireless-G IP Phone This chapter discusses how to configure the IP Phone's settings. • Appendix A: Troubleshooting This appendix describes some potential problems...

User Guide
Page 11
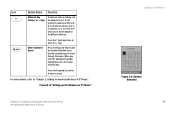
Headset Jack Headset Jack USB Port USB Port Figure 2-1: Bottom Panel This jack allows you to Know the Wireless-G IP Phone 3 The Bottom Panel Wireless-G IP Phone Chapter 2: Getting to connect a headset. The USB port allows you to Know the Wireless-G IP Phone The Bottom Panel The IP Phone's headset jack and USB port are located on the bottom panel. Chapter 2: Getting to attach the included power adapter.
Headset Jack Headset Jack USB Port USB Port Figure 2-1: Bottom Panel This jack allows you to Know the Wireless-G IP Phone 3 The Bottom Panel Wireless-G IP Phone Chapter 2: Getting to connect a headset. The USB port allows you to Know the Wireless-G IP Phone The Bottom Panel The IP Phone's headset jack and USB port are located on the bottom panel. Chapter 2: Getting to attach the included power adapter.

User Guide
Page 12
... red when the IP Phone is powered off and charging. Wireless-G IP Phone The Front and Side Panels Power LED The power LED is located at the top of the IP Phone, while its web browser Navigation Pad and Center Selection Key Soft Key Call Call Uses Internet phone line Different Key ...Enter Symbol or Space Figure 2-2: Front Panel 4 Chapter 2: Getting to Know the Wireless-G IP Phone The Front and Side Panels The LED alternates between blue and purple when the IP Phone is not ready for phone calls. Icon Button Name Function Soft Key Navigation Pad and Center Selection Key Selects...
... red when the IP Phone is powered off and charging. Wireless-G IP Phone The Front and Side Panels Power LED The power LED is located at the top of the IP Phone, while its web browser Navigation Pad and Center Selection Key Soft Key Call Call Uses Internet phone line Different Key ...Enter Symbol or Space Figure 2-2: Front Panel 4 Chapter 2: Getting to Know the Wireless-G IP Phone The Front and Side Panels The LED alternates between blue and purple when the IP Phone is not ready for phone calls. Icon Button Name Function Soft Key Navigation Pad and Center Selection Key Selects...
User Guide
Page 13
When you have the appropriate symbol highlighted, press the center selection key. Press the # (pound) key twice to Know the Wireless-G IP Phone The Front and Side Panels Wireless-G IP Phone Figure 2-3: Symbol Selection 5 Chapter 2: Getting to enter a space. Ends the call or exits the current menu Different Key Choices or + Sign To enter an entry ...
When you have the appropriate symbol highlighted, press the center selection key. Press the # (pound) key twice to Know the Wireless-G IP Phone The Front and Side Panels Wireless-G IP Phone Figure 2-3: Symbol Selection 5 Chapter 2: Getting to enter a space. Ends the call or exits the current menu Different Key Choices or + Sign To enter an entry ...

User Guide
Page 14
Wireless-G IP Phone Icon Button Name Volume Function Increases or decreases the volume The Back Panel Volume The IP Phone's battery compartment is located on how to insert the battery, refer to Know the Wireless-G IP Phone The Back Panel For directions on the back panel of the IP Phone. Battery Compartment Figure 2-4: Side Panel Figure 2-5: Back Panel 6 Chapter 2: Getting to "Chapter 3: Installing and Using the Wireless-G IP Phone."
Wireless-G IP Phone Icon Button Name Volume Function Increases or decreases the volume The Back Panel Volume The IP Phone's battery compartment is located on how to insert the battery, refer to Know the Wireless-G IP Phone The Back Panel For directions on the back panel of the IP Phone. Battery Compartment Figure 2-4: Side Panel Figure 2-5: Back Panel 6 Chapter 2: Getting to "Chapter 3: Installing and Using the Wireless-G IP Phone."
User Guide
Page 15
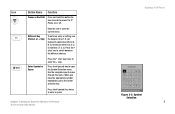
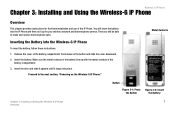
... cover of the battery compartment. 3. Push down on the Wireless-G IP Phone." Metal Contacts Button Figure 3-1: Press Figure 3-2: Insert the Button the Battery Chapter 3: Installing and Using the Wireless-G IP Phone 7 Overview Then you will insert the battery into the IP Phone and then set it snaps into the Wireless-G IP Phone To insert the battery, follow these instructions: 1. Inserting the...
... cover of the battery compartment. 3. Push down on the Wireless-G IP Phone." Metal Contacts Button Figure 3-1: Press Figure 3-2: Insert the Button the Battery Chapter 3: Installing and Using the Wireless-G IP Phone 7 Overview Then you will insert the battery into the IP Phone and then set it snaps into the Wireless-G IP Phone To insert the battery, follow these instructions: 1. Inserting the...
User Guide
Page 16
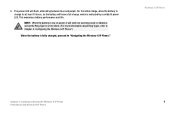
... account, then go to step 1. Make sure you already have the account information, including necessary IP Phone settings, supplied by your Internet phone service provider. 2. If you have an account set up an account, proceed to a standard ...of the IP Phone. Figure 3-3: Connect the Power 8 Chapter 3: Installing and Using the Wireless-G IP Phone Powering on the Wireless-G IP Phone Make sure you have the account information, including necessary IP Phone settings, supplied by your Internet phone service provider. Wireless-G IP Phone Powering on the Wireless-G IP Phone After ...
... account, then go to step 1. Make sure you already have the account information, including necessary IP Phone settings, supplied by your Internet phone service provider. 2. If you have an account set up an account, proceed to a standard ...of the IP Phone. Figure 3-3: Connect the Power 8 Chapter 3: Installing and Using the Wireless-G IP Phone Powering on the Wireless-G IP Phone Make sure you have the account information, including necessary IP Phone settings, supplied by your Internet phone service provider. Wireless-G IP Phone Powering on the Wireless-G IP Phone After ...
User Guide
Page 17
NOTE: When the battery is low on the Wireless-G IP Phone 3. For the initial charge, allow the battery to "Navigating the Wireless-G IP Phone." This maximizes battery performance and life. Wireless-G IP Phone Chapter 3: Installing and Using the Wireless-G IP Phone 9 Powering on power, it will emit one warning sound or vibration,... unless the Ring Type is set to Silent. (For more information about Ring Types, refer to Chapter 4: Configuring the Wireless-G IP Phone.") When the battery is indicated by a solidly lit power LED. The power LED will have a full charge, which is...
NOTE: When the battery is low on the Wireless-G IP Phone 3. For the initial charge, allow the battery to "Navigating the Wireless-G IP Phone." This maximizes battery performance and life. Wireless-G IP Phone Chapter 3: Installing and Using the Wireless-G IP Phone 9 Powering on power, it will emit one warning sound or vibration,... unless the Ring Type is set to Silent. (For more information about Ring Types, refer to Chapter 4: Configuring the Wireless-G IP Phone.") When the battery is indicated by a solidly lit power LED. The power LED will have a full charge, which is...
User Guide
Page 18
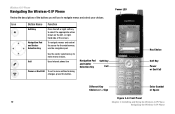
... Key Power or End Call Different Key Choices or + Sign Enter Symbol or Space Figure 3-4: Front Panel 10 Chapter 3: Installing and Using the Wireless-G IP Phone Navigating the Wireless-G IP Phone Wireless-G IP Phone Navigating the Wireless-G IP Phone Review the descriptions of the screen. Use the center selection key to select the appropriate action shown on the left- Call Uses Internet...
... Key Power or End Call Different Key Choices or + Sign Enter Symbol or Space Figure 3-4: Front Panel 10 Chapter 3: Installing and Using the Wireless-G IP Phone Navigating the Wireless-G IP Phone Wireless-G IP Phone Navigating the Wireless-G IP Phone Review the descriptions of the screen. Use the center selection key to select the appropriate action shown on the left- Call Uses Internet...
User Guide
Page 19
..., press the center selection key. Press the # (pound) key twice to enter the + sign. Chapter 3: Installing and Using the Wireless-G IP Phone Navigating the Wireless-G IP Phone Wireless-G IP Phone Figure 3-5: Symbol Selection 11 Icon Button Name Function Different Key Choices or + Sign To enter an entry or setting, use the keypad.... through the menu. Use the navigation pad to open the Symbol Selection menu. Press the * (star) key to Know the Wireless-G IP Phone." For more details, refer to "Chapter 2: Getting to switch between the different choices. Proceed to "Setting up the...
..., press the center selection key. Press the # (pound) key twice to enter the + sign. Chapter 3: Installing and Using the Wireless-G IP Phone Navigating the Wireless-G IP Phone Wireless-G IP Phone Figure 3-5: Symbol Selection 11 Icon Button Name Function Different Key Choices or + Sign To enter an entry or setting, use the keypad.... through the menu. Use the navigation pad to open the Symbol Selection menu. Press the * (star) key to Know the Wireless-G IP Phone." For more details, refer to "Chapter 2: Getting to switch between the different choices. Proceed to "Setting up the...

User Guide
Page 20
... will boot up and automatically scan for Wireless Networks Figure 3-7: Select Wireless Network 12 Chapter 3: Installing and Using the Wireless-G IP Phone Setting up the Wireless-G IP Phone Before you want is indicated by a bar graph. Wireless-G IP Phone Setting up the Wireless-G IP Phone Figure 3-6: Scan for wireless networks. 3. If the network you want to select the wireless network you begin, make sure your network...
... will boot up and automatically scan for Wireless Networks Figure 3-7: Select Wireless Network 12 Chapter 3: Installing and Using the Wireless-G IP Phone Setting up the Wireless-G IP Phone Before you want is indicated by a bar graph. Wireless-G IP Phone Setting up the Wireless-G IP Phone Figure 3-6: Scan for wireless networks. 3. If the network you want to select the wireless network you begin, make sure your network...

User Guide
Page 21
...pad, select the appropriate transmit key number and then move to Figure 3-9: Enter WEP Wireless Network Key (Secured Network) Chapter 3: Installing and Using the Wireless-G IP Phone Setting up the Wireless-G IP Phone Figure 3-10: Enter WPA Key (Secured Network) Figure 3-11: Successful Connection 13 ...Press the center selection key. The IP Phone will appear. Enter the network's WPA key. If WEP ...
...pad, select the appropriate transmit key number and then move to Figure 3-9: Enter WEP Wireless Network Key (Secured Network) Chapter 3: Installing and Using the Wireless-G IP Phone Setting up the Wireless-G IP Phone Figure 3-10: Enter WPA Key (Secured Network) Figure 3-11: Successful Connection 13 ...Press the center selection key. The IP Phone will appear. Enter the network's WPA key. If WEP ...
User Guide
Page 22
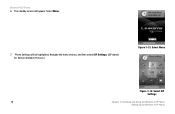
Wireless-G IP Phone 6. Navigate the menu choices, and then select SIP Settings. (SIP stands for Session Initiation Protocol.) Figure 3-12: Select Menu Figure 3-13: Select SIP Settings 14 Chapter 3: Installing and Using the Wireless-G IP Phone Setting up the Wireless-G IP Phone Select Menu. 7. Phone Settings will appear. The standby screen will be highlighted.
Wireless-G IP Phone 6. Navigate the menu choices, and then select SIP Settings. (SIP stands for Session Initiation Protocol.) Figure 3-12: Select Menu Figure 3-13: Select SIP Settings 14 Chapter 3: Installing and Using the Wireless-G IP Phone Setting up the Wireless-G IP Phone Select Menu. 7. Phone Settings will appear. The standby screen will be highlighted.

User Guide
Page 23
For the Proxy IP setting, select Edit. If you do not have been supplied by your Internet phone service provider. 9. Enter the Proxy IP address in the new window, and then press the center selection key. A list of SIP settings will be displayed. NOTE: The Proxy IP address and other information should have this information, contact your Internet phone service provider. 8. Wireless-G IP Phone Figure 3-14: Edit Proxy IP Chapter 3: Installing and Using the Wireless-G IP Phone Setting up the Wireless-G IP Phone Figure 3-15: Save Proxy IP 15
For the Proxy IP setting, select Edit. If you do not have been supplied by your Internet phone service provider. 9. Enter the Proxy IP address in the new window, and then press the center selection key. A list of SIP settings will be displayed. NOTE: The Proxy IP address and other information should have this information, contact your Internet phone service provider. 8. Wireless-G IP Phone Figure 3-14: Edit Proxy IP Chapter 3: Installing and Using the Wireless-G IP Phone Setting up the Wireless-G IP Phone Figure 3-15: Save Proxy IP 15


