
User Guide
Page 6
...Figure 3-30: Second Call 23 Figure 3-7: Select Wireless Network 12 Figure 3-31: Unlock Keys 23 Figure 3-8: Connect to Wireless Network 13 Figure 4-1: Front Panel 25 Figure 3-9: Enter WEP Key (Secured Network) 13 Figure 4-2: Symbol Selection 26 Figure 3-10: Enter WPA Key (Secured Network) 13 Figure 4-3: Standby ... IP 15 Figure 4-8: Type of Phone Number 29 Figure 3-16: Save Proxy Port 16 Figure 4-9: Select Phone Book 32 Figure 3-17: Save Register Proxy IP 16 Figure 4-10: Phone Book 32 Figure 3-18: Save Register Proxy Port 17 Figure 4-11: Phone Book Options 32 Figure 3-19: ...
...Figure 3-30: Second Call 23 Figure 3-7: Select Wireless Network 12 Figure 3-31: Unlock Keys 23 Figure 3-8: Connect to Wireless Network 13 Figure 4-1: Front Panel 25 Figure 3-9: Enter WEP Key (Secured Network) 13 Figure 4-2: Symbol Selection 26 Figure 3-10: Enter WPA Key (Secured Network) 13 Figure 4-3: Standby ... IP 15 Figure 4-8: Type of Phone Number 29 Figure 3-16: Save Proxy Port 16 Figure 4-9: Select Phone Book 32 Figure 3-17: Save Register Proxy IP 16 Figure 4-10: Phone Book 32 Figure 3-18: Save Register Proxy Port 17 Figure 4-11: Phone Book Options 32 Figure 3-19: ...
User Guide
Page 7
... 4-19: Enter Subnet Mask Figure 4-20: Wireless Figure 4-21: Scanning for Wireless Networks Figure 4-22: List of Wireless Networks Figure 4-23: Connecting to Wireless Network Figure 4-24: Enter WEP Key (for Secured Network) Figure 4-25: Enter WPA Key (for Secured Network) Figure 4-26: Connecting to Wireless Network Figure 4-27: Select Default Hotspot Figure ... 4-60: Enter Name of NTP Server 41 Figure 4-61: Select Language 41 Figure 4-62: Language 41 Figure 4-63: Phone Password 41 Figure 4-64: Select Upgrade Wireless-G IP Phone 42 42 42 43 43 44 45 45 46 46 46 46 47 47 48 48 48 48 49 49 49 49...
... 4-19: Enter Subnet Mask Figure 4-20: Wireless Figure 4-21: Scanning for Wireless Networks Figure 4-22: List of Wireless Networks Figure 4-23: Connecting to Wireless Network Figure 4-24: Enter WEP Key (for Secured Network) Figure 4-25: Enter WPA Key (for Secured Network) Figure 4-26: Connecting to Wireless Network Figure 4-27: Select Default Hotspot Figure ... 4-60: Enter Name of NTP Server 41 Figure 4-61: Select Language 41 Figure 4-62: Language 41 Figure 4-63: Phone Password 41 Figure 4-64: Select Upgrade Wireless-G IP Phone 42 42 42 43 43 44 45 45 46 46 46 46 47 47 48 48 48 48 49 49 49 49...

User Guide
Page 21
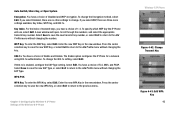
... the selected network, a new screen will automatically connect to the network, and a checkmark will appear. Enter the network's WPA key. Wireless-G IP Phone 5. Press the center selection key. If WEP security is enabled on the selected network, a new screen will appear next...select the appropriate transmit key number and then move to Figure 3-9: Enter WEP Wireless Network Key (Secured Network) Chapter 3: Installing and Using the Wireless-G IP Phone Setting up the Wireless-G IP Phone Figure 3-10: Enter WPA Key (Secured Network) Figure 3-11: Successful Connection 13 You will be ...
... the selected network, a new screen will automatically connect to the network, and a checkmark will appear. Enter the network's WPA key. Wireless-G IP Phone 5. Press the center selection key. If WEP security is enabled on the selected network, a new screen will appear next...select the appropriate transmit key number and then move to Figure 3-9: Enter WEP Wireless Network Key (Secured Network) Chapter 3: Installing and Using the Wireless-G IP Phone Setting up the Wireless-G IP Phone Figure 3-10: Enter WPA Key (Secured Network) Figure 3-11: Successful Connection 13 You will be ...

User Guide
Page 45
... navigation pad, select the appropriate transmit key number and then move to the name of the Wireless-G IP Phone Figure 4-25: Enter WPA Key (for Secured Network) Figure 4-26: Connecting to the network you have selected. WPA Security If WPA security is enabled on the selected network, a new screen will appear. Press the center selection...
... navigation pad, select the appropriate transmit key number and then move to the name of the Wireless-G IP Phone Figure 4-25: Enter WPA Key (for Secured Network) Figure 4-26: Connecting to the network you have selected. WPA Security If WPA security is enabled on the selected network, a new screen will appear. Press the center selection...

User Guide
Page 50
... selected hotspot, select Edit. To change the EAP Type setting, select Edit. To change the Wireless Mode, select Edit. You have default hotspots configured, then this setting will open. Wireless-G IP Phone WPA-PSK WPA Key. To enter the WPA Key, select Edit. Press the center selection key to save the new Authentication Mode, or select...
... selected hotspot, select Edit. To change the EAP Type setting, select Edit. To change the Wireless Mode, select Edit. You have default hotspots configured, then this setting will open. Wireless-G IP Phone WPA-PSK WPA Key. To enter the WPA Key, select Edit. Press the center selection key to save the new Authentication Mode, or select...
User Guide
Page 51
... WPA Key, or select Exit to return to the Add Profile menu without changing the EAP Type. To specify which WEP key the IP Phone will open. To enter the WEP Key, select Edit. You have a choice of TLS, MD5, and PEAP. Chapter 4: Configuring the Wireless-G IP Phone ...Settings of Enable and Disable. Key Index. You have a choice of the Wireless-G IP Phone Wireless-G IP Phone Figure 4-42: Change Transmit Key...
... WPA Key, or select Exit to return to the Add Profile menu without changing the EAP Type. To specify which WEP key the IP Phone will open. To enter the WEP Key, select Edit. You have a choice of TLS, MD5, and PEAP. Chapter 4: Configuring the Wireless-G IP Phone ...Settings of Enable and Disable. Key Index. You have a choice of the Wireless-G IP Phone Wireless-G IP Phone Figure 4-42: Change Transmit Key...
User Guide
Page 79
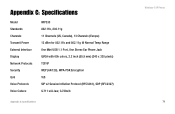
Appendix C: Specifications Model Standards Channels Transmit Power External Interface Display Network Protocols Security QoS Voice Protocols Voice Codecs WIP330 802.11b, 802.11g 11 Channels (US, Canada), 13 Channels (Europe) 12 dBm for 802.11b and 802.11g @ Normal Temp Range One Mini USB 1.1 Port, One Stereo Ear Phone Jack QVGA with 65k colors, 2.2 inch (55.9 mm) (240 x 320 pixels) TCP/IP WEP (64/128), WPA-PSK Encryption ToS SIP v2 Session Initiation Protocol (RFC3261), SDP (RFC2327) G.711 u/A-law, G.729a/b Appendix C: Specifications Wireless-G IP Phone 71
Appendix C: Specifications Model Standards Channels Transmit Power External Interface Display Network Protocols Security QoS Voice Protocols Voice Codecs WIP330 802.11b, 802.11g 11 Channels (US, Canada), 13 Channels (Europe) 12 dBm for 802.11b and 802.11g @ Normal Temp Range One Mini USB 1.1 Port, One Stereo Ear Phone Jack QVGA with 65k colors, 2.2 inch (55.9 mm) (240 x 320 pixels) TCP/IP WEP (64/128), WPA-PSK Encryption ToS SIP v2 Session Initiation Protocol (RFC3261), SDP (RFC2327) G.711 u/A-law, G.729a/b Appendix C: Specifications Wireless-G IP Phone 71