
User Guide
Page 5
... the Wireless-G IP Phone The Bottom Panel The Front and Side Panels The Back Panel Chapter 3: Installing and Using the Wireless-G IP Phone Overview Inserting the Battery into the Wireless-G IP Phone Powering on the Wireless-G IP Phone Navigating the Wireless-G IP Phone Setting up the Wireless-G IP Phone Using the Wireless-G IP Phone Chapter 4: Configuring the Wireless-G IP Phone Instructions for Configuring the Wireless-G IP Phone Status Information Settings of Contents Chapter 1: Introduction Welcome What's in This User Guide?
... the Wireless-G IP Phone The Bottom Panel The Front and Side Panels The Back Panel Chapter 3: Installing and Using the Wireless-G IP Phone Overview Inserting the Battery into the Wireless-G IP Phone Powering on the Wireless-G IP Phone Navigating the Wireless-G IP Phone Setting up the Wireless-G IP Phone Using the Wireless-G IP Phone Chapter 4: Configuring the Wireless-G IP Phone Instructions for Configuring the Wireless-G IP Phone Status Information Settings of Contents Chapter 1: Introduction Welcome What's in This User Guide?
User Guide
Page 6
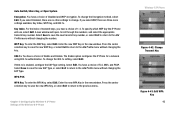
... 5 Figure 3-22: Save Phone Number 19 Figure 2-4: Side Panel 6 Figure 3-23: Save User Name 19 Figure 2-5: Back Panel 6 Figure 3-24: Save Password 20 Figure 3-1: Press the Button 7 Figure 3-25: Save SIP Settings 20 Figure 3-2: Insert the Battery 7 Figure 3-26: Return to Standby Screen 21 Figure 3-3: Connect the Power 8 Figure 3-27: Standby Screen 21 Figure 3-4: Front Panel 10 Figure 3-28: Call Connected 22 Figure 3-5: Symbol...
... 5 Figure 3-22: Save Phone Number 19 Figure 2-4: Side Panel 6 Figure 3-23: Save User Name 19 Figure 2-5: Back Panel 6 Figure 3-24: Save Password 20 Figure 3-1: Press the Button 7 Figure 3-25: Save SIP Settings 20 Figure 3-2: Insert the Battery 7 Figure 3-26: Return to Standby Screen 21 Figure 3-3: Connect the Power 8 Figure 3-27: Standby Screen 21 Figure 3-4: Front Panel 10 Figure 3-28: Call Connected 22 Figure 3-5: Symbol...
User Guide
Page 9
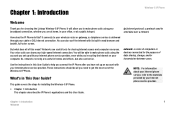
... between users. NOTE: For information about your Internet phone service, refer to make phone calls using the account you set up with its built-in this User Guide to help you connect the IP Phone after you need to make phone calls using your Internet phone service provider. Networks are useful in This User Guide? But what does all you have set up an account with your high-speed Internet connection. You can share your Internet phone service provider...
... between users. NOTE: For information about your Internet phone service, refer to make phone calls using the account you set up with its built-in this User Guide to help you connect the IP Phone after you need to make phone calls using your Internet phone service provider. Networks are useful in This User Guide? But what does all you have set up an account with your high-speed Internet connection. You can share your Internet phone service provider...
User Guide
Page 10
... to install the IP Phone and use it. • Chapter 4: Configuring the Wireless-G IP Phone This chapter discusses how to configure the IP Phone's settings. • Appendix A: Troubleshooting This appendix describes some potential problems and solutions, as well as frequently asked questions, regarding use of the IP Phone. • Appendix B: Glossary This appendix gives a brief glossary of terms frequently used in networking. • Appendix C: Specifications This...
... to install the IP Phone and use it. • Chapter 4: Configuring the Wireless-G IP Phone This chapter discusses how to configure the IP Phone's settings. • Appendix A: Troubleshooting This appendix describes some potential problems and solutions, as well as frequently asked questions, regarding use of the IP Phone. • Appendix B: Glossary This appendix gives a brief glossary of terms frequently used in networking. • Appendix C: Specifications This...

User Guide
Page 30
... want to transfer the caller without introduction. Then press the Call button. Use the navigation pad to end the call , and then press the Call button. Hold. A new window will appear. Enter the phone number to which you are two types of menu choices. Wireless-G IP Phone Using the Wireless-G IP Phone To make a selection, and press the right softkey to return to the previous menu. To change the volume, use the Line-2 feature. When...
... want to transfer the caller without introduction. Then press the Call button. Use the navigation pad to end the call , and then press the Call button. Hold. A new window will appear. Enter the phone number to which you are two types of menu choices. Wireless-G IP Phone Using the Wireless-G IP Phone To make a selection, and press the right softkey to return to the previous menu. To change the volume, use the Line-2 feature. When...

User Guide
Page 31
... check your voicemail, contact your call , select Conference. Voicemail For instructions on your Internet phone service provider. Conference. When the second call , and then press the Call button. To unlock the keys, select Unlock and then press the * key. A new window will appear. Second Incoming Call When you have a second call . Keyguard To lock the keys, press and hold down the # key. Chapter 3: Installing and Using the Wireless-G IP Phone Using the Wireless-G IP Phone Wireless-G IP Phone Figure 3-30: Second Call Figure 3-31: Unlock Keys...
... check your voicemail, contact your call , select Conference. Voicemail For instructions on your Internet phone service provider. Conference. When the second call , and then press the Call button. To unlock the keys, select Unlock and then press the * key. A new window will appear. Second Incoming Call When you have a second call . Keyguard To lock the keys, press and hold down the # key. Chapter 3: Installing and Using the Wireless-G IP Phone Using the Wireless-G IP Phone Wireless-G IP Phone Figure 3-30: Second Call Figure 3-31: Unlock Keys...

User Guide
Page 33
... Call To exit a menu without making changes, press this button. To navigate menus and control the cursor for the web browser, use these instructions to navigate menus and select your choices. or righthand side of the screen. Different Key Choices or + Sign Chapter 4: Configuring the Wireless-G IP Phone Instructions for Configuring the Wireless-G IP Phone Follow these buttons to configure the IP Phone's settings. Chapter 4: Configuring the Wireless-G Power LED IP Phone Wireless-G IP Phone Instructions for Configuring the Wireless...
... Call To exit a menu without making changes, press this button. To navigate menus and control the cursor for the web browser, use these instructions to navigate menus and select your choices. or righthand side of the screen. Different Key Choices or + Sign Chapter 4: Configuring the Wireless-G IP Phone Instructions for Configuring the Wireless-G IP Phone Follow these buttons to configure the IP Phone's settings. Chapter 4: Configuring the Wireless-G Power LED IP Phone Wireless-G IP Phone Instructions for Configuring the Wireless...

User Guide
Page 38
... Phone Book. The Phone Book screen will automatically appear. Select Option to see menu choices for the Phone Book settings. 30 Chapter 4: Configuring the Wireless-G IP Phone Settings of phone number it is, scroll down and select Home, Office, Mobile, Home-2, Office-2, or Mobile-2 (select Return if you have contacts in the Phone Book), Delete All, and Add to (or Modify) PhoneBook. Select Delete to dial the phone number of received calls will appear. Follow the instructions for the Phone Book settings. Delete...
... Phone Book. The Phone Book screen will automatically appear. Select Option to see menu choices for the Phone Book settings. 30 Chapter 4: Configuring the Wireless-G IP Phone Settings of phone number it is, scroll down and select Home, Office, Mobile, Home-2, Office-2, or Mobile-2 (select Return if you have contacts in the Phone Book), Delete All, and Add to (or Modify) PhoneBook. Select Delete to dial the phone number of received calls will appear. Follow the instructions for the Phone Book settings. Delete...

User Guide
Page 39
... calls. Dial. The Add Person screen will automatically appear. If the phone number is new, select Add to PhoneBook to add the phone number to modify its entry in the Phone Book), Delete All, and Add to the previous menu. If the call . Delete. Then follow the instructions for the Phone Book settings. Select Dial to delete the selected call . Chapter 4: Configuring the Wireless-G IP Phone Settings of dialed calls will be displayed. Select Delete to dial the phone number of phone number it is, scroll down and select Home...
... calls. Dial. The Add Person screen will automatically appear. If the phone number is new, select Add to PhoneBook to add the phone number to modify its entry in the Phone Book), Delete All, and Add to the previous menu. If the call . Delete. Then follow the instructions for the Phone Book settings. Select Dial to delete the selected call . Chapter 4: Configuring the Wireless-G IP Phone Settings of dialed calls will be displayed. Select Delete to dial the phone number of phone number it is, scroll down and select Home...

User Guide
Page 50
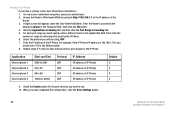
... Chapter 4: Configuring the Wireless-G IP Phone Settings of Open System, Auto Switch, Share Key, and WPA-PSK. Scroll through these choices, and select Edit to the previous menu. Figure 4-39: Edit EAP Add. If you have a choice of the Wireless-G IP Phone To change the Wireless Mode, select Edit. Select Add to the Wi-Fi Profiles screen. Wireless Mode. Select Save to save the new WPA Key, or select...
... Chapter 4: Configuring the Wireless-G IP Phone Settings of Open System, Auto Switch, Share Key, and WPA-PSK. Scroll through these choices, and select Edit to the previous menu. Figure 4-39: Edit EAP Add. If you have a choice of the Wireless-G IP Phone To change the Wireless Mode, select Edit. Select Add to the Wi-Fi Profiles screen. Wireless Mode. Select Save to save the new WPA Key, or select...
User Guide
Page 51
... Add Profile menu without changing the EAP Type. WPA-PSK WPA Key. Auto Switch, Share Key, or Open System Encryption. To specify which WEP key the IP Phone will open. WEP Key. Chapter 4: Configuring the Wireless-G IP Phone Settings of Disabled and WEP encryption. The Enable option configures the IP Phone for a network using 802.1x authentication. If 802.1x is enabled, configure the EAP Type setting. Enter the new WPA Key in the new...
... Add Profile menu without changing the EAP Type. WPA-PSK WPA Key. Auto Switch, Share Key, or Open System Encryption. To specify which WEP key the IP Phone will open. WEP Key. Chapter 4: Configuring the Wireless-G IP Phone Settings of Disabled and WEP encryption. The Enable option configures the IP Phone for a network using 802.1x authentication. If 802.1x is enabled, configure the EAP Type setting. Enter the new WPA Key in the new...

User Guide
Page 54
... to make a selection. Ring Types. Wireless-G IP Phone Phone Settings You can customize the settings of the Wireless-G IP Phone Select Return to return to the previous menu. The selected ring type is indicated by the symbol. Scroll through these choices and press the left soft key to the Ring Option menu without changing the ring tone. Scroll through these choices: Ring Option, Keypad Tone, Wallpaper, Date & Time, Language, Phone Password, and Upgrade. Highlight the ring...
... to make a selection. Ring Types. Wireless-G IP Phone Phone Settings You can customize the settings of the Wireless-G IP Phone Select Return to return to the previous menu. The selected ring type is indicated by the symbol. Scroll through these choices and press the left soft key to the Ring Option menu without changing the ring tone. Scroll through these choices: Ring Option, Keypad Tone, Wallpaper, Date & Time, Language, Phone Password, and Upgrade. Highlight the ring...

User Guide
Page 57
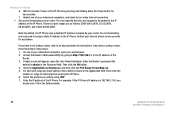
... Time Zone setting. Press the left soft key to save your change . A new window will be displayed. Select Exit to return to the Date & Time menu without changing the server. Select Exit to return to the Date & Time menu without changing the time zone. Press the center selection key to select the NTP Server setting. Wireless-G IP Phone NTP Server. Enter the URL (web address) of NTP Server 49 A list of multiple time...
... Time Zone setting. Press the left soft key to save your change . A new window will be displayed. Select Exit to return to the Date & Time menu without changing the server. Select Exit to return to the Date & Time menu without changing the time zone. Press the center selection key to select the NTP Server setting. Wireless-G IP Phone NTP Server. Enter the URL (web address) of NTP Server 49 A list of multiple time...

User Guide
Page 62
... and Large. Figure 4-76: Change User Name DTMF Relay. To add or change the RTP Port number, select Edit. Packet Time. Payload Type. To change the time period, select Edit until the appropriate order of the Wireless-G IP Phone Figure 4-77: Change Password Figure 4-78: Edit Payload Type 54 Chapter 4: Configuring the Wireless-G IP Phone Settings of preference is displayed on -screen. To enable or disable the feature, select Edit. Wireless-G IP Phone User Name.
... and Large. Figure 4-76: Change User Name DTMF Relay. To add or change the RTP Port number, select Edit. Packet Time. Payload Type. To change the time period, select Edit until the appropriate order of the Wireless-G IP Phone Figure 4-77: Change Password Figure 4-78: Edit Payload Type 54 Chapter 4: Configuring the Wireless-G IP Phone Settings of preference is displayed on -screen. To enable or disable the feature, select Edit. Wireless-G IP Phone User Name.
User Guide
Page 69
... port ranges be forwarded to the IP address of the Wireless-G IP Phone. When I hear a fast busy signal. Power off your cable or DSL modem by pressing and holding down the Power button for instructions. You must specify that may occur during the installation and operation of the IP Phone. Appendix A: Troubleshooting Common Problems and Solutions Wireless-G IP Phone 61 Wait 30 seconds, and then power on the IP Phone by plugging its power adapter. 2. Power...
... port ranges be forwarded to the IP address of the Wireless-G IP Phone. When I hear a fast busy signal. Power off your cable or DSL modem by pressing and holding down the Power button for instructions. You must specify that may occur during the installation and operation of the IP Phone. Appendix A: Troubleshooting Common Problems and Solutions Wireless-G IP Phone 61 Wait 30 seconds, and then power on the IP Phone by plugging its power adapter. 2. Power...
User Guide
Page 70
... the IP Phone. A login screen will be using, UDP. 7. Enter the Router's password (the default is 192.168.1.100, you have entered all four port ranges for the port services you have a Linksys router, then follow these instructions: 1. Enter the IP address of your networked computers, open your web browser. 2. Repeat steps 5-7 until you would enter 100 in the field provided. 8. Access the Router's Web-based Utility...
... the IP Phone. A login screen will be using, UDP. 7. Enter the Router's password (the default is 192.168.1.100, you have entered all four port ranges for the port services you have a Linksys router, then follow these instructions: 1. Enter the IP address of your networked computers, open your web browser. 2. Repeat steps 5-7 until you would enter 100 in the field provided. 8. Access the Router's Web-based Utility...

User Guide
Page 71
... phone service provider's website, and reduce the bandwidth requirements for two seconds. 4. If so, the router and cordless phone may want to reboot your problem is solved: • Check the ringer volume on a telephone call, words are not downloading any Internet telephone call . • There may be using a file sharing program. Wait 30 seconds, and then power on the router by pressing and holding down the Power button for your location using a wireless...
... phone service provider's website, and reduce the bandwidth requirements for two seconds. 4. If so, the router and cordless phone may want to reboot your problem is solved: • Check the ringer volume on a telephone call, words are not downloading any Internet telephone call . • There may be using a file sharing program. Wait 30 seconds, and then power on the router by pressing and holding down the Power button for your location using a wireless...
User Guide
Page 72
... that four port ranges be using, UDP. 7. Note: By default, the IP Phone uses a dynamic IP address assigned by pressing and holding down the Power button for an active Internet connection. • Set up port forwarding on the IP Phone by your router. For port forwarding, you have a non-Linksys router, refer to the IP address of your Internet phone service provider for instructions. For example, if the IP Phone's IP address is admin) in the...
... that four port ranges be using, UDP. 7. Note: By default, the IP Phone uses a dynamic IP address assigned by pressing and holding down the Power button for an active Internet connection. • Set up port forwarding on the IP Phone by your router. For port forwarding, you have a non-Linksys router, refer to the IP address of your Internet phone service provider for instructions. For example, if the IP Phone's IP address is admin) in the...

User Guide
Page 74
... of your Internet phone service provider. 66 Appendix A: Troubleshooting Frequently Asked Questions No. However, your Internet connection. Wireless-G IP Phone Frequently Asked Questions Can I make calls if my Internet connection is down? Can I receive calls while my network is down . You cannot directly receive calls while your computer. The IP Phone supports either calling or web browsing, not both at the same time? Your high-speed Internet connection must be...
... of your Internet phone service provider. 66 Appendix A: Troubleshooting Frequently Asked Questions No. However, your Internet connection. Wireless-G IP Phone Frequently Asked Questions Can I make calls if my Internet connection is down? Can I receive calls while my network is down . You cannot directly receive calls while your computer. The IP Phone supports either calling or web browsing, not both at the same time? Your high-speed Internet connection must be...
User Guide
Page 78
TFTP (Trivial File Transfer Protocol) - Topology - Upgrade - URL (Uniform Resource Locator) - WEP (Wired Equivalent Privacy) - A method of a file located on a wireless network for transmitting data that has no directory or password capability. Wireless-G IP Phone Switch - 1. A network protocol for greater security. TCP/IP (Transmission Control Protocol/Internet Protocol) - A user command and TCP/IP protocol used for making, breaking, or changing the connections in a given time period. A version of...
TFTP (Trivial File Transfer Protocol) - Topology - Upgrade - URL (Uniform Resource Locator) - WEP (Wired Equivalent Privacy) - A method of a file located on a wireless network for transmitting data that has no directory or password capability. Wireless-G IP Phone Switch - 1. A network protocol for greater security. TCP/IP (Transmission Control Protocol/Internet Protocol) - A user command and TCP/IP protocol used for making, breaking, or changing the connections in a given time period. A version of...


