
User Guide
Page 5
... Side Panels The Back Panel Chapter 3: Installing and Using the Wireless-G IP Phone Overview Inserting the Battery into the Wireless-G IP Phone Powering on the Wireless-G IP Phone Navigating the Wireless-G IP Phone Setting up the Wireless-G IP Phone Using the Wireless-G IP Phone Chapter 4: Configuring the Wireless-G IP Phone Instructions for Configuring the Wireless-G IP Phone Status Information Settings of Contents Chapter 1: Introduction Welcome What's in...
... Side Panels The Back Panel Chapter 3: Installing and Using the Wireless-G IP Phone Overview Inserting the Battery into the Wireless-G IP Phone Powering on the Wireless-G IP Phone Navigating the Wireless-G IP Phone Setting up the Wireless-G IP Phone Using the Wireless-G IP Phone Chapter 4: Configuring the Wireless-G IP Phone Instructions for Configuring the Wireless-G IP Phone Status Information Settings of Contents Chapter 1: Introduction Welcome What's in...
User Guide
Page 6
... Selection 5 Figure 3-22: Save Phone Number 19 Figure 2-4: Side Panel 6 Figure 3-23: Save User Name 19 Figure 2-5: Back Panel 6 Figure 3-24: Save Password 20 Figure 3-1: Press the Button 7 Figure 3-25: Save SIP Settings 20 Figure 3-2: Insert the Battery 7 Figure 3-26: Return to ...3-5: Symbol Selection 11 Figure 3-29: Line Options 22 Figure 3-6: Scan for Wireless Networks 12 Figure 3-30: Second Call 23 Figure 3-7: Select Wireless Network 12 Figure 3-31: Unlock Keys 23 Figure 3-8: Connect to Wireless Network 13 Figure 4-1: Front Panel 25 Figure 3-9: Enter WEP Key (Secured ...
... Selection 5 Figure 3-22: Save Phone Number 19 Figure 2-4: Side Panel 6 Figure 3-23: Save User Name 19 Figure 2-5: Back Panel 6 Figure 3-24: Save Password 20 Figure 3-1: Press the Button 7 Figure 3-25: Save SIP Settings 20 Figure 3-2: Insert the Battery 7 Figure 3-26: Return to ...3-5: Symbol Selection 11 Figure 3-29: Line Options 22 Figure 3-6: Scan for Wireless Networks 12 Figure 3-30: Second Call 23 Figure 3-7: Select Wireless Network 12 Figure 3-31: Unlock Keys 23 Figure 3-8: Connect to Wireless Network 13 Figure 4-1: Front Panel 25 Figure 3-9: Enter WEP Key (Secured ...

User Guide
Page 14
For directions on the back panel of the IP Phone. Battery Compartment Figure 2-4: Side Panel Figure 2-5: Back Panel 6 Chapter 2: Getting to "Chapter 3: Installing and Using the Wireless-G IP Phone." Wireless-G IP Phone Icon Button Name Volume Function Increases or decreases the volume The Back Panel Volume The IP Phone's battery compartment is located on how to insert the battery, refer to Know the Wireless-G IP Phone The Back Panel
For directions on the back panel of the IP Phone. Battery Compartment Figure 2-4: Side Panel Figure 2-5: Back Panel 6 Chapter 2: Getting to "Chapter 3: Installing and Using the Wireless-G IP Phone." Wireless-G IP Phone Icon Button Name Volume Function Increases or decreases the volume The Back Panel Volume The IP Phone's battery compartment is located on how to insert the battery, refer to Know the Wireless-G IP Phone The Back Panel
User Guide
Page 15
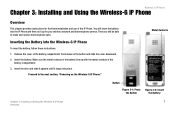
... up with the metal contacts of the battery compartment. Wireless-G IP Phone Chapter 3: Installing and Using the Wireless-G IP Phone Overview This chapter provides instructions for your wireless network and Internet phone service. Then you will insert the battery into the IP Phone and then set it snaps into the Wireless-G IP Phone To insert the battery, follow these instructions: 1. Insert the...
... up with the metal contacts of the battery compartment. Wireless-G IP Phone Chapter 3: Installing and Using the Wireless-G IP Phone Overview This chapter provides instructions for your wireless network and Internet phone service. Then you will insert the battery into the IP Phone and then set it snaps into the Wireless-G IP Phone To insert the battery, follow these instructions: 1. Insert the...
User Guide
Page 17
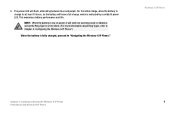
... have a full charge, which is fully charged, proceed to Chapter 4: Configuring the Wireless-G IP Phone.") When the battery is indicated by a solidly lit power LED. NOTE: When the battery is low on the Wireless-G IP Phone Wireless-G IP Phone Chapter 3: Installing and Using the Wireless-G IP Phone 9 Powering on power, it will flash, alternating between blue and purple. The power...
... have a full charge, which is fully charged, proceed to Chapter 4: Configuring the Wireless-G IP Phone.") When the battery is indicated by a solidly lit power LED. NOTE: When the battery is low on the Wireless-G IP Phone Wireless-G IP Phone Chapter 3: Installing and Using the Wireless-G IP Phone 9 Powering on power, it will flash, alternating between blue and purple. The power...

User Guide
Page 35
.... Status Information The standby screen will display a variety of the IP Phone Figure 4-3: Standby Screen The IP Phone has three status messages. Battery Strength The icon on the left indicates wireless signal strength. Wireless Signal Strength Wireless Signal Strength Wireless-G IP Phone Battery Strength At the top of the screen, the icon on the right of the screen indicates...
.... Status Information The standby screen will display a variety of the IP Phone Figure 4-3: Standby Screen The IP Phone has three status messages. Battery Strength The icon on the left indicates wireless signal strength. Wireless Signal Strength Wireless Signal Strength Wireless-G IP Phone Battery Strength At the top of the screen, the icon on the right of the screen indicates...

User Guide
Page 73
... (IP address of IP Phone) (IP address of IP Phone) (IP address of IP Phone) (IP address of IP Phone) Enable X X X X 9. Wait five seconds while the IP Phone resets itself. Wireless-G IP Phone Appendix A: Troubleshooting 65 Common... Problems and Solutions Check the Enable option for the IP Phone. The power LED does not light up. Repeat steps 5-7 until your problem is the one included with the IP Phone. Go through this checklist until you are using the wrong power adapter. Insert the battery...
... (IP address of IP Phone) (IP address of IP Phone) (IP address of IP Phone) (IP address of IP Phone) Enable X X X X 9. Wait five seconds while the IP Phone resets itself. Wireless-G IP Phone Appendix A: Troubleshooting 65 Common... Problems and Solutions Check the Enable option for the IP Phone. The power LED does not light up. Repeat steps 5-7 until your problem is the one included with the IP Phone. Go through this checklist until you are using the wrong power adapter. Insert the battery...

User Guide
Page 80
... Buffer Control Comfortable Noise Generation Packet Loss Concealment 1.84" x 5.32" x 0.74" (46.7 mm x 135.2 mm x 18.8 mm) 4.20 oz. (0.12 kg) 3.7V, 1250mAh Lithium Battery, 5V, 1A AC Adapter FCC, cUL, CE 32ºF to 113ºF (0ºC to 45ºC) -4ºF to 131ºF (-20ºC to 55º...;C) 10% to 85% Relative Humidity, Non-Condensing 10% to 95% Non-Condensing 72 Appendix C: Specifications Wireless-G IP Phone DTMF Transmission Voice Quality Dimensions (W x H x D) Unit Weight Power Certifications Operating Temp. Storage Temp.
... Buffer Control Comfortable Noise Generation Packet Loss Concealment 1.84" x 5.32" x 0.74" (46.7 mm x 135.2 mm x 18.8 mm) 4.20 oz. (0.12 kg) 3.7V, 1250mAh Lithium Battery, 5V, 1A AC Adapter FCC, cUL, CE 32ºF to 113ºF (0ºC to 45ºC) -4ºF to 131ºF (-20ºC to 55º...;C) 10% to 85% Relative Humidity, Non-Condensing 10% to 95% Non-Condensing 72 Appendix C: Specifications Wireless-G IP Phone DTMF Transmission Voice Quality Dimensions (W x H x D) Unit Weight Power Certifications Operating Temp. Storage Temp.
