User Guide
Page 3
... exclamation point means there is a caution or warning and is a note of California to while using the IP Phone. WIP300-UG-60714A DF Copyright © 2006 Cisco Systems, Inc. Other brands and product names are subject to do while using the ...checkmark means there is something that could damage your property or IP Phone. Linksys is something you with the Wireless-G IP Phone easier than ever. This question mark provides you might need to change without notice. Wireless-G IP Phone Copyright and Trademarks Specifications are trademarks or registered trademarks of Cisco Systems...
... exclamation point means there is a caution or warning and is a note of California to while using the IP Phone. WIP300-UG-60714A DF Copyright © 2006 Cisco Systems, Inc. Other brands and product names are subject to do while using the ...checkmark means there is something that could damage your property or IP Phone. Linksys is something you with the Wireless-G IP Phone easier than ever. This question mark provides you might need to change without notice. Wireless-G IP Phone Copyright and Trademarks Specifications are trademarks or registered trademarks of Cisco Systems...
User Guide
Page 4
... Bottom Panel The Front Panel The Side Panel The Back Panel Chapter 3: Installing and Using the Wireless-G IP Phone Overview Charging the IP Phone's Battery Setting up the Wireless-G IP Phone Using the Wireless-G IP Phone Chapter 4: Configuring the Wireless-G IP Phone Home Screen Main Menu Phonebook Call Log E-mail Configuring Your Account Using the E-mail Client Speed Dial...
... Bottom Panel The Front Panel The Side Panel The Back Panel Chapter 3: Installing and Using the Wireless-G IP Phone Overview Charging the IP Phone's Battery Setting up the Wireless-G IP Phone Using the Wireless-G IP Phone Chapter 4: Configuring the Wireless-G IP Phone Home Screen Main Menu Phonebook Call Log E-mail Configuring Your Account Using the E-mail Client Speed Dial...
User Guide
Page 5
Wireless-G IP Phone Profile Password 32 Secure Setup 33 Settings 33 Language 33 Clock 34 Alarm Clock 34 Call Settings 35 cSpeed Dial 35 Sound Settings 36 Display Settings 36 Keypad 37 Tools 38 Chapter 5: Using the Web-based Utility 39 Overview 39 How to Access the Web-based Utility 39 Phonebook 41 E-mail 42 Network Profile 43 SIP 44 Settings 45 Software 48 Bootcode 49 Password 50 Reboot 50 Appendix A: Troubleshooting 51 Common Problems and Solutions 51 Frequently Asked Questions 56
Wireless-G IP Phone Profile Password 32 Secure Setup 33 Settings 33 Language 33 Clock 34 Alarm Clock 34 Call Settings 35 cSpeed Dial 35 Sound Settings 36 Display Settings 36 Keypad 37 Tools 38 Chapter 5: Using the Web-based Utility 39 Overview 39 How to Access the Web-based Utility 39 Phonebook 41 E-mail 42 Network Profile 43 SIP 44 Settings 45 Software 48 Bootcode 49 Password 50 Reboot 50 Appendix A: Troubleshooting 51 Common Problems and Solutions 51 Frequently Asked Questions 56
User Guide
Page 6
Appendix B: Glossary Appendix C: Specifications Appendix D: Warranty Information Appendix E: Regulatory Information Appendix F: Contact Information Wireless-G IP Phone 57 61 63 65 79
Appendix B: Glossary Appendix C: Specifications Appendix D: Warranty Information Appendix E: Regulatory Information Appendix F: Contact Information Wireless-G IP Phone 57 61 63 65 79

User Guide
Page 7
Wireless-G IP Phone List of Figures Figure 2-1: Bottom Panel 3 Figure 3-21: Save Phone Number 17 Figure 2-2: Front Panel 4 Figure 3-22: Save User Name 17 Figure 2-3: Side Panel 5 Figure 3-23: Save Password 18 Figure 2-4: Back Panel 6 ...3-4: Front Panel 9 Figure 3-28: Line Options 20 Figure 3-5: Scan for Wireless Networks 10 Figure 3-29: Second Call 21 Figure 3-6: Select Wireless Network 10 Figure 3-30: Unlock Keys 21 Figure 3-7: Connect to Wireless Network 11 Figure 4-1: Front Panel of IP Phone 23 Figure 3-8: Enter WEP Key (for Secured Networks) 11 Figure 4-2: Standby...
Wireless-G IP Phone List of Figures Figure 2-1: Bottom Panel 3 Figure 3-21: Save Phone Number 17 Figure 2-2: Front Panel 4 Figure 3-22: Save User Name 17 Figure 2-3: Side Panel 5 Figure 3-23: Save Password 18 Figure 2-4: Back Panel 6 ...3-4: Front Panel 9 Figure 3-28: Line Options 20 Figure 3-5: Scan for Wireless Networks 10 Figure 3-29: Second Call 21 Figure 3-6: Select Wireless Network 10 Figure 3-30: Unlock Keys 21 Figure 3-7: Connect to Wireless Network 11 Figure 4-1: Front Panel of IP Phone 23 Figure 3-8: Enter WEP Key (for Secured Networks) 11 Figure 4-2: Standby...
User Guide
Page 8
... Figure 4-35: Select NTP Server Figure 4-36: Enter Name of NTP Server Figure 4-37: Select Language Figure 4-38: Language Figure 4-39: Phone Password Figure 4-40: Change Power Saving Wireless-G IP Phone 31 Figure 4-41: Select Upgrade 39 31 Figure 4-42: Upgrade 39 32 Figure 4-43: Upgrade in Progress 39 32 Figure 4-44: Upgrade...
... Figure 4-35: Select NTP Server Figure 4-36: Enter Name of NTP Server Figure 4-37: Select Language Figure 4-38: Language Figure 4-39: Phone Password Figure 4-40: Change Power Saving Wireless-G IP Phone 31 Figure 4-41: Select Upgrade 39 31 Figure 4-42: Upgrade 39 32 Figure 4-43: Upgrade in Progress 39 32 Figure 4-44: Upgrade...
User Guide
Page 9
... Figure 4-76: Web Site 50 Figure 4-77: Visit Web Site 50 Figure 4-78: Auto-Scroll Option 50 Figure 4-79: Information 51 Figure 5-1: Wireless Network Status screen 40 Figure 5-2: Phone Book Edit screen 41 Figure 5-3: E-mail screen 42 Figure 5-4: Network Profile screen 43 Figure 5-5: SIP screen 44 Figure 5-6: Settings screen 45 Figure 5-7: Software...
... Figure 4-76: Web Site 50 Figure 4-77: Visit Web Site 50 Figure 4-78: Auto-Scroll Option 50 Figure 4-79: Information 51 Figure 5-1: Wireless Network Status screen 40 Figure 5-2: Phone Book Edit screen 41 Figure 5-3: E-mail screen 42 Figure 5-4: Network Profile screen 43 Figure 5-5: SIP screen 44 Figure 5-6: Settings screen 45 Figure 5-7: Software...
User Guide
Page 10
...But what does all you set up with your Internet phone service provider. So, networks not only are useful tools for choosing the Linksys Wireless-G IP Phone. Chapter 1: Introduction 1 Welcome It will allow you to make phone calls using your broadband connection, whether you're at home... or in this User Guide to the materials provided by your Internet phone service provider. Use the ...
...But what does all you set up with your Internet phone service provider. So, networks not only are useful tools for choosing the Linksys Wireless-G IP Phone. Chapter 1: Introduction 1 Welcome It will allow you to make phone calls using your broadband connection, whether you're at home... or in this User Guide to the materials provided by your Internet phone service provider. Use the ...

User Guide
Page 11
... User Guide. • Chapter 2: Getting to Know the Wireless-G IP Phone Describes the physical features of the IP Phone. • Chapter 3: Installing and Using the Wireless-G IP Phone Explains how to install the IP Phone and use it. • Chapter 4: Configuring the Wireless-G IP Phone Discusses how to configure the IP Phone's settings. • Appendix A: Troubleshooting Describes potential problems...
... User Guide. • Chapter 2: Getting to Know the Wireless-G IP Phone Describes the physical features of the IP Phone. • Chapter 3: Installing and Using the Wireless-G IP Phone Explains how to install the IP Phone and use it. • Chapter 4: Configuring the Wireless-G IP Phone Discusses how to configure the IP Phone's settings. • Appendix A: Troubleshooting Describes potential problems...
User Guide
Page 12
Wireless-G IP Phone Chapter 1: Introduction 3 What's in This User Guide? • Appendix E: Regulatory Information Provides regulatory information regarding the IP Phone. • Appendix F: Contact Information Provides contact information for a variety of Linksys resources, including Technical Support.
Wireless-G IP Phone Chapter 1: Introduction 3 What's in This User Guide? • Appendix E: Regulatory Information Provides regulatory information regarding the IP Phone. • Appendix F: Contact Information Provides contact information for a variety of Linksys resources, including Technical Support.

User Guide
Page 13
Wireless-G IP Phone 4 Chapter 1: Introduction What's in This User Guide?
Wireless-G IP Phone 4 Chapter 1: Introduction What's in This User Guide?
User Guide
Page 14
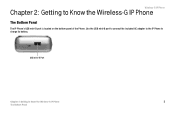
Wireless-G IP Phone Chapter 2: Getting to Know the Wireless-G IP Phone 5 The Bottom Panel USB mini-B Port Chapter 2: Getting to Know the Wireless-G IP Phone The Bottom Panel The IP Phone's USB mini-B port is located on the bottom panel of the Phone. Use the USB mini-B port to connect the included AC adapter to the IP Phone to charge its battery.
Wireless-G IP Phone Chapter 2: Getting to Know the Wireless-G IP Phone 5 The Bottom Panel USB mini-B Port Chapter 2: Getting to Know the Wireless-G IP Phone The Bottom Panel The IP Phone's USB mini-B port is located on the bottom panel of the Phone. Use the USB mini-B port to connect the included AC adapter to the IP Phone to charge its battery.
User Guide
Page 15
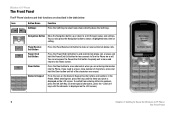
...hold the Power/End Call button for two seconds to Turn the Phone on the LCD screen.) 6 Chapter 2: Getting to Know the Wireless-G IP Phone The Front Panel When entering text, press the keys until the ...to quickly exit a menu and return to erase a large number of the characters are entering information into the Phone. To switch from entering letters to numbers, press the left Soft Key. (To enter special characters, press the...Receive Call button to scroll through menus and settings. Wireless-G IP Phone The Front Panel The IP Phone's buttons and their functions are described in the...
...hold the Power/End Call button for two seconds to Turn the Phone on the LCD screen.) 6 Chapter 2: Getting to Know the Wireless-G IP Phone The Front Panel When entering text, press the keys until the ...to quickly exit a menu and return to erase a large number of the characters are entering information into the Phone. To switch from entering letters to numbers, press the left Soft Key. (To enter special characters, press the...Receive Call button to scroll through menus and settings. Wireless-G IP Phone The Front Panel The IP Phone's buttons and their functions are described in the...

User Guide
Page 16
Wireless-G IP Phone Headset Jack Chapter 2: Getting to connect a headset for hands-free operation. Use it to Know the Wireless-G IP Phone 7 The Side Panel The Side Panel The IP Phone's Headset jack is located on the side panel of the Phone.
Wireless-G IP Phone Headset Jack Chapter 2: Getting to connect a headset for hands-free operation. Use it to Know the Wireless-G IP Phone 7 The Side Panel The Side Panel The IP Phone's Headset jack is located on the side panel of the Phone.

User Guide
Page 17
For directions on the back panel of the IP Phone. Battery compartment 8 Chapter 2: Getting to "Chapter 3: Installing and Using the Wireless-G IP Phone". Wireless-G IP Phone The Back Panel The IP Phone's battery compartment is located on how to insert the battery, refer to Know the Wireless-G IP Phone The Back Panel
For directions on the back panel of the IP Phone. Battery compartment 8 Chapter 2: Getting to "Chapter 3: Installing and Using the Wireless-G IP Phone". Wireless-G IP Phone The Back Panel The IP Phone's battery compartment is located on how to insert the battery, refer to Know the Wireless-G IP Phone The Back Panel
User Guide
Page 18
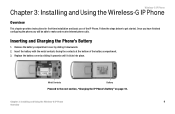
... the battery with the metal contacts facing the contacts at the bottom of the IP Phone. Inserting and Charging the Phone's Battery 1. Follow the steps below to get started. Wireless-G IP Phone Chapter 3: Installing and Using the Wireless-G IP Phone Overview This chapter provides instructions for first-time installation and basic use of the battery compartment...
... the battery with the metal contacts facing the contacts at the bottom of the IP Phone. Inserting and Charging the Phone's Battery 1. Follow the steps below to get started. Wireless-G IP Phone Chapter 3: Installing and Using the Wireless-G IP Phone Overview This chapter provides instructions for first-time installation and basic use of the battery compartment...
User Guide
Page 19
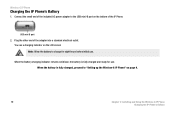
...Connect the small end of the included AC power adapter to the USB mini-B port on page 9. 10 Chapter 3: Installing and Using the Wireless-G IP Phone Charging the IP Phone's Battery When the Battery charging indicator remains solid blue, the battery is fully charged, proceed to charge for use . You see a charging... indicator on the LCD screen Note: Allow the battery to "Setting up the Wireless-G IP Phone" on the bottom of the adapter into a standard electrical outlet. USB mini-B port 2. Plug the other end of the IP...
...Connect the small end of the included AC power adapter to the USB mini-B port on page 9. 10 Chapter 3: Installing and Using the Wireless-G IP Phone Charging the IP Phone's Battery When the Battery charging indicator remains solid blue, the battery is fully charged, proceed to charge for use . You see a charging... indicator on the LCD screen Note: Allow the battery to "Setting up the Wireless-G IP Phone" on the bottom of the adapter into a standard electrical outlet. USB mini-B port 2. Plug the other end of the IP...

User Guide
Page 20
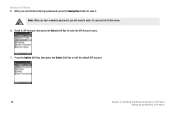
... press the Navigation button to enter a password. Chapter 3: Installing and Using the Wireless-G IP Phone 11 Setting up the Wireless-G IP Phone Wireless-G IP Phone Before you begin, make sure you are configuring the Phone, press any key to turn on and continue configuring the Phone. 1. Press the Navigation button, then use . Press the Power button to create...
... press the Navigation button to enter a password. Chapter 3: Installing and Using the Wireless-G IP Phone 11 Setting up the Wireless-G IP Phone Wireless-G IP Phone Before you begin, make sure you are configuring the Phone, press any key to turn on and continue configuring the Phone. 1. Press the Navigation button, then use . Press the Power button to create...
User Guide
Page 21
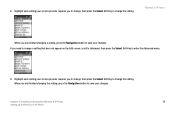
Note: After you have created a password, you are finished entering a password, press the Navigation button to access the Profile menu. 6. Press the Option Soft Key, then press the Select Soft Key to enter the SIP Account menu. 7. Wireless-G IP Phone 5. When you will need to enter it to save it. Scroll to SIP Account, then press the Select Soft Key to edit the default SIP account. 12 Chapter 3: Installing and Using the Wireless-G IP Phone Setting up the Wireless-G IP Phone
Note: After you have created a password, you are finished entering a password, press the Navigation button to access the Profile menu. 6. Press the Option Soft Key, then press the Select Soft Key to enter the SIP Account menu. 7. Wireless-G IP Phone 5. When you will need to enter it to save it. Scroll to SIP Account, then press the Select Soft Key to edit the default SIP account. 12 Chapter 3: Installing and Using the Wireless-G IP Phone Setting up the Wireless-G IP Phone
User Guide
Page 22
...the Advanced menu. 9. Highlight each setting your changes. 8. Highlight each setting your changes. Chapter 3: Installing and Using the Wireless-G IP Phone 13 Setting up the Wireless-G IP Phone If you to change, then press the Select Soft Key to change a setting that does not appear on the Edit screen..., scroll to Advanced, then press the Select Soft Key to change the setting. Wireless-G IP Phone When you are finished changing the setting, press the Navigation button to save your service provider requires you to change, then press...
...the Advanced menu. 9. Highlight each setting your changes. 8. Highlight each setting your changes. Chapter 3: Installing and Using the Wireless-G IP Phone 13 Setting up the Wireless-G IP Phone If you to change, then press the Select Soft Key to change a setting that does not appear on the Edit screen..., scroll to Advanced, then press the Select Soft Key to change the setting. Wireless-G IP Phone When you are finished changing the setting, press the Navigation button to save your service provider requires you to change, then press...


