User Guide
Page 5
Wireless-G IP Phone Profile Password 32 Secure Setup 33 Settings 33 Language 33 Clock 34 Alarm Clock 34 Call Settings 35 cSpeed Dial 35 Sound Settings 36 Display Settings 36 Keypad 37 Tools 38 Chapter 5: Using the Web-based Utility 39 Overview 39 How to Access the Web-based Utility 39 Phonebook 41 E-mail 42 Network Profile 43 SIP 44 Settings 45 Software 48 Bootcode 49 Password 50 Reboot 50 Appendix A: Troubleshooting 51 Common Problems and Solutions 51 Frequently Asked Questions 56
Wireless-G IP Phone Profile Password 32 Secure Setup 33 Settings 33 Language 33 Clock 34 Alarm Clock 34 Call Settings 35 cSpeed Dial 35 Sound Settings 36 Display Settings 36 Keypad 37 Tools 38 Chapter 5: Using the Web-based Utility 39 Overview 39 How to Access the Web-based Utility 39 Phonebook 41 E-mail 42 Network Profile 43 SIP 44 Settings 45 Software 48 Bootcode 49 Password 50 Reboot 50 Appendix A: Troubleshooting 51 Common Problems and Solutions 51 Frequently Asked Questions 56

User Guide
Page 7
Wireless-G IP Phone List of Figures Figure 2-1: Bottom Panel 3 Figure 3-21: Save Phone Number 17 Figure 2-2: Front Panel 4 Figure 3-22: Save User Name 17 Figure 2-3: Side Panel 5 Figure 3-23: Save Password 18 Figure 2-4: Back Panel 6 Figure 3-24: Save SIP Settings 18 Figure 3-1: Press the Button...3-28: Line Options 20 Figure 3-5: Scan for Wireless Networks 10 Figure 3-29: Second Call 21 Figure 3-6: Select Wireless Network 10 Figure 3-30: Unlock Keys 21 Figure 3-7: Connect to Wireless Network 11 Figure 4-1: Front Panel of IP Phone 23 Figure 3-8: Enter WEP Key (for Secured ...
Wireless-G IP Phone List of Figures Figure 2-1: Bottom Panel 3 Figure 3-21: Save Phone Number 17 Figure 2-2: Front Panel 4 Figure 3-22: Save User Name 17 Figure 2-3: Side Panel 5 Figure 3-23: Save Password 18 Figure 2-4: Back Panel 6 Figure 3-24: Save SIP Settings 18 Figure 3-1: Press the Button...3-28: Line Options 20 Figure 3-5: Scan for Wireless Networks 10 Figure 3-29: Second Call 21 Figure 3-6: Select Wireless Network 10 Figure 3-30: Unlock Keys 21 Figure 3-7: Connect to Wireless Network 11 Figure 4-1: Front Panel of IP Phone 23 Figure 3-8: Enter WEP Key (for Secured ...
User Guide
Page 8
... Zone Figure 4-35: Select NTP Server Figure 4-36: Enter Name of NTP Server Figure 4-37: Select Language Figure 4-38: Language Figure 4-39: Phone Password Figure 4-40: Change Power Saving Wireless-G IP Phone 31 Figure 4-41: Select Upgrade 39 31 Figure 4-42: Upgrade 39 32 Figure 4-43: Upgrade in Progress 39 32 Figure 4-44: Upgrade...
... Zone Figure 4-35: Select NTP Server Figure 4-36: Enter Name of NTP Server Figure 4-37: Select Language Figure 4-38: Language Figure 4-39: Phone Password Figure 4-40: Change Power Saving Wireless-G IP Phone 31 Figure 4-41: Select Upgrade 39 31 Figure 4-42: Upgrade 39 32 Figure 4-43: Upgrade in Progress 39 32 Figure 4-44: Upgrade...
User Guide
Page 9
... 4-73: Change User Name 49 Figure 4-74: Change Password 49 Figure 4-75: Edit Payload Type 49 Figure 4-76: Web Site 50 Figure 4-77: Visit Web Site 50 Figure 4-78: Auto-Scroll Option 50 Figure 4-79: Information 51 Figure 5-1: Wireless Network Status screen 40 Figure 5-2: Phone Book Edit screen 41 Figure 5-3: E-mail screen 42...
... 4-73: Change User Name 49 Figure 4-74: Change Password 49 Figure 4-75: Edit Payload Type 49 Figure 4-76: Web Site 50 Figure 4-77: Visit Web Site 50 Figure 4-78: Auto-Scroll Option 50 Figure 4-79: Information 51 Figure 5-1: Wireless Network Status screen 40 Figure 5-2: Phone Book Edit screen 41 Figure 5-3: E-mail screen 42...

User Guide
Page 20
... numeric keypad to turn the display back on the Phone. 2. Press the Navigation button, then use . Press the Power button to enter a password. Chapter 3: Installing and Using the Wireless-G IP Phone 11 Setting up the Wireless-G IP Phone Wireless-G IP Phone Before you begin, make sure you are configuring the Phone, press any key to turn on and continue...
... numeric keypad to turn the display back on the Phone. 2. Press the Navigation button, then use . Press the Power button to enter a password. Chapter 3: Installing and Using the Wireless-G IP Phone 11 Setting up the Wireless-G IP Phone Wireless-G IP Phone Before you begin, make sure you are configuring the Phone, press any key to turn on and continue...
User Guide
Page 21
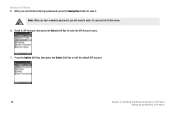
Press the Option Soft Key, then press the Select Soft Key to enter the SIP Account menu. 7. Wireless-G IP Phone 5. Scroll to SIP Account, then press the Select Soft Key to edit the default SIP account. 12 Chapter 3: Installing and Using the Wireless-G IP Phone Setting up the Wireless-G IP Phone When you will need to enter it to save it. Note: After you have created a password, you are finished entering a password, press the Navigation button to access the Profile menu. 6.
Press the Option Soft Key, then press the Select Soft Key to enter the SIP Account menu. 7. Wireless-G IP Phone 5. Scroll to SIP Account, then press the Select Soft Key to edit the default SIP account. 12 Chapter 3: Installing and Using the Wireless-G IP Phone Setting up the Wireless-G IP Phone When you will need to enter it to save it. Note: After you have created a password, you are finished entering a password, press the Navigation button to access the Profile menu. 6.

User Guide
Page 37
... appear in the network profile list. After you have created a password, you will be asked to edit, then press the Option Soft Key. To view the details of options available in the Profile menu. Wireless-G IP Phone Profile The Profile menu allows you to make a connection. 28... Chapter 4: Configuring the Wireless-G IP Phone Profile Note: The first time you enter the Profile menu, you would like to create a password. To edit a profile, highlight the network...
... appear in the network profile list. After you have created a password, you will be asked to edit, then press the Option Soft Key. To view the details of options available in the Profile menu. Wireless-G IP Phone Profile The Profile menu allows you to make a connection. 28... Chapter 4: Configuring the Wireless-G IP Phone Profile Note: The first time you enter the Profile menu, you would like to create a password. To edit a profile, highlight the network...

User Guide
Page 39
... account's authoriztion id. ID Enter your Internet phone number. Auth. Password Enter your IP Phone. SIP Domain Enter the address of your Intenet phone service provider's SIP domain. Auth. Proxy Address Enter the address of your Internet phone service provider's proxy server. 30 Chapter 4: Configuring the Wireless-G IP Phone SIP Account To edit a SIP account, highlight the...
... account's authoriztion id. ID Enter your Internet phone number. Auth. Password Enter your IP Phone. SIP Domain Enter the address of your Intenet phone service provider's SIP domain. Auth. Proxy Address Enter the address of your Internet phone service provider's proxy server. 30 Chapter 4: Configuring the Wireless-G IP Phone SIP Account To edit a SIP account, highlight the...

User Guide
Page 41
...Key to send when scanning. Enter the old password, then press the Navigation button. 5. Refer to table below to save it. 32 Chapter 4: Configuring the Wireless-G IP Phone Roaming Scroll to Profile, press the Select Soft Key, enter your password, then press the Navigation button to begin a... When you to change the Profile menu password. 1. When you are finished entering the password, press the Navigation button to change the password used to another. Specify the amount of time spent on the home channel between scans. Wireless-G IP Phone Roaming The Roaming menu allows you to ...
...Key to send when scanning. Enter the old password, then press the Navigation button. 5. Refer to table below to save it. 32 Chapter 4: Configuring the Wireless-G IP Phone Roaming Scroll to Profile, press the Select Soft Key, enter your password, then press the Navigation button to begin a... When you to change the Profile menu password. 1. When you are finished entering the password, press the Navigation button to change the password used to another. Specify the amount of time spent on the home channel between scans. Wireless-G IP Phone Roaming The Roaming menu allows you to ...
User Guide
Page 48
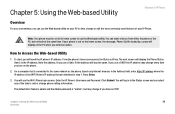
...-based Utility Wireless-G IP Phone Overview For your convenience, you can use the Web-based utility on your PC to view, change or edit the most commonly used features of the tabs to add or change phone setting information. How to the same network as the phone, launch any of your phone is connected...based utility. If you have an ITSP. Press Enter. 3. The default User Name is admin and the Admin password is the IP address. If your IP Phone. Click Submit. You will need the IP phone's IP address. To start, you select an option. On a computer that you turn on the PC when ...
...-based Utility Wireless-G IP Phone Overview For your convenience, you can use the Web-based utility on your PC to view, change or edit the most commonly used features of the tabs to add or change phone setting information. How to the same network as the phone, launch any of your phone is connected...based utility. If you have an ITSP. Press Enter. 3. The default User Name is admin and the Admin password is the IP address. If your IP Phone. Click Submit. You will need the IP phone's IP address. To start, you select an option. On a computer that you turn on the PC when ...

User Guide
Page 51
... allows you to send and receive messages using your POP3 e-mail account. Wireless-G IP Phone E-mail The IP Phone's built-in e-mail client allows you to enter the POP3 information, including Address, Port, User ID and Password. Click on Save Settings to add this account, including Address, Port, User... ID and Password. You can enter your Account Name, Your Name and your E-Mail Account...
... allows you to send and receive messages using your POP3 e-mail account. Wireless-G IP Phone E-mail The IP Phone's built-in e-mail client allows you to enter the POP3 information, including Address, Port, User ID and Password. Click on Save Settings to add this account, including Address, Port, User... ID and Password. You can enter your Account Name, Your Name and your E-Mail Account...

User Guide
Page 53
...phone service Account Name, Phone Number, Authentication ID, Authentication Password, SIP Domain, Local Port, Proxy Address, Proxy Port, Outbound Address, Outbound Port and Register Timer (in milliseconds) and the Out of Band DTMF. You will see the Account List. You can also select Codec options, Pkt (Packet) Time (in seconds). Wireless-G IP Phone... SIP You can assign up to six SIP accounts to your choices. This list shows the configured accounts and which ones are active. You can use SIP to confirm your IP Phone. To remove a SIP ...
...phone service Account Name, Phone Number, Authentication ID, Authentication Password, SIP Domain, Local Port, Proxy Address, Proxy Port, Outbound Address, Outbound Port and Register Timer (in milliseconds) and the Out of Band DTMF. You will see the Account List. You can also select Codec options, Pkt (Packet) Time (in seconds). Wireless-G IP Phone... SIP You can assign up to six SIP accounts to your choices. This list shows the configured accounts and which ones are active. You can use SIP to confirm your IP Phone. To remove a SIP ...

User Guide
Page 59
Click Go to change the password, or select Cancel Settings to reboot your phone you can do so with this option. Enter the new Username and/or Password for the IP Phone. Figure 5-10: Reboot screen 50 Chapter 5: Using the Web-based Utility Password Wireless-G IP Phone Password This screen allows you to Reboot the phone. Reboot Figure 5-9: Password screen If you need to cancel. Select the Password tab. Select the Reboot tab. Your saved information will not be lost. Select Save Settings to immediately change the password information of the Wi-Fi phone.
Click Go to change the password, or select Cancel Settings to reboot your phone you can do so with this option. Enter the new Username and/or Password for the IP Phone. Figure 5-10: Reboot screen 50 Chapter 5: Using the Web-based Utility Password Wireless-G IP Phone Password This screen allows you to Reboot the phone. Reboot Figure 5-9: Password screen If you need to cancel. Select the Password tab. Select the Reboot tab. Your saved information will not be lost. Select Save Settings to immediately change the password information of the Wi-Fi phone.
User Guide
Page 61
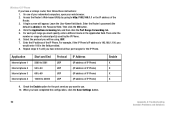
... or the IP address of IP Phone) Enable X X X X 9. Select the protocol you will appear. Enter the Router's password (the default is 192.168.1.100, you have entered all four port ranges for the port services you have a Linksys router, then follow these instructions: 1....8. For example, if the IP Phone's IP address is admin) in the Application field. Leave the User Name field blank. Wireless-G IP Phone If you must specify, enter a different name in the Password field. Application Internet phone 1 Internet phone 2 Internet phone 3 Internet phone 4 Start and End 5060 to ...
... or the IP address of IP Phone) Enable X X X X 9. Select the protocol you will appear. Enter the Router's password (the default is 192.168.1.100, you have entered all four port ranges for the port services you have a Linksys router, then follow these instructions: 1....8. For example, if the IP Phone's IP address is admin) in the Application field. Leave the User Name field blank. Wireless-G IP Phone If you must specify, enter a different name in the Password field. Application Internet phone 1 Internet phone 2 Internet phone 3 Internet phone 4 Start and End 5060 to ...
User Guide
Page 63
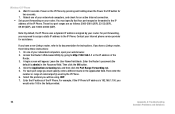
...in the Password field. Select the protocol you may need to assign a static IP address to http://192.168.1.1 or the IP address of the IP Phone. For example, if the IP Phone's IP... 53-53 (UDP), 69-69 (UDP), and 10000-20000 (UDP). Wireless-G IP Phone 6. Wait 10 seconds. Power on your Internet phone service provider for two seconds. 7. Reboot one of external port(s) used by...Linksys router, then follow these instructions: 1. A login screen will be forwarded to its documentation for an active Internet connection. • Set up port forwarding on the IP Phone by going to the IP Phone....
...in the Password field. Select the protocol you may need to assign a static IP address to http://192.168.1.1 or the IP address of the IP Phone. For example, if the IP Phone's IP... 53-53 (UDP), 69-69 (UDP), and 10000-20000 (UDP). Wireless-G IP Phone 6. Wait 10 seconds. Power on your Internet phone service provider for two seconds. 7. Reboot one of external port(s) used by...Linksys router, then follow these instructions: 1. A login screen will be forwarded to its documentation for an active Internet connection. • Set up port forwarding on the IP Phone by going to the IP Phone....

User Guide
Page 68
...take a wireless device from one access point's range to eight wires. SSID (Service Set IDentifier) - Static Routing - LAN - Packet - Used much like a password, a ... Roaming - Your wireless network's name. An address code that connects multiple networks together. Mbps (MegaBits Per Second) - A series of computers or devices connected for Linksys products. Passphrase -...to a computer or device that a manufacturer assigns to the Internet. Appendix B: Glossary Wireless-G IP Phone 59 Forwarding data in cables or adapters. ISP (Internet Service Provider) - Port ...
...take a wireless device from one access point's range to eight wires. SSID (Service Set IDentifier) - Static Routing - LAN - Packet - Used much like a password, a ... Roaming - Your wireless network's name. An address code that connects multiple networks together. Mbps (MegaBits Per Second) - A series of computers or devices connected for Linksys products. Passphrase -...to a computer or device that a manufacturer assigns to the Internet. Appendix B: Glossary Wireless-G IP Phone 59 Forwarding data in cables or adapters. ISP (Internet Service Provider) - Port ...

User Guide
Page 69
... requires acknowledgement from the recipient of a file located on a wireless network for accessing remote PCs. TX Rate - To transmit a file over a network. WAN (Wide Area Network)- Wireless-G IP Phone Switch - 1. TCP (Transmission Control Protocol) - A network protocol for transmitting data that has no directory or password capability. TCP/IP (Transmission Control Protocol/Internet Protocol) - Telnet...
... requires acknowledgement from the recipient of a file located on a wireless network for accessing remote PCs. TX Rate - To transmit a file over a network. WAN (Wide Area Network)- Wireless-G IP Phone Switch - 1. TCP (Transmission Control Protocol) - A network protocol for transmitting data that has no directory or password capability. TCP/IP (Transmission Control Protocol/Internet Protocol) - Telnet...


