
User Guide
Page 2
...36 Installing a printer hard disk ...43 Installing a fax card ...47 Installing hardware options...50 Installing a 250- or 550-sheet drawer...50 Attaching cables...51 Verifying printer setup...52 Printing a menu settings page...52 Printing a network setup page ...53 Setting up the printer software...53 Installing ... glass...22 Understanding the printer control panel...23 Understanding the home screen...24 Using the touch-screen buttons...25 Additional printer setup 29 Installing internal options...29 Available internal options...29 Accessing the system board to set up the printer on a wireless ...
...36 Installing a printer hard disk ...43 Installing a fax card ...47 Installing hardware options...50 Installing a 250- or 550-sheet drawer...50 Attaching cables...51 Verifying printer setup...52 Printing a menu settings page...52 Printing a network setup page ...53 Setting up the printer software...53 Installing ... glass...22 Understanding the printer control panel...23 Understanding the home screen...24 Using the touch-screen buttons...25 Additional printer setup 29 Installing internal options...29 Available internal options...29 Accessing the system board to set up the printer on a wireless ...
User Guide
Page 6
... machine to the same telephone line 126 Connecting to an adapter for your country or region...128 Connecting to a computer with a modem...132 Enabling the fax function...133 Using the Embedded Web Server for fax setup...134 Setting the date and time...134 Turning daylight saving time on or off ...134 Sending...
... machine to the same telephone line 126 Connecting to an adapter for your country or region...128 Connecting to a computer with a modem...132 Enabling the fax function...133 Using the Embedded Web Server for fax setup...134 Setting the date and time...134 Turning daylight saving time on or off ...134 Sending...
User Guide
Page 7
Content...140 Sides (Duplex) ...141 Resolution...141 Darkness...141 Advanced Options...141 Improving fax quality...142 Holding and forwarding faxes...142 Holding faxes...142 Forwarding a fax ...143 Scanning to an FTP address 144 Scanning to an FTP address...144 Scanning to an FTP address ...Improving FTP quality...148 Scanning to a computer or flash drive 149 Scanning to a computer...149 Understanding scan profile options...150 Quick Setup...150 Format Type...150 Compression...150 Default Content...150 Color ...151 Original Size ...151 Orientation ...151 Duplex...151 JPEG Quality...151 Darkness...
Content...140 Sides (Duplex) ...141 Resolution...141 Darkness...141 Advanced Options...141 Improving fax quality...142 Holding and forwarding faxes...142 Holding faxes...142 Forwarding a fax ...143 Scanning to an FTP address 144 Scanning to an FTP address...144 Scanning to an FTP address ...Improving FTP quality...148 Scanning to a computer or flash drive 149 Scanning to a computer...149 Understanding scan profile options...150 Quick Setup...150 Format Type...150 Compression...150 Default Content...150 Color ...151 Original Size ...151 Orientation ...151 Duplex...151 JPEG Quality...151 Darkness...

User Guide
Page 17
....lexmark.com/publications/. After all, you check the latest updates on the Software and Documentation CD. Initial setup instructions: • Connecting the printer • Installing the printer software Additional setup and instructions for using the printer: • Selecting and storing paper and specialty media • Loading paper • Performing printing, copying, scanning, and faxing...
....lexmark.com/publications/. After all, you check the latest updates on the Software and Documentation CD. Initial setup instructions: • Connecting the printer • Installing the printer software Additional setup and instructions for using the printer: • Selecting and storing paper and specialty media • Loading paper • Performing printing, copying, scanning, and faxing...
User Guide
Page 25
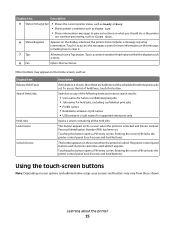
...; Job names for held jobs This button appears on any of held faxes with a scheduled hold time previously set . Tips is a context-sensitive Help feature within the display touch screens. 8 Fax Opens the Fax menus Other buttons may vary from those shown. Entering the correct PIN locks... used while it . 7 Tips All menus have a Tips button. Using the touch-screen buttons Note: Depending on your options and administrative setup, your screens and buttons may appear on the message, including how to access the messages screen for supported extensions only Opens a screen containing...
...; Job names for held jobs This button appears on any of held faxes with a scheduled hold time previously set . Tips is a context-sensitive Help feature within the display touch screens. 8 Fax Opens the Fax menus Other buttons may vary from those shown. Entering the correct PIN locks... used while it . 7 Tips All menus have a Tips button. Using the touch-screen buttons Note: Depending on your options and administrative setup, your screens and buttons may appear on the message, including how to access the messages screen for supported extensions only Opens a screen containing...
User Guide
Page 29
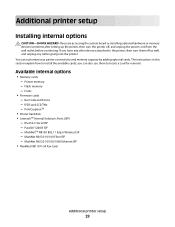
Additional printer setup Installing internal options CAUTION-SHOCK HAZARD: If you are accessing the system board or installing optional hardware or memory devices sometime after setting up the ... any other devices attached to install the available cards; Bar Code and Forms - MarkNet N8120 10/100/1000 Ethernet ISP • MarkNet N8110 V-34 Fax Card Additional printer setup 29 MarkNetTM N8150 802.11 b/g/n Wireless ISP - Printer memory - Parallel 1284-B ISP - MarkNet N8130 10/100 Fiber ISP - If you can customize your...
Additional printer setup Installing internal options CAUTION-SHOCK HAZARD: If you are accessing the system board or installing optional hardware or memory devices sometime after setting up the ... any other devices attached to install the available cards; Bar Code and Forms - MarkNet N8120 10/100/1000 Ethernet ISP • MarkNet N8110 V-34 Fax Card Additional printer setup 29 MarkNetTM N8150 802.11 b/g/n Wireless ISP - Printer memory - Parallel 1284-B ISP - MarkNet N8130 10/100 Fiber ISP - If you can customize your...
User Guide
Page 31
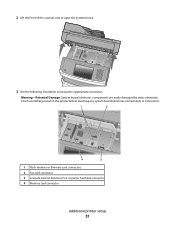
2 Lift the front of the scanner unit to open the system board. 3 Use the following illustration to locate the appropriate connector. Touch something metal on the printer before touching any system board electronic components or connectors. 1 Flash memory or firmware card connectors 2 Fax card connector 3 Lexmark Internal Solutions Port or printer hard disk connector 4 Memory card connector Additional printer setup 31 Warning-Potential Damage: System board electronic components are easily damaged by static electricity.
2 Lift the front of the scanner unit to open the system board. 3 Use the following illustration to locate the appropriate connector. Touch something metal on the printer before touching any system board electronic components or connectors. 1 Flash memory or firmware card connectors 2 Fax card connector 3 Lexmark Internal Solutions Port or printer hard disk connector 4 Memory card connector Additional printer setup 31 Warning-Potential Damage: System board electronic components are easily damaged by static electricity.

User Guide
Page 47
If you are easily damaged by static electricity. Additional printer setup 47 Installing a fax card Note: This task requires a #2 Phillips screwdriver and a flathead screwdriver. Warning-Potential Damage: System board electronic components are accessing the system board ...clockwise a quarter turn the printer off as well, and unplug any system board electronic components or connectors. 1 Access the system board. 2 Unpack the fax card. 5 Push in on the printer before continuing. Warning-Potential Damage: Make sure the system board is locked to prevent possible damage to lock ...
If you are easily damaged by static electricity. Additional printer setup 47 Installing a fax card Note: This task requires a #2 Phillips screwdriver and a flathead screwdriver. Warning-Potential Damage: System board electronic components are accessing the system board ...clockwise a quarter turn the printer off as well, and unplug any system board electronic components or connectors. 1 Access the system board. 2 Unpack the fax card. 5 Push in on the printer before continuing. Warning-Potential Damage: Make sure the system board is locked to prevent possible damage to lock ...

User Guide
Page 48
Additional printer setup 48 3 Remove the metal cover from the fax card opening. 2 1 4 Insert the fax card, and then tighten the two screws to secure the fax card mounting bracket.
Additional printer setup 48 3 Remove the metal cover from the fax card opening. 2 1 4 Insert the fax card, and then tighten the two screws to secure the fax card mounting bracket.
User Guide
Page 134
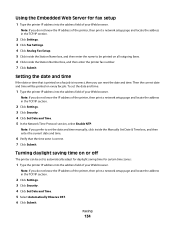
... and time: 1 Type the printer IP address into the address field of the printer, then print a network setup page and locate the address in the TCP/IP section. 2 Click Settings. 3 Click Fax Settings. 4 Click Analog Fax Setup. 5 Click inside the Station Name box, and then enter the name to be printed on... box, and then enter the current date and time. 6 Verify that is incorrect, then you prefer to automatically adjust for daylight saving time for fax setup 1 Type the printer IP address into the address field of your Web browser. Note: If you do not know the IP address of your Web...
... and time: 1 Type the printer IP address into the address field of the printer, then print a network setup page and locate the address in the TCP/IP section. 2 Click Settings. 3 Click Fax Settings. 4 Click Analog Fax Setup. 5 Click inside the Station Name box, and then enter the name to be printed on... box, and then enter the current date and time. 6 Verify that is incorrect, then you prefer to automatically adjust for daylight saving time for fax setup 1 Type the printer IP address into the address field of your Web browser. Note: If you do not know the IP address of your Web...
User Guide
Page 139
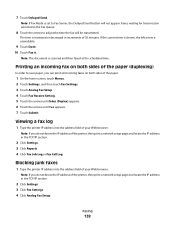
...: If you do not know the IP address of the printer, then print a network setup page and locate the IP address in the TCP/IP section. 2 Click Settings. 3 Click Fax Settings. 4 Click Analog Fax Setup. Faxes waiting for transmission are listed in the TCP/IP section. 2 Click Settings. 3 Click... Reports. 4 Click Fax Job Log or Fax Call Log. Blocking junk faxes 1 Type the printer IP address into the address field of ...
...: If you do not know the IP address of the printer, then print a network setup page and locate the IP address in the TCP/IP section. 2 Click Settings. 3 Click Fax Settings. 4 Click Analog Fax Setup. Faxes waiting for transmission are listed in the TCP/IP section. 2 Click Settings. 3 Click... Reports. 4 Click Fax Job Log or Fax Call Log. Blocking junk faxes 1 Type the printer IP address into the address field of ...

User Guide
Page 142
... the time you want the held faxes released. Use Photo mode when faxing photos printed on a laser printer or taken from the original document is not a concern. • Text mode is recommended for magazine articles, business graphics, and brochures. Held faxes can be released manually or at ...address of the printer, then print a network setup page and locate the IP address in the TCP/IP section. 2 Click Settings. 3 Click Fax Settings. 4 Click Analog Fax Setup. 5 Click Holding Faxes. 6 Enter a password in the Print Faxes Password box. 7 From the Held Fax Mode menu, select one of your Web ...
... the time you want the held faxes released. Use Photo mode when faxing photos printed on a laser printer or taken from the original document is not a concern. • Text mode is recommended for magazine articles, business graphics, and brochures. Held faxes can be released manually or at ...address of the printer, then print a network setup page and locate the IP address in the TCP/IP section. 2 Click Settings. 3 Click Fax Settings. 4 Click Analog Fax Setup. 5 Click Holding Faxes. 6 Enter a password in the Print Faxes Password box. 7 From the Held Fax Mode menu, select one of your Web ...
User Guide
Page 143
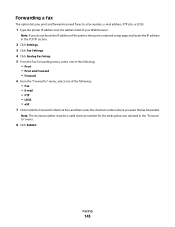
... shortcut number must be a valid shortcut number for the setting that was selected in the TCP/IP section. 2 Click Settings. 3 Click Fax Settings. 4 Click Analog Fax Setup. 5 From the Fax Forwarding menu, select one of the following: • Print • Print and Forward • Forward 6 From the "Forward to" ... and then enter the shortcut number where you print and forward received faxes to a fax number, e-mail address, FTP site, or LDSS. 1 Type the printer IP address into the address field of the printer, then print a network setup page and locate the IP address in the "Forward to" menu...
... shortcut number must be a valid shortcut number for the setting that was selected in the TCP/IP section. 2 Click Settings. 3 Click Fax Settings. 4 Click Analog Fax Setup. 5 From the Fax Forwarding menu, select one of the following: • Print • Print and Forward • Forward 6 From the "Forward to" ... and then enter the shortcut number where you print and forward received faxes to a fax number, e-mail address, FTP site, or LDSS. 1 Type the printer IP address into the address field of the printer, then print a network setup page and locate the IP address in the "Forward to" menu...
User Guide
Page 194
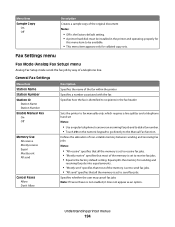
...splitter and a telephone hand set Notes: • Use a regular telephone to answer an incoming fax job and to dial a fax number. • Touch # 0 on the numeric keypad to go directly to send fax jobs. Menu item Sample Copy On Off Description Creates a sample copy of the original document Notes:.... • A printer hard disk must be available. • This menu item appears only for this menu item to receive fax jobs. • Equal is the factory default setting. Fax Settings menu Fax Mode (Analog Fax Setup) menu Analog Fax Setup mode sends the fax job by way of a telephone line.
...splitter and a telephone hand set Notes: • Use a regular telephone to answer an incoming fax job and to dial a fax number. • Touch # 0 on the numeric keypad to go directly to send fax jobs. Menu item Sample Copy On Off Description Creates a sample copy of the original document Notes:.... • A printer hard disk must be available. • This menu item appears only for this menu item to receive fax jobs. • Equal is the factory default setting. Fax Settings menu Fax Mode (Analog Fax Setup) menu Analog Fax Setup mode sends the fax job by way of a telephone line.
User Guide
Page 254
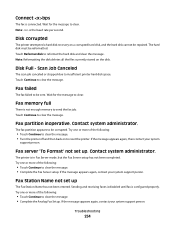
... : • Touch Continue to be sent. Touch Continue to insufficient printer hard disk space. The fax partition appears to clear the message. • Complete the Fax Server setup. Contact system administrator. Try one or more of the following : • Touch Continue to clear.... The hard disk must be repaired. Sending and receiving faxes is disabled until fax is in Fax Server mode, but the Fax Server setup has not been completed. Fax server 'To Format' not set up . Troubleshooting 254 Touch Continue to reformat the hard...
... : • Touch Continue to be sent. Touch Continue to insufficient printer hard disk space. The fax partition appears to clear the message. • Complete the Fax Server setup. Contact system administrator. Try one or more of the following : • Touch Continue to clear.... The hard disk must be repaired. Sending and receiving faxes is disabled until fax is in Fax Server mode, but the Fax Server setup has not been completed. Fax server 'To Format' not set up . Troubleshooting 254 Touch Continue to reformat the hard...
User Guide
Page 255
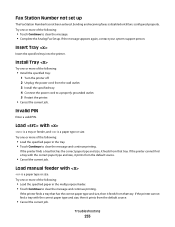
..., it prints from the wall outlet. 3 Install the specified tray. 4 Connect the power cord to clear the message. • Complete the Analog Fax Setup. Try one or more of the following : • Touch Continue to a properly grounded outlet. 5 Restart the printer. • Cancel the current...; Load the specified paper in the multipurpose feeder. • Touch Continue to clear the message and continue printing. Sending and receiving faxes is disabled until fax is a paper type or size. If the printer cannot find a tray with is a paper type or size. Troubleshooting 255 Load...
..., it prints from the wall outlet. 3 Install the specified tray. 4 Connect the power cord to clear the message. • Complete the Analog Fax Setup. Try one or more of the following : • Touch Continue to a properly grounded outlet. 5 Restart the printer. • Cancel the current...; Load the specified paper in the multipurpose feeder. • Touch Continue to clear the message and continue printing. Sending and receiving faxes is disabled until fax is a paper type or size. If the printer cannot find a tray with is a paper type or size. Troubleshooting 255 Load...
User Guide
Page 276
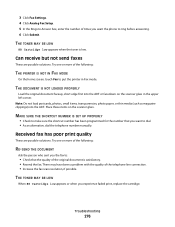
... dial. • As an alternative, dial the telephone number manually. Place these items on the scanner glass in Fax mode. 3 Click Fax Settings. 4 Click Analog Fax Setup. 5 In the Rings to Answer box, enter the number of times you want to : • Check that the quality of the original document... is low. THE TONER MAY BE LOW 88 Cartridge low appears when the toner is satisfactory. • Resend the fax. THE ...
... dial. • As an alternative, dial the telephone number manually. Place these items on the scanner glass in Fax mode. 3 Click Fax Settings. 4 Click Analog Fax Setup. 5 In the Rings to Answer box, enter the number of times you want to : • Check that the quality of the original document... is low. THE TONER MAY BE LOW 88 Cartridge low appears when the toner is satisfactory. • Resend the fax. THE ...
User Guide
Page 277
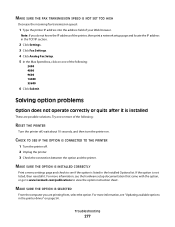
...seconds, and then turn the printer on. For more of the printer, then print a network setup page and locate the IP address in the TCP/IP section. 2 Click Settings. 3 Click Fax Settings. 4 Click Analog Fax Setup. 5 In the Max Speed box, click on page 54. Try one of your Web browser...menu settings page and check to see the hardware setup documentation that came with the option, or go to www.lexmark.com/publications to view the option instruction sheet. MAKE SURE THE FAX TRANSMISSION SPEED IS NOT SET TOO HIGH Decrease the incoming fax transmission speed: 1 Type the printer IP address ...
...seconds, and then turn the printer on. For more of the printer, then print a network setup page and locate the IP address in the TCP/IP section. 2 Click Settings. 3 Click Fax Settings. 4 Click Analog Fax Setup. 5 In the Max Speed box, click on page 54. Try one of your Web browser...menu settings page and check to see the hardware setup documentation that came with the option, or go to www.lexmark.com/publications to view the option instruction sheet. MAKE SURE THE FAX TRANSMISSION SPEED IS NOT SET TOO HIGH Decrease the incoming fax transmission speed: 1 Type the printer IP address ...
User Guide
Page 312
... the Embedded Web Server 136 creating shortcuts using the touch screen 136 enabling 133 fax setup 123, 133, 134 forwarding faxes 143 holding faxes 142 improving fax quality 142 making a fax lighter or darker 138 printing on both sides (duplexing) 139 sending a fax at a scheduled time 138 sending using the computer 135 sending using the printer control...
... the Embedded Web Server 136 creating shortcuts using the touch screen 136 enabling 133 fax setup 123, 133, 134 forwarding faxes 143 holding faxes 142 improving fax quality 142 making a fax lighter or darker 138 printing on both sides (duplexing) 139 sending a fax at a scheduled time 138 sending using the computer 135 sending using the printer control...
User Guide
Page 313
...Custom Names 161 Custom Scan Sizes 161 Custom Types 161 Default Source 154 diagram of 153 Disk Wiping 179 E-mail Settings 203 Fax Mode (Analog Fax Setup) 194 Fax Mode (Fax Server Setup) 201 Finishing 218 Flash Drive 211 FTP Settings 208 Help 227 HTML 225 Image 226 IPv6 169 LexLink 171 Miscellaneous 178 ...NetWare menu 170 Network 256 Network 256 Network menu 164 Network Card menu 167 Network Reports menu 167 network setup page 53 Networking Guide 236 No analog phone line connected to modem, fax is disabled. 256 No answer 256 No dial tone 256 noise reducing 75 noise emission levels 293 notices ...
...Custom Names 161 Custom Scan Sizes 161 Custom Types 161 Default Source 154 diagram of 153 Disk Wiping 179 E-mail Settings 203 Fax Mode (Analog Fax Setup) 194 Fax Mode (Fax Server Setup) 201 Finishing 218 Flash Drive 211 FTP Settings 208 Help 227 HTML 225 Image 226 IPv6 169 LexLink 171 Miscellaneous 178 ...NetWare menu 170 Network 256 Network 256 Network menu 164 Network Card menu 167 Network Reports menu 167 network setup page 53 Networking Guide 236 No analog phone line connected to modem, fax is disabled. 256 No answer 256 No dial tone 256 noise reducing 75 noise emission levels 293 notices ...


