User's Guide
Page 145
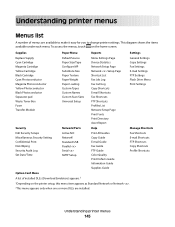
Understanding printer menus 145 Supplies Paper Menu Reports Settings Replace Supply Cyan Cartridge Magenta Cartridge Yellow Cartridge Black Cartridge Cyan Photoconductor Magenta Photoconductor Yellow Photoconductor Black Photoconductor Separator pad Waste Toner Box Fuser Transfer Module Default Source Paper Size/Type Configure MP Substitute Size Paper Texture Paper Weight Paper Loading Custom Types ...
Understanding printer menus 145 Supplies Paper Menu Reports Settings Replace Supply Cyan Cartridge Magenta Cartridge Yellow Cartridge Black Cartridge Cyan Photoconductor Magenta Photoconductor Yellow Photoconductor Black Photoconductor Separator pad Waste Toner Box Fuser Transfer Module Default Source Paper Size/Type Configure MP Substitute Size Paper Texture Paper Weight Paper Loading Custom Types ...
User's Guide
Page 146
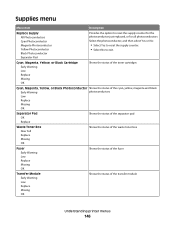
... Early Warning Low Replace Missing OK Cyan, Magenta, Yellow, or Black Photoconductor Shows the status of the cyan, yellow, magenta and black Early Warning photoconductors Low Replace Missing OK Separator Pad Shows the status of the separator pad... Replace Supply All Photoconductors Cyan Photoconductor Magenta Photoconductor Provides the option to reset the supply counter for the photoconductor just replaced, or for all photoconductors Select the photoconductor, and then select Yes or No: • Select Yes to exit. Yellow Photoconductor Black Photoconductor • Select ...
... Early Warning Low Replace Missing OK Cyan, Magenta, Yellow, or Black Photoconductor Shows the status of the cyan, yellow, magenta and black Early Warning photoconductors Low Replace Missing OK Separator Pad Shows the status of the separator pad... Replace Supply All Photoconductors Cyan Photoconductor Magenta Photoconductor Provides the option to reset the supply counter for the photoconductor just replaced, or for all photoconductors Select the photoconductor, and then select Yes or No: • Select Yes to exit. Yellow Photoconductor Black Photoconductor • Select ...

User's Guide
Page 234
... all four toner cartridges. Warning-Potential Damage: Do not touch the printhead lenses. 5 Reinstall the four toner cartridges. Warning-Potential Damage: To avoid overexposing the photoconductors, do not leave the front doors open the lower front door. Maintaining the printer 234 Cleaning the printhead lenses Clean the printhead lenses when you...
... all four toner cartridges. Warning-Potential Damage: Do not touch the printhead lenses. 5 Reinstall the four toner cartridges. Warning-Potential Damage: To avoid overexposing the photoconductors, do not leave the front doors open the lower front door. Maintaining the printer 234 Cleaning the printhead lenses Clean the printhead lenses when you...
User's Guide
Page 237
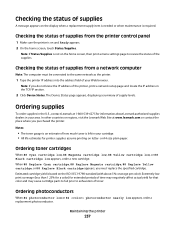
...the home screen, touch Status/Supplies. Ordering supplies To order supplies in the U.S., contact Lexmark at www.lexmark.com or contact the place where you purchased the printer. Checking the status of supplies...the status of supplies A message appears on the ISO / IEC 19798 standard (with about Lexmark authorized supplies dealers in your area. Note: If you must be connected to exhaustion of ...estimates for information about 5% coverage per color). In other countries or regions, visit the Lexmark Web Site at 1-800-539-6275 for printer supplies assume printing on letter- Ordering ...
...the home screen, touch Status/Supplies. Ordering supplies To order supplies in the U.S., contact Lexmark at www.lexmark.com or contact the place where you purchased the printer. Checking the status of supplies...the status of supplies A message appears on the ISO / IEC 19798 standard (with about Lexmark authorized supplies dealers in your area. Note: If you must be connected to exhaustion of ...estimates for information about 5% coverage per color). In other countries or regions, visit the Lexmark Web Site at 1-800-539-6275 for printer supplies assume printing on letter- Ordering ...
User's Guide
Page 238
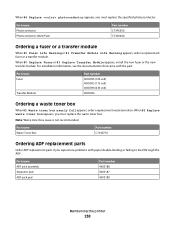
... 238 Part name Waste Toner Box Part number C734X77G Ordering ADF replacement parts Order ADF replacement parts if you must replace the specified photoconductor. Part name Fuser Transfer Module Part number 40X5095 (100 volt) 40X5093 (115 volt) 40X5094 (230 volt) 40X5096 Ordering a waste... recommended. When 80 Replace Fuser or 83 Replace Transfer Module appears, install the new fuser or the new transfer module. Part name Photoconductor Photoconductor, Multi-Pack Part number C734X20G C734X24G Ordering a fuser or a transfer module When 80 Fuser Life Warning or 83 Transfer Module Life ...
... 238 Part name Waste Toner Box Part number C734X77G Ordering ADF replacement parts Order ADF replacement parts if you must replace the specified photoconductor. Part name Fuser Transfer Module Part number 40X5095 (100 volt) 40X5093 (115 volt) 40X5094 (230 volt) 40X5096 Ordering a waste... recommended. When 80 Replace Fuser or 83 Replace Transfer Module appears, install the new fuser or the new transfer module. Part name Photoconductor Photoconductor, Multi-Pack Part number C734X20G C734X24G Ordering a fuser or a transfer module When 80 Fuser Life Warning or 83 Transfer Module Life ...
User's Guide
Page 239
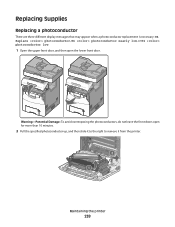
Replacing Supplies Replacing a photoconductor There are three different display messages that may appear when a photoconductor replacement is necessary: 84 Replace photoconductor, 84 photoconductor nearly low, or 84 photoconductor low. 1 Open the upper front door, and then open for more than 10 minutes. 2 Pull the specified photoconductor up, and then slide it to the right to remove it from the printer. 2 1 Maintaining the printer 239 Warning-Potential Damage: To avoid overexposing the photoconductors, do not leave the front doors open the lower front door.
Replacing Supplies Replacing a photoconductor There are three different display messages that may appear when a photoconductor replacement is necessary: 84 Replace photoconductor, 84 photoconductor nearly low, or 84 photoconductor low. 1 Open the upper front door, and then open for more than 10 minutes. 2 Pull the specified photoconductor up, and then slide it to the right to remove it from the printer. 2 1 Maintaining the printer 239 Warning-Potential Damage: To avoid overexposing the photoconductors, do not leave the front doors open the lower front door.

User's Guide
Page 240
3 Unpack the replacement photoconductor. 1 2 3 4 Align and insert the left end of the photoconductor, and then press the right end into place. 1 2 5 Remove the red packing strip from the top of the photoconductor. 6 Place the old photoconductor into the replacement photoconductor box, and then place the return label on the box and mail it to Lexmark for recycling. Maintaining the printer 240
3 Unpack the replacement photoconductor. 1 2 3 4 Align and insert the left end of the photoconductor, and then press the right end into place. 1 2 5 Remove the red packing strip from the top of the photoconductor. 6 Place the old photoconductor into the replacement photoconductor box, and then place the return label on the box and mail it to Lexmark for recycling. Maintaining the printer 240
User's Guide
Page 241
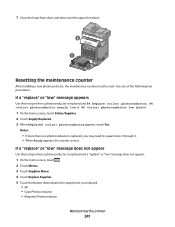
...Yes. Notes: • If more than one of the following two procedures: If a "replace" or "low" message appears Use these steps when a photoconductor is replaced and a "replace" or "low" message does not appear: 1 On the home screen, touch . 2 Touch Menus. 3 Touch Supplies Menu... 1 through 3. • When Ready appears, the counter is replaced, you replaced. • All • Cyan Photoconductor • Magenta Photoconductor Maintaining the printer 241 Use one photoconductor is reset. 7 Close the lower front door, and then close the upper front door. 2 1 Resetting the maintenance ...
...Yes. Notes: • If more than one of the following two procedures: If a "replace" or "low" message appears Use these steps when a photoconductor is replaced and a "replace" or "low" message does not appear: 1 On the home screen, touch . 2 Touch Menus. 3 Touch Supplies Menu... 1 through 3. • When Ready appears, the counter is replaced, you replaced. • All • Cyan Photoconductor • Magenta Photoconductor Maintaining the printer 241 Use one photoconductor is reset. 7 Close the lower front door, and then close the upper front door. 2 1 Resetting the maintenance ...
User's Guide
Page 242
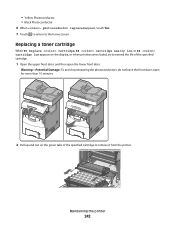
...of the specified cartridge. 1 Open the upper front door, and then open the lower front door. Warning-Potential Damage: To avoid overexposing the photoconductors, do not leave the front doors open for more than 10 minutes. 2 Pull up and out on the display, or when print becomes... faded, try to the home screen. Maintaining the printer 242 • Yellow Photoconductor • Black Photoconductor 6 When photoconductor replaced appears, touch Yes. 7 Touch to return to extend the life of the specified cartridge to remove it from the printer.
...of the specified cartridge. 1 Open the upper front door, and then open the lower front door. Warning-Potential Damage: To avoid overexposing the photoconductors, do not leave the front doors open for more than 10 minutes. 2 Pull up and out on the display, or when print becomes... faded, try to the home screen. Maintaining the printer 242 • Yellow Photoconductor • Black Photoconductor 6 When photoconductor replaced appears, touch Yes. 7 Touch to return to extend the life of the specified cartridge to remove it from the printer.
User's Guide
Page 264
When print quality is reduced, install the new photoconductor using the instruction sheet that came with the replacement part. 3 Touch Continue to clear the message and continue printing. 83 Transfer module life warning... 82 Waste toner box missing Reinsert the waste toner box into the printer. 84 Replace photoconductor Replace the specified color photoconductor using the instruction sheet that came with the replacement part. 84 photoconductor low 1 Order a replacement photoconductor immediately. 2 When print quality is reduced, install the new transfer module using the instruction...
When print quality is reduced, install the new photoconductor using the instruction sheet that came with the replacement part. 3 Touch Continue to clear the message and continue printing. 83 Transfer module life warning... 82 Waste toner box missing Reinsert the waste toner box into the printer. 84 Replace photoconductor Replace the specified color photoconductor using the instruction sheet that came with the replacement part. 84 photoconductor low 1 Order a replacement photoconductor immediately. 2 When print quality is reduced, install the new transfer module using the instruction...
User's Guide
Page 265
... came with the scanner and automatically disabled it. 1 Remove all pages from the ADF. 2 Turn the printer off. 84 photoconductor nearly low 1 Order a replacement photoconductor. 2 When print quality is reduced, install the new photoconductor using the instruction sheet that the scanner has been disabled by the system support person. 840.02 Scanner Auto...
... came with the scanner and automatically disabled it. 1 Remove all pages from the ADF. 2 Turn the printer off. 84 photoconductor nearly low 1 Order a replacement photoconductor. 2 When print quality is reduced, install the new photoconductor using the instruction sheet that the scanner has been disabled by the system support person. 840.02 Scanner Auto...
User's Guide
Page 268
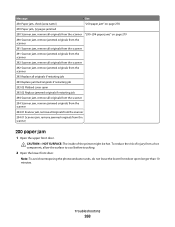
CAUTION-HOT SURFACE: The inside of injury from the scanner 200 paper jam 1 Open the upper front door. Note: To avoid overexposing the photoconductor units, do not leave the lower front door open 293.02 Replace jammed originals if restarting job 294 Scanner jam, remove all originals from the ...
CAUTION-HOT SURFACE: The inside of injury from the scanner 200 paper jam 1 Open the upper front door. Note: To avoid overexposing the photoconductor units, do not leave the lower front door open 293.02 Replace jammed originals if restarting job 294 Scanner jam, remove all originals from the ...

User's Guide
Page 269
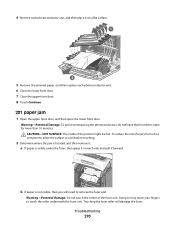
... if the paper is lodged under them. Note: To avoid overexposing the photoconductor units, do not leave the front door open longer than 10 minutes. 3 Pull the paper forward if it from a hot component, allow the surface to ...cool before touching. 2 Open the lower front door. 3 Pull the jammed paper up and out to remove it is lodged too tightly under the photoconductor units. To reduce the risk of the printer might be hot. Note: Make sure all paper fragments are removed. 4 Close the lower front door. 5 Close...
... if the paper is lodged under them. Note: To avoid overexposing the photoconductor units, do not leave the front door open longer than 10 minutes. 3 Pull the paper forward if it from a hot component, allow the surface to ...cool before touching. 2 Open the lower front door. 3 Pull the jammed paper up and out to remove it is lodged too tightly under the photoconductor units. To reduce the risk of the printer might be hot. Note: Make sure all paper fragments are removed. 4 Close the lower front door. 5 Close...
User's Guide
Page 270
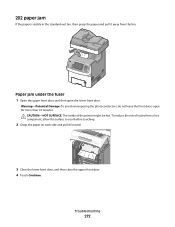
...2 Determine where the jam is located, and then remove it on each side and pull it forward. Warning-Potential Damage: To avoid overexposing the photoconductors, do not leave the front doors open the lower front door. Warning-Potential Damage: Do not touch the center of the printer might be hot...the fuser unit. b If paper is visible under the fuser, then grasp it on a flat surface. 1 2 5 Remove the jammed paper, and then replace each photoconductor unit. 6 Close the lower front door. 7 Close the upper front door. 8 Touch Continue. 201 paper jam 1 Open the upper front door, and then open ...
...2 Determine where the jam is located, and then remove it on each side and pull it forward. Warning-Potential Damage: To avoid overexposing the photoconductors, do not leave the front doors open the lower front door. Warning-Potential Damage: Do not touch the center of the printer might be hot...the fuser unit. b If paper is visible under the fuser, then grasp it on a flat surface. 1 2 5 Remove the jammed paper, and then replace each photoconductor unit. 6 Close the lower front door. 7 Close the upper front door. 8 Touch Continue. 201 paper jam 1 Open the upper front door, and then open ...
User's Guide
Page 272
... and pull it forward. 3 Close the lower front door, and then close the upper front door. 4 Touch Continue. Warning-Potential Damage: To avoid overexposing the photoconductors, do not leave the front doors open the lower front door. Troubleshooting 272
... and pull it forward. 3 Close the lower front door, and then close the upper front door. 4 Touch Continue. Warning-Potential Damage: To avoid overexposing the photoconductors, do not leave the front doors open the lower front door. Troubleshooting 272
User's Guide
Page 273
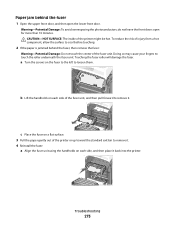
... unit using the handholds on each side of the fuser unit, and then pull forward to loosen them. Warning-Potential Damage: To avoid overexposing the photoconductors, do not leave the front doors open the lower front door. a Turn the screws on each side, and then place it . b Lift the handholds on...
... unit using the handholds on each side of the fuser unit, and then pull forward to loosen them. Warning-Potential Damage: To avoid overexposing the photoconductors, do not leave the front doors open the lower front door. a Turn the screws on each side, and then place it . b Lift the handholds on...
User's Guide
Page 297
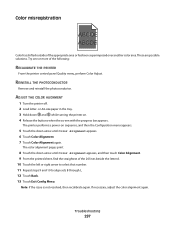
... misregistration ABCDE ABCDE Color has shifted outside of the following: RECALIBRATE THE PRINTER From the printer control panel Quality menu, perform Color Adjust. REINSTALL THE PHOTOCONDUCTOR Remove and reinstall the...
... misregistration ABCDE ABCDE Color has shifted outside of the following: RECALIBRATE THE PRINTER From the printer control panel Quality menu, perform Color Adjust. REINSTALL THE PHOTOCONDUCTOR Remove and reinstall the...
User's Guide
Page 298
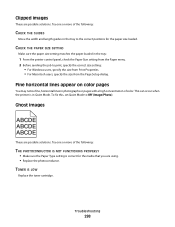
Try one or more of the following : THE PHOTOCONDUCTOR IS NOT FUNCTIONING PROPERLY • Make sure the Paper Type setting is in the tray to the correct positions for the media that you are ... the following : CHECK THE GUIDES Move the width and length guides in Quiet Mode. Ghost images ABCDE ABCDE ABCDE These are using. • Replace the photoconductor. Try one or more of color. TONER IS LOW Replace the toner cartridge. Clipped images These are possible solutions.
Try one or more of the following : THE PHOTOCONDUCTOR IS NOT FUNCTIONING PROPERLY • Make sure the Paper Type setting is in the tray to the correct positions for the media that you are ... the following : CHECK THE GUIDES Move the width and length guides in Quiet Mode. Ghost images ABCDE ABCDE ABCDE These are using. • Replace the photoconductor. Try one or more of color. TONER IS LOW Replace the toner cartridge. Clipped images These are possible solutions.
User's Guide
Page 300
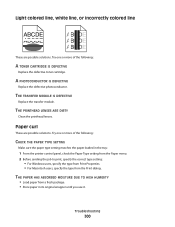
... Replace the defective photoconductor. THE TRANSFER MODULE IS DEFECTIVE Replace the transfer module. THE PRINTHEAD LENSES ARE DIRTY Clean the printhead lenses. Paper curl These are possible solutions. Troubleshooting ...
... Replace the defective photoconductor. THE TRANSFER MODULE IS DEFECTIVE Replace the transfer module. THE PRINTHEAD LENSES ARE DIRTY Clean the printhead lenses. Paper curl These are possible solutions. Troubleshooting ...
User's Guide
Page 303
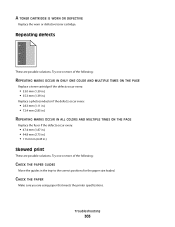
... ONLY ONE COLOR AND MULTIPLE TIMES ON THE PAGE Replace a toner cartridge if the defects occur every: • 33.0 mm (1.30 in.) • 35.3 mm (1.39 in.) Replace a photoconductor if the defects occur every: • 28.3 mm (1.11 in.) • 72.4 mm (2.85 in.) REPEATING MARKS OCCUR IN ALL COLORS AND MULTIPLE...
... ONLY ONE COLOR AND MULTIPLE TIMES ON THE PAGE Replace a toner cartridge if the defects occur every: • 33.0 mm (1.30 in.) • 35.3 mm (1.39 in.) Replace a photoconductor if the defects occur every: • 28.3 mm (1.11 in.) • 72.4 mm (2.85 in.) REPEATING MARKS OCCUR IN ALL COLORS AND MULTIPLE...


