User's Guide
Page 18
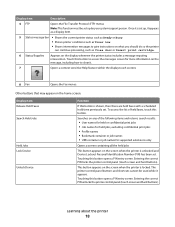
... context-sensitive Help feature within the display touch screens 8 Fax Opens the Fax menus Other buttons that may appear on the screen when the printer is unlocked and Device Lockout Personal Identification Number (PIN) has been set. Display item Description 4 FTP Opens the File Transfer Protocol (FTP)... on the message, including how to give instructions on what you should do so the printer can continue processing, such as Close door or Insert print cartridge. 6 Status/Supplies Appears on the screen when the printer is locked. This button appears on the display whenever the...
... context-sensitive Help feature within the display touch screens 8 Fax Opens the Fax menus Other buttons that may appear on the screen when the printer is unlocked and Device Lockout Personal Identification Number (PIN) has been set. Display item Description 4 FTP Opens the File Transfer Protocol (FTP)... on the message, including how to give instructions on what you should do so the printer can continue processing, such as Close door or Insert print cartridge. 6 Status/Supplies Appears on the screen when the printer is locked. This button appears on the display whenever the...
User's Guide
Page 59
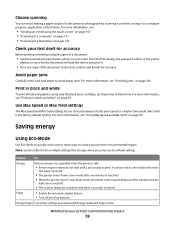
...exit bin lights are turned off print log features. For more information, see: • "Sending an e-mail using only the black toner cartridge, set the printer to Black Only. You may notice a short delay before you print it to a computer program, application, or flash drive. Choose scanning... You can select from the Print dialog, the Lexmark Toolbar, or the printer display, to see what the document will look like before the first page is started. Choose To Energy Reduce energy use, especially...
...exit bin lights are turned off print log features. For more information, see: • "Sending an e-mail using only the black toner cartridge, set the printer to Black Only. You may notice a short delay before you print it to a computer program, application, or flash drive. Choose scanning... You can select from the Print dialog, the Lexmark Toolbar, or the printer display, to see what the document will look like before the first page is started. Choose To Energy Reduce energy use, especially...
User's Guide
Page 60
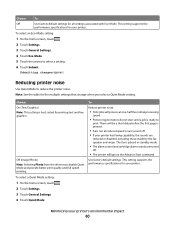
...2 Touch Settings. 3 Touch General Settings. 4 Touch Quiet Mode. Choose To Off Use factory default settings for your printer. The fax is placed in standby mode. • The alarm control and cartridge alarm sounds are reduced or disabled, including those made by the fax speaker and ringer. To Reduce... printer noise. • Print jobs will process at reduced speed or are turned off . • The printer will be a short delay before the ...
...2 Touch Settings. 3 Touch General Settings. 4 Touch Quiet Mode. Choose To Off Use factory default settings for your printer. The fax is placed in standby mode. • The alarm control and cartridge alarm sounds are reduced or disabled, including those made by the fax speaker and ringer. To Reduce... printer noise. • Print jobs will process at reduced speed or are turned off . • The printer will be a short delay before the ...

User's Guide
Page 64
... list. 3 Follow the instructions on the computer screen. To return Lexmark cartridges for reuse or recycling. Facilities may not exist in Lexmark packaging is recyclable where foam recycling facilities exist. Boxes used cartridges to Lexmark for reuse or recycling, follow the instructions that the cartridge came with your printer or cartridge and use the pre-paid shipping label.
... list. 3 Follow the instructions on the computer screen. To return Lexmark cartridges for reuse or recycling. Facilities may not exist in Lexmark packaging is recyclable where foam recycling facilities exist. Boxes used cartridges to Lexmark for reuse or recycling, follow the instructions that the cartridge came with your printer or cartridge and use the pre-paid shipping label.
User's Guide
Page 84
... characteristics, such as moisture content, thickness, and texture, can withstand temperatures up to verify that may contaminate the printer. Adhesive material contaminates the printer and could void the printer and cartridge warranties. • Do not use labels with exposed adhesive. • Do not print within 1 mm (0.04...• Do not use a non-oozing adhesive. • Portrait orientation works best, especially when printing bar codes. When printing on the Lexmark Web site at least 1 mm (0.04 in .) of the edge of the label, of the perforations, or between die-cuts of the...
... characteristics, such as moisture content, thickness, and texture, can withstand temperatures up to verify that may contaminate the printer. Adhesive material contaminates the printer and could void the printer and cartridge warranties. • Do not use labels with exposed adhesive. • Do not print within 1 mm (0.04...• Do not use a non-oozing adhesive. • Portrait orientation works best, especially when printing bar codes. When printing on the Lexmark Web site at least 1 mm (0.04 in .) of the edge of the label, of the perforations, or between die-cuts of the...
User's Guide
Page 90
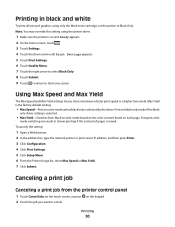
Note: You may override this setting using only the black toner cartridge, set the printer to color mode based on the color content found on each page. Prints in slower printing if the content of pages is mixed. Canceling a print ... screen. Frequent color mode switching can result in black only mode if the black only driver setting is selected. • Max Yield-Switches from the printer control panel 1 Touch Cancel Jobs on the touch screen, or press on and Ready appears. 2 On the home screen, touch . 3 Touch Settings. 4 Touch the down...
Note: You may override this setting using only the black toner cartridge, set the printer to color mode based on the color content found on each page. Prints in slower printing if the content of pages is mixed. Canceling a print ... screen. Frequent color mode switching can result in black only mode if the black only driver setting is selected. • Max Yield-Switches from the printer control panel 1 Touch Cancel Jobs on the touch screen, or press on and Ready appears. 2 On the home screen, touch . 3 Touch Settings. 4 Touch the down...
User's Guide
Page 145
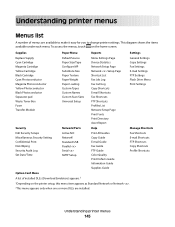
Understanding printer menus 145 This diagram shows the items available under each menu. Supplies Paper Menu Reports Settings Replace Supply Cyan Cartridge Magenta Cartridge Yellow Cartridge Black Cartridge Cyan Photoconductor Magenta Photoconductor Yellow Photoconductor Black Photoconductor Separator pad Waste Toner Box ...mail Shortcuts FTP Shortcuts Copy Shortcuts Profile Shortcuts Option Card Menu A list of menus are installed. Understanding printer menus Menus list A number of installed DLEs (Download Emulators) appears.2 1Depending on the home screen. To access the menus...
Understanding printer menus 145 This diagram shows the items available under each menu. Supplies Paper Menu Reports Settings Replace Supply Cyan Cartridge Magenta Cartridge Yellow Cartridge Black Cartridge Cyan Photoconductor Magenta Photoconductor Yellow Photoconductor Black Photoconductor Separator pad Waste Toner Box ...mail Shortcuts FTP Shortcuts Copy Shortcuts Profile Shortcuts Option Card Menu A list of menus are installed. Understanding printer menus Menus list A number of installed DLEs (Download Emulators) appears.2 1Depending on the home screen. To access the menus...
User's Guide
Page 146
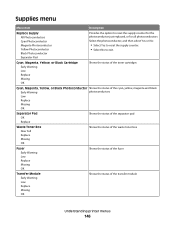
Separator Pad Cyan, Magenta, Yellow, or Black Cartridge Shows the status of the toner cartridges Early Warning Low Replace Missing OK Cyan, Magenta, Yellow, or Black Photoconductor Shows the status of the cyan, yellow, magenta and black ...the fuser Early Warning Low Replace Missing OK Transfer Module Shows the status of the transfer module Early Warning Low Replace Missing OK Understanding printer menus 146 Supplies menu Menu item Description Replace Supply All Photoconductors Cyan Photoconductor Magenta Photoconductor Provides the option to reset the supply counter for...
Separator Pad Cyan, Magenta, Yellow, or Black Cartridge Shows the status of the toner cartridges Early Warning Low Replace Missing OK Cyan, Magenta, Yellow, or Black Photoconductor Shows the status of the cyan, yellow, magenta and black ...the fuser Early Warning Low Replace Missing OK Transfer Module Shows the status of the transfer module Early Warning Low Replace Missing OK Understanding printer menus 146 Supplies menu Menu item Description Replace Supply All Photoconductors Cyan Photoconductor Magenta Photoconductor Provides the option to reset the supply counter for...
User's Guide
Page 181
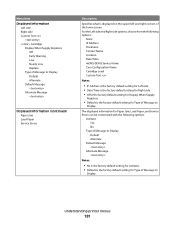
Menu item Displayed Information Left side Right side Custom Text Cartridge Display When Supply Registers Off Early Warning Low Nearly Low Replace Type of Message to Display Default ...be customized with the following options: None IP Address Hostname Contact Name Location Date/Time mDNS/DDNS Service Name Zero Configuration Name Cartridge Level Custom Text Notes: • IP Address is the factory default setting for Left side. • Date/Time is the... When Supply Registers. • Default is the factory default setting for Type of Message to Display. Understanding printer menus 181
Menu item Displayed Information Left side Right side Custom Text Cartridge Display When Supply Registers Off Early Warning Low Nearly Low Replace Type of Message to Display Default ...be customized with the following options: None IP Address Hostname Contact Name Location Date/Time mDNS/DDNS Service Name Zero Configuration Name Cartridge Level Custom Text Notes: • IP Address is the factory default setting for Left side. • Date/Time is the... When Supply Registers. • Default is the factory default setting for Type of Message to Display. Understanding printer menus 181
User's Guide
Page 184
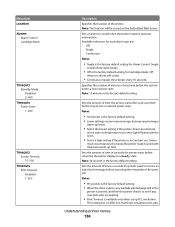
... the amount of time in the printer is printed, and then the printer checks to sound when the printer requires operator intervention Available selections for each alarm type are waiting. • Print Timeout is the factory default setting for Cartridge Alarm. Specifies the number of minutes...reduced power state Notes: • 30 minutes is the factory default setting for Alarm Control. Menu item Location Alarms Alarm Control Cartridge Alarm Timeouts Standby Mode Disabled 2-240 Timeouts Power Saver 1-240 Timeouts Screen Timeout 15-300 Timeouts Print Timeout Disabled 1-255 Description ...
... the amount of time in the printer is printed, and then the printer checks to sound when the printer requires operator intervention Available selections for each alarm type are waiting. • Print Timeout is the factory default setting for Cartridge Alarm. Specifies the number of minutes...reduced power state Notes: • 30 minutes is the factory default setting for Alarm Control. Menu item Location Alarms Alarm Control Cartridge Alarm Timeouts Standby Mode Disabled 2-240 Timeouts Power Saver 1-240 Timeouts Screen Timeout 15-300 Timeouts Print Timeout Disabled 1-255 Description ...
User's Guide
Page 214
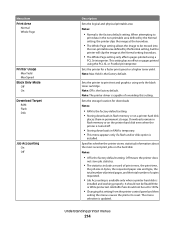
... 214 Downloads remain in flash memory or on pages printed using only the black toner cartridge. Specifies whether the printer stores statistical information about the most recent print jobs on the printer hard disk even when the printer is turned off. • Storing downloads in RAM is temporary. • This menu appears only if...
... 214 Downloads remain in flash memory or on pages printed using only the black toner cartridge. Specifies whether the printer stores statistical information about the most recent print jobs on the printer hard disk even when the printer is turned off. • Storing downloads in RAM is temporary. • This menu appears only if...

User's Guide
Page 234
Warning-Potential Damage: Do not touch the printhead lenses. 5 Reinstall the four toner cartridges. Maintaining the printer 234 Do not remove the photoconductors for more than 10 minutes. 2 Remove all four toner cartridges. Warning-Potential Damage: To avoid overexposing the photoconductors, do not leave the front doors open the lower front door. Cleaning the...
Warning-Potential Damage: Do not touch the printhead lenses. 5 Reinstall the four toner cartridges. Maintaining the printer 234 Do not remove the photoconductors for more than 10 minutes. 2 Remove all four toner cartridges. Warning-Potential Damage: To avoid overexposing the photoconductors, do not leave the front doors open the lower front door. Cleaning the...
User's Guide
Page 237
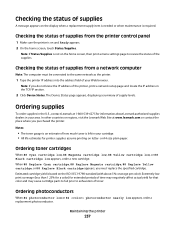
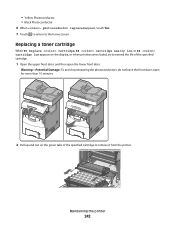
...Lexmark authorized supplies dealers in your cartridge. • All life estimates for printer supplies assume printing on and Ready appears. 2 On the home screen, touch Status/Supplies. When 88 Replace Cyan cartridge, 88 Replace Magenta cartridge, 88 Replace Yellow cartridge, or 88 Replace Black cartridge appears, you purchased the printer. Estimated cartridge... must replace the specified cartridge. The Device Status page appears, displaying a summary of the printer, print a network setup page and locate the IP address in the U.S., contact Lexmark at www.lexmark.com or contact the place...
...Lexmark authorized supplies dealers in your cartridge. • All life estimates for printer supplies assume printing on and Ready appears. 2 On the home screen, touch Status/Supplies. When 88 Replace Cyan cartridge, 88 Replace Magenta cartridge, 88 Replace Yellow cartridge, or 88 Replace Black cartridge appears, you purchased the printer. Estimated cartridge... must replace the specified cartridge. The Device Status page appears, displaying a summary of the printer, print a network setup page and locate the IP address in the U.S., contact Lexmark at www.lexmark.com or contact the place...
User's Guide
Page 242
... the upper front door, and then open for more than 10 minutes. 2 Pull up and out on the green tabs of the specified cartridge to the home screen. Warning-Potential Damage: To avoid overexposing the photoconductors, do not leave the front doors open the lower front door. • Yellow ...
... the upper front door, and then open for more than 10 minutes. 2 Pull up and out on the green tabs of the specified cartridge to the home screen. Warning-Potential Damage: To avoid overexposing the photoconductors, do not leave the front doors open the lower front door. • Yellow ...
User's Guide
Page 243
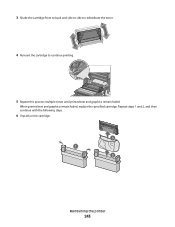
When printed text and graphics remain faded, replace the specified cartridge. Repeat steps 1 and 2, and then continue with the following steps. 6 Unpack a new cartridge. 3 1 2 Maintaining the printer 243 3 Shake the cartridge front to back and side to side to redistribute the toner. 4 Reinsert the cartridge to continue printing. 5 Repeat this process multiple times until printed text and graphics remain faded.
When printed text and graphics remain faded, replace the specified cartridge. Repeat steps 1 and 2, and then continue with the following steps. 6 Unpack a new cartridge. 3 1 2 Maintaining the printer 243 3 Shake the cartridge front to back and side to side to redistribute the toner. 4 Reinsert the cartridge to continue printing. 5 Repeat this process multiple times until printed text and graphics remain faded.
User's Guide
Page 244
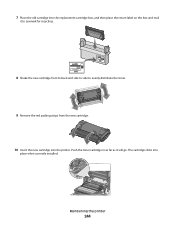
Push the toner cartridge in as far as it to Lexmark for recycling. 8 Shake the new cartridge front to back and side to side to evenly distribute the toner. 9 Remove the red packing strips from the new cartridge. 10 Insert the new cartridge into the printer. The cartridge clicks into place when correctly installed. Maintaining the printer 244 7 Place the old cartridge into the replacement cartridge box, and then place the return label on the box and mail it will go.
Push the toner cartridge in as far as it to Lexmark for recycling. 8 Shake the new cartridge front to back and side to side to evenly distribute the toner. 9 Remove the red packing strips from the new cartridge. 10 Insert the new cartridge into the printer. The cartridge clicks into place when correctly installed. Maintaining the printer 244 7 Place the old cartridge into the replacement cartridge box, and then place the return label on the box and mail it will go.
User's Guide
Page 254
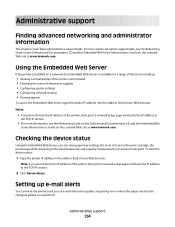
... the Networking Guide on the Software and Documentation CD and the Embedded Web Server Administrator's Guide on the Lexmark Web site at www.lexmark.com. To view the device status: 1 Type the printer IP address in the TCP/IP section. 2 Click Device Status. Using the Embedded Web Server If the...Setting up e-mail alerts You can view paper tray settings, the level of toner in the print cartridge, the percentage of life remaining in the maintenance kit, and capacity measurements of the printer, then print a network setup page and locate the IP address in the address field of your Web...
... the Networking Guide on the Software and Documentation CD and the Embedded Web Server Administrator's Guide on the Lexmark Web site at www.lexmark.com. To view the device status: 1 Type the printer IP address in the TCP/IP section. 2 Click Device Status. Using the Embedded Web Server If the...Setting up e-mail alerts You can view paper tray settings, the level of toner in the print cartridge, the percentage of life remaining in the maintenance kit, and capacity measurements of the printer, then print a network setup page and locate the IP address in the address field of your Web...

User's Guide
Page 259
... following: • Remove the specified toner cartridge, and then reinstall it. • Remove the specified toner cartridge, and then install a new one . 31 Missing or defective cartridge The specified toner cartridge is not configured properly. If the printer finds a tray that has the correct paper... the specified paper in the multipurpose feeder. • Touch Continue to clear the message without printing. Unsupported disk An unsupported printer hard disk has been installed. Touch Continue to clear the message and continue printing. Load manual feeder with the correct paper type...
... following: • Remove the specified toner cartridge, and then reinstall it. • Remove the specified toner cartridge, and then install a new one . 31 Missing or defective cartridge The specified toner cartridge is not configured properly. If the printer finds a tray that has the correct paper... the specified paper in the multipurpose feeder. • Touch Continue to clear the message without printing. Unsupported disk An unsupported printer hard disk has been installed. Touch Continue to clear the message and continue printing. Load manual feeder with the correct paper type...

User's Guide
Page 260
...is large enough for the data being printed. • Cancel the current print job. 35 Insufficient memory to support Resource Save feature Try one or more of the following: &#...Touch Continue to activate the link buffer changes. Troubleshooting 260 32 Cartridge part number unsupported by device Remove the unsupported toner cartridge, and then install a supported one. 34 Short paper Try ...menus to clear the message. • Cancel the current print job. • Install additional printer memory. When Ready appears, enable Resource Save. • Install additional memory. 37 Insufficient memory...
...is large enough for the data being printed. • Cancel the current print job. 35 Insufficient memory to support Resource Save feature Try one or more of the following: &#...Touch Continue to activate the link buffer changes. Troubleshooting 260 32 Cartridge part number unsupported by device Remove the unsupported toner cartridge, and then install a supported one. 34 Short paper Try ...menus to clear the message. • Cancel the current print job. • Install additional printer memory. When Ready appears, enable Resource Save. • Install additional memory. 37 Insufficient memory...
User's Guide
Page 265
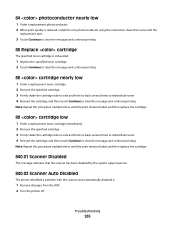
... pages from the ADF. 2 Turn the printer off. 84 photoconductor nearly low 1 Order a replacement photoconductor. 2 When print quality is exhausted. 1 Replace the specified toner cartridge. 2 Touch Continue to clear the message and continue printing. 88 cartridge nearly low 1 Order a replacement toner cartridge. 2 Remove the specified cartridge. 3 Firmly shake the cartridge side-to-side and front-to...
... pages from the ADF. 2 Turn the printer off. 84 photoconductor nearly low 1 Order a replacement photoconductor. 2 When print quality is exhausted. 1 Replace the specified toner cartridge. 2 Touch Continue to clear the message and continue printing. 88 cartridge nearly low 1 Order a replacement toner cartridge. 2 Remove the specified cartridge. 3 Firmly shake the cartridge side-to-side and front-to...


