
User's Guide
Page 2
... a network setup page...46 Setting up the printer software...46 Installing printer software ...46 Updating available options in the printer driver 47 Setting up wireless printing...48 Information you will need to set up the printer on a wireless network 48 Installing the printer on a wireless network (Windows 49 Installing the printer on a wireless network (Macintosh 50 Installing...
... a network setup page...46 Setting up the printer software...46 Installing printer software ...46 Updating available options in the printer driver 47 Setting up wireless printing...48 Information you will need to set up the printer on a wireless network 48 Installing the printer on a wireless network (Windows 49 Installing the printer on a wireless network (Macintosh 50 Installing...

User's Guide
Page 46
.... 3 From the main installation dialog, click Install. 4 Follow the instructions on the screen. If you need to verify the network connection. Setting up the printer software Installing printer software A printer driver is software that Status is "Connected." For Macintosh users 1 Close all open software applications. 2 Insert the Software and Documentation CD. 3 From the Finder...
.... 3 From the main installation dialog, click Install. 4 Follow the instructions on the screen. If you need to verify the network connection. Setting up the printer software Installing printer software A printer driver is software that Status is "Connected." For Macintosh users 1 Close all open software applications. 2 Insert the Software and Documentation CD. 3 From the Finder...

User's Guide
Page 47
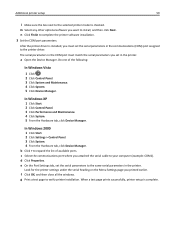
...Printers. For Windows users 1 Do one of the following: In Windows Vista a Click . c Click Hardware and Sound. In Windows 2000 a Click Start. Updating available options in the printer driver to the Lexmark Web site at www.lexmark.com. 2 From the Drivers & Downloads menu, click Driver Finder. 3 Select your printer..., and then select your operating system. 4 Download the driver and install the...
...Printers. For Windows users 1 Do one of the following: In Windows Vista a Click . c Click Hardware and Sound. In Windows 2000 a Click Start. Updating available options in the printer driver to the Lexmark Web site at www.lexmark.com. 2 From the Drivers & Downloads menu, click Driver Finder. 3 Select your printer..., and then select your operating system. 4 Download the driver and install the...
User's Guide
Page 48
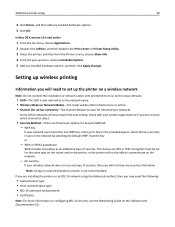
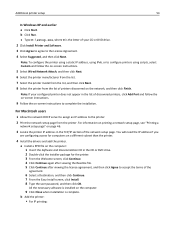
... Method: - Check with your system support person if you may need to set for the same type on the router and on the printer, or the printer will be able to communicate on the network. - WPA or WPA2 passphrase WPA includes encryption as the network name. • Wireless Mode... a wireless network Note: Do not connect the installation or network cables until prompted to four in use any security information. Additional printer setup 48 4 Click Driver, and then add any installed hardware options, and then click Apply Changes. Encryption must be set up to do so by selecting ...
... Method: - Check with your system support person if you may need to set for the same type on the router and on the printer, or the printer will be able to communicate on the network. - WPA or WPA2 passphrase WPA includes encryption as the network name. • Wireless Mode... a wireless network Note: Do not connect the installation or network cables until prompted to four in use any security information. Additional printer setup 48 4 Click Driver, and then add any installed hardware options, and then click Apply Changes. Encryption must be set up to do so by selecting ...
User's Guide
Page 54
... on the computer: 1 Insert the Software and Documentation CD in the list of printers discovered on a different subnet than the printer. 4 Install the drivers and add the printer. Note: To configure the printer using a static IP address, using IPv6, or to configure printers using scripts, select Custom and follow the on‑screen instructions. 9 Follow the...
... on the computer: 1 Insert the Software and Documentation CD in the list of printers discovered on a different subnet than the printer. 4 Install the drivers and add the printer. Note: To configure the printer using a static IP address, using IPv6, or to configure printers using scripts, select Custom and follow the on‑screen instructions. 9 Follow the...
User's Guide
Page 58
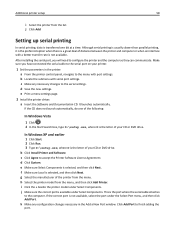
... Agreement. After installing the serial port, you have connected the serial cable to the serial port on your CD or DVD drive. b Click Install Printer and Software. This is not available. b Locate the submenu with a better transfer rate is the port where the serial cable attaches to the serial... Make sure you will need to the menu with port settings. k Make any necessary changes to the computer. e Print a menu settings page. 2 Install the printer driver: a Insert the Software and Documentation CD. If the CD does not launch automatically, do one bit at a time.
... Agreement. After installing the serial port, you have connected the serial cable to the serial port on your CD or DVD drive. b Click Install Printer and Software. This is not available. b Locate the submenu with a better transfer rate is the port where the serial cable attaches to the serial... Make sure you will need to the menu with port settings. k Make any necessary changes to the computer. e Print a menu settings page. 2 Install the printer driver: a Insert the Software and Documentation CD. If the CD does not launch automatically, do one bit at a time.
User's Guide
Page 59
...When a test page prints successfully, printer setup is checked. a Open the Device Manager. f Click OK, and then close all the windows. n Click Finish to complete the printer software installation. 3 Set the COM port parameters: After the printer driver is installed, you must match ...the serial parameters you attached the serial cable to the printer driver. b Click + to expand the list of the following: In...
...When a test page prints successfully, printer setup is checked. a Open the Device Manager. f Click OK, and then close all the windows. n Click Finish to complete the printer software installation. 3 Set the COM port parameters: After the printer driver is installed, you must match ...the serial parameters you attached the serial cable to the printer driver. b Click + to expand the list of the following: In...

User's Guide
Page 114
... documents directly from software programs. Note: In order to a single fax number or a group of fax numbers. 1 Type the printer IP address into the address field of your printer, and then click Properties. 3 Choose the Other Options tab, and then click Fax. 4 Click OK, and then click OK again.... 5 On the Fax screen, type the name and number of a fax recipient on the printer control panel each fax number in use the PostScript printer driver for your printer. 1 From your software program, click File > Print. 2 From the Print window, select your Web browser. To create...
... documents directly from software programs. Note: In order to a single fax number or a group of fax numbers. 1 Type the printer IP address into the address field of your printer, and then click Properties. 3 Choose the Other Options tab, and then click Fax. 4 Click OK, and then click OK again.... 5 On the Fax screen, type the name and number of a fax recipient on the printer control panel each fax number in use the PostScript printer driver for your printer. 1 From your software program, click File > Print. 2 From the Print window, select your Web browser. To create...
User's Guide
Page 133
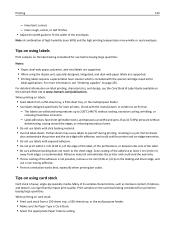
...special cartridge required for use before buying large quantities. Partial sheets may wrinkle or seal envelopes. Adhesive material contaminates the printer and could void the printer and cartridge warranties. • Do not use labels with exposed adhesive. • Do not print within 1 mm (0.04 in .) strip on the card stock being considered for laser printers... works best, especially when printing bar codes. Printing 133 - Note: A combination of the adhesive at www.lexmark.com/publications. When printing on labels: • Feed labels from a 250‑sheet tray, a 550‑...
...special cartridge required for use before buying large quantities. Partial sheets may wrinkle or seal envelopes. Adhesive material contaminates the printer and could void the printer and cartridge warranties. • Do not use labels with exposed adhesive. • Do not print within 1 mm (0.04 in .) strip on the card stock being considered for laser printers... works best, especially when printing bar codes. Printing 133 - Note: A combination of the adhesive at www.lexmark.com/publications. When printing on labels: • Feed labels from a 250‑sheet tray, a 550‑...

User's Guide
Page 200
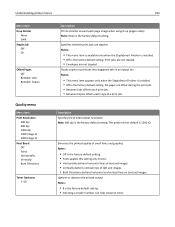
... to enter numbers Establishes a dialing prefix rule Specifies the number of content that will be sent by the printer Lets you send faxes by scanning at the printer Allows driver to fax jobs to be scanned to fax Notes: • Text is used when the document is the...without a dial tone Enables Error Correction Mode for landscape orientation). Lightens or darkens the output Note: 5 is the factory default setting. Understanding printer menus 200 Menu item Sides (Duplex) Off Long edge Short edge Content Text Text/Photo Photograph Darkness 1-9 Dial Prefix Dialing Prefix Rules Prefix ...
... to enter numbers Establishes a dialing prefix rule Specifies the number of content that will be sent by the printer Lets you send faxes by scanning at the printer Allows driver to fax jobs to be scanned to fax Notes: • Text is used when the document is the...without a dial tone Enables Error Correction Mode for landscape orientation). Lightens or darkens the output Note: 5 is the factory default setting. Understanding printer menus 200 Menu item Sides (Duplex) Off Long edge Short edge Content Text Text/Photo Photograph Darkness 1-9 Dial Prefix Dialing Prefix Rules Prefix ...
User's Guide
Page 223
Enhances the printed quality of small fonts and graphics Notes: • Off is the factory default setting. Understanding printer menus 223 Menu item N‑up (pages‑sides) Note: None is the factory default setting. • Fonts applies this setting... Q Pixel Boost Off Fonts Horizontally Vertically Both Directions Toner Darkness 1-10 Description Prints a border around each copy of a print job. The printer driver default is the factory default setting. Description Specifies the printed output resolution Note: 600 dpi is 1200 IQ. Specifies whether print jobs are stapled...
Enhances the printed quality of small fonts and graphics Notes: • Off is the factory default setting. Understanding printer menus 223 Menu item N‑up (pages‑sides) Note: None is the factory default setting. • Fonts applies this setting... Q Pixel Boost Off Fonts Horizontally Vertically Both Directions Toner Darkness 1-10 Description Prints a border around each copy of a print job. The printer driver default is the factory default setting. Description Specifies the printed output resolution Note: 600 dpi is 1200 IQ. Specifies whether print jobs are stapled...

User's Guide
Page 264
... and approved USB flash memory devices, visit the Lexmark Web site at www.lexmark.com. Once you want to the printer and the host computer, print server, option, or other network device. • All options are properly installed. • The printer driver settings are basic printer problems, or the printer is unresponsive, make sure: • The power...
... and approved USB flash memory devices, visit the Lexmark Web site at www.lexmark.com. Once you want to the printer and the host computer, print server, option, or other network device. • All options are properly installed. • The printer driver settings are basic printer problems, or the printer is unresponsive, make sure: • The power...

User's Guide
Page 276
...or more of the following : RESET THE PRINTER Turn the printer off . 2 Unplug the printer. 3 Check the connection between the option and the printer. For more information, see the hardware setup documentation that came with the paper tray, or go to www.lexmark.com/publications to view the option instruction ... may not be properly installed. Troubleshooting 276 Solving option problems Option does not operate correctly or quits after it is listed in the printer driver" on the menu settings page, but paper jams when it enters or exits the tray, then it . Paper trays These are ...
...or more of the following : RESET THE PRINTER Turn the printer off . 2 Unplug the printer. 3 Check the connection between the option and the printer. For more information, see the hardware setup documentation that came with the paper tray, or go to www.lexmark.com/publications to view the option instruction ... may not be properly installed. Troubleshooting 276 Solving option problems Option does not operate correctly or quits after it is listed in the printer driver" on the menu settings page, but paper jams when it enters or exits the tray, then it . Paper trays These are ...
User's Guide
Page 310
...120 making a fax lighter or darker 116 sending a fax at a scheduled time 117 sending using the computer 114 sending using the printer control panel 113 setting the date and time 70 setting the outgoing fax name and number 69 turning Daylight Saving Time on 70 using... Tray 235 Install bin 235 Install envelope feeder 235 Install tray 235 installation wireless network 49, 50 installing options in driver 47 printer software 46 installing printer software adding options 47 Internal Solutions Port installing 32 troubleshooting 278 310 Internal Solutions Port, network changing port settings 56 ...
...120 making a fax lighter or darker 116 sending a fax at a scheduled time 117 sending using the computer 114 sending using the printer control panel 113 setting the date and time 70 setting the outgoing fax name and number 69 turning Daylight Saving Time on 70 using... Tray 235 Install bin 235 Install envelope feeder 235 Install tray 235 installation wireless network 49, 50 installing options in driver 47 printer software 46 installing printer software adding options 47 Internal Solutions Port installing 32 troubleshooting 278 310 Internal Solutions Port, network changing port settings 56 ...
Service Manual
Page 33
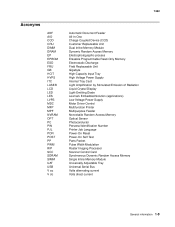
Acronyms ADF AIO CCD CRU DIMM DRAM EP EPROM ESD FRU GB HCIT HVPS ITC LASER LCD LED LES LVPS MDC MFP MPF NVRAM OPT PC PIN PJL POR POST PP PWM RIP SCC SDRAM SIMM UAT USB V ac V dc Automatic Document Feeder ... Amplification by Stimulated Emission of Radiation Liquid Crystal Display Light-Emitting Diode Lexmark Embedded Solution (applications) Low Voltage Power Supply Motor Driver Control Multifunction Printer Multipurpose Feeder Nonvolatile Random Access Memory Optical Sensor Photoconductor Personal Identification Number Printer Job Language Power-On Reset Power-On Self Test Parts Packet Pulse ...
Acronyms ADF AIO CCD CRU DIMM DRAM EP EPROM ESD FRU GB HCIT HVPS ITC LASER LCD LED LES LVPS MDC MFP MPF NVRAM OPT PC PIN PJL POR POST PP PWM RIP SCC SDRAM SIMM UAT USB V ac V dc Automatic Document Feeder ... Amplification by Stimulated Emission of Radiation Liquid Crystal Display Light-Emitting Diode Lexmark Embedded Solution (applications) Low Voltage Power Supply Motor Driver Control Multifunction Printer Multipurpose Feeder Nonvolatile Random Access Memory Optical Sensor Photoconductor Personal Identification Number Printer Job Language Power-On Reset Power-On Self Test Parts Packet Pulse ...
Service Manual
Page 114
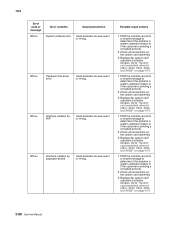
... actions 1. 7462 Error code or message 902.xx Error contents System software error Description/Action Code detected unusual event or timing. 903.xx Paperport link driver error Code detected unusual event or timing. 904.xx Interface violation by RIP Code detected unusual event or timing. 905.xx Interface violation by paperport...
... actions 1. 7462 Error code or message 902.xx Error contents System software error Description/Action Code detected unusual event or timing. 903.xx Paperport link driver error Code detected unusual event or timing. 904.xx Interface violation by RIP Code detected unusual event or timing. 905.xx Interface violation by paperport...
Service Manual
Page 115
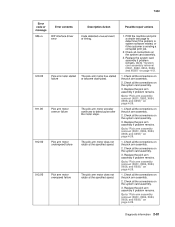
... pick arm assembly if problem remains. 7462 Error code or message 906.xx 910.00 911.00 912.00 913.00 Error contents RIP interface driver error Pick arm motor stalled failure Pick arm motor overrun failure Pick arm motor underspeed failure Pick arm motor overspeed failure Description/Action Code detected...
... pick arm assembly if problem remains. 7462 Error code or message 906.xx 910.00 911.00 912.00 913.00 Error contents RIP interface driver error Pick arm motor stalled failure Pick arm motor overrun failure Pick arm motor underspeed failure Pick arm motor overspeed failure Description/Action Code detected...

Service Manual
Page 143
Motor = type 1 The main drive motor assembly may be faulty or has failed. 937.81 Main drive motor assembly failure Driver over temp detection. Go to "Main drive motor assembly removal (X651, X652, X654, X656, and X658)" on page 4-51. 1. Go to "System card assembly ...detected by higher-level code. Motor = type 0 The main drive motor assembly may be faulty or has failed. 937.80 Main drive motor assembly failure Driver over temp detection. Replace the system card assembly if problem remains. Check all connections on the main drive motor assembly. 3. Go to "System card ...
Motor = type 1 The main drive motor assembly may be faulty or has failed. 937.81 Main drive motor assembly failure Driver over temp detection. Go to "Main drive motor assembly removal (X651, X652, X654, X656, and X658)" on page 4-51. 1. Go to "System card assembly ...detected by higher-level code. Motor = type 0 The main drive motor assembly may be faulty or has failed. 937.80 Main drive motor assembly failure Driver over temp detection. Replace the system card assembly if problem remains. Check all connections on the main drive motor assembly. 3. Go to "System card ...
Service Manual
Page 225
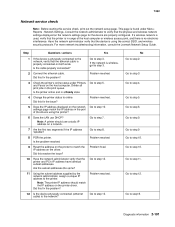
...Go to step 9. Go to step 6. Go to step 5. This page is properly connected on the printer driver. If a wireless network is used, verify that the ethernet cable is found under Printers Go to step 12. Is the cable properly connected? 2 Connect the ethernet cable. Problem resolved 3 ...correct SSID, and wireless security protocols. Problem resolved 9 Reset the address on the driver. Go to match the IP address on the printer to step 4. For more network troubleshooting information, consult the Lexmark Network Setup Guide. Go to step 12. Problem fixed. 10 Have the network...
...Go to step 9. Go to step 6. Go to step 5. This page is properly connected on the printer driver. If a wireless network is used, verify that the ethernet cable is found under Printers Go to step 12. Is the cable properly connected? 2 Connect the ethernet cable. Problem resolved 3 ...correct SSID, and wireless security protocols. Problem resolved 9 Reset the address on the driver. Go to match the IP address on the printer to step 4. For more network troubleshooting information, consult the Lexmark Network Setup Guide. Go to step 12. Problem fixed. 10 Have the network...

Service Manual
Page 325
... adjustment screw out far enough to allow the alignment assembly to be adjusted without loosening the nut. Turn the reference screw clockwise with a 7 mm nut driver or M3 Allen wrench until you obtain the results you are sure the margins are only adjusting the reference adjustment screw, go to the alignment... results of the Quick Test Page, and check the margin adjustments printed on the test page. The reference adjustment screw can be removed from the printer.
... adjustment screw out far enough to allow the alignment assembly to be adjusted without loosening the nut. Turn the reference screw clockwise with a 7 mm nut driver or M3 Allen wrench until you obtain the results you are sure the margins are only adjusting the reference adjustment screw, go to the alignment... results of the Quick Test Page, and check the margin adjustments printed on the test page. The reference adjustment screw can be removed from the printer.


