
User's Guide
Page 4
... custom-size paper...51 Loading banner paper...51 Loading original documents on the scanner glass 52 Printing 53 Printing basic documents...53 Printing a document...53 Printing a Web page ...53 Printing photos or images from a Web page ...54 Printing multiple copies of a document... page order)...56 Printing multiple pages on one sheet (N-Up)...56 Pausing print jobs...56 Canceling print jobs...56 Printing specialty documents...57 Choosing compatible specialty paper types ...57 Printing envelopes ...57 Printing greeting cards, index cards, photo cards, and postcards 57 Printing a document...
... custom-size paper...51 Loading banner paper...51 Loading original documents on the scanner glass 52 Printing 53 Printing basic documents...53 Printing a document...53 Printing a Web page ...53 Printing photos or images from a Web page ...54 Printing multiple copies of a document... page order)...56 Printing multiple pages on one sheet (N-Up)...56 Pausing print jobs...56 Canceling print jobs...56 Printing specialty documents...57 Choosing compatible specialty paper types ...57 Printing envelopes ...57 Printing greeting cards, index cards, photo cards, and postcards 57 Printing a document...
User's Guide
Page 5
... PictBridge menu...66 Transferring photos ...68 Changing the Lexmark Productivity Studio preferences 70 Editing photos...71 Cropping a photo ...71 Rotating a photo ...71 Changing the Resolution / Size of a photo...71 Applying One-Click Auto Fixes to a photo ...72 Reducing the red-eye effect in a photo...72 Blurring/Sharpening a photo ...72 Enhancing a photo...72 Changing the Hue / Saturation of a photo ...73 Changing the Gamma...
... PictBridge menu...66 Transferring photos ...68 Changing the Lexmark Productivity Studio preferences 70 Editing photos...71 Cropping a photo ...71 Rotating a photo ...71 Changing the Resolution / Size of a photo...71 Applying One-Click Auto Fixes to a photo ...72 Reducing the red-eye effect in a photo...72 Blurring/Sharpening a photo ...72 Enhancing a photo...72 Changing the Hue / Saturation of a photo ...73 Changing the Gamma...
User's Guide
Page 6
...Scanning a document using the computer...87 Scanning text for editing...88 Scanning images for editing...88 Scanning a photo to the Library...88 Scanning multiple photos at one time using the computer 89 Creating a PDF from a scanned item...89 Canceling a scan job...90 ...94 Faxing 96 Sending a fax...96 Entering a fax number ...96 Sending a fax using the software...96 Sending a fax using the control panel ...97 Sending a fax while listening to a call (On Hook Dial)...97 Sending a broadcast fax at a scheduled time...98 Receiving a fax...98 Receiving a fax manually...98 Setting a fax manual...
...Scanning a document using the computer...87 Scanning text for editing...88 Scanning images for editing...88 Scanning a photo to the Library...88 Scanning multiple photos at one time using the computer 89 Creating a PDF from a scanned item...89 Canceling a scan job...90 ...94 Faxing 96 Sending a fax...96 Entering a fax number ...96 Sending a fax using the software...96 Sending a fax using the control panel ...97 Sending a fax while listening to a call (On Hook Dial)...97 Sending a broadcast fax at a scheduled time...98 Receiving a fax...98 Receiving a fax manually...98 Setting a fax manual...
User's Guide
Page 8
...not lit ...121 Software does not install...122 Page does not print...123 Solving printer communication problems ...124 Understanding Warning levels ...125 Removing and reinstalling the software ...125 Enabling the USB port...125 Print troubleshooting...126 Improving print quality ...126 Poor text and graphic ... page prints...131 Characters on printout are missing or unexpected ...131 Colors on printout are faded or differ from colors on the screen 132 Copied item does not match the original item...132 Glossy photo paper or transparencies stick together ...133 Page prints with different fonts...
...not lit ...121 Software does not install...122 Page does not print...123 Solving printer communication problems ...124 Understanding Warning levels ...125 Removing and reinstalling the software ...125 Enabling the USB port...125 Print troubleshooting...126 Improving print quality ...126 Poor text and graphic ... page prints...131 Characters on printout are missing or unexpected ...131 Colors on printout are faded or differ from colors on the screen 132 Copied item does not match the original item...132 Glossy photo paper or transparencies stick together ...133 Page prints with different fonts...
User's Guide
Page 9
...happens when memory card is inserted ...150 Copy troubleshooting...151 Copier does not respond ...151 Scanner unit does not close...151 Poor copy quality...151 Partial document or photo copies...152 Scan troubleshooting...153 Scanner does not respond ...153 Scan was not successful ...153 Scanning......154 Partial document or photo scans...155 Cannot scan to a computer over a network...155 Fax troubleshooting...155 Cannot send or receive a fax...155 Can send but not receive faxes...158 Can receive but not send faxes...158 Printer receives a blank fax...160 Received fax has poor print quality...160...
...happens when memory card is inserted ...150 Copy troubleshooting...151 Copier does not respond ...151 Scanner unit does not close...151 Poor copy quality...151 Partial document or photo copies...152 Scan troubleshooting...153 Scanner does not respond ...153 Scan was not successful ...153 Scanning......154 Partial document or photo scans...155 Cannot scan to a computer over a network...155 Fax troubleshooting...155 Cannot send or receive a fax...155 Can send but not receive faxes...158 Can receive but not send faxes...158 Printer receives a blank fax...160 Received fax has poor print quality...160...

User's Guide
Page 10
Error messages on memory card...171 Paper Jam ...171 Multiple All-In-Ones found on the printer display...163 Alignment Error...164 Cartridge Error (1102, 1203, 1204, or 120F)...164 Black Ink Low / Color Ink Low / Photo Ink Low ...165 Clear Carrier Jam ...165 Cover Open ...165 Error 1104 ... proof sheet...167 No proof sheet information ...167 No valid photo image files detected ...167 Only one photo enhancement may be chosen at a time 168 Only one photo/size selection can be chosen at a time 168 Photo size error. Photo must fit on page...168 PictBridge communications error...168 Please remove...
Error messages on memory card...171 Paper Jam ...171 Multiple All-In-Ones found on the printer display...163 Alignment Error...164 Cartridge Error (1102, 1203, 1204, or 120F)...164 Black Ink Low / Color Ink Low / Photo Ink Low ...165 Clear Carrier Jam ...165 Cover Open ...165 Error 1104 ... proof sheet...167 No proof sheet information ...167 No valid photo image files detected ...167 Only one photo enhancement may be chosen at a time 168 Only one photo/size selection can be chosen at a time 168 Photo size error. Photo must fit on page...168 PictBridge communications error...168 Please remove...
User's Guide
Page 14
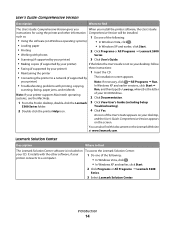
...8226; Printing 2 Click Programs or All Programs Œ Lexmark 5300 • Working with photos Series. • Scanning (if supported by your printer) 3 Click User's Guide. • Making copies (if supported by your printer) • Troubleshooting problems with the other information Comprehensive ...To access the Lexmark Solution Center: 1 Do one of your printer) If the link to find this document on your CD. It installs with printing, copying, scanning, faxing, paper jams, and misfeeds The installation screen appears. Troubleshooting). 2 Double-click the printer Help icon....
...8226; Printing 2 Click Programs or All Programs Œ Lexmark 5300 • Working with photos Series. • Scanning (if supported by your printer) 3 Click User's Guide. • Making copies (if supported by your printer) • Troubleshooting problems with the other information Comprehensive ...To access the Lexmark Solution Center: 1 Do one of your printer) If the link to find this document on your CD. It installs with printing, copying, scanning, faxing, paper jams, and misfeeds The installation screen appears. Troubleshooting). 2 Double-click the printer Help icon....

User's Guide
Page 17
... camera • Photo Card mode Checking the box contents 12 3 4 1 2 3 7 5 6 Name Description 1 Black print cartridge Cartridges to be found on the installation software CD. For more information about connecting this cord, see "Choosing a fax connection" on page 28. 4 Power cord Attaches to purchase a USB cable separately. Setting up the printer Your printer may need to...
... camera • Photo Card mode Checking the box contents 12 3 4 1 2 3 7 5 6 Name Description 1 Black print cartridge Cartridges to be found on the installation software CD. For more information about connecting this cord, see "Choosing a fax connection" on page 28. 4 Power cord Attaches to purchase a USB cable separately. Setting up the printer Your printer may need to...
User's Guide
Page 35
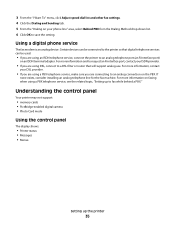
..., see the related topic, "Setting up the printer 35 Understanding the control panel Your printer may not support: • memory cards • PictBridge-enabled digital camera • Photo Card mode Using the control panel The display shows: • Printer status • Messages • Menus Setting up to fax while behind a PBX." Certain devices can be...
..., see the related topic, "Setting up the printer 35 Understanding the control panel Your printer may not support: • memory cards • PictBridge-enabled digital camera • Photo Card mode Using the control panel The display shows: • Printer status • Messages • Menus Setting up to fax while behind a PBX." Certain devices can be...

User's Guide
Page 36
... printer on . 4 Fax Mode Access the fax default screen and send faxes. Note: The mode is selected when the button light is on. 6 Resize • In Copy mode: Change the size of a copy. • In Photo Card mode: Change the size of a photo. 7 Lighter / Darker Adjust the brightness of a copy, fax, or photo. 8 Display the Copy, Scan, Fax, or Photo...
... printer on . 4 Fax Mode Access the fax default screen and send faxes. Note: The mode is selected when the button light is on. 6 Resize • In Copy mode: Change the size of a copy. • In Photo Card mode: Change the size of a photo. 7 Lighter / Darker Adjust the brightness of a copy, fax, or photo. 8 Display the Copy, Scan, Fax, or Photo...

User's Guide
Page 37
Setting up the printer 37 123 45 Press To 1 • Return to the previous screen. • Delete a letter or number. 2 • Decrease a number. • Delete a letter or number. • ..., or settings on the display. 5 • Cancel a print, copy, scan, or fax job in progress. • Clear a fax number or end a fax transmission, and return to the fax default screen. • Exit a menu or submenu, and return to the default copy, scan, fax, or photo card screen. • Clear current settings or error messages, and return...
Setting up the printer 37 123 45 Press To 1 • Return to the previous screen. • Delete a letter or number. 2 • Decrease a number. • Delete a letter or number. • ..., or settings on the display. 5 • Cancel a print, copy, scan, or fax job in progress. • Clear a fax number or end a fax transmission, and return to the fax default screen. • Exit a menu or submenu, and return to the default copy, scan, fax, or photo card screen. • Clear current settings or error messages, and return...

User's Guide
Page 38
...) or Group Dial numbers (90-99). 5 Start Color Start a color copy, scan, fax, or photo print job, depending on which mode is selected. 6 Start Black Start a black-and-white copy, scan, fax, or photo print job, depending on which mode is on the display. 2 Auto Answer Set the printer to wait for an outside line or get...
...) or Group Dial numbers (90-99). 5 Start Color Start a color copy, scan, fax, or photo print job, depending on which mode is selected. 6 Start Black Start a black-and-white copy, scan, fax, or photo print job, depending on which mode is on the display. 2 Auto Answer Set the printer to wait for an outside line or get...

User's Guide
Page 39
...; To save most settings. Temporary settings Copy Mode - Quality - Repeat Image - Quality Photo Card The following Photo Card settings will not time-out after two minutes of inactivity or turning off . Photo Effects - Resize - Original Type Scan Mode - Lighter/Darker - Quality - Saving settings ... to the default setting of a temporary setting after two minutes of inactivity or if the printer is removed. - Copies - Original Size - Quality - Original Size - Resize Fax Mode - Paper Size - Layout - Paper Type To change the setting: 1 Press or repeatedly ...
...; To save most settings. Temporary settings Copy Mode - Quality - Repeat Image - Quality Photo Card The following Photo Card settings will not time-out after two minutes of inactivity or turning off . Photo Effects - Resize - Original Type Scan Mode - Lighter/Darker - Quality - Saving settings ... to the default setting of a temporary setting after two minutes of inactivity or if the printer is removed. - Copies - Original Size - Quality - Original Size - Resize Fax Mode - Paper Size - Layout - Paper Type To change the setting: 1 Press or repeatedly ...
User's Guide
Page 42
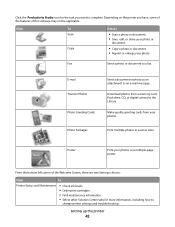
... Scan Copy Details • Scan a photo or document. • Save, edit, or share your photo or document. • Copy a photo or document. • Reprint or enlarge your photos as a multiple-page poster. Setting up the printer 42 E-mail Transfer Photos Photo Greeting Cards Photo Packages Send a document or photo as a fax. Poster Print your photo. Click the Productivity Studio icon for...
... Scan Copy Details • Scan a photo or document. • Save, edit, or share your photo or document. • Copy a photo or document. • Reprint or enlarge your photos as a multiple-page poster. Setting up the printer 42 E-mail Transfer Photos Photo Greeting Cards Photo Packages Send a document or photo as a fax. Poster Print your photo. Click the Productivity Studio icon for...

User's Guide
Page 43
... for more information. • View ink levels and order new print cartridges. Setting up the printer 43 The Solution Center appears with us regarding how you use one of the Printing Status window. • Turn printing voice notification on or off. • ...as photos, envelopes, cards, banners, iron-on the Solution Center icon. 2 Click Setup and diagnose printer. 1 Click Programs or All Programs Œ Lexmark 5300 Series. 2 Select Solution Center. Print, scan, copy, and fax. - Use basic features. - To open . Click Fax History and Settings To Set printer fax settings...
... for more information. • View ink levels and order new print cartridges. Setting up the printer 43 The Solution Center appears with us regarding how you use one of the Printing Status window. • Turn printing voice notification on or off. • ...as photos, envelopes, cards, banners, iron-on the Solution Center icon. 2 Click Setup and diagnose printer. 1 Click Programs or All Programs Œ Lexmark 5300 Series. 2 Select Solution Center. Print, scan, copy, and fax. - Use basic features. - To open . Click Fax History and Settings To Set printer fax settings...
User's Guide
Page 48
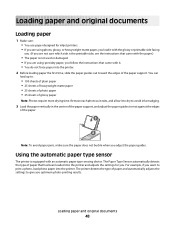
... the paper vertically in the center of the paper support, and adjust the paper guides to print a photo, load photo paper into the printer and adjusts the settings for inkjet printers. • If you are using photo, glossy, or heavyweight matte paper, you load it with the glossy or printable side facing you. (... documents 48 Loading paper and original documents Loading paper 1 Make sure: • You use paper designed for you. The printer detects the type of glossy paper Note: Photos require more drying time. You can load up to: • 100 sheets of plain paper • 25 sheets of ...
... the paper vertically in the center of the paper support, and adjust the paper guides to print a photo, load photo paper into the printer and adjusts the settings for inkjet printers. • If you are using photo, glossy, or heavyweight matte paper, you load it with the glossy or printable side facing you. (... documents 48 Loading paper and original documents Loading paper 1 Make sure: • You use paper designed for you. The printer detects the type of glossy paper Note: Photos require more drying time. You can load up to: • 100 sheets of plain paper • 25 sheets of ...
User's Guide
Page 50
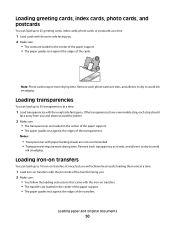
... have a removable strip, each strip should face away from you and down toward the printer. 2 Make sure: • The transparencies are loaded in the center of the paper... You can load up to 10 iron-on transfers at once, but you will achieve best results loading them one at a time. 1 Load iron-on transfers with the print side of the transfer facing you. 2 Make...center of the paper support. • The paper guides rest against the edges of the cards. 1 2 Note: Photo cards require more drying time. Loading transparencies You can load up to 50 transparencies at a time. 1 Load transparencies ...
... have a removable strip, each strip should face away from you and down toward the printer. 2 Make sure: • The transparencies are loaded in the center of the paper... You can load up to 10 iron-on transfers at once, but you will achieve best results loading them one at a time. 1 Load iron-on transfers with the print side of the transfer facing you. 2 Make...center of the paper support. • The paper guides rest against the edges of the cards. 1 2 Note: Photo cards require more drying time. Loading transparencies You can load up to 50 transparencies at a time. 1 Load transparencies ...

User's Guide
Page 52
Loading paper and original documents 52 You can scan a document for faxing. 1 Make sure the computer and the printer are on. 2 Open the top cover. 3 Place the original document or item facedown on the scanner glass in the upper left corner. 4 Close the top cover to avoid dark edges on the scanner glass You can scan and then print photos, text documents, magazine articles, newspapers, and other publications. Loading original documents on the scanned image.
Loading paper and original documents 52 You can scan a document for faxing. 1 Make sure the computer and the printer are on. 2 Open the top cover. 3 Place the original document or item facedown on the scanner glass in the upper left corner. 4 Close the top cover to avoid dark edges on the scanner glass You can scan and then print photos, text documents, magazine articles, newspapers, and other publications. Loading original documents on the scanned image.
User's Guide
Page 54
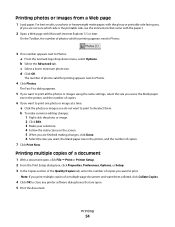
...to deselect them collated, click Collate Copies. 4 Click OK to Photos: a From the Lexmark logo drop-down menu, select Options. c Select a lower minimum photo size. The number of a document 1 With a document open . 5 Print the document. Printing photos or images from a Web page 1 Load paper. Printing 54 The.... b Select the Advanced tab. Note: If you do not want to print one photo or image at a time: a Click the photos or images you print multiple copies of a multiple-page document and want , the blank paper size in the printer, and the number of copies. 7 Click Print Now.
...to deselect them collated, click Collate Copies. 4 Click OK to Photos: a From the Lexmark logo drop-down menu, select Options. c Select a lower minimum photo size. The number of a document 1 With a document open . 5 Print the document. Printing photos or images from a Web page 1 Load paper. Printing 54 The.... b Select the Advanced tab. Note: If you do not want to print one photo or image at a time: a Click the photos or images you print multiple copies of a multiple-page document and want , the blank paper size in the printer, and the number of copies. 7 Click Print Now.
User's Guide
Page 55
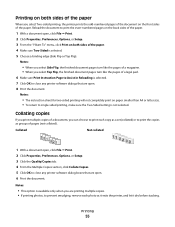
... the "I Want To" menu, click Print on both sides of the paper When you are printing multiple copies. • If printing photos, to print the copies as it exits the printer, and let it dry before stacking. Collated Not collated 1 With a document open, click File Œ Print. 2 Click Properties, ... The instruction sheet for two-sided printing will not completely print on paper smaller than A4 or letter size. • To return to close any printer software dialog boxes that are open . 8 Print the document. Notes: • This option is selected. 7 Click OK to Assist in Reloading ...
... the "I Want To" menu, click Print on both sides of the paper When you are printing multiple copies. • If printing photos, to print the copies as it exits the printer, and let it dry before stacking. Collated Not collated 1 With a document open, click File Œ Print. 2 Click Properties, ... The instruction sheet for two-sided printing will not completely print on paper smaller than A4 or letter size. • To return to close any printer software dialog boxes that are open . 8 Print the document. Notes: • This option is selected. 7 Click OK to Assist in Reloading ...


