X5150 All-In-One Series User's Guide
Page 3
... the Help button on the scanner glass 16 Loading paper 17 Copying using the operator panel 20 Copying using the All-In-One software 21 Scanning using the operator panel 22 Scanning using the All-In-One software 24 Printing 26 Sending a fax using the operator panel 26 Sending a fax using the All-In...
... the Help button on the scanner glass 16 Loading paper 17 Copying using the operator panel 20 Copying using the All-In-One software 21 Scanning using the operator panel 22 Scanning using the All-In-One software 24 Printing 26 Sending a fax using the operator panel 26 Sending a fax using the All-In...

X5150 All-In-One Series User's Guide
Page 7
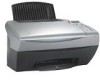
For more information, see page 4. Lock the scanner if you are disabled during printing, copying, and scanning. 3 Connect your All-In-One to do these things. Make sure paper feeds correctly into the All-In-One. Note: Lift the scanner unit to a computer. The table on or remove an item from the ... buttons help you scan, copy, fax, and customize documents. Use the: Display Operator panel Paper exit tray Paper guide Paper support Power supply Scanner lock Scanner support Scanner unit Top cover USB cable When you want to the All-In-One. Load paper in the All-In-One. You can press...
For more information, see page 4. Lock the scanner if you are disabled during printing, copying, and scanning. 3 Connect your All-In-One to do these things. Make sure paper feeds correctly into the All-In-One. Note: Lift the scanner unit to a computer. The table on or remove an item from the ... buttons help you scan, copy, fax, and customize documents. Use the: Display Operator panel Paper exit tray Paper guide Paper support Power supply Scanner lock Scanner support Scanner unit Top cover USB cable When you want to the All-In-One. Load paper in the All-In-One. You can press...
X5150 All-In-One Series User's Guide
Page 8
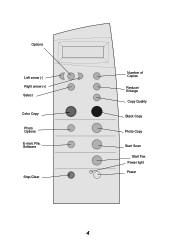
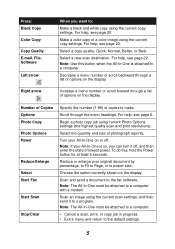
Options Left arrow (-) Right arrow (+) Select Color Copy Photo Options E-mail, File, Software Stop/Clear Number of Copies Reduce/ Enlarge Copy Quality Black Copy Photo Copy Start Scan Start Fax Power light Power 4
Options Left arrow (-) Right arrow (+) Select Color Copy Photo Options E-mail, File, Software Stop/Clear Number of Copies Reduce/ Enlarge Copy Quality Black Copy Photo Copy Start Scan Start Fax Power light Power 4
X5150 All-In-One Series User's Guide
Page 9
...size of copies to make. Note: If your All-In-One is attached to a computer. Scan an image using the current copy settings. Number of Copies Options Photo Copy Photo Options Power Reduce/Enlarge Select Start Fax Start Scan Stop/Clear Specify the number (1-99) of photograph reprints. ...Begin a photo copy job using the current copy settings. Reduce or enlarge your All-In-One on the display. Note: The All-In-One must be attached to a computer. • Cancel a scan, print, or copy job in progress. • Exit a menu and return to the default settings. ...
...size of copies to make. Note: If your All-In-One is attached to a computer. Scan an image using the current copy settings. Number of Copies Options Photo Copy Photo Options Power Reduce/Enlarge Select Start Fax Start Scan Stop/Clear Specify the number (1-99) of photograph reprints. ...Begin a photo copy job using the current copy settings. Reduce or enlarge your All-In-One on the display. Note: The All-In-One must be attached to a computer. • Cancel a scan, print, or copy job in progress. • Exit a menu and return to the default settings. ...
X5150 All-In-One Series User's Guide
Page 11
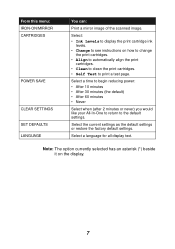
... minutes • After 30 minutes (the default) • After 60 minutes • Never Select when (after 2 minutes or never) you would like your All-In-One to return to print a test page. Note: The option currently selected has an asterisk (*) beside it on how to change the print cartridges. • Align... the factory default settings. From this menu: IRON-ON/MIRROR CARTRIDGES POWER SAVE CLEAR SETTINGS SET DEFAULTS LANGUAGE You can: Print a mirror image of the scanned image. Select a language for all display text.
... minutes • After 30 minutes (the default) • After 60 minutes • Never Select when (after 2 minutes or never) you would like your All-In-One to return to print a test page. Note: The option currently selected has an asterisk (*) beside it on how to change the print cartridges. • Align... the factory default settings. From this menu: IRON-ON/MIRROR CARTRIDGES POWER SAVE CLEAR SETTINGS SET DEFAULTS LANGUAGE You can: Print a mirror image of the scanned image. Select a language for all display text.
X5150 All-In-One Series User's Guide
Page 12
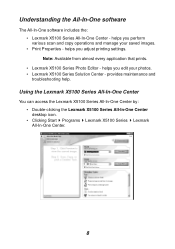
... perform various scan and copy operations and manage your photos. • Lexmark X5100 Series Solution Center - helps you edit your saved images. • Print Properties - Note: Available from almost every application that prints. • Lexmark X5100 Series Photo Editor - Using the Lexmark X5100 Series All-In-One Center You can access the Lexmark X5100 Series All...
... perform various scan and copy operations and manage your photos. • Lexmark X5100 Series Solution Center - helps you edit your saved images. • Print Properties - Note: Available from almost every application that prints. • Lexmark X5100 Series Photo Editor - Using the Lexmark X5100 Series All-In-One Center You can access the Lexmark X5100 Series All...
X5150 All-In-One Series User's Guide
Page 13
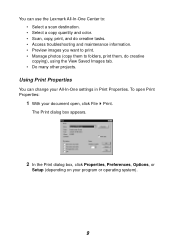
... Properties. To open Print Properties: 1 With your program or operating system). 9 Using Print Properties You can use the Lexmark All-In-One Center to: • Select a scan destination. • Select a copy quantity and color. • Scan, copy, print, and do creative tasks. • Access troubleshooting and maintenance information. • Preview images you want to...
... Properties. To open Print Properties: 1 With your program or operating system). 9 Using Print Properties You can use the Lexmark All-In-One Center to: • Select a scan destination. • Select a copy quantity and color. • Scan, copy, print, and do creative tasks. • Access troubleshooting and maintenance information. • Preview images you want to...

X5150 All-In-One Series User's Guide
Page 14
.... There are three ways to open , and then click Edit. • From the All-In-One Center, scan image to Photo Editor. 10 The Print Properties screen appears. Using the Lexmark X5100 Series Photo Editor The Lexmark X5100 Series Photo Editor lets you adjust photo attributes (brightness, contrast, and orientation) of the Print Properties...
.... There are three ways to open , and then click Edit. • From the All-In-One Center, scan image to Photo Editor. 10 The Print Properties screen appears. Using the Lexmark X5100 Series Photo Editor The Lexmark X5100 Series Photo Editor lets you adjust photo attributes (brightness, contrast, and orientation) of the Print Properties...
X5150 All-In-One Series User's Guide
Page 16
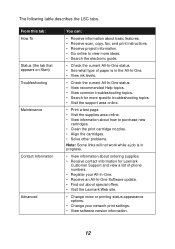
...Status (the tab that appears on Start) Troubleshooting Maintenance Contact Information Advanced You can: • Receive information about basic features. • Receive scan, copy, fax, and print instructions. • Receive project information. • Go online to view more ideas. • Search the ...supplies. • Receive contact information for Lexmark Customer Support and view a list of phone numbers. • Register your All-In-One. • Receive an All-In-One Software update. • Find out about special offers. • Visit the Lexmark Web site. • Change voice or ...
...Status (the tab that appears on Start) Troubleshooting Maintenance Contact Information Advanced You can: • Receive information about basic features. • Receive scan, copy, fax, and print instructions. • Receive project information. • Go online to view more ideas. • Search the ...supplies. • Receive contact information for Lexmark Customer Support and view a list of phone numbers. • Register your All-In-One. • Receive an All-In-One Software update. • Find out about special offers. • Visit the Lexmark Web site. • Change voice or ...

X5150 All-In-One Series User's Guide
Page 23
... tray can use your All-In-One to copy, scan, print, and fax. The following instructions explain how to create specific projects, see page 27. 19 You can hold . To find out how to complete these tasks. Note: Do not force the paper into the All-In-One. Transparencies may require up to... 10 sheets of labels 10 envelopes 10 cards 1 transparency Note: To avoid smearing ink, remove each transparency from the paper exit tray before the next one exits the All-In-One. Before you begin copying (page 20), scanning (page 22), printing (page 26), or sending faxes (page 26), refer to dry.
... tray can use your All-In-One to copy, scan, print, and fax. The following instructions explain how to create specific projects, see page 27. 19 You can hold . To find out how to complete these tasks. Note: Do not force the paper into the All-In-One. Transparencies may require up to... 10 sheets of labels 10 envelopes 10 cards 1 transparency Note: To avoid smearing ink, remove each transparency from the paper exit tray before the next one exits the All-In-One. Before you begin copying (page 20), scanning (page 22), printing (page 26), or sending faxes (page 26), refer to dry.
X5150 All-In-One Series User's Guide
Page 26
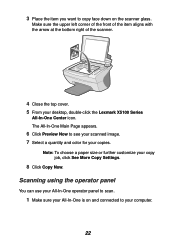
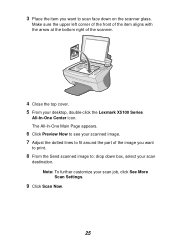
3 Place the item you want to see your scanned image. 7 Select a quantity and color for your copies. Note: To choose a paper size or further customize your desktop, double-click the Lexmark X5100 Series All-In-One Center icon. The All-In-One Main Page appears. 6 Click Preview Now to copy face down on and ...the arrow at the bottom right of the scanner. 4 Close the top cover. 5 From your copy job, click See More Copy Settings. 8 Click Copy Now. Scanning using the operator panel You can use your All-In-One operator panel to scan. 1 Make sure your All-In-One is on the scanner glass.
3 Place the item you want to see your scanned image. 7 Select a quantity and color for your copies. Note: To choose a paper size or further customize your desktop, double-click the Lexmark X5100 Series All-In-One Center icon. The All-In-One Main Page appears. 6 Click Preview Now to copy face down on and ...the arrow at the bottom right of the scanner. 4 Close the top cover. 5 From your copy job, click See More Copy Settings. 8 Click Copy Now. Scanning using the operator panel You can use your All-In-One operator panel to scan. 1 Make sure your All-In-One is on the scanner glass.

X5150 All-In-One Series User's Guide
Page 27
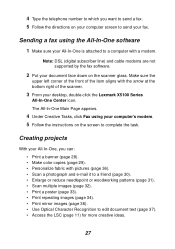
The scan destination that you want to scan face down on the scanner glass. Make sure the upper left corner of the front of the item aligns with the arrow at the bottom right of scan destinations. 7 When your preferred scan destination appears, press Select. 8 Press Start Scan to begin a scan job using the current settings. 23 2 Open the top cover. 3 Place the item you last selected (or the factory default, e-mail) appears. 6 Press the right arrow to scroll through the list of the scanner. 4 Close the top cover. 5 Press E-mail, File, Software.
The scan destination that you want to scan face down on the scanner glass. Make sure the upper left corner of the front of the item aligns with the arrow at the bottom right of scan destinations. 7 When your preferred scan destination appears, press Select. 8 Press Start Scan to begin a scan job using the current settings. 23 2 Open the top cover. 3 Place the item you last selected (or the factory default, e-mail) appears. 6 Press the right arrow to scroll through the list of the scanner. 4 Close the top cover. 5 Press E-mail, File, Software.
X5150 All-In-One Series User's Guide
Page 28
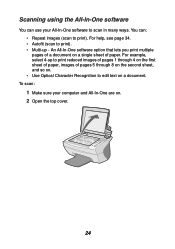
... images of pages 1 through 4 on the first sheet of paper, images of paper. An All-In-One software option that lets you print multiple pages of a document on a document. To scan: 1 Make sure your All-In-One software to edit text on a single sheet of pages 5 through 8 on the second sheet, and so... on. • Use Optical Character Recognition to scan in many ways. For example, select 4-up - You can use your computer and All-In-One are on. 2 Open the top cover. 24 For help, see page 34. • Autofit...
... images of pages 1 through 4 on the first sheet of paper, images of paper. An All-In-One software option that lets you print multiple pages of a document on a document. To scan: 1 Make sure your All-In-One software to edit text on a single sheet of pages 5 through 8 on the second sheet, and so... on. • Use Optical Character Recognition to scan in many ways. For example, select 4-up - You can use your computer and All-In-One are on. 2 Open the top cover. 24 For help, see page 34. • Autofit...
X5150 All-In-One Series User's Guide
Page 29
... 5 From your desktop, double-click the Lexmark X5100 Series All-In-One Center icon. The All-In-One Main Page appears. 6 Click Preview Now to see your scanned image. 7 Adjust the dotted lines to scan face down box, select your scan job, click See More Scan Settings. 9 Click Scan Now. 25 Make sure the upper left ...corner of the front of the item aligns with the arrow at the bottom right of the image you want to print. 8 From the Send scanned image to:...
... 5 From your desktop, double-click the Lexmark X5100 Series All-In-One Center icon. The All-In-One Main Page appears. 6 Click Preview Now to see your scanned image. 7 Adjust the dotted lines to scan face down box, select your scan job, click See More Scan Settings. 9 Click Scan Now. 25 Make sure the upper left ...corner of the front of the item aligns with the arrow at the bottom right of the image you want to print. 8 From the Send scanned image to:...

X5150 All-In-One Series User's Guide
Page 30
Printing 1 With your document open, click File Print. 2 To change the All-In-One settings, click Properties, Options, Setup or Preferences (depending on the program or operating system). 3 On the three tabs along the left corner of the front ... Print Properties screen, confirm the selections and then click OK or Print (depending on the scanner glass. The Fax software appears on your All-In-One is attached to fax face down on the program or operating system). Make sure the upper left side (Quality/Copies, Paper Setup, and Print Layout...
Printing 1 With your document open, click File Print. 2 To change the All-In-One settings, click Properties, Options, Setup or Preferences (depending on the program or operating system). 3 On the three tabs along the left corner of the front ... Print Properties screen, confirm the selections and then click OK or Print (depending on the scanner glass. The Fax software appears on your All-In-One is attached to fax face down on the program or operating system). Make sure the upper left side (Quality/Copies, Paper Setup, and Print Layout...
X5150 All-In-One Series User's Guide
Page 31
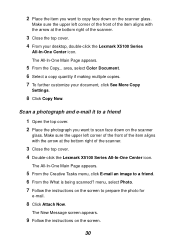
...upper left corner of the front of the item aligns with pictures (page 36). • Scan a photograph and e-mail it to a friend (page 30). • Enlarge or reduce needlepoint or woodworking patterns (page 31). &#...8226; Scan multiple images (page 32). • Print a poster (page 33). • Print repeating images (page 34). • ...Personalize fabric with the arrow at the bottom right of the scanner. 3 From your desktop, double-click the Lexmark X5100 Series All-In-One Center icon.
...upper left corner of the front of the item aligns with pictures (page 36). • Scan a photograph and e-mail it to a friend (page 30). • Enlarge or reduce needlepoint or woodworking patterns (page 31). &#...8226; Scan multiple images (page 32). • Print a poster (page 33). • Print repeating images (page 34). • ...Personalize fabric with the arrow at the bottom right of the scanner. 3 From your desktop, double-click the Lexmark X5100 Series All-In-One Center icon.
X5150 All-In-One Series User's Guide
Page 34
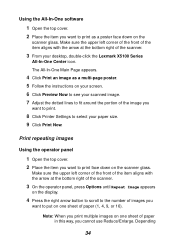
... the photograph you want to scan face down on the scanner glass. Make sure the upper left corner of the front of the item aligns with the arrow at the bottom right of the scanner. 3 Close the top cover. 4 Double-click the Lexmark X5100 Series All-In-One Center icon. The New Message... More Copy Settings. 8 Click Copy Now. area, select Color Document. 6 Select a copy quantity if making multiple copies. 7 To further customize your desktop, double-click the Lexmark X5100 Series All-In-One Center icon. 2 Place the item you want to copy face down on the scanner glass.
... the photograph you want to scan face down on the scanner glass. Make sure the upper left corner of the front of the item aligns with the arrow at the bottom right of the scanner. 3 Close the top cover. 4 Double-click the Lexmark X5100 Series All-In-One Center icon. The New Message... More Copy Settings. 8 Click Copy Now. area, select Color Document. 6 Select a copy quantity if making multiple copies. 7 To further customize your desktop, double-click the Lexmark X5100 Series All-In-One Center icon. 2 Place the item you want to copy face down on the scanner glass.

X5150 All-In-One Series User's Guide
Page 36
...click See More Scan Settings, and then click Display Advanced Scan Settings. 7 On the Scan tab, select Scan multiple items before output. 8 Click OK. The All-In-One Main Page appears. 9 Click Scan Now. 32 The All-In-One Main Page appears. 5 Select your desktop, double-click the Lexmark X5100 Series All-In-One Center icon. ...Make sure the upper left corner of the front of the item aligns with the arrow at the bottom right of the scanner. 3 Close the top cover. 4 From your scan destination from the drop-down on...
...click See More Scan Settings, and then click Display Advanced Scan Settings. 7 On the Scan tab, select Scan multiple items before output. 8 Click OK. The All-In-One Main Page appears. 9 Click Scan Now. 32 The All-In-One Main Page appears. 5 Select your desktop, double-click the Lexmark X5100 Series All-In-One Center icon. ...Make sure the upper left corner of the front of the item aligns with the arrow at the bottom right of the scanner. 3 Close the top cover. 4 From your scan destination from the drop-down on...
X5150 All-In-One Series User's Guide
Page 37
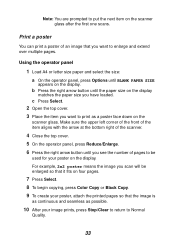
... paper size you have loaded. b Press the right arrow button until the paper size on the scanner glass after the first one scans. For example, 2x2 poster means the image you scan will be enlarged so that it fits on four pages. 7 Press Select. 8 To begin copying, press Color Copy or Black Copy...
... paper size you have loaded. b Press the right arrow button until the paper size on the scanner glass after the first one scans. For example, 2x2 poster means the image you scan will be enlarged so that it fits on four pages. 7 Press Select. 8 To begin copying, press Color Copy or Black Copy...
X5150 All-In-One Series User's Guide
Page 38
...poster face down on the scanner glass. Using the All-In-One software 1 Open the top cover. 2 Place the item you want to print as a multi-page poster. 5 Follow the instructions on your screen. 6 Click Preview Now to see your scanned image. 7 Adjust the dotted lines to fit around the portion... of the image you want to print. 8 Click Printer Settings to select your desktop, double-click the Lexmark X5100 Series All-In-One Center icon.
...poster face down on the scanner glass. Using the All-In-One software 1 Open the top cover. 2 Place the item you want to print as a multi-page poster. 5 Follow the instructions on your screen. 6 Click Preview Now to see your scanned image. 7 Adjust the dotted lines to fit around the portion... of the image you want to print. 8 Click Printer Settings to select your desktop, double-click the Lexmark X5100 Series All-In-One Center icon.


