
X5150 All-In-One Series User's Guide
Page 9
.... Select the quantity and size of options on the display. Reduce or enlarge your All-In-One is attached to a computer. Press: Black Copy Color Copy Copy Quality E-mail, File, Software Left arrow When you can turn it to a program. Select a copy quality: Quick, Normal, Better, or Best. For help ...attached to a computer. • Cancel a scan, print, or copy job in progress. • Exit a menu and return to the default settings. 5 Turn your All-In-One on , you want to poster size. Note: If your original document by percentage, to Fit to Page, or to : Make a black and white copy...
.... Select the quantity and size of options on the display. Reduce or enlarge your All-In-One is attached to a computer. Press: Black Copy Color Copy Copy Quality E-mail, File, Software Left arrow When you can turn it to a program. Select a copy quality: Quick, Normal, Better, or Best. For help ...attached to a computer. • Cancel a scan, print, or copy job in progress. • Exit a menu and return to the default settings. 5 Turn your All-In-One on , you want to poster size. Note: If your original document by percentage, to Fit to Page, or to : Make a black and white copy...
X5150 All-In-One Series User's Guide
Page 18
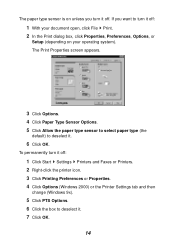
... off . The paper type sensor is on your operating system). If you turn it . 7 Click OK. 14 The Print Properties screen appears. 3 Click Options. 4 Click Paper Type Sensor Options. 5 Click Allow the paper type sensor to select paper ... Printing Preferences or Properties. 4 Click Options (Windows 2000) or the Printer Settings tab and then change (Windows 9x). 5 Click PTS Options. 6 Click the box to turn it . 6 Click OK.
... off . The paper type sensor is on your operating system). If you turn it . 7 Click OK. 14 The Print Properties screen appears. 3 Click Options. 4 Click Paper Type Sensor Options. 5 Click Allow the paper type sensor to select paper ... Printing Preferences or Properties. 4 Click Options (Windows 2000) or the Printer Settings tab and then change (Windows 9x). 5 Click PTS Options. 6 Click the box to turn it . 6 Click OK.

X5150 All-In-One Series User's Guide
Page 41
... text found in some things you can 't use your computer screen. Note: You can do if you are considering using your desktop, double-click the Lexmark X5100 Series All-In-One Center icon. Make sure the upper left corner of the front of the scanner. 3 From your All-In... the bottom right of the item aligns with the arrow at some geographies. 37 Use Optical Character Recognition Optical Character Recognition is a software feature that turns a scanned image into editable text within a word processing program. 1 Open the top cover. 2 Place the item you can : • Connect your All-...
... text found in some things you can 't use your computer screen. Note: You can do if you are considering using your desktop, double-click the Lexmark X5100 Series All-In-One Center icon. Make sure the upper left corner of the front of the scanner. 3 From your All-In... the bottom right of the item aligns with the arrow at some geographies. 37 Use Optical Character Recognition Optical Character Recognition is a software feature that turns a scanned image into editable text within a word processing program. 1 Open the top cover. 2 Place the item you can : • Connect your All-...
X5150 All-In-One Series User's Guide
Page 57
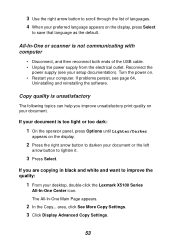
... you are copying in black and white and want to save that language as the default. Turn the power on the display. 2 Press the right arrow button to darken your document or the ...your setup documentation). Reconnect the power supply (see page 64, Uninstalling and reinstalling the software. All-In-One or scanner is not communicating with computer • Disconnect, and then reconnect both ends of languages. 4 ... the quality: 1 From your desktop, double-click the Lexmark X5100 Series All-In-One Center icon. area, click See More Copy Settings. 3 Click Display Advanced Copy Settings. 53
... you are copying in black and white and want to save that language as the default. Turn the power on the display. 2 Press the right arrow button to darken your document or the ...your setup documentation). Reconnect the power supply (see page 64, Uninstalling and reinstalling the software. All-In-One or scanner is not communicating with computer • Disconnect, and then reconnect both ends of languages. 4 ... the quality: 1 From your desktop, double-click the Lexmark X5100 Series All-In-One Center icon. area, click See More Copy Settings. 3 Click Display Advanced Copy Settings. 53

X5150 All-In-One Series User's Guide
Page 58
... on your computer screen. 2 Under Scan... The All-In-One Main Page appears on your computer screen. 2 Under Copy... 4 Click the Scan tab. 5 Under the Color depth drop down menu, select Gray. 6 Click OK. If you can either turn the auto cropping feature off or adjust how the image is... a printed source, and your copy has a checkerboard pattern on it, follow these directions: For scanning: 1 From your desktop, double-click the Lexmark X5100 Series All-In-One Center icon. Auto-cropping of scanned image is being scanned? If that does not work, you are scanning or copying from magazine or...
... on your computer screen. 2 Under Scan... The All-In-One Main Page appears on your computer screen. 2 Under Copy... 4 Click the Scan tab. 5 Under the Color depth drop down menu, select Gray. 6 Click OK. If you can either turn the auto cropping feature off or adjust how the image is... a printed source, and your copy has a checkerboard pattern on it, follow these directions: For scanning: 1 From your desktop, double-click the Lexmark X5100 Series All-In-One Center icon. Auto-cropping of scanned image is being scanned? If that does not work, you are scanning or copying from magazine or...

X5150 All-In-One Series User's Guide
Page 59
To adjust the auto-cropping: 1 From your desktop, double-click the Lexmark X5100 Series All-In-One Center icon. To turn the feature off for your next scan: 1 From your desktop, double-click the Lexmark X5100 Series All-In-One Center icon. click See More Scan Settings. 3 Click Display Advanced Scan ... from the drop-down menu. 6 Click OK. OR 1 From your desktop, double-click the Lexmark X5100 Series All-In-One Center icon. The All-In-One Main Page appears. 2 Under Scan... The All-In-One Main Page appears. 2 Under Scan... menu, select anything but Photo. To clean the scanner glass...
To adjust the auto-cropping: 1 From your desktop, double-click the Lexmark X5100 Series All-In-One Center icon. To turn the feature off for your next scan: 1 From your desktop, double-click the Lexmark X5100 Series All-In-One Center icon. click See More Scan Settings. 3 Click Display Advanced Scan ... from the drop-down menu. 6 Click OK. OR 1 From your desktop, double-click the Lexmark X5100 Series All-In-One Center icon. The All-In-One Main Page appears. 2 Under Scan... The All-In-One Main Page appears. 2 Under Scan... menu, select anything but Photo. To clean the scanner glass...
X5150 All-In-One Series User's Guide
Page 62
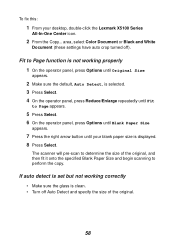
...will pre-scan to determine the size of the original. 58 area, select Color Document or Black and White Document (these settings have auto crop turned off Auto Detect and specify the size of the original, and then fit it onto the specified Blank Paper Size and begin scanning to Page... appears. 2 Make sure the default, Auto Detect, is selected. 3 Press Select. 4 On the operator panel, press Reduce/Enlarge repeatedly until your desktop, double-click the Lexmark X5100 Series All-In-One Center icon. 2 From the Copy... To fix this: 1 From your blank paper size is displayed. 8 Press Select.
...will pre-scan to determine the size of the original. 58 area, select Color Document or Black and White Document (these settings have auto crop turned off Auto Detect and specify the size of the original, and then fit it onto the specified Blank Paper Size and begin scanning to Page... appears. 2 Make sure the default, Auto Detect, is selected. 3 Press Select. 4 On the operator panel, press Reduce/Enlarge repeatedly until your desktop, double-click the Lexmark X5100 Series All-In-One Center icon. 2 From the Copy... To fix this: 1 From your blank paper size is displayed. 8 Press Select.
X5150 All-In-One Series User's Guide
Page 63
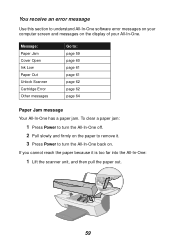
To clear a paper jam: 1 Press Power to turn the All-In-One back on the display of your computer screen and messages on . If you cannot reach the paper because it . 3 Press Power to understand All-In-One software error messages on your All-In-One. You receive an error message Use this section to... turn the All-In-One off. 2 Pull slowly and firmly on the paper to remove it is too far into the...
To clear a paper jam: 1 Press Power to turn the All-In-One back on the display of your computer screen and messages on . If you cannot reach the paper because it . 3 Press Power to understand All-In-One software error messages on your All-In-One. You receive an error message Use this section to... turn the All-In-One off. 2 Pull slowly and firmly on the paper to remove it is too far into the...

X5150 All-In-One Series User's Guide
Page 64
Cover Open message The Cover open message appears when the scanner unit is open . The message disappears, and the operator panel buttons function. 60 Lower the scanner unit. Note: The operator panel buttons do not function while the scanner unit is open . 2 Lower the scanner unit to close it. 3 Press Power to turn the All-In-One on, and then send your document to print.
Cover Open message The Cover open message appears when the scanner unit is open . The message disappears, and the operator panel buttons function. 60 Lower the scanner unit. Note: The operator panel buttons do not function while the scanner unit is open . 2 Lower the scanner unit to close it. 3 Press Power to turn the All-In-One on, and then send your document to print.
X5150 All-In-One Series User's Guide
Page 66
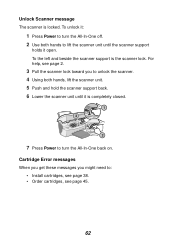
To the left and beside the scanner support is locked. For help, see page 45. 62 To unlock it: 1 Press Power to turn the All-In-One off. 2 Use both hands, lift the scanner unit. 5 Push and hold the scanner support back. 6 Lower the scanner unit until the scanner support holds it ...: • Install cartridges, see page 38. • Order cartridges, see page 2. 3 Pull the scanner lock toward you to unlock the scanner. 4 Using both hands to turn the All-In-One back on.
To the left and beside the scanner support is locked. For help, see page 45. 62 To unlock it: 1 Press Power to turn the All-In-One off. 2 Use both hands, lift the scanner unit. 5 Push and hold the scanner support back. 6 Lower the scanner unit until the scanner support holds it ...: • Install cartridges, see page 38. • Order cartridges, see page 2. 3 Pull the scanner lock toward you to unlock the scanner. 4 Using both hands to turn the All-In-One back on.
X5150 All-In-One Series User's Guide
Page 67
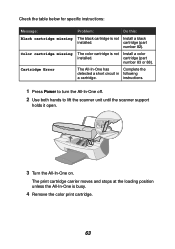
...The black cartridge is not Install a color installed. instructions. 1 Press Power to turn the All-In-One off. 2 Use both hands to lift the scanner unit until the scanner support holds it open. 3 Turn the All-In-One on. The color cartridge is not Install a black installed. The print cartridge ...carrier moves and stops at the loading position unless the All-In-One is busy. 4 Remove the color print cartridge. 63
...The black cartridge is not Install a color installed. instructions. 1 Press Power to turn the All-In-One off. 2 Use both hands to lift the scanner unit until the scanner support holds it open. 3 Turn the All-In-One on. The color cartridge is not Install a black installed. The print cartridge ...carrier moves and stops at the loading position unless the All-In-One is busy. 4 Remove the color print cartridge. 63

X5150 All-In-One Series User's Guide
Page 68
... cartridge. Other error messages 1 Turn the All-In-One off. 2 Wait a few seconds, and then turn the All-In-One back on. 3 Send your All-In-One, you may need to uninstall, and then reinstall the All-In-One software. 64 Uninstall and reinstall the All-In-One software If the All-In-One is not functioning properly...
... cartridge. Other error messages 1 Turn the All-In-One off. 2 Wait a few seconds, and then turn the All-In-One back on. 3 Send your All-In-One, you may need to uninstall, and then reinstall the All-In-One software. 64 Uninstall and reinstall the All-In-One software If the All-In-One is not functioning properly...
X5150 All-In-One Series User's Guide
Page 70
...233;riel brouilleur du Canada. A declaration of conformity with the requirements of the directives has been signed by one or more of Manufacturing and Technical Support, Lexmark International, S.A., Boigny, France. The manufacturer is subject to the following measures: • Reorient or relocate ... suggestions. Unauthorized changes or modifications could void the user's authority to operate this compliance information statement should be determined by turning the equipment off and on, the user is connected. • Consult your point of the Canadian Interference-Causing Equipment ...
...233;riel brouilleur du Canada. A declaration of conformity with the requirements of the directives has been signed by one or more of Manufacturing and Technical Support, Lexmark International, S.A., Boigny, France. The manufacturer is subject to the following measures: • Reorient or relocate ... suggestions. Unauthorized changes or modifications could void the user's authority to operate this compliance information statement should be determined by turning the equipment off and on, the user is connected. • Consult your point of the Canadian Interference-Causing Equipment ...


