User's Guide
Page 32
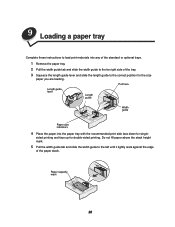
... the length guide lever and slide the length guide to the correct position for the size paper you are loading. 9 Loading a paper tray Complete these instructions to load print materials into the paper tray with the recommended print side face down for single- Pull here Length guide lever Length guide Width...
... the length guide lever and slide the length guide to the correct position for the size paper you are loading. 9 Loading a paper tray Complete these instructions to load print materials into the paper tray with the recommended print side face down for single- Pull here Length guide lever Length guide Width...

User's Guide
Page 35
... lower release latch. Doing so may be used with paper, how to turn an envelope for printing, and how to load letterhead paper for detailed instructions on loading documents loaded on the operator panel. See Loading letterhead for simplex and duplex printing. Also, avoid pressing down or applying excessive force on...
... lower release latch. Doing so may be used with paper, how to turn an envelope for printing, and how to load letterhead paper for detailed instructions on loading documents loaded on the operator panel. See Loading letterhead for simplex and duplex printing. Also, avoid pressing down or applying excessive force on...

User's Guide
Page 37
Fan the stack of print material in the multipurpose feeder. Do not mix types. Loading letterhead 35 Hold transparencies by the edges and avoid touching the print side. Loading paper and transparencies - Loading envelopes - - Stack height limiter 6 Load one type of transparencies to prevent jams. Be careful not to scratch or leave fingerprints on the transparencies. 5 Use the stack height limiter as a guide for loading instructions: - Click a topic for stack height when loading print materials.
Fan the stack of print material in the multipurpose feeder. Do not mix types. Loading letterhead 35 Hold transparencies by the edges and avoid touching the print side. Loading paper and transparencies - Loading envelopes - - Stack height limiter 6 Load one type of transparencies to prevent jams. Be careful not to scratch or leave fingerprints on the transparencies. 5 Use the stack height limiter as a guide for loading instructions: - Click a topic for stack height when loading print materials.

User's Guide
Page 50
... printing special label applications. 6 Plug the printer power cord into a properly grounded electrical outlet and turn the printer on. 7 Follow the instructions on ordering print cartridges. Note: We do . With the cartridge arrows pointing downward, shake the print cartridge back and forth. When you...replace the print cartridge. WARNING: Never touch the photoconductor drum on the underside of the print cartridge. Complete the following steps to Lexmark for detailed installation information. 1 Turn the printer off and unplug the printer power cord. 2 Open the front doors and remove ...
... printing special label applications. 6 Plug the printer power cord into a properly grounded electrical outlet and turn the printer on. 7 Follow the instructions on ordering print cartridges. Note: We do . With the cartridge arrows pointing downward, shake the print cartridge back and forth. When you...replace the print cartridge. WARNING: Never touch the photoconductor drum on the underside of the print cartridge. Complete the following steps to Lexmark for detailed installation information. 1 Turn the printer off and unplug the printer power cord. 2 Open the front doors and remove ...

User's Guide
Page 62
... may need to the output bin 60 Note: If the paper does not move when you must clear all paper from the rear door. For instructions on a sheet of paper. 3 Pull the paper up toward the upper front door, and then pull it aside on clearing the jam, click the area...
... may need to the output bin 60 Note: If the paper does not move when you must clear all paper from the rear door. For instructions on a sheet of paper. 3 Pull the paper up toward the upper front door, and then pull it aside on clearing the jam, click the area...

User's Guide
Page 65
... is jammed: - If most of the paper to access from the paper path. 1 Open the duplex rear door. 2 Look under the duplex rear door for instructions. - If a short piece is visible toward you cannot grasp it may be easier to determine how the paper is visible, continue with the following. 3 Pull...
... is jammed: - If most of the paper to access from the paper path. 1 Open the duplex rear door. 2 Look under the duplex rear door for instructions. - If a short piece is visible toward you cannot grasp it may be easier to determine how the paper is visible, continue with the following. 3 Pull...

User's Guide
Page 68
... area where the jam occurred: • On the incline surface of a tray or between two trays, pull the paper straight up and out. 66 For instructions on how it is in the pass-through area between two trays • Between three trays (This may happen if you must clear all paper...
... area where the jam occurred: • On the incline surface of a tray or between two trays, pull the paper straight up and out. 66 For instructions on how it is in the pass-through area between two trays • Between three trays (This may happen if you must clear all paper...

User's Guide
Page 73
For instructions on clearing the jam, click the area where the jam occurred: • At entry into the envelope feeder • Between the envelope feeder and the ...
For instructions on clearing the jam, click the area where the jam occurred: • At entry into the envelope feeder • Between the envelope feeder and the ...

User's Guide
Page 75
See Replacing the print cartridge for instructions. 8 Reinstall the envelope feeder. Make sure it aside. 7 Pull the envelope straight out of the printer. Note: You may have to remove the print cartridge to the stack. 73 6 Pull the envelope feeder up slightly and straight out of envelopes in the envelope feeder. 11 Adjust the envelope edge guide. 12 Lower the envelope weight to get the envelope out. Set it snaps into place. 9 Close the printer upper front door. 10 Replace the stack of the printer.
See Replacing the print cartridge for instructions. 8 Reinstall the envelope feeder. Make sure it aside. 7 Pull the envelope straight out of the printer. Note: You may have to remove the print cartridge to the stack. 73 6 Pull the envelope feeder up slightly and straight out of envelopes in the envelope feeder. 11 Adjust the envelope edge guide. 12 Lower the envelope weight to get the envelope out. Set it snaps into place. 9 Close the printer upper front door. 10 Replace the stack of the printer.

User's Guide
Page 189
... you need to install a replacement memory option or other option on the system board, refer to the Setup Guide. 6 Refer to the Setup Guide for instructions on accessing the printer system board. 1 Locate the memory option you touch the memory option. 2 Push out on closing the printer system board cover. 187... to remove. WARNING: Electronic components are easily damaged by static electricity. 50 Removing printer or flash memory If necessary, refer to the Setup Guide for instructions on the latches at each end of the connector.
... you need to install a replacement memory option or other option on the system board, refer to the Setup Guide. 6 Refer to the Setup Guide for instructions on accessing the printer system board. 1 Locate the memory option you touch the memory option. 2 Push out on closing the printer system board cover. 187... to remove. WARNING: Electronic components are easily damaged by static electricity. 50 Removing printer or flash memory If necessary, refer to the Setup Guide for instructions on the latches at each end of the connector.

User's Guide
Page 190
... and under the slot. Touch something metal on the printer before you touch the card. 1 Locate the option you want to the Setup Guide for instructions on the system board. 3 Place the option card in a box. 4 If you did not save the packaging, wrap the card in paper and store it... board cover. 188 If you need to install another option on the system board, refer to the Setup Guide. 5 Refer to the Setup Guide for instructions on accessing the printer system board. WARNING: Electronic components are easily damaged by static electricity.
... and under the slot. Touch something metal on the printer before you touch the card. 1 Locate the option you want to the Setup Guide for instructions on the system board. 3 Place the option card in a box. 4 If you did not save the packaging, wrap the card in paper and store it... board cover. 188 If you need to install another option on the system board, refer to the Setup Guide. 5 Refer to the Setup Guide for instructions on accessing the printer system board. WARNING: Electronic components are easily damaged by static electricity.

User's Guide
Page 194
See Printing a font sample list for instructions on how to print samples of the most popular typefaces, like Courier and Times New Roman, are available for all the fonts resident in PCL 6 ...
See Printing a font sample list for instructions on how to print samples of the most popular typefaces, like Courier and Times New Roman, are available for all the fonts resident in PCL 6 ...

User's Guide
Page 205
... equipment in a residential area is likely to cause harmful interference, in your printer hardware or software. Lexmark is not responsible for the use of harmful emissions. WARNING: A warning identifies something that might damage your operating instructions that discusses the guidelines for a Class A digital device, pursuant to Part 15 of some parts may...
... equipment in a residential area is likely to cause harmful interference, in your printer hardware or software. Lexmark is not responsible for the use of harmful emissions. WARNING: A warning identifies something that might damage your operating instructions that discusses the guidelines for a Class A digital device, pursuant to Part 15 of some parts may...

User's Guide
Page 206
...Note: To assure compliance with FCC regulations on electromagnetic interference for use a properly shielded and grounded cable such as Lexmark part number 1329605. Operation is subject to provide reasonable protection against harmful interference in a residential installation. The FCC...brouilleur du Canada. Without a network cable attached Federal Communications Commission (FCC) Compliance Information Statement The Lexmark T522 has been tested and found to comply with the instructions, may result in conformity with the requirements of the Directive has been signed by one or ...
...Note: To assure compliance with FCC regulations on electromagnetic interference for use a properly shielded and grounded cable such as Lexmark part number 1329605. Operation is subject to provide reasonable protection against harmful interference in a residential installation. The FCC...brouilleur du Canada. Without a network cable attached Federal Communications Commission (FCC) Compliance Information Statement The Lexmark T522 has been tested and found to comply with the instructions, may result in conformity with the requirements of the Directive has been signed by one or ...
Quick Reference Guide
Page 1
...letterhead Letterhead must be single-sided or double-sided (duplexed). In a paper tray Single-sided printing In the multipurpose feeder Complete these instructions to load print materials into the paper tray with the recommended print side face down for single-sided printing and face up for ... slide the width guide to the correct position for double-sided printing. All rights reserved. Double-sided (duplex) printing Copyright © 2001 Lexmark International, Inc. Printed in USA This document is not available until it lightly rests against the edge of the tray. 3 Squeeze the length...
...letterhead Letterhead must be single-sided or double-sided (duplexed). In a paper tray Single-sided printing In the multipurpose feeder Complete these instructions to load print materials into the paper tray with the recommended print side face down for single-sided printing and face up for ... slide the width guide to the correct position for double-sided printing. All rights reserved. Double-sided (duplex) printing Copyright © 2001 Lexmark International, Inc. Printed in USA This document is not available until it lightly rests against the edge of the tray. 3 Squeeze the length...

Setup Guide
Page 2
... identifies something that could damage your operating instructions that discusses the guidelines for the use of publications related to this product by the Government is subject to the following paragraph does not apply to avoid the possibility of purchase. Changes are provided with local law: LEXMARK INTERNATIONAL, INC., PROVIDES THIS PUBLICATION "AS...
... identifies something that could damage your operating instructions that discusses the guidelines for the use of publications related to this product by the Government is subject to the following paragraph does not apply to avoid the possibility of purchase. Changes are provided with local law: LEXMARK INTERNATIONAL, INC., PROVIDES THIS PUBLICATION "AS...

Setup Guide
Page 5
paper. The 2000-sheet drawer is packaged with a User's Guide that contains detailed instructions for installation, setup, and use, including loading paper and removing paper jams. When you have finished installing the 2000-sheet drawer, install any other... up to : Four optional drawers. 2000-Sheet drawer 250-Sheet drawer 500-Sheet drawer 500-Sheet Duplex unit Envelope feeder Installing the 2000-sheet drawer Lexmark T522 label (colored triangle) Your printer supports one 2000-sheet drawer. Step 1: Install paper options and printer The table illustrates various combinations of 20...
paper. The 2000-sheet drawer is packaged with a User's Guide that contains detailed instructions for installation, setup, and use, including loading paper and removing paper jams. When you have finished installing the 2000-sheet drawer, install any other... up to : Four optional drawers. 2000-Sheet drawer 250-Sheet drawer 500-Sheet drawer 500-Sheet Duplex unit Envelope feeder Installing the 2000-sheet drawer Lexmark T522 label (colored triangle) Your printer supports one 2000-sheet drawer. Step 1: Install paper options and printer The table illustrates various combinations of 20...

Setup Guide
Page 12
The instructions in this section help you install any of the following options: • Printer memory • Flash memory • Tri-Port Adapter • USB/Parallel 1284-C Interface Card • Parallel 1284-C Interface Card • MarkNet™ internal print servers (also called internal network adapters or INAs) • Hard disk &#...
The instructions in this section help you install any of the following options: • Printer memory • Flash memory • Tri-Port Adapter • USB/Parallel 1284-C Interface Card • Parallel 1284-C Interface Card • MarkNet™ internal print servers (also called internal network adapters or INAs) • Hard disk &#...

Setup Guide
Page 15
Installing an optional firmware card Follow the instructions in "Reattaching the shield and closing the doors" on page 16. 13 Touch something metal on the connector. Warning! Pins Card Connectors 3 Hold the firmware ...
Installing an optional firmware card Follow the instructions in "Reattaching the shield and closing the doors" on page 16. 13 Touch something metal on the connector. Warning! Pins Card Connectors 3 Hold the firmware ...

Setup Guide
Page 19
... trays are loading. Step 3: Load print material Length guide lever Length guide Paper size indicators . Paper capacity mark Width guide tab Width guide Complete these instructions to load print material into the paper tray with the recommended print side face down for single-sided printing and face up for the size...
... trays are loading. Step 3: Load print material Length guide lever Length guide Paper size indicators . Paper capacity mark Width guide tab Width guide Complete these instructions to load print material into the paper tray with the recommended print side face down for single-sided printing and face up for the size...


