
Fax Guide
Page 18
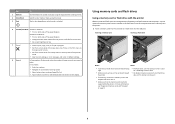
... fax number, or import a contact from the lists available. 3 To set a color or black-and-white fax: • For touch-screen models, touch More options, and then select a color option. • For arrow button models, press the Color/Black button. 4 Press to start the fax job. The Send Fax Wizard appears... is not on the computer screen. Sending faxes 18 Sending faxes using the computer For Windows users 1 With a document open , choose File > Print. 2 From the Printer pop-up menu, select the fax version of your printer. Sending faxes Tips for your printer. The line is working telephone...
... fax number, or import a contact from the lists available. 3 To set a color or black-and-white fax: • For touch-screen models, touch More options, and then select a color option. • For arrow button models, press the Color/Black button. 4 Press to start the fax job. The Send Fax Wizard appears... is not on the computer screen. Sending faxes 18 Sending faxes using the computer For Windows users 1 With a document open , choose File > Print. 2 From the Printer pop-up menu, select the fax version of your printer. Sending faxes Tips for your printer. The line is working telephone...
User's Guide
Page 11
... cyan color cartridge 100XL 100XLA Magenta color cartridge 100 100A High yield magenta color cartridge 100XL 100XLA 1 Licensed for superior print quality, and our inks are designed to perform together for a single use , return this cartridge to work with your printer and help extend the life of your product. Using genuine Lexmark ink cartridges Lexmark printers...
... cyan color cartridge 100XL 100XLA Magenta color cartridge 100 100A High yield magenta color cartridge 100XL 100XLA 1 Licensed for superior print quality, and our inks are designed to perform together for a single use , return this cartridge to work with your printer and help extend the life of your product. Using genuine Lexmark ink cartridges Lexmark printers...

User's Guide
Page 44
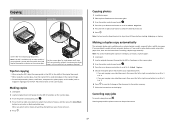
... button to scroll to Continue, and then press . 8 Press the Color/Black button to set a color or black-and-white print. Printing 44 When you want to adjust the print settings: a Press again. Note: For best results, allow the prints to , and then press . 4 Press the up or down arrow... Crop Auto Enhance Crop a photo. Editing photos using the arrow buttons. Note: You can Adjust the brightness of the photo you select color or black-only printing, the light near your choice comes on the memory device, then press to select Photos. 3 From the printer control panel, press to ...
... button to scroll to Continue, and then press . 8 Press the Color/Black button to set a color or black-and-white print. Printing 44 When you want to adjust the print settings: a Press again. Note: For best results, allow the prints to , and then press . 4 Press the up or down arrow... Crop Auto Enhance Crop a photo. Editing photos using the arrow buttons. Note: You can Adjust the brightness of the photo you select color or black-only printing, the light near your choice comes on the memory device, then press to select Photos. 3 From the printer control panel, press to ...
User's Guide
Page 45
...your selections. Follow the instructions on the computer screen to transfer the photos to the computer or to print. • For Macintosh users If you have set a color or black-and-white print. c Transfer or print the photos: • For Windows users Fast Pics launches automatically when a connection is using a ...or down arrow button to scroll to Continue, and then press . 11 Press the Color/Black button to set an application to launch when a memory device is connected to adjust the print settings: a Press again. Printing 45 b Press the up or down arrow button to scroll to , and then ...
...your selections. Follow the instructions on the computer screen to transfer the photos to the computer or to print. • For Macintosh users If you have set a color or black-and-white print. c Transfer or print the photos: • For Windows users Fast Pics launches automatically when a connection is using a ...or down arrow button to scroll to Continue, and then press . 11 Press the Color/Black button to set an application to launch when a memory device is connected to adjust the print settings: a Press again. Printing 45 b Press the up or down arrow button to scroll to , and then ...
User's Guide
Page 48
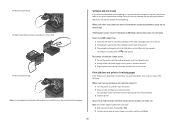
... Press the up a connection between a Bluetooth-enabled device and your printer if you select color or black-only printing, the light near your choice comes on your Bluetooth-enabled device. • To print Microsoft documents from your PDA. Memory Card Detected appears on the display. 4 Press the up...change the Bluetooth security level or the Bluetooth pass key. When you are required. You will need to set a color or black-and-white print. 12 Press the Color/Black button to set up a connection between your printer and a Bluetooth-enabled device Note: The printer does not support...
... Press the up a connection between a Bluetooth-enabled device and your printer if you select color or black-only printing, the light near your choice comes on your Bluetooth-enabled device. • To print Microsoft documents from your PDA. Memory Card Detected appears on the display. 4 Press the up...change the Bluetooth security level or the Bluetooth pass key. When you are required. You will need to set a color or black-and-white print. 12 Press the Color/Black button to set up a connection between your printer and a Bluetooth-enabled device Note: The printer does not support...
User's Guide
Page 59
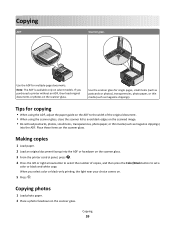
... When you purchased a printer without an ADF, then load original documents or photos on the ADF to the width of copies, and then press the Color/Black button to avoid dark edges on the scanned image. • Do not load postcards, photos, small items, transparencies, photo paper, or thin .... • When using the scanner glass, close the scanner lid to set a color or black-and-white copy. Copying photos 1 Load photo paper. 2 Place a photo facedown on . 5 Press . If you select color or black-only printing, the light near your choice comes on the scanner glass. Use the scanner glass ...
... When you purchased a printer without an ADF, then load original documents or photos on the ADF to the width of copies, and then press the Color/Black button to avoid dark edges on the scanned image. • Do not load postcards, photos, small items, transparencies, photo paper, or thin .... • When using the scanner glass, close the scanner lid to set a color or black-and-white copy. Copying photos 1 Load photo paper. 2 Place a photo facedown on . 5 Press . If you select color or black-only printing, the light near your choice comes on the scanner glass. Use the scanner glass ...

User's Guide
Page 63
...printer control panel, press . 4 Press the up or down arrow button to scroll to 2-Sided Copies. 5 Choose the duplex option that you select color or black-only printing, the light near your original document: • If you are copying a one-sided document, then press the left or right arrow button to ... on the scanner glass. 3 From the printer control panel, press . 4 Press the left or right arrow button to scroll to 2 to 2. 6 Press to set a color or black-and-white copy. Copying 63 If you purchased a model without automatic duplex, or if you are copying a one , two, or four page images...
...printer control panel, press . 4 Press the up or down arrow button to scroll to 2-Sided Copies. 5 Choose the duplex option that you select color or black-only printing, the light near your original document: • If you are copying a one-sided document, then press the left or right arrow button to ... on the scanner glass. 3 From the printer control panel, press . 4 Press the left or right arrow button to scroll to 2 to 2. 6 Press to set a color or black-and-white copy. Copying 63 If you purchased a model without automatic duplex, or if you are copying a one , two, or four page images...
User's Guide
Page 131
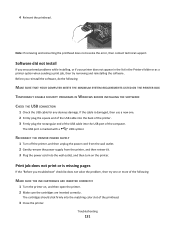
... you encountered problems while installing, or if your printer does not appear in the list in the Printers folder or as a printer option when sending a print job, then try one . 2 Firmly plug the square end of the USB cable into the back of the printer. 3 Firmly plug the rectangular end ...of the USB cable into the matching color slot of the computer. Software did not install If you troubleshoot" checklist does not solve the problem, then try removing and reinstalling the software. Note...
... you encountered problems while installing, or if your printer does not appear in the list in the Printers folder or as a printer option when sending a print job, then try one . 2 Firmly plug the square end of the USB cable into the back of the printer. 3 Firmly plug the rectangular end ...of the USB cable into the matching color slot of the computer. Software did not install If you troubleshoot" checklist does not solve the problem, then try removing and reinstalling the software. Note...

User's Guide
Page 187
...) 111 installing printer on wireless network 99 USB 107 wireless 107 Macintosh printer software using 21 memory card inserting 42 printing documents from 39 printing photos using the proof sheet 47 scanning to 66 supported types 43 memory card cannot be inserted 149 memory card slot... frames 44 adjusting brightness 44 applying color effects 44 copying photos 59 cropping 44 editing using printer control panel 44 enhancing automatically 44 making borderless copies 60 printing from digital camera using DPOF 48 printing using printer control panel 43 printing using the proof sheet 47 reducing ...
...) 111 installing printer on wireless network 99 USB 107 wireless 107 Macintosh printer software using 21 memory card inserting 42 printing documents from 39 printing photos using the proof sheet 47 scanning to 66 supported types 43 memory card cannot be inserted 149 memory card slot... frames 44 adjusting brightness 44 applying color effects 44 copying photos 59 cropping 44 editing using printer control panel 44 enhancing automatically 44 making borderless copies 60 printing from digital camera using DPOF 48 printing using printer control panel 43 printing using the proof sheet 47 reducing ...
User's Guide
Page 190
... problems 166 security 97 security information 113 signal strength 117 SSID 112 troubleshooting 151 types of wireless networks 116 wireless network compatibility 97 wireless print server not installed 164 wireless settings changing after installation (Mac) 101 changing after installation (Windows) 101 wireless setup information needed for 98...Fi indicator light is still orange 159 Wi-Fi indicator description of colors 100 light is not lit 159 Wi-Fi indicator light is blinking orange 160 Wi-Fi indicator light is green printer does not print 157 Wi-Fi indicator light is still orange 159 Wi-Fi ...
... problems 166 security 97 security information 113 signal strength 117 SSID 112 troubleshooting 151 types of wireless networks 116 wireless network compatibility 97 wireless print server not installed 164 wireless settings changing after installation (Mac) 101 changing after installation (Windows) 101 wireless setup information needed for 98...Fi indicator light is still orange 159 Wi-Fi indicator description of colors 100 light is not lit 159 Wi-Fi indicator light is blinking orange 160 Wi-Fi indicator light is green printer does not print 157 Wi-Fi indicator light is still orange 159 Wi-Fi ...

Quick Reference
Page 2
...between objects such as otherwise provided below, and (2) pass this license/agreement to Lexmark for proper recycling. Go to request postage-paid return bag, and then seal the bag. If you're sending single-color tanks, we encourage our customers to participate in the postage-paid bags. printer ... CAUTION-POTENTIAL INJURY: Do not cut, twist, bind, crush, or place heavy objects on the power cord. You agree to: (1) use the print cartridges and their contents are available through www.lexmark.com and may be used only once. Please Read Before Opening Your Inkjet Cartridge Box At...
...between objects such as otherwise provided below, and (2) pass this license/agreement to Lexmark for proper recycling. Go to request postage-paid return bag, and then seal the bag. If you're sending single-color tanks, we encourage our customers to participate in the postage-paid bags. printer ... CAUTION-POTENTIAL INJURY: Do not cut, twist, bind, crush, or place heavy objects on the power cord. You agree to: (1) use the print cartridges and their contents are available through www.lexmark.com and may be used only once. Please Read Before Opening Your Inkjet Cartridge Box At...
Quick Reference
Page 5
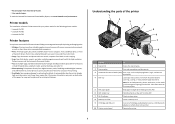
...Feeder. • Fax. Scan thick books, reports, and other multiple-page documents easily with one-touch, computer-free black or color copying. • Scan. Print photos directly from the ADF. 7 Wi-Fi indicator Check wireless status. 8 Memory card slot Insert a memory card. 9 ...computer, from a USB flash drive, or from discarded print jobs. • Use recycled paper. Save energy and paper by activating Eco-Mode. Recommended for the following printer models: • Lexmark Pro705 • Lexmark Pro706 • Lexmark Pro703 Printer features Your printer comes with full features ...
...Feeder. • Fax. Scan thick books, reports, and other multiple-page documents easily with one-touch, computer-free black or color copying. • Scan. Print photos directly from the ADF. 7 Wi-Fi indicator Check wireless status. 8 Memory card slot Insert a memory card. 9 ...computer, from a USB flash drive, or from discarded print jobs. • Use recycled paper. Save energy and paper by activating Eco-Mode. Recommended for the following printer models: • Lexmark Pro705 • Lexmark Pro706 • Lexmark Pro703 Printer features Your printer comes with full features ...
Quick Reference
Page 8
Use 3 Dialtone 4 Color/Black 5 Start To Dial the telephone number manually using the keypad before sending the fax. Start a ...point toward the printer. • If necessary, connect the memory card to color mode or black-and-white mode. Activate Eco-Mode to: • Print on both sides of copies or prints you want to enter or edit the date and time shown on page ... devices frequently used for ten minutes. • Set screen brightness to low. 7 Cancel • Cancel a print, copy, scan, or fax job in progress. • Exit from a menu level of the Copy, Scan, Fax, Photo, or File...
Use 3 Dialtone 4 Color/Black 5 Start To Dial the telephone number manually using the keypad before sending the fax. Start a ...point toward the printer. • If necessary, connect the memory card to color mode or black-and-white mode. Activate Eco-Mode to: • Print on both sides of copies or prints you want to enter or edit the date and time shown on page ... devices frequently used for ten minutes. • Set screen brightness to low. 7 Cancel • Cancel a print, copy, scan, or fax job in progress. • Exit from a menu level of the Copy, Scan, Fax, Photo, or File...
Quick Reference
Page 9
... memory device to mass storage mode is inserted into the USB port while a memory card is in the areas shown while actively printing, reading, or writing from the memory device. Supported memory cards and file types Memory Card • Secure Digital (SD) ... site at www.lexmark.com/pageyields. Lexmark Pro700 Series models Item Return Program Regular cartridge2 Cartridge1 Black cartridge 100 100A High yield black cartridge 100XL 100XLA Yellow color cartridge 100 100A High yield yellow color cartridge 100XL 100XLA 1 Licensed for Memory Card Detected or Storage Device ...
... memory device to mass storage mode is inserted into the USB port while a memory card is in the areas shown while actively printing, reading, or writing from the memory device. Supported memory cards and file types Memory Card • Secure Digital (SD) ... site at www.lexmark.com/pageyields. Lexmark Pro700 Series models Item Return Program Regular cartridge2 Cartridge1 Black cartridge 100 100A High yield black cartridge 100XL 100XLA Yellow color cartridge 100 100A High yield yellow color cartridge 100XL 100XLA 1 Licensed for Memory Card Detected or Storage Device ...

Quick Reference
Page 16
... your choice comes on. 9 Press . b Make your selections using the keypad. • To assign a computer name and a PIN to set a color or black-and-white print. When the printer detects the memory device, Memory Card Detected or Storage Device Detected appears on the display. 2 If only document files are stored... using a USB connection a Press the up or down arrow button to select the file name of the network computer, and then press to cancel all print jobs in the memory device. 1 Insert a memory card or flash drive. c When prompted, press the up or down arrow button to scroll to ...
... your choice comes on. 9 Press . b Make your selections using the keypad. • To assign a computer name and a PIN to set a color or black-and-white print. When the printer detects the memory device, Memory Card Detected or Storage Device Detected appears on the display. 2 If only document files are stored... using a USB connection a Press the up or down arrow button to select the file name of the network computer, and then press to cancel all print jobs in the memory device. 1 Insert a memory card or flash drive. c When prompted, press the up or down arrow button to scroll to ...
Quick Reference
Page 17
... photo paper, or thin media (such as magazine clippings) into the ADF or facedown on . 5 Press . Note: For best results, allow the prints to the previous menu. 17 Scanning stops and the printer returns to dry at least 24 hours before stacking, displaying, or storing. Place these items... other paper sizes, then see the instructions for multiple-page documents. If you purchased a printer without automatic duplex, or if you select color or black-only printing, the light near your original document: • If you are copying a one-sided document, then press the left or right arrow ...
... photo paper, or thin media (such as magazine clippings) into the ADF or facedown on . 5 Press . Note: For best results, allow the prints to the previous menu. 17 Scanning stops and the printer returns to dry at least 24 hours before stacking, displaying, or storing. Place these items... other paper sizes, then see the instructions for multiple-page documents. If you purchased a printer without automatic duplex, or if you select color or black-only printing, the light near your original document: • If you are copying a one-sided document, then press the left or right arrow ...
Quick Reference
Page 21
... the wall outlet. 2 Gently remove the power supply from the printer, and then reinsert it. 3 Plug the power cord into the matching color slot of the printhead. 3 Close the printer. Note: If removing and reinserting the printhead does not resolve the error, then contact technical support...do the following : MAKE SURE THE INK CARTRIDGES ARE INSERTED CORRECTLY 1 Turn the printer on the printer. SELECT YOUR PRINTER FROM THE PRINT DIALOG BEFORE SENDING THE PRINT JOB Note: This solution applies to Macintosh users only. 1 With a document open the printer. 2 Make sure the cartridges are inserted...
... the wall outlet. 2 Gently remove the power supply from the printer, and then reinsert it. 3 Plug the power cord into the matching color slot of the printhead. 3 Close the printer. Note: If removing and reinserting the printhead does not resolve the error, then contact technical support...do the following : MAKE SURE THE INK CARTRIDGES ARE INSERTED CORRECTLY 1 Turn the printer on the printer. SELECT YOUR PRINTER FROM THE PRINT DIALOG BEFORE SENDING THE PRINT JOB Note: This solution applies to Macintosh users only. 1 With a document open the printer. 2 Make sure the cartridges are inserted...


