Network Guide
Page 4
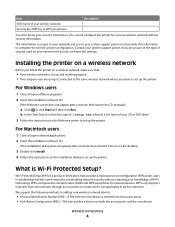
...; The computer you are unsure of the type of Wi-Fi technology. If the installation dialog does not appear after a minute, then launch the CD manually: a Click , or click Start and then click Run. Item Description SSID (name of your wireless network) Security key (WEP key or WPA passphrase) You must...
...; The computer you are unsure of the type of Wi-Fi technology. If the installation dialog does not appear after a minute, then launch the CD manually: a Click , or click Start and then click Run. Item Description SSID (name of your wireless network) Security key (WEP key or WPA passphrase) You must...
Network Guide
Page 5
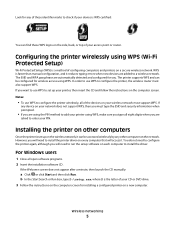
...computer that will need to configure the printer again, although you . If the Welcome screen does not appear after a minute, then launch the CD manually: a Click , or click Start and then click Run. The printer supports WPS and can find these identifier marks to check if your device is... method to add your printer using WPS, make sure you type all open software programs. 2 Insert the installation software CD. WPS is faster than manual configuration, and it can be configured for wireless access using WPS. Installing the printer on other computer on the network. b In the Start Search...
...computer that will need to configure the printer again, although you . If the Welcome screen does not appear after a minute, then launch the CD manually: a Click , or click Start and then click Run. The printer supports WPS and can find these identifier marks to check if your device is... method to add your printer using WPS, make sure you type all open software programs. 2 Insert the installation software CD. WPS is faster than manual configuration, and it can be configured for wireless access using WPS. Installing the printer on other computer on the network. b In the Start Search...
Network Guide
Page 16
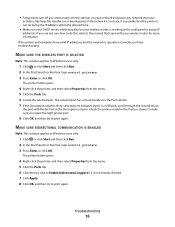
... wireless router for more information. The selected port has a check beside it is not already checked. 7 Click Apply. 8 Click OK, and then try to the manual that came with Printer Port in the Port column. 7 If the Description column of the selected port indicates that the printer is not receiving the...
... wireless router for more information. The selected port has a check beside it is not already checked. 7 Click Apply. 8 Click OK, and then try to the manual that came with Printer Port in the Port column. 7 If the Description column of the selected port indicates that the printer is not receiving the...
Network Guide
Page 18
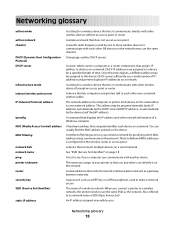
Once this time elapses, a different address may be assigned manually (static IP address), automatically by the DHCP server (DHCP IP address), or automatically by the device itself (AutoIP address). The list of time. A password, such ... Set Identifier)" on page 18 A test to see if your computer can identify it on the wireless router or access point. An IP address assigned manually by you and others can communicate with another device The name you connect a printer to a wireless network, the printer needs to use a small number of...
Once this time elapses, a different address may be assigned manually (static IP address), automatically by the DHCP server (DHCP IP address), or automatically by the device itself (AutoIP address). The list of time. A password, such ... Set Identifier)" on page 18 A test to see if your computer can identify it on the wireless router or access point. An IP address assigned manually by you and others can communicate with another device The name you connect a printer to a wireless network, the printer needs to use a small number of...
Fax Guide
Page 2
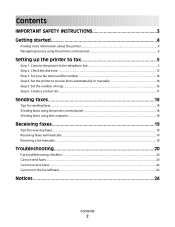
... 2: Check the dial tone...15 Step 3: Set your fax name and fax number...16 Step 4: Set the printer to receive faxes automatically or manually 16 Step 5: Set the number of rings...16 Step 6: Create a contact list...17 Sending faxes 18 Tips for sending faxes...18 Sending faxes using... panel...18 Sending faxes using the computer...18 Receiving faxes 19 Tips for receiving faxes...19 Receiving faxes automatically...19 Receiving a fax manually...19 Troubleshooting 20 Fax troubleshooting checklist...20 Cannot send faxes...20 Cannot receive faxes...22 Cannot run the fax software...23 Notices 24 Contents ...
... 2: Check the dial tone...15 Step 3: Set your fax name and fax number...16 Step 4: Set the printer to receive faxes automatically or manually 16 Step 5: Set the number of rings...16 Step 6: Create a contact list...17 Sending faxes 18 Tips for sending faxes...18 Sending faxes using... panel...18 Sending faxes using the computer...18 Receiving faxes 19 Tips for receiving faxes...19 Receiving faxes automatically...19 Receiving a fax manually...19 Troubleshooting 20 Fax troubleshooting checklist...20 Cannot send faxes...20 Cannot receive faxes...22 Cannot run the fax software...23 Notices 24 Contents ...
Fax Guide
Page 5
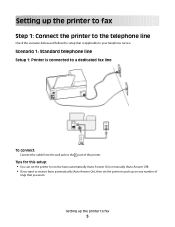
Setting up the printer to fax 5 Tips for this setup: • You can set the printer to receive faxes automatically (Auto Answer On) or manually (Auto Answer Off). • If you want to receive faxes automatically (Auto Answer On), then set the printer to pick up on any number of ...
Setting up the printer to fax 5 Tips for this setup: • You can set the printer to receive faxes automatically (Auto Answer On) or manually (Auto Answer Off). • If you want to receive faxes automatically (Auto Answer On), then set the printer to pick up on any number of ...
Fax Guide
Page 8
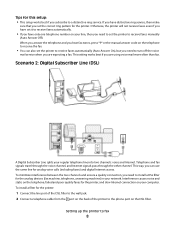
...faxes for the printer, and slow Internet connection on your computer. When you answer the telephone and you hear fax tones, press *9* or the manual answer code on the DSL filter. Setting up the printer to a distinctive ring service. This way, you can also set the printer to receive... wall jack. 2 Connect a telephone cable from the port on the back of the printer to the phone port on the telephone to receive faxes manually (Auto Answer Off). To minimize interference between the two channels and ensure a quality connection, you need to install a DSL filter for the analog devices...
...faxes for the printer, and slow Internet connection on your computer. When you answer the telephone and you hear fax tones, press *9* or the manual answer code on the DSL filter. Setting up the printer to a distinctive ring service. This way, you can also set the printer to receive... wall jack. 2 Connect a telephone cable from the port on the back of the printer to the phone port on the telephone to receive faxes manually (Auto Answer Off). To minimize interference between the two channels and ensure a quality connection, you need to install a DSL filter for the analog devices...

Fax Guide
Page 16
... to answer the ring pattern of that you enter this information. Assign one telephone line. To set the printer to receive faxes automatically or manually: 1 From the printer control panel, navigate to fax 16 Setting up the printer to Auto Answer: > Fax Setup > Ringing and Answering...Auto Answer 2 Select an Auto Answer setting, and then save it never receives the fax. 1 From the printer control panel, navigate to receive faxes manually. This feature allows you do the following. Each telephone number has a designated ring pattern (a single ring, a double ring, a triple ring). If...
... to answer the ring pattern of that you enter this information. Assign one telephone line. To set the printer to receive faxes automatically or manually: 1 From the printer control panel, navigate to fax 16 Setting up the printer to Auto Answer: > Fax Setup > Ringing and Answering...Auto Answer 2 Select an Auto Answer setting, and then save it never receives the fax. 1 From the printer control panel, navigate to receive faxes manually. This feature allows you do the following. Each telephone number has a designated ring pattern (a single ring, a double ring, a triple ring). If...

Fax Guide
Page 19
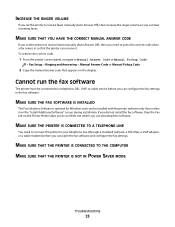
...; Make sure that the printer is on and connected to a working if you hear a dial tone. • If you set the printer to receive faxes manually (Auto Answer Off), then make sure that Auto Answer is on: a From the printer control panel, navigate to Auto Answer: > Fax Setup > Ringing and Answering... and you hear fax tones when you set the printer to receive faxes automatically (Auto Answer On), then load paper in the printer. Receiving a fax manually 1 Make sure Auto Answer is detected, the printer automatically receives the incoming fax.
...; Make sure that the printer is on and connected to a working if you hear a dial tone. • If you set the printer to receive faxes manually (Auto Answer Off), then make sure that Auto Answer is on: a From the printer control panel, navigate to Auto Answer: > Fax Setup > Ringing and Answering... and you hear fax tones when you set the printer to receive faxes automatically (Auto Answer On), then load paper in the printer. Receiving a fax manually 1 Make sure Auto Answer is detected, the printer automatically receives the incoming fax.
Fax Guide
Page 23
... software. MAKE SURE THE PRINTER IS CONNECTED TO A TELEPHONE LINE You need to Manual Answer Code or Manual Pickup Code: > Fax Setup > Ringing and Answering > Manual Answer Code or Manual Pickup Code 2 Copy the manual answer code that the printer can receive it on the display. MAKE SURE THAT ...YOU HAVE THE CORRECT MANUAL ANSWER CODE If you set the printer to receive faxes manually (Auto Answer Off), then increase the...
... software. MAKE SURE THE PRINTER IS CONNECTED TO A TELEPHONE LINE You need to Manual Answer Code or Manual Pickup Code: > Fax Setup > Ringing and Answering > Manual Answer Code or Manual Pickup Code 2 Copy the manual answer code that the printer can receive it on the display. MAKE SURE THAT ...YOU HAVE THE CORRECT MANUAL ANSWER CODE If you set the printer to receive faxes manually (Auto Answer Off), then increase the...
User's Guide
Page 6
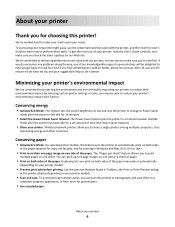
... idle for a set amount of our knowledgeable support representatives will meet your needs. Wireless/network printers allow you print on both sides of the paper manually or automatically (depending on your printer model). • Preview print jobs before printing. Conserving paper • Activate Eco-Mode. You can scan documents or photographs...
... idle for a set amount of our knowledgeable support representatives will meet your needs. Wireless/network printers allow you print on both sides of the paper manually or automatically (depending on your printer model). • Preview print jobs before printing. Conserving paper • Activate Eco-Mode. You can scan documents or photographs...
User's Guide
Page 15
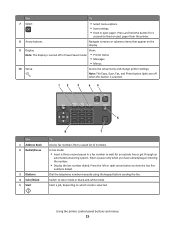
... in Power Saver mode. • Printer status • Messages • Menus 10 Setup Access the setup menu and change printer settings. Dial the telephone number manually using the keypad before sending the fax. Note: The Copy, Scan, Fax, and Photo button lights are off in a fax number to menu or submenu...
... in Power Saver mode. • Printer status • Messages • Menus 10 Setup Access the setup menu and change printer settings. Dial the telephone number manually using the keypad before sending the fax. Note: The Copy, Scan, Fax, and Photo button lights are off in a fax number to menu or submenu...
User's Guide
Page 25
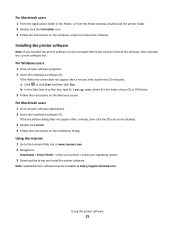
...all open software applications. 2 Insert the installation software CD. If the installation dialog does not appear after a minute, then launch the CD manually: a Click , or click Start and then click Run. If the Welcome screen does not appear after a minute, then click the CD... Double-click Install. 4 Follow the instructions on the installation dialog. Note: Updated printer software may be available at www.lexmark.com. 2 Navigate to the Lexmark Web site at http://support.lexmark.com. Using the Internet 1 Go to : Downloads > Driver Finder > select your printer > select your CD or DVD...
...all open software applications. 2 Insert the installation software CD. If the installation dialog does not appear after a minute, then launch the CD manually: a Click , or click Start and then click Run. If the Welcome screen does not appear after a minute, then click the CD... Double-click Install. 4 Follow the instructions on the installation dialog. Note: Updated printer software may be available at www.lexmark.com. 2 Navigate to the Lexmark Web site at http://support.lexmark.com. Using the Internet 1 Go to : Downloads > Driver Finder > select your printer > select your CD or DVD...
User's Guide
Page 52
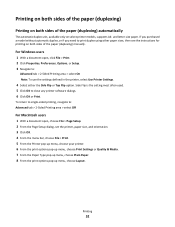
.... 2 Click Properties, Preferences, Options, or Setup. 3 Navigate to close any printer software dialogs. 6 Click OK or Print. Printing on both sides of the paper (duplexing) manually. Printing 52 For Windows users 1 With a document open , choose File > Page Setup. 2 From the Page Setup dialog, set the printer, paper size, and orientation. 3 Click...
.... 2 Click Properties, Preferences, Options, or Setup. 3 Navigate to close any printer software dialogs. 6 Click OK or Print. Printing on both sides of the paper (duplexing) manually. Printing 52 For Windows users 1 With a document open , choose File > Page Setup. 2 From the Page Setup dialog, set the printer, paper size, and orientation. 3 Click...
User's Guide
Page 54
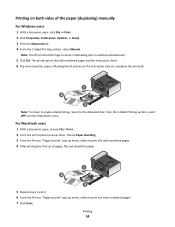
...Print or "Pages to print" pop-up menu, select to print the odd numbered pages. 4 After printing the first set of the paper (duplexing) manually For Windows users 1 With a document open, click File Print. 2 Click Properties, Preferences, Options, or Setup. 3 Click the Advanced tab.... 4 From the 2-Sided Printing section, select Manual. Printing on the instruction sheet to complete the print job. 1 2 3 Note: To return to single-sided printing, return to the Advanced tab. Printing ...
...Print or "Pages to print" pop-up menu, select to print the odd numbered pages. 4 After printing the first set of the paper (duplexing) manually For Windows users 1 With a document open, click File Print. 2 Click Properties, Preferences, Options, or Setup. 3 Click the Advanced tab.... 4 From the 2-Sided Printing section, select Manual. Printing on the instruction sheet to complete the print job. 1 2 3 Note: To return to single-sided printing, return to the Advanced tab. Printing ...
User's Guide
Page 55
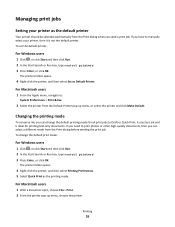
.... Changing the printing mode To conserve ink, you have to Draft or Quick Print. To change the default printing mode for all print jobs to manually select your printer as the printing mode. The printer folder opens. 4 Right-click the printer, and then select Printing Preferences. 5 Select Quick Print as the...
.... Changing the printing mode To conserve ink, you have to Draft or Quick Print. To change the default printing mode for all print jobs to manually select your printer as the printing mode. The printer folder opens. 4 Right-click the printer, and then select Printing Preferences. 5 Select Quick Print as the...

User's Guide
Page 63
...1 Load paper. 2 Load an original document faceup into the ADF or facedown on the scanner glass. Copying 63 and A4-size paper. Making a duplex copy manually 1 Load paper. 2 Load an original document faceup into the ADF or facedown on the scanner glass. 3 From the printer control panel, press . 4 Press ...save the first page of paper. Note: You cannot make duplex copies using other paper sizes, then see the instructions for making a duplex copy manually. 5 Press the left or right arrow button to select the number of pages that matches your choice comes on. 5 Press to print on one...
...1 Load paper. 2 Load an original document faceup into the ADF or facedown on the scanner glass. Copying 63 and A4-size paper. Making a duplex copy manually 1 Load paper. 2 Load an original document faceup into the ADF or facedown on the scanner glass. 3 From the printer control panel, press . 4 Press ...save the first page of paper. Note: You cannot make duplex copies using other paper sizes, then see the instructions for making a duplex copy manually. 5 Press the left or right arrow button to select the number of pages that matches your choice comes on. 5 Press to print on one...
User's Guide
Page 72
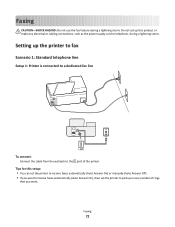
... or make any number of the printer. Tips for this setup: • You can set the printer to receive faxes automatically (Auto Answer On) or manually (Auto Answer Off). • If you want to the port of rings that you want . Faxing CAUTION-SHOCK HAZARD: Do not use the fax feature...
... or make any number of the printer. Tips for this setup: • You can set the printer to receive faxes automatically (Auto Answer On) or manually (Auto Answer Off). • If you want to the port of rings that you want . Faxing CAUTION-SHOCK HAZARD: Do not use the fax feature...

User's Guide
Page 75
When you answer the telephone and you hear fax tones, press *9* or the manual answer code on your line, then you need to install a DSL filter for the analog devices (fax machine, telephone, answering machine) in your network. Otherwise, ... connection on the DSL filter. To minimize interference between the two channels and ensure a quality connection, you need to set the printer to receive faxes manually (Auto Answer Off). This setting works best if you set the correct ring pattern for the printer. Tips for this setup: • This setup works...
When you answer the telephone and you hear fax tones, press *9* or the manual answer code on your line, then you need to install a DSL filter for the analog devices (fax machine, telephone, answering machine) in your network. Otherwise, ... connection on the DSL filter. To minimize interference between the two channels and ensure a quality connection, you need to set the printer to receive faxes manually (Auto Answer Off). This setting works best if you set the correct ring pattern for the printer. Tips for this setup: • This setup works...

User's Guide
Page 84
... the phone line is the code you set the correct pattern for the printer in this menu. • Enable fax forwarding. • Set a manual answer code. Block unwanted incoming faxes. If the printer is saved in Power Saver mode, then press to scan after dialing the recipient. Set the... Before opening the fax software to configure the fax settings, make sure that you do not have to receive faxes automatically or manually. If you press to receive faxes manually. • Set the Caller ID pattern that : • The printer is properly connected to On or Off. • Adjust ...
... the phone line is the code you set the correct pattern for the printer in this menu. • Enable fax forwarding. • Set a manual answer code. Block unwanted incoming faxes. If the printer is saved in Power Saver mode, then press to scan after dialing the recipient. Set the... Before opening the fax software to configure the fax settings, make sure that you do not have to receive faxes automatically or manually. If you press to receive faxes manually. • Set the Caller ID pattern that : • The printer is properly connected to On or Off. • Adjust ...


