
User Guide
Page 2
...26 Conserving supplies...26 Saving energy...27 Adjusting Power Saver...27 Recycling...27 Recycling Lexmark products...28 Recycling Lexmark packaging...28 Returning Lexmark cartridges for the printer...10 Printer configurations...11 Understanding the printer control panel...14 ...Additional printer setup 16 Installing internal options...16 Available internal options...16 Accessing the system board to install internal options...16 Installing a memory...
...26 Conserving supplies...26 Saving energy...27 Adjusting Power Saver...27 Recycling...27 Recycling Lexmark products...28 Recycling Lexmark packaging...28 Returning Lexmark cartridges for the printer...10 Printer configurations...11 Understanding the printer control panel...14 ...Additional printer setup 16 Installing internal options...16 Available internal options...16 Accessing the system board to install internal options...16 Installing a memory...
User Guide
Page 6
Large jobs do not collate ...111 Solving option problems...112 Option does not operate correctly or quits after it is installed 112 Drawers...112 Memory card ...113 Solving paper feed problems...113 Paper frequently jams ...113 Paper jam lights remain on after jam is cleared ...113 Page that jammed does ...
Large jobs do not collate ...111 Solving option problems...112 Option does not operate correctly or quits after it is installed 112 Drawers...112 Memory card ...113 Solving paper feed problems...113 Paper frequently jams ...113 Paper jam lights remain on after jam is cleared ...113 Page that jammed does ...

User Guide
Page 7
.... Do not pinch the power cord between objects such as Ethernet and telephone system connections) are accessing the system board or installing optional hardware or memory devices sometime after setting up the printer, then turn them off as well, and unplug any of these guidelines to lift it only with this...
.... Do not pinch the power cord between objects such as Ethernet and telephone system connections) are accessing the system board or installing optional hardware or memory devices sometime after setting up the printer, then turn them off as well, and unplug any of these guidelines to lift it only with this...

User Guide
Page 16
...16 Additional printer setup Installing internal options CAUTION-SHOCK HAZARD: If you are accessing the system board or installing optional hardware or memory devices sometime after setting up the printer, then turn the printer off as well, and unplug any cables going into the ... printer before continuing. The instructions in this section explain how to locate the appropriate connector. Available internal options Memory cards • Printer memory • Flash memory • Fonts Accessing the system board to install internal options CAUTION-SHOCK HAZARD: If you are accessing the...
...16 Additional printer setup Installing internal options CAUTION-SHOCK HAZARD: If you are accessing the system board or installing optional hardware or memory devices sometime after setting up the printer, then turn the printer off as well, and unplug any cables going into the ... printer before continuing. The instructions in this section explain how to locate the appropriate connector. Available internal options Memory cards • Printer memory • Flash memory • Fonts Accessing the system board to install internal options CAUTION-SHOCK HAZARD: If you are accessing the...
User Guide
Page 17
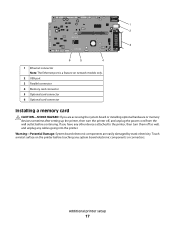
Touch a metal surface on network models only. 2 USB port 3 Parallel connector 4 Memory card connector 5 Optional card connector 6 Optional card connector Installing a memory card CAUTION-SHOCK HAZARD: If you have any other devices attached to the printer, then turn the printer off as...feature on the printer before continuing. Warning-Potential Damage: System board electronic components are accessing the system board or installing optional hardware or memory devices sometime after setting up the printer, then turn them off , and unplug the power cord from the wall outlet before touching ...
Touch a metal surface on network models only. 2 USB port 3 Parallel connector 4 Memory card connector 5 Optional card connector 6 Optional card connector Installing a memory card CAUTION-SHOCK HAZARD: If you have any other devices attached to the printer, then turn the printer off as...feature on the printer before continuing. Warning-Potential Damage: System board electronic components are accessing the system board or installing optional hardware or memory devices sometime after setting up the printer, then turn them off , and unplug the power cord from the wall outlet before touching ...
User Guide
Page 18
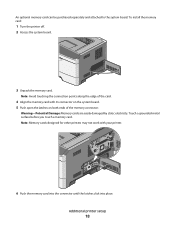
.... Additional printer setup 18 Note: Avoid touching the connection points along the edge of the memory connector. An optional memory card can be purchased separately and attached to the system board. Note: Memory cards designed for other printers may not work with its connector on the system board. 5 Push ...open the latches on both ends of the card. 4 Align the memory card with your printer. 6 Push the memory card into the connector until the latches click into place. To install the memory card: 1 Turn the printer off. 2 Access the system board. 3 Unpack the...
.... Additional printer setup 18 Note: Avoid touching the connection points along the edge of the memory connector. An optional memory card can be purchased separately and attached to the system board. Note: Memory cards designed for other printers may not work with its connector on the system board. 5 Push ...open the latches on both ends of the card. 4 Align the memory card with your printer. 6 Push the memory card into the connector until the latches click into place. To install the memory card: 1 Turn the printer off. 2 Access the system board. 3 Unpack the...
User Guide
Page 19
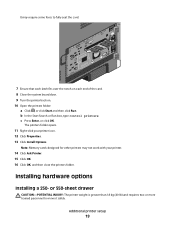
... and then click Run. It may not work with your printer icon. 12 Click Properties. 13 Click Install Options. Installing hardware options Installing a 250- Note: Memory cards designed for other printers may require some force to move it safely.
... and then click Run. It may not work with your printer icon. 12 Click Properties. 13 Click Install Options. Installing hardware options Installing a 250- Note: Memory cards designed for other printers may require some force to move it safely.

User Guide
Page 20
... optional drawer attaches under the printer. or 550-sheet drawer. Additional printer setup 20 you are accessing the system board or installing optional hardware or memory devices sometime after setting up the printer, then turn them off , and unplug the power cord from inside the tray. 4 Insert the tray into the...
... optional drawer attaches under the printer. or 550-sheet drawer. Additional printer setup 20 you are accessing the system board or installing optional hardware or memory devices sometime after setting up the printer, then turn them off , and unplug the power cord from inside the tray. 4 Insert the tray into the...

User Guide
Page 37
On Press to support Resource Save feature - Insufficient memory to print the remaining pages of the job. On - On - Light sequences What you can do Press either or to clear the light sequence. Job will be printed without Resource Save. On Interpreting the printer control panel lights 37 to collate job - Insufficient memory to clear the Complex page, some data may not have printed - Blinking - On - On • Install additional printer memory. • Press either or light sequence. On - On -
On Press to support Resource Save feature - Insufficient memory to print the remaining pages of the job. On - On - Light sequences What you can do Press either or to clear the light sequence. Job will be printed without Resource Save. On Interpreting the printer control panel lights 37 to collate job - Insufficient memory to clear the Complex page, some data may not have printed - Blinking - On - On • Install additional printer memory. • Press either or light sequence. On - On -
User Guide
Page 62
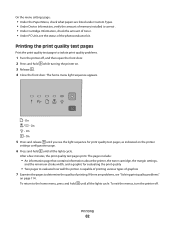
... - On - After a few minutes, the print quality test pages print. If there are listed under Custom Types. • Under Device Information, verify the amount of memory installed is capable of printing various types of graphics 7 Examine the pages to determine the quality of the photoconductor kit . To exit the menus, turn...
... - On - After a few minutes, the print quality test pages print. If there are listed under Custom Types. • Under Device Information, verify the amount of memory installed is capable of printing various types of graphics 7 Examine the pages to determine the quality of the photoconductor kit . To exit the menus, turn...

User Guide
Page 75
...sets the printer to never reprint jammed pages. This setting has no effect on PCL emulation print jobs. The printer reprints jammed pages unless the memory required to hold the pages is the factory default setting. Specifies whether the printer reprints jammed pages Notes: • Auto is needed for ... printer waits after a job is printed before it goes into a reduced power state Note: Disabled does not appear unless Energy Conserve is not enough memory to print the whole page. • On sets the printer to process the whole page so that may not have printed otherwise Notes: •...
...sets the printer to never reprint jammed pages. This setting has no effect on PCL emulation print jobs. The printer reprints jammed pages unless the memory required to hold the pages is the factory default setting. Specifies whether the printer reprints jammed pages Notes: • Auto is needed for ... printer waits after a job is printed before it goes into a reduced power state Note: Disabled does not appear unless Energy Conserve is not enough memory to print the whole page. • On sets the printer to process the whole page so that may not have printed otherwise Notes: •...

User Guide
Page 76
All downloads stored in flash memory are deleted. Downloads stored in RAM are not affected. PCL emulation uses a PCL interpreter for processing print jobs. Sets the logical and physical printable area ...
All downloads stored in flash memory are deleted. Downloads stored in RAM are not affected. PCL emulation uses a PCL interpreter for processing print jobs. Sets the logical and physical printable area ...
User Guide
Page 77
...of the page Notes: • Long Edge is the factory default setting. • Long Edge specifies that binding be placed on the back of memory, downloads are printed. for Macintosh users, choose File > Print, and then adjust the settings from the software program: for Windows users, click ... when the printer receives a job that binding be placed on the left edge of landscape pages. • Short Edge specifies that requires more memory than is available Notes: • Off is the factory default setting. Downloads are inserted in order to process print jobs. • The On...
...of the page Notes: • Long Edge is the factory default setting. • Long Edge specifies that binding be placed on the back of memory, downloads are printed. for Macintosh users, choose File > Print, and then adjust the settings from the software program: for Windows users, click ... when the printer receives a job that binding be placed on the left edge of landscape pages. • Short Edge specifies that requires more memory than is available Notes: • Off is the factory default setting. Downloads are inserted in order to process print jobs. • The On...

User Guide
Page 80
Establishes the font search order Notes: • Resident is the factory default setting. • A formatted optional flash memory card must be installed in printed output Notes: • 0 is the factory default setting. • Higher settings show more difference between levels of fonts ...a page containing the PostScript error Note: Off is R for Resident, M1 for Flash, and S for this menu item to be available. • The optional flash memory card cannot be Read/Write, Write, or password protected. • Job Buffer Size must be properly formatted and cannot be set of gray.
Establishes the font search order Notes: • Resident is the factory default setting. • A formatted optional flash memory card must be installed in printed output Notes: • 0 is the factory default setting. • Higher settings show more difference between levels of fonts ...a page containing the PostScript error Note: Off is R for Resident, M1 for Flash, and S for this menu item to be available. • The optional flash memory card cannot be Read/Write, Write, or password protected. • Job Buffer Size must be properly formatted and cannot be set of gray.
User Guide
Page 107
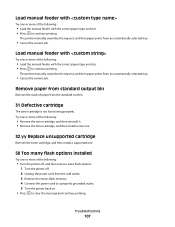
..., and then install a supported one. 58 Too many flash options installed Try one or more of paper from the wall outlet. 3 Remove the excess flash memory. 4 Connect the power cord to a properly grounded outlet. 5 Turn the printer back on. • Press to clear the message and continue printing. Load manual feeder...
..., and then install a supported one. 58 Too many flash options installed Try one or more of paper from the wall outlet. 3 Remove the excess flash memory. 4 Connect the power cord to a properly grounded outlet. 5 Turn the printer back on. • Press to clear the message and continue printing. Load manual feeder...

User Guide
Page 112
... 1 Pull the tray completely out. 2 Check for paper jams or misfeeds. 3 Make sure the guides are possible solutions. MAKE SURE THE PRINTER HAS ENOUGH MEMORY Add printer memory. If the option is not listed, reinstall it is listed in the Chooser. Troubleshooting 112 MAKE SURE THE OPTION IS INSTALLED Print a menu settings...
... 1 Pull the tray completely out. 2 Check for paper jams or misfeeds. 3 Make sure the guides are possible solutions. MAKE SURE THE PRINTER HAS ENOUGH MEMORY Add printer memory. If the option is not listed, reinstall it is listed in the Chooser. Troubleshooting 112 MAKE SURE THE OPTION IS INSTALLED Print a menu settings...
User Guide
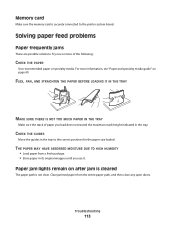
Page 113
... the following: CHECK THE PAPER Use recommended paper or specialty media. Clear jammed paper from a fresh package. • Store paper in the tray. Memory card Make sure the memory card is not clear. For more of paper you load does not exceed the maximum stack height indicated in its original wrapper until...
... the following: CHECK THE PAPER Use recommended paper or specialty media. Clear jammed paper from a fresh package. • Store paper in the tray. Memory card Make sure the memory card is not clear. For more of paper you load does not exceed the maximum stack height indicated in its original wrapper until...
User Guide
Page 139
...tray 44 standard 250-sheet tray 40 Local Printer Settings Utility installing 65 using 66 M manual duplex printing 56 manual feeder loading 45 memory card installing 17 troubleshooting 113 menu settings page printing 61 menus Custom Types 72 Default Source 67 Finishing 77 General settings 74 in ...127, 128, 129, 130 N-up setting Finishing menu 67 O optional trays, loading 44 options 250-sheet drawer 19 550-sheet drawer 19 memory card 17 memory cards 16 ordering toner cartridges 84 P paper characteristics 49 letterhead 51 preprinted forms 51 recycled 26 selecting 51 setting size 40 setting type 40...
...tray 44 standard 250-sheet tray 40 Local Printer Settings Utility installing 65 using 66 M manual duplex printing 56 manual feeder loading 45 memory card installing 17 troubleshooting 113 menu settings page printing 61 menus Custom Types 72 Default Source 67 Finishing 77 General settings 74 in ...127, 128, 129, 130 N-up setting Finishing menu 67 O optional trays, loading 44 options 250-sheet drawer 19 550-sheet drawer 19 memory card 17 memory cards 16 ordering toner cartridges 84 P paper characteristics 49 letterhead 51 preprinted forms 51 recycled 26 selecting 51 setting size 40 setting type 40...
User Guide
Page 140
... Load manual feeder with 107 Load manual feeder with 106 Remove paper from standard output bin 107 printer options troubleshooting drawers 112 memory card 113 option not working 112 printer problems, solving basic 108 printer settings configuration sheet printing 22 printing booklet 61 duplex (2-...the paper 56 print quality test pages 62, 114 publications, finding 9 Q Quality menu 79 R recycled paper using 26 recycling Lexmark packaging 28 Lexmark products 28 toner cartridges 28 WEEE statement 126 Remove paper from standard output bin 107 replacing photoconductor kit 87 toner cartridge 85 ...
... Load manual feeder with 107 Load manual feeder with 106 Remove paper from standard output bin 107 printer options troubleshooting drawers 112 memory card 113 option not working 112 printer problems, solving basic 108 printer settings configuration sheet printing 22 printing booklet 61 duplex (2-...the paper 56 print quality test pages 62, 114 publications, finding 9 Q Quality menu 79 R recycled paper using 26 recycling Lexmark packaging 28 Lexmark products 28 toner cartridges 28 WEEE statement 126 Remove paper from standard output bin 107 replacing photoconductor kit 87 toner cartridge 85 ...

User Guide
Page 141
... horizontal lines 121 streaked vertical lines 121 toner fog or background shading 119 toner rubs off 119 toner specks 120 troubleshooting, printer options drawers 112 memory card 113 option not working 112 U Universal Paper Size 73 setting 40 Universal Setup menu 73 unlinking trays 47 USB port 22 W Web site finding...
... horizontal lines 121 streaked vertical lines 121 toner fog or background shading 119 toner rubs off 119 toner specks 120 troubleshooting, printer options drawers 112 memory card 113 option not working 112 U Universal Paper Size 73 setting 40 Universal Setup menu 73 unlinking trays 47 USB port 22 W Web site finding...


