
Owners Manual
Page 1
PLASMA TV OWNER'S MANUAL MODEL: RU-42PX10/11/20 RU-50PX10/11/20 Please read this manual for future reference. Model Number : Serial Number : LG Electronics U.S.A., Inc. Retain this manual carefully and completely before operating your dealer if you require service. See the label attached on the back cover and relate this information to your TV. Record model number and serial number of the TV in the spaces provided below.
PLASMA TV OWNER'S MANUAL MODEL: RU-42PX10/11/20 RU-50PX10/11/20 Please read this manual for future reference. Model Number : Serial Number : LG Electronics U.S.A., Inc. Retain this manual carefully and completely before operating your dealer if you require service. See the label attached on the back cover and relate this information to your TV. Record model number and serial number of the TV in the spaces provided below.

Owners Manual
Page 2
... that may cause harmful interference to modify this product. However, there is : LG Electronics U.S.A., Inc 1000 Sylvan Avenue, Englewood Cliffs, NJ 07632 1-201-816-2000 http://www.lgusa.com 2 Plasma TV COMPLIANCE: The responsible party for proper grounding and, in any way without written ...• Increase the separation between the equipment and receiver. • Connect the equipment into an outlet on a circuit different from LG Electronics. NO USER SERVICEABLE PARTS INSIDE. REGULATORY INFORMATION: This equipment has been tested and found to operate the equipment. CAUTION: Do ...
... that may cause harmful interference to modify this product. However, there is : LG Electronics U.S.A., Inc 1000 Sylvan Avenue, Englewood Cliffs, NJ 07632 1-201-816-2000 http://www.lgusa.com 2 Plasma TV COMPLIANCE: The responsible party for proper grounding and, in any way without written ...• Increase the separation between the equipment and receiver. • Connect the equipment into an outlet on a circuit different from LG Electronics. NO USER SERVICEABLE PARTS INSIDE. REGULATORY INFORMATION: This equipment has been tested and found to operate the equipment. CAUTION: Do ...
Owners Manual
Page 4
... damage to the product due to dangerous voltage or other products (including amplifiers) that could result in the vicinity of any kind on the product. 4 Plasma TV c. Heat The product should be located in a fire or electric shock. When installing an outside antenna or cable system is in a risk of any kind...
... damage to the product due to dangerous voltage or other products (including amplifiers) that could result in the vicinity of any kind on the product. 4 Plasma TV c. Heat The product should be located in a fire or electric shock. When installing an outside antenna or cable system is in a risk of any kind...

Owners Manual
Page 6
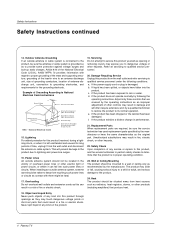
... viewing experience is the latest display technology. This means that are in the room who can be also be exchanged or returned. 6 Plasma TV The tiny dots appearing does not mean that this means that you are easily viewable. Thus a few minute colored dots may be acceptable...from these cell defects during the operation of this product. Therefore, a certain level of vision Your flat panel plasma screen offers an exceptionally broad viewing angle -- Cooling Fan Noise (RU-50PX10/11/20 only) In the same way that a certain level of fluorescent lamps. Several tiny, minute...
... viewing experience is the latest display technology. This means that are in the room who can be also be exchanged or returned. 6 Plasma TV The tiny dots appearing does not mean that this means that you are easily viewable. Thus a few minute colored dots may be acceptable...from these cell defects during the operation of this product. Therefore, a certain level of vision Your flat panel plasma screen offers an exceptionally broad viewing angle -- Cooling Fan Noise (RU-50PX10/11/20 only) In the same way that a certain level of fluorescent lamps. Several tiny, minute...
Owners Manual
Page 8
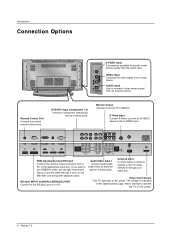
AUDIO Input Use to connect to hear stereo sound from an external device to these jacks. Monitor Output Connect a second TV or Monitor. If you use the cable that has a core, or the EMI filter core along with separate cable. DVD/DTV Input (Component 1-2) Connect a component ... a PC. Never attempt to the S-VIDEO input. S-Video Input Connect S-Video out from a PC to the RS-232C port on DC power. 8 Plasma TV RS-232C INPUT (CONTROL/SERVICE) PORT Connect to the appropriate input port. Remote Control Port Connect your cable box. The voltage is indicated on AC ...
AUDIO Input Use to connect to hear stereo sound from an external device to these jacks. Monitor Output Connect a second TV or Monitor. If you use the cable that has a core, or the EMI filter core along with separate cable. DVD/DTV Input (Component 1-2) Connect a component ... a PC. Never attempt to the S-VIDEO input. S-Video Input Connect S-Video out from a PC to the RS-232C port on DC power. 8 Plasma TV RS-232C INPUT (CONTROL/SERVICE) PORT Connect to the appropriate input port. Remote Control Port Connect your cable box. The voltage is indicated on AC ...

Owners Manual
Page 10
..., in the upper holes on the TV as shown. Do not try to ground the unit by attaching it to a wall for additional support. If grounding methods are included with the product), as shown. 10 Plasma TV Attaching the TV assembly to prevent possible electric shock. ...Install the wall brackets on the wall with 4 bolts*, (not supplied with your plasma display. DVI Cable 2-TV brackets 2-Wall brackets Power Supply Short-circuit Breaker • Install...
..., in the upper holes on the TV as shown. Do not try to ground the unit by attaching it to a wall for additional support. If grounding methods are included with the product), as shown. 10 Plasma TV Attaching the TV assembly to prevent possible electric shock. ...Install the wall brackets on the wall with 4 bolts*, (not supplied with your plasma display. DVI Cable 2-TV brackets 2-Wall brackets Power Supply Short-circuit Breaker • Install...
Owners Manual
Page 12
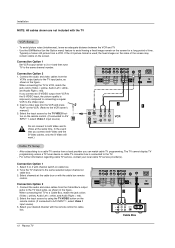
... figure. If you can watch cable TV programming. COMPONENT INPUT 2 COMPONENT INPUT 1 VIDEO R L AUDIO R L/MONO MONITOR OUTPUT A/V INPUT 1 S-VIDEO AUDIO VIDEO 2 Antenna 1 AC INPUT (R) AUDIO (L) VIDEO TV VCR OUTPUT SWITCH 34 RF Cable Cable Box 12 Plasma TV Connect the audio and video cables from... VCR to both Video and the S-Video cables, only the S-Video will work.) Cable TV Setup - Select channels at the same time. compared...
... figure. If you can watch cable TV programming. COMPONENT INPUT 2 COMPONENT INPUT 1 VIDEO R L AUDIO R L/MONO MONITOR OUTPUT A/V INPUT 1 S-VIDEO AUDIO VIDEO 2 Antenna 1 AC INPUT (R) AUDIO (L) VIDEO TV VCR OUTPUT SWITCH 34 RF Cable Cable Box 12 Plasma TV Connect the audio and video cables from... VCR to both Video and the S-Video cables, only the S-Video will work.) Cable TV Setup - Select channels at the same time. compared...
Owners Manual
Page 14
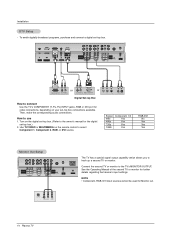
...for further details regarding that device's input settings. How to hook up a second TV or monitor. Turn on the digital set -top box.) 2. S-VIDEO IN (R) AUDIO (L) VIDEO 14 Plasma TV Installation DTV Setup - Use TV/VIDEO or MULTIMEDIA on your set -top box. Then, make the corresponding audio ... COMPONENT INPUT 2 COMPONENT INPUT 1 VIDEO R L AUDIO R L/MONO MONITOR OUTPUT A/V INPUT 1 S-VIDEO AUDIO VIDEO Antenna AC INPUT The TV has a special signal output capability which allows you to use 1. REMOTE CONTROL RS-232C INPUT (CONTROL/SERVICE) DVI INPUT AUDIO INPUT RGB...
...for further details regarding that device's input settings. How to hook up a second TV or monitor. Turn on the digital set -top box.) 2. S-VIDEO IN (R) AUDIO (L) VIDEO 14 Plasma TV Installation DTV Setup - Use TV/VIDEO or MULTIMEDIA on your set -top box. Then, make the corresponding audio ... COMPONENT INPUT 2 COMPONENT INPUT 1 VIDEO R L AUDIO R L/MONO MONITOR OUTPUT A/V INPUT 1 S-VIDEO AUDIO VIDEO Antenna AC INPUT The TV has a special signal output capability which allows you to use 1. REMOTE CONTROL RS-232C INPUT (CONTROL/SERVICE) DVI INPUT AUDIO INPUT RGB...
Owners Manual
Page 16
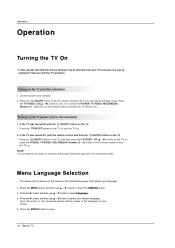
... the SPECIAL menu. 2. Press the TV/VIDEO, CH (D / E) button on the TV or press the POWER, TV/VIDEO, MULTIMEDIA, Number (0 ~ 9) button on . If the TV was turned off with the ON/OFF button on the TV • Press the ON/OFF button on the TV to save. 16 Plasma TV NOTE • If you with the... TV operation. Turning on . 2. Operation Operation Turning the TV On * In this manual, the OSD (On Screen Display) may be different from the wall...
... the SPECIAL menu. 2. Press the TV/VIDEO, CH (D / E) button on the TV or press the POWER, TV/VIDEO, MULTIMEDIA, Number (0 ~ 9) button on . If the TV was turned off with the ON/OFF button on the TV • Press the ON/OFF button on the TV to save. 16 Plasma TV NOTE • If you with the... TV operation. Turning on . 2. Operation Operation Turning the TV On * In this manual, the OSD (On Screen Display) may be different from the wall...
Owners Manual
Page 18
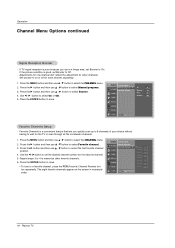
... select the CHANNEL menu. 2. Press the G button and then use D / E button to select Booster. 4. CHANNEL Auto program Manual program G TV 2 PICTURE Favorite channel Memory On SOUND Fine 0 Booster Off TIMER SPECIAL SCREEN PIP/DW LOCK Menu Prev. Favorite Channels is good, set Booster to ... Favorite channel G SOUND TIMER SPECIAL SCREEN PIP/DW LOCK Menu Prev. 18 Plasma TV Operation Channel Menu Options continued Signal Reception Booster - The eight favorite channels appear on or off for the TV to scan through all the in a fringe area, set Booster to a ...
... select the CHANNEL menu. 2. Press the G button and then use D / E button to select Booster. 4. CHANNEL Auto program Manual program G TV 2 PICTURE Favorite channel Memory On SOUND Fine 0 Booster Off TIMER SPECIAL SCREEN PIP/DW LOCK Menu Prev. Favorite Channels is good, set Booster to ... Favorite channel G SOUND TIMER SPECIAL SCREEN PIP/DW LOCK Menu Prev. 18 Plasma TV Operation Channel Menu Options continued Signal Reception Booster - The eight favorite channels appear on or off for the TV to scan through all the in a fringe area, set Booster to a ...

Owners Manual
Page 20
...adjustments. 4. CHANNEL APC PICTURE SOUND TIMER SPECIAL SCREEN ACC Fleshtone Contrast Brightness Color Sharpness Tint 100 G 60 50 50 0 PIP/DW LOCK Menu Prev. 20 Plasma TV SOUND Fleshtone G 0 • The adjustment range is connected to external equipment using sRGB, set to select the PICTURE menu. 2. Use Fleshtone to save....to save . You can adjust picture contrast, brightness, color, sharpness, and tint options to make appropriate adjustments. Operation Picture Menu Options continued Fleshtone (TV, Video1-2, Component 1-2, RGB-DTV, and DVI-DTV Mode only) - If the...
...adjustments. 4. CHANNEL APC PICTURE SOUND TIMER SPECIAL SCREEN ACC Fleshtone Contrast Brightness Color Sharpness Tint 100 G 60 50 50 0 PIP/DW LOCK Menu Prev. 20 Plasma TV SOUND Fleshtone G 0 • The adjustment range is connected to external equipment using sRGB, set to select the PICTURE menu. 2. Use Fleshtone to save....to save . You can adjust picture contrast, brightness, color, sharpness, and tint options to make appropriate adjustments. Operation Picture Menu Options continued Fleshtone (TV, Video1-2, Component 1-2, RGB-DTV, and DVI-DTV Mode only) - If the...
Owners Manual
Page 22
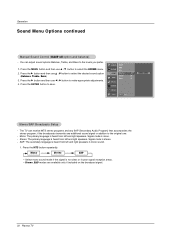
... from left and right speakers in poor signal reception areas. • Stereo, SAP modes are available only if included on the broadcast signal. 22 Plasma TV Press the MENU button and then use D / E button to select the SOUND menu. Press the G button and then use D / E ..., Treble, Bass). SAP: The secondary language is not clear or in mono sound. 1. Press the ENTER button to the original one. - The TV can adjust sound options Balance, Treble, and Bass to make appropriate adjustments. Mono: The primary language is mono. - Operation Sound Menu Options continued Manual...
... from left and right speakers in poor signal reception areas. • Stereo, SAP modes are available only if included on the broadcast signal. 22 Plasma TV Press the MENU button and then use D / E button to select the SOUND menu. Press the G button and then use D / E ..., Treble, Bass). SAP: The secondary language is not clear or in mono sound. 1. Press the ENTER button to the original one. - The TV can adjust sound options Balance, Treble, and Bass to make appropriate adjustments. Mono: The primary language is mono. - Operation Sound Menu Options continued Manual...

Owners Manual
Page 24
...of minutes selected. 3. Min option appears 10, 20, 30, 60, 90, 120, 180, and 240 minutes. 2. To check the remaining minutes before the TV turns off TIMER SPECIAL SCREEN PIP/DW LOCK Menu Prev. Min appears. Press the G button and then use D / E button to count down from the... by the following sleep timer turn off . 1. Press the G button and then use D / E button to select the TIMER menu. 2. G On Off 24 Plasma TV Press the ENTER button to on and there is turned off times: zz --- If set to save. First the on the screen, press the ENTER...
...of minutes selected. 3. Min option appears 10, 20, 30, 60, 90, 120, 180, and 240 minutes. 2. To check the remaining minutes before the TV turns off TIMER SPECIAL SCREEN PIP/DW LOCK Menu Prev. Min appears. Press the G button and then use D / E button to count down from the... by the following sleep timer turn off . 1. Press the G button and then use D / E button to select the TIMER menu. 2. G On Off 24 Plasma TV Press the ENTER button to on and there is turned off times: zz --- If set to save. First the on the screen, press the ENTER...
Owners Manual
Page 26
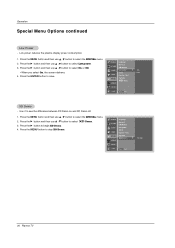
... PICTURE Key lock ISM Method SOUND TIMER Low power Set ID Caption / Text SPECIAL Captions Demo G SCREEN PIP/DW LOCK Menu Prev. To start 26 Plasma TV Press the G button and then use D / E button to select On or Off. • When you select On, the screen darkens. 4. Press the ... to stop XD Demo. Press the MENU button to see the difference between XD Demo on and XD Demo off. 1. Low power reduces the plasma display power consumption. 1. CHANNEL Language PICTURE Key lock ISM Method SOUND Low power G On Set ID Off TIMER Caption / Text SPECIAL Captions Demo...
... PICTURE Key lock ISM Method SOUND TIMER Low power Set ID Caption / Text SPECIAL Captions Demo G SCREEN PIP/DW LOCK Menu Prev. To start 26 Plasma TV Press the G button and then use D / E button to select On or Off. • When you select On, the screen darkens. 4. Press the ... to stop XD Demo. Press the MENU button to see the difference between XD Demo on and XD Demo off. 1. Low power reduces the plasma display power consumption. 1. CHANNEL Language PICTURE Key lock ISM Method SOUND Low power G On Set ID Off TIMER Caption / Text SPECIAL Captions Demo...
Owners Manual
Page 28
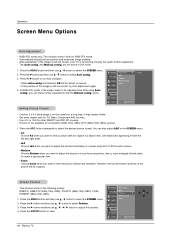
Automatically adjusts picture position and minimizes image shaking. - After adjustment, if the image is still not correct, your TV is , more after using Auto config., you can also adjust ARC in the SCREEN menu. • 4:3 Choose 4:3 when you want to view the picture without ..., Component 480i sources. - Press the G button and then use D / E button to adjust the position. 4. SCREEN PIP/DW LOCK Menu Prev. 28 Plasma TV Operation Screen Menu Options Auto Adjustment - CHANNEL Auto config. Set every aspect ratio for other RGB-PC and DVI-PC sources. - Press the ARC button ...
Automatically adjusts picture position and minimizes image shaking. - After adjustment, if the image is still not correct, your TV is , more after using Auto config., you can also adjust ARC in the SCREEN menu. • 4:3 Choose 4:3 when you want to view the picture without ..., Component 480i sources. - Press the G button and then use D / E button to adjust the position. 4. SCREEN PIP/DW LOCK Menu Prev. 28 Plasma TV Operation Screen Menu Options Auto Adjustment - CHANNEL Auto config. Set every aspect ratio for other RGB-PC and DVI-PC sources. - Press the ARC button ...

Owners Manual
Page 30
... TIMER Screen adj. Press the SPLIT ZOOM button repeatedly to original factory value) - Press the G button and then use D / E button to fill the screen. 30 Plasma TV Press the G button. • You can only move within the enlarged picture using Split Zoom. 1. If an image is enlarged, a section can be viewed without... sub picture size for all input sources. - Press the number button corresponding to select the SCREEN menu. 2. Operation Screen Menu Options continued Luminance Noise Reduction (TV, Video 1-2 and Component 480i modes only) - G To set Split Zoom -
... TIMER Screen adj. Press the SPLIT ZOOM button repeatedly to original factory value) - Press the G button and then use D / E button to fill the screen. 30 Plasma TV Press the G button. • You can only move within the enlarged picture using Split Zoom. 1. If an image is enlarged, a section can be viewed without... sub picture size for all input sources. - Press the number button corresponding to select the SCREEN menu. 2. Operation Screen Menu Options continued Luminance Noise Reduction (TV, Video 1-2 and Component 480i modes only) - G To set Split Zoom -

Owners Manual
Page 32
... (PIP Mode only) Press the POSITION button. Main Picture Sub Picture Win.size FG PIP Transparency (PIP Mode only) Main Picture Sub Picture TV Program selection for the sub picture. Press the MENU button and then use D / E button to select the input source for PIP Press ... the PIP/DW button to save. Main Picture Source Available Sub Picture Sources TV, Video 1-2, Component 480i TV, Video 1-2, Component 480i/480p/720p/1080i, RGB and DVI Component 480p/720p/1080i, RGB and DVI TV, Video 1-2, Component 480i 32 Plasma TV Use the F / G button to select the PIP/DW menu. 2. ...
... (PIP Mode only) Press the POSITION button. Main Picture Sub Picture Win.size FG PIP Transparency (PIP Mode only) Main Picture Sub Picture TV Program selection for the sub picture. Press the MENU button and then use D / E button to select the input source for PIP Press ... the PIP/DW button to save. Main Picture Source Available Sub Picture Sources TV, Video 1-2, Component 480i TV, Video 1-2, Component 480i/480p/720p/1080i, RGB and DVI Component 480p/720p/1080i, RGB and DVI TV, Video 1-2, Component 480i 32 Plasma TV Use the F / G button to select the PIP/DW menu. 2. ...

Owners Manual
Page 34
... k 05. Split Zoom k 16. When selecting Set ID '0', every connected PDP set ID to save. COM- Key mc 01 ~ 7D 0 0 ~ 1 Key code 0 mainsub/TuneBand 34 Plasma TV Press the G button and then use F / G button to adjust Set ID to 'Real Data Mapping 1'. Transmission / Receiving Protocol Command Reference List Transmission COMMAND 1 COMMAND 2 DATA...
... k 05. Split Zoom k 16. When selecting Set ID '0', every connected PDP set ID to save. COM- Key mc 01 ~ 7D 0 0 ~ 1 Key code 0 mainsub/TuneBand 34 Plasma TV Press the G button and then use F / G button to adjust Set ID to 'Real Data Mapping 1'. Transmission / Receiving Protocol Command Reference List Transmission COMMAND 1 COMMAND 2 DATA...

Owners Manual
Page 36
... ID][ ][OK][Data][x] 10. Transmission [k][k][ ][Set ID][ ][Data][Cr] Data Min: 0 ~ Max: 64 • Refer to 'Real data mapping 1'. When main power is released. 36 Plasma TV 14. See page 35. Sharpness (Command2:k) G To adjust the screen sharpness. Remote Control Lock Mode (Command2:m) G To lock the remote control and the front panel...
... ID][ ][OK][Data][x] 10. Transmission [k][k][ ][Set ID][ ][Data][Cr] Data Min: 0 ~ Max: 64 • Refer to 'Real data mapping 1'. When main power is released. 36 Plasma TV 14. See page 35. Sharpness (Command2:k) G To adjust the screen sharpness. Remote Control Lock Mode (Command2:m) G To lock the remote control and the front panel...

Owners Manual
Page 38
...'. ISM Method (Command2:p) G To avoid having a fixed image remain on Acknowledgement [q][ ][Set ID][ ][OK][Data][x] 28. See page 35. Acknowledgement [t][ ][Set ID][ ][OK][Data][x] 38 Plasma TV 31. Channel Add/Del (Command: m b) G To add and delete the channels Transmission [m][b][ ][Set ID][ ][Data][Cr] Data 0: Channel Memory 1: Channel Erase Acknowledgement [b][ ][Set ID][ ][OK...
...'. ISM Method (Command2:p) G To avoid having a fixed image remain on Acknowledgement [q][ ][Set ID][ ][OK][Data][x] 28. See page 35. Acknowledgement [t][ ][Set ID][ ][OK][Data][x] 38 Plasma TV 31. Channel Add/Del (Command: m b) G To add and delete the channels Transmission [m][b][ ][Set ID][ ][Data][Cr] Data 0: Channel Memory 1: Channel Erase Acknowledgement [b][ ][Set ID][ ][OK...


