

Owners Manual
Page 2
... maintenance (servicing) instructions in a particular installation. COMPLIANCE: The responsible party for compliance could void the user's authority to the presence of the cable entry as close to which can radiate radio frequency energy and, if not installed and used in accordance with the instruction manual, may be determined by turning the equipment off and on a circuit different from LG Electronics. The exclamation point...
... maintenance (servicing) instructions in a particular installation. COMPLIANCE: The responsible party for compliance could void the user's authority to the presence of the cable entry as close to which can radiate radio frequency energy and, if not installed and used in accordance with the instruction manual, may be determined by turning the equipment off and on a circuit different from LG Electronics. The exclamation point...
Owners Manual
Page 4
... extensive work by following conditions: a. Power Lines An outside antenna system should be fatal. 17. If the product exhibits a distinct change in fire, electric shock, or other products (including amplifiers) that the product is damaged. Replacement Parts When replacement parts are covered by the operating instructions as an improper adjustment of other controls may result in wire to an antenna discharge unit, size of...
... extensive work by following conditions: a. Power Lines An outside antenna system should be fatal. 17. If the product exhibits a distinct change in fire, electric shock, or other products (including amplifiers) that the product is damaged. Replacement Parts When replacement parts are covered by the operating instructions as an improper adjustment of other controls may result in wire to an antenna discharge unit, size of...
Owners Manual
Page 5
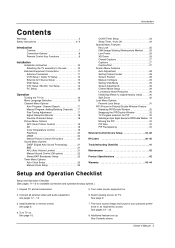
... 8 Remote Control Key Functions 9 Installation Installation Instruction 10 Attaching the TV assembly to the wall 10 External Equipment Connections 11 Antenna Connection 11 VCR Setup / Cable TV Setup 12 External A/V Source Setup 13 DVD Setup 13 DTV Setup / Monitor Out Setup 14 PC Setup 15 Operation Turning the TV On 16 Menu Language Selection 16 Channel Menu Options Auto Program: Channel Search 17 Manual Program: Adding/Deleting Channels . . .17 Fine Tuning Adjustment 17 Signal Reception Booster 18 Favorite Channels Setup 18 Picture Menu Options APC (Auto Picture Control 19...
... 8 Remote Control Key Functions 9 Installation Installation Instruction 10 Attaching the TV assembly to the wall 10 External Equipment Connections 11 Antenna Connection 11 VCR Setup / Cable TV Setup 12 External A/V Source Setup 13 DVD Setup 13 DTV Setup / Monitor Out Setup 14 PC Setup 15 Operation Turning the TV On 16 Menu Language Selection 16 Channel Menu Options Auto Program: Channel Search 17 Manual Program: Adding/Deleting Channels . . .17 Fine Tuning Adjustment 17 Signal Reception Booster 18 Favorite Channels Setup 18 Picture Menu Options APC (Auto Picture Control 19...
Owners Manual
Page 8
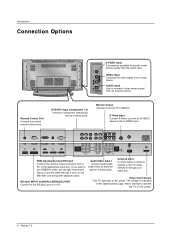
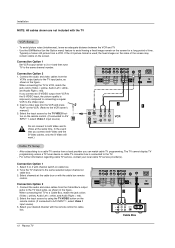
... Port Connect your cable box. Monitor Output Connect a second TV or Monitor. S-Video Input Connect S-Video out from a PC to the appropriate input port. REMOTE CONTROL RS-232C INPUT (CONTROL/SERVICE) DVI INPUT AUDIO INPUT RGB INPUT COMPONENT INPUT 2 COMPONENT INPUT 1 VIDEO R L AUDIO MONITOR OUTPUT R L/MONO A/V INPUT 1 S-VIDEO AUDIO VIDEO Antenna AC INPUT RGB Input/Audio Input/DVI Input Connect the monitor output connector from an S-VIDEO device to these jacks. Antenna Input Connect cable or antenna signals to provide better picture quality than the video input. DVD...
... Port Connect your cable box. Monitor Output Connect a second TV or Monitor. S-Video Input Connect S-Video out from a PC to the appropriate input port. REMOTE CONTROL RS-232C INPUT (CONTROL/SERVICE) DVI INPUT AUDIO INPUT RGB INPUT COMPONENT INPUT 2 COMPONENT INPUT 1 VIDEO R L AUDIO MONITOR OUTPUT R L/MONO A/V INPUT 1 S-VIDEO AUDIO VIDEO Antenna AC INPUT RGB Input/Audio Input/DVI Input Connect the monitor output connector from an S-VIDEO device to these jacks. Antenna Input Connect cable or antenna signals to provide better picture quality than the video input. DVD...
Owners Manual
Page 9
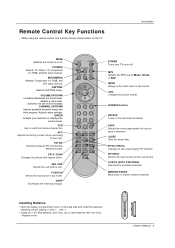
... (+ with Auto program. MULTIMEDIA Selects: Component 1-2, RGB, and DVI input sources. Selects a menu item. Adjusts menu settings. POSITION Moves the sub picture in pip mode. MTS Selects the MTS sound: Mono, Stereo, or SAP. Owner's Manual 9 When using the remote control, aim it at the remote control sensor on or off . FCR Use to next lower/higher PIP channel. PIP INPUT Selects the input source for the sub picture. Remote Control Key Functions - CAPTION Selects CAPTION mode. Replace cover. SWAP Exchanges the main/sub images. ARC Changes the picture format. Don...
... (+ with Auto program. MULTIMEDIA Selects: Component 1-2, RGB, and DVI input sources. Selects a menu item. Adjusts menu settings. POSITION Moves the sub picture in pip mode. MTS Selects the MTS sound: Mono, Stereo, or SAP. Owner's Manual 9 When using the remote control, aim it at the remote control sensor on or off . FCR Use to next lower/higher PIP channel. PIP INPUT Selects the input source for the sub picture. Remote Control Key Functions - CAPTION Selects CAPTION mode. Replace cover. SWAP Exchanges the main/sub images. ARC Changes the picture format. Don...
Owners Manual
Page 12
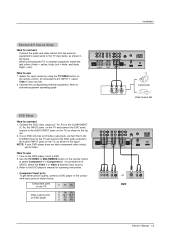
...INPUT 2 COMPONENT INPUT 1 VIDEO R L AUDIO R L/MONO MONITOR OUTPUT A/V INPUT 1 S-VIDEO AUDIO VIDEO 2 Antenna 1 AC INPUT (R) AUDIO (L) VIDEO TV VCR OUTPUT SWITCH 34 RF Cable Cable Box 12 Plasma TV compared to connecting a regular VCR to a Cable Box, match the jack colors (Video = yellow, Audio Left = white, and Audio Right = red). 2. In the event that you connect an S-VIDEO output from the VCR's output jacks to both Video and the S-Video cables, only the S-Video will work.) Cable TV Setup - Tune the TV channel to the same selected output channel on the remote control...
...INPUT 2 COMPONENT INPUT 1 VIDEO R L AUDIO R L/MONO MONITOR OUTPUT A/V INPUT 1 S-VIDEO AUDIO VIDEO 2 Antenna 1 AC INPUT (R) AUDIO (L) VIDEO TV VCR OUTPUT SWITCH 34 RF Cable Cable Box 12 Plasma TV compared to connecting a regular VCR to a Cable Box, match the jack colors (Video = yellow, Audio Left = white, and Audio Right = red). 2. In the event that you connect an S-VIDEO output from the VCR's output jacks to both Video and the S-Video cables, only the S-Video will work.) Cable TV Setup - Tune the TV channel to the same selected output channel on the remote control...
Owners Manual
Page 13
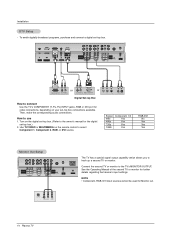
... player's manual for operating instructions. • Component Input ports To get better picture quality, connect a DVD player to A/V INPUT 1, select Video 1 input source). 2. Turn on the remote control. (If connected to the component input ports as shown in the figure. When connecting the TV to connect 1. How to the AUDIO INPUT jacks on DVD player Y Pb Pr Y B-Y R-Y Y Cb Cr Y PB PR COMPONENT INPUT 2 COMPONENT INPUT 1 VIDEO R L AUDIO R L/MONO MONITOR OUTPUT A/V INPUT 1 S-VIDEO AUDIO VIDEO Antenna AC INPUT B R (R) AUDIO (L) or S-VIDEO (R) AUDIO (L) DVD Owner's Manual...
... player's manual for operating instructions. • Component Input ports To get better picture quality, connect a DVD player to A/V INPUT 1, select Video 1 input source). 2. Turn on the remote control. (If connected to the component input ports as shown in the figure. When connecting the TV to connect 1. How to the AUDIO INPUT jacks on DVD player Y Pb Pr Y B-Y R-Y Y Cb Cr Y PB PR COMPONENT INPUT 2 COMPONENT INPUT 1 VIDEO R L AUDIO R L/MONO MONITOR OUTPUT A/V INPUT 1 S-VIDEO AUDIO VIDEO Antenna AC INPUT B R (R) AUDIO (L) or S-VIDEO (R) AUDIO (L) DVD Owner's Manual...
Owners Manual
Page 14
... TV REMOTE CONTROL RS-232C INPUT (CONTROL/SERVICE) DVI INPUT AUDIO INPUT RGB INPUT COMPONENT INPUT 2 COMPONENT INPUT 1 VIDEO R L AUDIO MONITOR OUTPUT R L/MONO A/V INPUT 1 S-VIDEO AUDIO VIDEO Antenna or or DVI-DTV OUTPUT (R) AUDIO (L) (R) AUDIO (L) RGB-DTV OUTPUT Digital Set-top Box How to connect Use the TV's COMPONENT (Y, PB, PR) INPUT jacks, RGB or DVI port for the digital set -top box connections available. Use TV/VIDEO or MULTIMEDIA on your set -top box.) 2. See the Operating Manual of the second TV or monitor for Monitor out. To watch digitally broadcast programs...
... TV REMOTE CONTROL RS-232C INPUT (CONTROL/SERVICE) DVI INPUT AUDIO INPUT RGB INPUT COMPONENT INPUT 2 COMPONENT INPUT 1 VIDEO R L AUDIO MONITOR OUTPUT R L/MONO A/V INPUT 1 S-VIDEO AUDIO VIDEO Antenna or or DVI-DTV OUTPUT (R) AUDIO (L) (R) AUDIO (L) RGB-DTV OUTPUT Digital Set-top Box How to connect Use the TV's COMPONENT (Y, PB, PR) INPUT jacks, RGB or DVI port for the digital set -top box connections available. Use TV/VIDEO or MULTIMEDIA on your set -top box.) 2. See the Operating Manual of the second TV or monitor for Monitor out. To watch digitally broadcast programs...
Owners Manual
Page 15
... PC mode. NOTES: • Use a DVI cable. • Avoid keeping a fixed image on the PC does not output analog and digital RGB simultaneously, connect only one of the PC graphic card. Check the image on your PC connector. • If the graphic card on the TV's screen for Horizontal and Vertical frequencies is separate. REMOTE CONTROL RS-232C INPUT (CONTROL/SERVICE) DVI INPUT AUDIO INPUT RGB INPUT Operation How to select RGB, or DVI source...
... PC mode. NOTES: • Use a DVI cable. • Avoid keeping a fixed image on the PC does not output analog and digital RGB simultaneously, connect only one of the PC graphic card. Check the image on your PC connector. • If the graphic card on the TV's screen for Horizontal and Vertical frequencies is separate. REMOTE CONTROL RS-232C INPUT (CONTROL/SERVICE) DVI INPUT AUDIO INPUT RGB INPUT Operation How to select RGB, or DVI source...
Owners Manual
Page 19
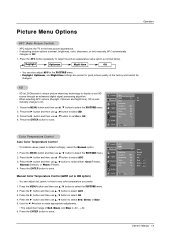
... color temperature you prefer. 1. Cool Normal Warm Off Red 0 Green 0 Blue 0 Owner's Manual 19 Press the G button and then use D / E button to select either: Cool (Preset), Normal (Default), or Warm (Preset). 4. Press the G button and then use D / E button to select Off. 4. To initialize values (reset to the best picture appearance. - Press the ENTER button to display a real HD source through an advanced digital signal processing algorithm. - Use the F / G button to make appropriate adjustments...
... color temperature you prefer. 1. Cool Normal Warm Off Red 0 Green 0 Blue 0 Owner's Manual 19 Press the G button and then use D / E button to select either: Cool (Preset), Normal (Default), or Warm (Preset). 4. Press the G button and then use D / E button to select Off. 4. To initialize values (reset to the best picture appearance. - Press the ENTER button to display a real HD source through an advanced digital signal processing algorithm. - Use the F / G button to make appropriate adjustments...

Owners Manual
Page 20
... use D / E button to select the PICTURE menu. 2. Press the MENU button and then use D / E button to save. Press the ENTER button to Off option) - Operation Picture Menu Options continued Fleshtone (TV, Video1-2, Component 1-2, RGB-DTV, and DVI-DTV Mode only) - TIMER Contrast 100 Brightness 55 4. Press the ENTER button to select the desired picture option (Contrast, Brightness, Color, Sharpness, Tint). 3. SOUND Fleshtone G 0 • The adjustment range is connected to external equipment using sRGB, set to save . CHANNEL APC PICTURE...
... use D / E button to select the PICTURE menu. 2. Press the MENU button and then use D / E button to save. Press the ENTER button to Off option) - Operation Picture Menu Options continued Fleshtone (TV, Video1-2, Component 1-2, RGB-DTV, and DVI-DTV Mode only) - TIMER Contrast 100 Brightness 55 4. Press the ENTER button to select the desired picture option (Contrast, Brightness, Color, Sharpness, Tint). 3. SOUND Fleshtone G 0 • The adjustment range is connected to external equipment using sRGB, set to save . CHANNEL APC PICTURE...
Owners Manual
Page 23
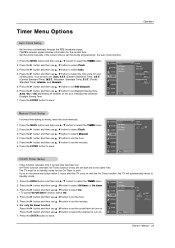
... select Auto. 4. TV 2 Owner's Manual 23 Set the clock manually, if the current time is wrong, reset the clock manually. 1. Press the G button and then use D / E button to selectt Manual. 4. The TV must be in standby mode for the current time. - CHANNEL PICTURE SOUND Clock Off timer On timer Auto off TIMER SPECIAL SCREEN PIP/DW LOCK Menu Prev. If current time setting is set . - Press the G button and then use D / E button to select Clock. 3. Timer function operates only if current time has been set incorrectly programed...
... select Auto. 4. TV 2 Owner's Manual 23 Set the clock manually, if the current time is wrong, reset the clock manually. 1. Press the G button and then use D / E button to selectt Manual. 4. The TV must be in standby mode for the current time. - CHANNEL PICTURE SOUND Clock Off timer On timer Auto off TIMER SPECIAL SCREEN PIP/DW LOCK Menu Prev. If current time setting is set . - Press the G button and then use D / E button to select Clock. 3. Timer function operates only if current time has been set incorrectly programed...
Owners Manual
Page 25
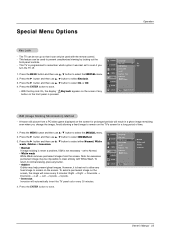
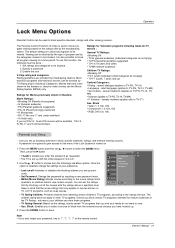
..., White wash, Orbiter or Inversion. • Normal If image sticking is never a problem, ISM is pressed. Press the ENTER button to Normal. • White wash White Wash removes permanent images from a PC/video game displayed on the front panel is not necessary - CHANNEL Language Key lock PICTURE ISM Method G SOUND TIMER Low power Set ID Caption / Text SPECIAL Captions Demo SCREEN PIP/DW LOCK Menu Prev. Normal White wash Orbiter Inversion Owner's Manual 25
..., White wash, Orbiter or Inversion. • Normal If image sticking is never a problem, ISM is pressed. Press the ENTER button to Normal. • White wash White Wash removes permanent images from a PC/video game displayed on the front panel is not necessary - CHANNEL Language Key lock PICTURE ISM Method G SOUND TIMER Low power Set ID Caption / Text SPECIAL Captions Demo SCREEN PIP/DW LOCK Menu Prev. Normal White wash Orbiter Inversion Owner's Manual 25
Owners Manual
Page 28
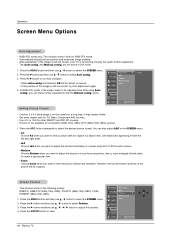
... select Auto config.. 3. Use 4:3, or 16:9 for TV, Video, Component 480i sources. - Choose Zoom when you can also adjust ARC in a non-linear proportion, that is not available for RGB-DTV mode. - TIMER Reset 2. SPECIAL 3. SCREEN PIP/DW LOCK Menu Prev. 28 Plasma TV Press the G button and then use D / E button to view a picture with an original 4:3 aspect ratio, with the Manual config. To set Setting Picture Format - Caution: If a 4:3 fixed image is functioning properly but needs further adjustment. - Set every aspect ratio...
... select Auto config.. 3. Use 4:3, or 16:9 for TV, Video, Component 480i sources. - Choose Zoom when you can also adjust ARC in a non-linear proportion, that is not available for RGB-DTV mode. - TIMER Reset 2. SPECIAL 3. SCREEN PIP/DW LOCK Menu Prev. 28 Plasma TV Press the G button and then use D / E button to view a picture with an original 4:3 aspect ratio, with the Manual config. To set Setting Picture Format - Caution: If a 4:3 fixed image is functioning properly but needs further adjustment. - Set every aspect ratio...
Owners Manual
Page 31
...; Video 1, 2 (On, Off) • Component 1, 2 (On, Off) • RGB, DVI (On, Off) Parental Lock Setup - Then, press the G button • If Lock is already set, enter the password as soap operas. Press the ENTER button to TV-PG, TV-14) • Language - Owner's Manual 31 Viewing can be blocked by the type of program and by the broadcasting station. Set ratings and categories to be blocked. Most television programs...
...; Video 1, 2 (On, Off) • Component 1, 2 (On, Off) • RGB, DVI (On, Off) Parental Lock Setup - Then, press the G button • If Lock is already set, enter the password as soap operas. Press the ENTER button to TV-PG, TV-14) • Language - Owner's Manual 31 Viewing can be blocked by the type of program and by the broadcasting station. Set ratings and categories to be blocked. Most television programs...

Owners Manual
Page 36
... menu. Treble (Command2:r) G To adjust treble. You can also adjust sharpness in the Picture menu. Remote Control Lock Mode (Command2:m) G To lock the remote control and the front panel controls on screen Acknowledgement [q][ ][Set ID][ ][OK][Data][x] 17. Transmission [k][q][ ][Set ID][ ][Data][Cr] Data 0: Right down on screen 1: Left down on screen 2: Left up on screen 3: Right up on the monitor. Acknowledgement [i][ ][Set ID][ ][OK][Data][x] 10. When main power is on Acknowledgement [l][ ][Set...
... menu. Treble (Command2:r) G To adjust treble. You can also adjust sharpness in the Picture menu. Remote Control Lock Mode (Command2:m) G To lock the remote control and the front panel controls on screen Acknowledgement [q][ ][Set ID][ ][OK][Data][x] 17. Transmission [k][q][ ][Set ID][ ][Data][Cr] Data 0: Right down on screen 1: Left down on screen 2: Left up on screen 3: Right up on the monitor. Acknowledgement [i][ ][Set ID][ ][OK][Data][x] 10. When main power is on Acknowledgement [l][ ][Set...

Owners Manual
Page 38
...][x] Picture Size Setting for Double Window mode (Command2:t) G To adjust main window size in RGB (PC) mode. Auto Configure (Command2:u) G To adjust picture position and minimize image shaking automatically. Orbiter Pixel Setting (Command2:s) G To adjust pixel number in orbiter function. Channel Add/Del (Command: m b) G To add and delete the channels Transmission [m][b][ ][Set ID][ ][Data][Cr] Data 0: Channel Memory 1: Channel Erase Acknowledgement [b][ ][Set ID][ ][OK][Data][x] 34. External Control Device Setup 26. Transmission [j][s][ ][Set ID...
...][x] Picture Size Setting for Double Window mode (Command2:t) G To adjust main window size in RGB (PC) mode. Auto Configure (Command2:u) G To adjust picture position and minimize image shaking automatically. Orbiter Pixel Setting (Command2:s) G To adjust pixel number in orbiter function. Channel Add/Del (Command: m b) G To add and delete the channels Transmission [m][b][ ][Set ID][ ][Data][Cr] Data 0: Channel Memory 1: Channel Erase Acknowledgement [b][ ][Set ID][ ][OK][Data][x] 34. External Control Device Setup 26. Transmission [j][s][ ][Set ID...
Owners Manual
Page 41
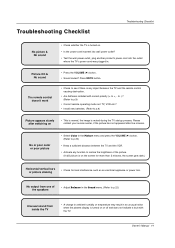
... or poor color or poor picture • Select Color in the Picture menu and press the VOLUME (G) button. (Refer to +, - Press MUTE button. • Check to see if there is any function to restore the brightness of the speakers • Adjust Balance in the Sound menu. (Refer to p.9) Picture appears slowly after five minutes. to -)? (Refer to p.9) • Correct remote operating mode set: TV, VCR etc.? • Install new batteries...
... or poor color or poor picture • Select Color in the Picture menu and press the VOLUME (G) button. (Refer to +, - Press MUTE button. • Check to see if there is any function to restore the brightness of the speakers • Adjust Balance in the Sound menu. (Refer to p.9) Picture appears slowly after five minutes. to -)? (Refer to p.9) • Correct remote operating mode set: TV, VCR etc.? • Install new batteries...
Owners Manual
Page 43
... your product online. Replacement Units and Repair Parts are warranted for proof of warranty, and submit a copy of the bill of the product. Please call 1-201-816-2000 to submit a legible copy of your display. Plasma TV typically contain a small number of pixels that any pixel defects do not effect the operation or use , during the warranty period ("Warranty Period") listed below, effective...
... your product online. Replacement Units and Repair Parts are warranted for proof of warranty, and submit a copy of the bill of the product. Please call 1-201-816-2000 to submit a legible copy of your display. Plasma TV typically contain a small number of pixels that any pixel defects do not effect the operation or use , during the warranty period ("Warranty Period") listed below, effective...
Owners Manual
Page 44
... the owner's manual for power supply requirements) G installation or repair of antenna systems, cable converters, cable company supplied equipment, or other components in a video system G set-up or adjustment on the remote control. G units purchased or serviced outside of batteries on consumer controls, or damage caused by improper adjustments G damage caused by other product G replacement of the coverage area. G product where the original factory serial numbers have your operating guide - you have problems in obtaining satisfactory warranty service...
... the owner's manual for power supply requirements) G installation or repair of antenna systems, cable converters, cable company supplied equipment, or other components in a video system G set-up or adjustment on the remote control. G units purchased or serviced outside of batteries on consumer controls, or damage caused by improper adjustments G damage caused by other product G replacement of the coverage area. G product where the original factory serial numbers have your operating guide - you have problems in obtaining satisfactory warranty service...


