Owner's Manual
Page 4
... could result in electric shock or fire. Do not overload wall outlets. on the back of fire or electrical shock, do not drop onto the screen with a three-prong grounded AC plug must remain readily operable. 19 "As long as being twisted, kinked, pinched, closed in . Do not touch the TV...
... could result in electric shock or fire. Do not overload wall outlets. on the back of fire or electrical shock, do not drop onto the screen with a three-prong grounded AC plug must remain readily operable. 19 "As long as being twisted, kinked, pinched, closed in . Do not touch the TV...
Owner's Manual
Page 5
... and reliability of the product. 5 This noise is common for products where thermal deformation is installed, follow the precautions below. It varies depending on the screen while you smell smoke or other materials (e.g.) plastic while plugged in a confined space such as electric shock may take 2 or more people to grounding electrodes...
... and reliability of the product. 5 This noise is common for products where thermal deformation is installed, follow the precautions below. It varies depending on the screen while you smell smoke or other materials (e.g.) plastic while plugged in a confined space such as electric shock may take 2 or more people to grounding electrodes...
Owner's Manual
Page 6
... PC Setup 30 WATCHING TV / CHANNEL CONTROL Remote Control Functions 36 Turning On TV 38 Channel Selection 38 Volume Adjustment 38 Initial Setting 39 On-Screen Menus Selection 40 Quick Menu 42 Channel Setup - Auto Scan (Auto Tuning 43 - Channel Editing 45 Channel List 46 Favorite Channel Setup 47 Favorite Channel...
... PC Setup 30 WATCHING TV / CHANNEL CONTROL Remote Control Functions 36 Turning On TV 38 Channel Selection 38 Volume Adjustment 38 Initial Setting 39 On-Screen Menus Selection 40 Quick Menu 42 Channel Setup - Auto Scan (Auto Tuning 43 - Channel Editing 45 Channel List 46 Favorite Channel Setup 47 Favorite Channel...
Owner's Manual
Page 7
...-232C 114 7 User Mode 79 Balance 81 TV Speakers On/Off Setup 82 Audio Reset 83 Stereo/SAP Broadcasts Setup 84 Audio Language 85 On-Screen Menus Language Selection 86 Caption Mode -
...-232C 114 7 User Mode 79 Balance 81 TV Speakers On/Off Setup 82 Audio Reset 83 Stereo/SAP Broadcasts Setup 84 Audio Language 85 On-Screen Menus Language Selection 86 Caption Mode -
Owner's Manual
Page 8
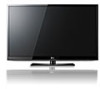
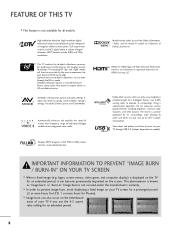
... Cinema, Sports, and Game Modes. Using a sophisticated algorithm, the LG processes picture quality elements including brightness, contrast, color, sharpness and white balance. View videos and photos and listen to music on the screen. This phenomenon is a picture optimized for it can become permanently imprinted...surroundings, more hours for professional certification by the user to experience the best their LG HDTV has to watch and which can also occur on the TV for a more pixels, 16:9 aspect-ratio screens, and AC3 digital audio. FEATURE OF THIS TV I This feature is not...
... Cinema, Sports, and Game Modes. Using a sophisticated algorithm, the LG processes picture quality elements including brightness, contrast, color, sharpness and white balance. View videos and photos and listen to music on the screen. This phenomenon is a picture optimized for it can become permanently imprinted...surroundings, more hours for professional certification by the user to experience the best their LG HDTV has to watch and which can also occur on the TV for a more pixels, 16:9 aspect-ratio screens, and AC3 digital audio. FEATURE OF THIS TV I This feature is not...
Owner's Manual
Page 15
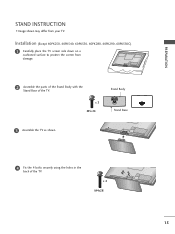
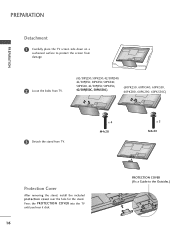
x 3 M5x14 Stand Body Stand Base 3 Assemble the TV as shown. 4 Fix the 4 bolts securely using the holes in the back of the TV. PREPARATION STAND INSTRUCTION I Image shown may differ from damage. 2 Assemble the parts of the Stand Body with the Stand Base of the TV. Installation (Except 60PK250, 60PK540, 60PK550, 60PK280, 60PK290, 60PK550C) 1 Carefully place the TV screen side down on a cushioned surface to protect the screen from your TV. x 4 M4x28 15
x 3 M5x14 Stand Body Stand Base 3 Assemble the TV as shown. 4 Fix the 4 bolts securely using the holes in the back of the TV. PREPARATION STAND INSTRUCTION I Image shown may differ from damage. 2 Assemble the parts of the Stand Body with the Stand Base of the TV. Installation (Except 60PK250, 60PK540, 60PK550, 60PK280, 60PK290, 60PK550C) 1 Carefully place the TV screen side down on a cushioned surface to protect the screen from your TV. x 4 M4x28 15
Owner's Manual
Page 16
... a cushioned surface to the Outsides.) Press the PROTECTION COVER into the TV until you hear it click. 16 PROTECTION COVER (Fix a Guide to protect the screen from damage. 2 Loose the bolts from TV. (42/50PJ250, 50PK250, 42/50PJ340, 42/50PJ350, 50PK350, 50PK340, 50PK540, 42/50PJ550, 50PK550, 42/50PJ350C, 50PK550C) (60PK250, 60PK540...
... a cushioned surface to the Outsides.) Press the PROTECTION COVER into the TV until you hear it click. 16 PROTECTION COVER (Fix a Guide to protect the screen from damage. 2 Loose the bolts from TV. (42/50PJ250, 50PK250, 42/50PJ340, 42/50PJ350, 50PK350, 50PK340, 50PK540, 42/50PJ550, 50PK550, 42/50PJ350C, 50PK550C) (60PK250, 60PK540...
Owner's Manual
Page 23
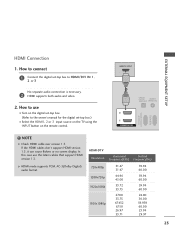
... 30.00 59.939 60.00 23.94 29.97 23 If the HDMI cables don't support HDMI version 1.3, it can cause flickers or no screen display. NOTE G Check HDMI cable over version 1.3. In this case use I Turn on the remote control. How to connect 1 Connect the digital set-top box...
... 30.00 59.939 60.00 23.94 29.97 23 If the HDMI cables don't support HDMI version 1.3, it can cause flickers or no screen display. NOTE G Check HDMI cable over version 1.3. In this case use I Turn on the remote control. How to connect 1 Connect the digital set-top box...
Owner's Manual
Page 31
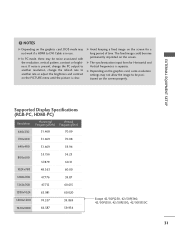
...G The synchronization input form for a long period of time. G Avoid keeping a fixed image on the screen. The fixed image could become permanently imprinted on the screen for Horizontal and Vertical frequencies is clear. Supported Display Specifications (RGB-PC, HDMI-PC) Resolution Horizontal Vertical ...50PJ350C 31 NOTES G Depending on the PICTURE menu until the picture is separate. G In PC mode, there may be positioned on the screen properly. EXTERNAL EQUIPMENT SETUP ! If noise is in use. G Depending on the graphics card, some resolution settings may not work if ...
...G The synchronization input form for a long period of time. G Avoid keeping a fixed image on the screen. The fixed image could become permanently imprinted on the screen for Horizontal and Vertical frequencies is clear. Supported Display Specifications (RGB-PC, HDMI-PC) Resolution Horizontal Vertical ...50PJ350C 31 NOTES G Depending on the PICTURE menu until the picture is separate. G In PC mode, there may be positioned on the screen properly. EXTERNAL EQUIPMENT SETUP ! If noise is in use. G Depending on the graphics card, some resolution settings may not work if ...
Owner's Manual
Page 32
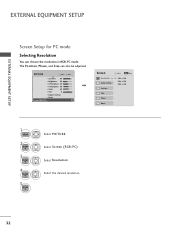
...; Contrast 90 • Brightness 50 • H Sharpness 60 • V Sharpness 60 • Color 60 • Tint 0R • Expert Control • Reset Screen (RGB-PC) Enter G Screen Resolution G Auto config. Select Screen (RGB-PC). Position Size Phase Reset Move MENU Prev. 1024 x 768 1280 x 768 1360 x 768 1 MENU 2 ENTER 3 ENTER 4 ENTER 5 ENTER Select...
...; Contrast 90 • Brightness 50 • H Sharpness 60 • V Sharpness 60 • Color 60 • Tint 0R • Expert Control • Reset Screen (RGB-PC) Enter G Screen Resolution G Auto config. Select Screen (RGB-PC). Position Size Phase Reset Move MENU Prev. 1024 x 768 1280 x 768 1360 x 768 1 MENU 2 ENTER 3 ENTER 4 ENTER 5 ENTER Select...
Owner's Manual
Page 33
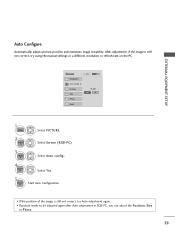
G Position Size Phase Reset Move MENU Prev. Select Screen (RGB-PC). 3 ENTER Select Auto config.. 4 ENTER Select Y e s. 5 ENTER Start Auto Configuration. • If the position of the image is still not correct, try Auto ... Position, S i z e or Phase. 33 EXTERNAL EQUIPMENT SETUP Auto Configure Automatically adjusts picture position and minimizes image instability. To Set Yes No 1 MENU 2 ENTER Select PICTURE. Screen Resolution Auto config. After adjustment, if the image is still not correct, try using the manual settings or a different resolution or refresh rate on the...
G Position Size Phase Reset Move MENU Prev. Select Screen (RGB-PC). 3 ENTER Select Auto config.. 4 ENTER Select Y e s. 5 ENTER Start Auto Configuration. • If the position of the image is still not correct, try Auto ... Position, S i z e or Phase. 33 EXTERNAL EQUIPMENT SETUP Auto Configure Automatically adjusts picture position and minimizes image instability. To Set Yes No 1 MENU 2 ENTER Select PICTURE. Screen Resolution Auto config. After adjustment, if the image is still not correct, try using the manual settings or a different resolution or refresh rate on the...

Owner's Manual
Page 34
...90 • Brightness 50 • H Sharpness 60 • V Sharpness 60 • Color 60 • Tint 0R • Expert Control • Reset Screen (RGB-PC) Enter G Screen Resolution Auto config. Make appropriate adjustments. Position G Size Phase Reset Move MENU Prev. I S i z e: This function is not clear after auto adjustment and... if characters are still trembling, adjust the picture phase manually. EXTERNAL EQUIPMENT SETUP EXTERNAL EQUIPMENT SETUP Adjustment for screen Position, Size, and Phase If the picture is to remove any vertical bars or stripes visible on the...
...90 • Brightness 50 • H Sharpness 60 • V Sharpness 60 • Color 60 • Tint 0R • Expert Control • Reset Screen (RGB-PC) Enter G Screen Resolution Auto config. Make appropriate adjustments. Position G Size Phase Reset Move MENU Prev. I S i z e: This function is not clear after auto adjustment and... if characters are still trembling, adjust the picture phase manually. EXTERNAL EQUIPMENT SETUP EXTERNAL EQUIPMENT SETUP Adjustment for screen Position, Size, and Phase If the picture is to remove any vertical bars or stripes visible on the...
Owner's Manual
Page 35
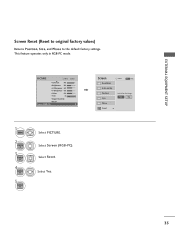
Select Reset. Auto config. This feature operates only in RGB-PC mode. Select Screen (RGB-PC). Screen Resolution Move MENU Prev. Yes No Phase Reset G 35 Select Y e s. EXTERNAL EQUIPMENT SETUP Screen Reset (Reset to original factory values) Returns Position, S i z e, and Phase to the default factory settings. Position Size Initialize ...90 • Brightness 50 • H Sharpness 60 • V Sharpness 60 • Color 60 • Tint 0R • Expert Control • Reset Screen (RGB-PC) Enter G 1 MENU 2 ENTER 3 ENTER 4 ENTER 5 ENTER Select PICTURE.
Select Reset. Auto config. This feature operates only in RGB-PC mode. Select Screen (RGB-PC). Screen Resolution Move MENU Prev. Yes No Phase Reset G 35 Select Y e s. EXTERNAL EQUIPMENT SETUP Screen Reset (Reset to original factory values) Returns Position, S i z e, and Phase to the default factory settings. Position Size Initialize ...90 • Brightness 50 • H Sharpness 60 • V Sharpness 60 • Color 60 • Tint 0R • Expert Control • Reset Screen (RGB-PC) Enter G 1 MENU 2 ENTER 3 ENTER 4 ENTER 5 ENTER Select PICTURE.
Owner's Manual
Page 37
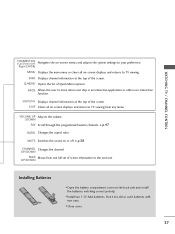
...ratio. UP/DOWN PAGE Moves from any menu. I Close cover. 37 I Install two 1.5V AAA batteries. Q.MENU Opens the list of the screen. MUTE Switches the sound on the back side and install the batteries matching correct polarity. UP/DOWN Installing Batteries I Open the battery compartment cover ...Adjusts the volume. /DOWN FAV Scroll through the programmed Favorite channels. Right/ENTER) MENU Displays the main menu or clears all on -screen menus and adjusts the system settings to move return one . Don't mix old or used batteries with new ones. INFO Displays channel ...
...ratio. UP/DOWN PAGE Moves from any menu. I Close cover. 37 I Install two 1.5V AAA batteries. Q.MENU Opens the list of the screen. MUTE Switches the sound on the back side and install the batteries matching correct polarity. UP/DOWN Installing Batteries I Open the battery compartment cover ...Adjusts the volume. /DOWN FAV Scroll through the programmed Favorite channels. Right/ENTER) MENU Displays the main menu or clears all on -screen menus and adjusts the system settings to move return one . Don't mix old or used batteries with new ones. INFO Displays channel ...
Owner's Manual
Page 39
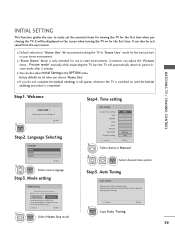
INITIAL SETTING This Function guides the user to easily set when you choose "Home Use". It will be displayed on the screen when turning the TV on until the Initial setting procedure is only intended for use this TV at home. I "Store Demo" Mode is completed. I If ... English Español Français Next 1 ENTER Select menu Language. Store Demo Home Use Select [Home Use] to "Home Use" mode for choosing LG Next Step2. Step5. Auto Tuning Auto Tuning Check your home environment. We recommend setting the TV to use in retail environments. Step4. I You can also...
INITIAL SETTING This Function guides the user to easily set when you choose "Home Use". It will be displayed on the screen when turning the TV on until the Initial setting procedure is only intended for use this TV at home. I "Store Demo" Mode is completed. I If ... English Español Français Next 1 ENTER Select menu Language. Store Demo Home Use Select [Home Use] to "Home Use" mode for choosing LG Next Step2. Step5. Auto Tuning Auto Tuning Check your home environment. We recommend setting the TV to use in retail environments. Step4. I You can also...
Owner's Manual
Page 40
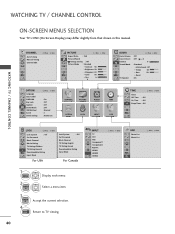
... Password Block Channel TV Rating-English TV Rating-French Downloadable Rating Input Block For Canada 1 MENU 2 ENTER Display each menu. WATCHING TV / CHANNEL CONTROL ON-SCREEN MENUS SELECTION Your TV's OSD (On Screen Display) may differ slightly from that shown in this manual.
... Password Block Channel TV Rating-English TV Rating-French Downloadable Rating Input Block For Canada 1 MENU 2 ENTER Display each menu. WATCHING TV / CHANNEL CONTROL ON-SCREEN MENUS SELECTION Your TV's OSD (On Screen Display) may differ slightly from that shown in this manual.
Owner's Manual
Page 42
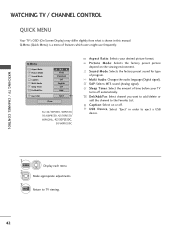
... format. WATCHING TV / CHANNEL CONTROL 1 Q.MENU 2 Display each menu. SAP: Selects MTS sound (Analog signal). WATCHING TV / CHANNEL CONTROL QUICK MENU Your TV's OSD (On Screen Display) may differ slightly from what is a menu of features which users might use frequently.
... format. WATCHING TV / CHANNEL CONTROL 1 Q.MENU 2 Display each menu. SAP: Selects MTS sound (Analog signal). WATCHING TV / CHANNEL CONTROL QUICK MENU Your TV's OSD (On Screen Display) may differ slightly from what is a menu of features which users might use frequently.

Owner's Manual
Page 44
... TV / CHANNEL CONTROL WATCHING TV / CHANNEL CONTROL Add/Delete Channel (Manual Tuning) If you select DTV or CADTV input signal, you can view the on-screen signal strength monitor to see the quality of maximum channel you can store is subject to change depending on the broadcasting signal environment. 44 Use...
... TV / CHANNEL CONTROL WATCHING TV / CHANNEL CONTROL Add/Delete Channel (Manual Tuning) If you select DTV or CADTV input signal, you can view the on-screen signal strength monitor to see the quality of maximum channel you can store is subject to change depending on the broadcasting signal environment. 44 Use...
Owner's Manual
Page 47
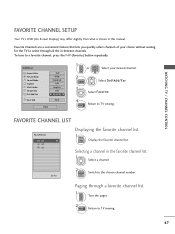
... list 1 Select a channel. 2 ENTER Switch to a favorite channel, press the FAV (Favorite) button repeatedly. WATCHING TV / CHANNEL CONTROL FAVORITE CHANNEL SETUP Your TV's OSD (On Screen Display) may differ slightly from what is shown in this manual. To tune to the chosen channel number.
... list 1 Select a channel. 2 ENTER Switch to a favorite channel, press the FAV (Favorite) button repeatedly. WATCHING TV / CHANNEL CONTROL FAVORITE CHANNEL SETUP Your TV's OSD (On Screen Display) may differ slightly from what is shown in this manual. To tune to the chosen channel number.

Owner's Manual
Page 48
... resolution is 1920x1080p V-Chip: The program contains V-Chip information. WATCHING TV / CHANNEL CONTROL BRIEF INFORMATION Brief Info shows the present screen information. 1 INFO or ENTER Show the Brief Info on the screen. 2 EXIT Return to the LOCK menu: A (Age), D (Dialogue), L (Language), S (Sex), V (Violence), FV (Fantasy Violence) 1 Program title 2 Day, Month, Year 3 Program...
... resolution is 1920x1080p V-Chip: The program contains V-Chip information. WATCHING TV / CHANNEL CONTROL BRIEF INFORMATION Brief Info shows the present screen information. 1 INFO or ENTER Show the Brief Info on the screen. 2 EXIT Return to the LOCK menu: A (Age), D (Dialogue), L (Language), S (Sex), V (Violence), FV (Fantasy Violence) 1 Program title 2 Day, Month, Year 3 Program...


