Owner's Manual
Page 6
... SIMPLINK 52 USB Entry Modes 54 Photo List 55 Music List 61 PICTURE CONTROL Picture Size (Aspect Ratio) Control 64 Picture Wizard 66 Energy Saving 68 Preset Picture Settings(Picture Mode 69 Manual Picture Adjustment - User Mode 70 Picture Improvement Technology 71 Expert Picture Control 72 Picture Reset 74 Demo Mode 74 Image Sticking Minimization (ISM) Method 75...PC Setup 30 WATCHING TV / CHANNEL CONTROL Remote Control Functions 36 Turning On TV 38 Channel Selection 38 Volume Adjustment 38 Initial Setting 39 On-Screen Menus Selection 40 Quick Menu 42 Channel Setup -
... SIMPLINK 52 USB Entry Modes 54 Photo List 55 Music List 61 PICTURE CONTROL Picture Size (Aspect Ratio) Control 64 Picture Wizard 66 Energy Saving 68 Preset Picture Settings(Picture Mode 69 Manual Picture Adjustment - User Mode 70 Picture Improvement Technology 71 Expert Picture Control 72 Picture Reset 74 Demo Mode 74 Image Sticking Minimization (ISM) Method 75...PC Setup 30 WATCHING TV / CHANNEL CONTROL Remote Control Functions 36 Turning On TV 38 Channel Selection 38 Volume Adjustment 38 Initial Setting 39 On-Screen Menus Selection 40 Quick Menu 42 Channel Setup -
Owner's Manual
Page 8
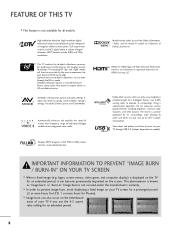
... Science Foundation. Displays HDTV programs in ." Manufactured under the manufacturer's warranty. Using a sophisticated algorithm, the LG processes picture quality elements including brightness, contrast, color, sharpness and white balance. I Image burn can also occur on ...your local dealer to quickly switch between common settings. This TV contains the detailed calibrations necessary for professional certification by the user to experience the best their LG...
... Science Foundation. Displays HDTV programs in ." Manufactured under the manufacturer's warranty. Using a sophisticated algorithm, the LG processes picture quality elements including brightness, contrast, color, sharpness and white balance. I Image burn can also occur on ...your local dealer to quickly switch between common settings. This TV contains the detailed calibrations necessary for professional certification by the user to experience the best their LG...
Owner's Manual
Page 20
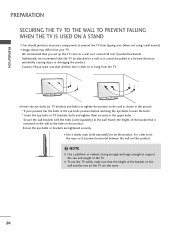
... the TV from tipping over if pushed backwards. NOTE G Use a platform or cabinet strong enough and large enough to the wall as shown in the picture. * If your TV. G To use the TV safely, make sure that the TV be pulled in the product. Additionally, we recommend that children don't climb... brackets/bolts and tighten them securely in the upper holes. I Use a sturdy rope (sold separately) to tie the product. Caution: Please make sure that you set up the TV close to a wall so it cannot be attached to a wall so it cannot fall over (when not using a wall mount). Ensure the...
... the TV from tipping over if pushed backwards. NOTE G Use a platform or cabinet strong enough and large enough to the wall as shown in the picture. * If your TV. G To use the TV safely, make sure that the TV be pulled in the product. Additionally, we recommend that children don't climb... brackets/bolts and tighten them securely in the upper holes. I Use a sturdy rope (sold separately) to tie the product. Caution: Please make sure that you set up the TV close to a wall so it cannot be attached to a wall so it cannot fall over (when not using a wall mount). Ensure the...
Owner's Manual
Page 31
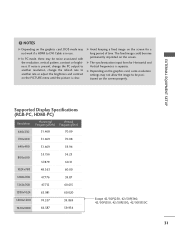
... output to another resolution, change the refresh rate to another rate or adjust the brightness and contrast on the PICTURE menu until the picture is in use. G Depending on the graphics card, some resolution settings may not allow the image to DVI Cable is clear. NOTES G Depending on the screen. Supported Display Specifications...
... output to another resolution, change the refresh rate to another rate or adjust the brightness and contrast on the PICTURE menu until the picture is in use. G Depending on the graphics card, some resolution settings may not allow the image to DVI Cable is clear. NOTES G Depending on the screen. Supported Display Specifications...
Owner's Manual
Page 33
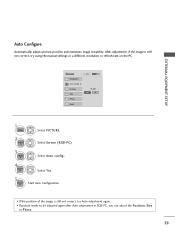
...adjustment again. • If picture needs to be adjusted again after Auto adjustment in RGB-PC, you can adjust the Position, S i z e or Phase. 33 After adjustment, if the image is still not correct, try using the manual settings or a different resolution or ...refresh rate on the PC. Screen Resolution Auto config. EXTERNAL EQUIPMENT SETUP Auto Configure Automatically adjusts picture position and minimizes image instability. G Position Size Phase Reset Move MENU Prev.
...adjustment again. • If picture needs to be adjusted again after Auto adjustment in RGB-PC, you can adjust the Position, S i z e or Phase. 33 After adjustment, if the image is still not correct, try using the manual settings or a different resolution or ...refresh rate on the PC. Screen Resolution Auto config. EXTERNAL EQUIPMENT SETUP Auto Configure Automatically adjusts picture position and minimizes image instability. G Position Size Phase Reset Move MENU Prev.
Owner's Manual
Page 35
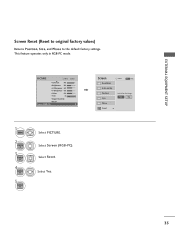
Select Screen (RGB-PC). Position Size Initialize Settings. This feature operates only in RGB-PC mode. Screen Resolution Move MENU Prev. Yes No Phase Reset G 35 Select Reset. Auto config. Select Y e s. PICTURE Move E • Contrast 90 • Brightness 50 • H Sharpness 60 • V Sharpness... Tint 0R • Expert Control • Reset Screen (RGB-PC) Enter G 1 MENU 2 ENTER 3 ENTER 4 ENTER 5 ENTER Select PICTURE. EXTERNAL EQUIPMENT SETUP Screen Reset (Reset to original factory values) Returns Position, S i z e, and Phase to the default factory...
Select Screen (RGB-PC). Position Size Initialize Settings. This feature operates only in RGB-PC mode. Screen Resolution Move MENU Prev. Yes No Phase Reset G 35 Select Reset. Auto config. Select Y e s. PICTURE Move E • Contrast 90 • Brightness 50 • H Sharpness 60 • V Sharpness... Tint 0R • Expert Control • Reset Screen (RGB-PC) Enter G 1 MENU 2 ENTER 3 ENTER 4 ENTER 5 ENTER Select PICTURE. EXTERNAL EQUIPMENT SETUP Screen Reset (Reset to original factory values) Returns Position, S i z e, and Phase to the default factory...
Owner's Manual
Page 39
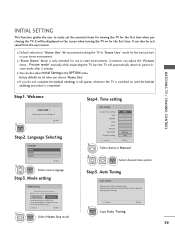
... for use this TV at home. It can adjust the "Picture menu - Mode setting Mode Setting Selecting the environment. Step4. I Default selection is only intended for choosing LG Next Step2. Previous Next 1 ENTER Start Auto Tuning. 39 WATCHING TV / CHANNEL CONTROL Step1. Choose the setting mode you choose "Home Use". Previous Next 1 ENTER Select H o m e U s e mode...
... for use this TV at home. It can adjust the "Picture menu - Mode setting Mode Setting Selecting the environment. Step4. I Default selection is only intended for choosing LG Next Step2. Previous Next 1 ENTER Start Auto Tuning. 39 WATCHING TV / CHANNEL CONTROL Step1. Choose the setting mode you choose "Home Use". Previous Next 1 ENTER Select H o m e U s e mode...
Owner's Manual
Page 40
...• Reset : On Enter R OPTION Language Input Label SIMPLINK Key Lock Caption Demo Mode ISM Method Set ID Initial Setting Move Enter : On : Off : Off : Off : Normal : 1 : Home Use CHANNEL PICTURE AUDIO TIME OPTION LOCK INPUT USB TIME Clock Off Time : Off On Time : Off Sleep Timer :... Off Move Enter 40 LOCK Move Enter Lock System : Off Set Password Block Channel Movie Rating TV Rating-Children TV Rating-General Downloadable...
...• Reset : On Enter R OPTION Language Input Label SIMPLINK Key Lock Caption Demo Mode ISM Method Set ID Initial Setting Move Enter : On : Off : Off : Off : Normal : 1 : Home Use CHANNEL PICTURE AUDIO TIME OPTION LOCK INPUT USB TIME Clock Off Time : Off On Time : Off Sleep Timer :... Off Move Enter 40 LOCK Move Enter Lock System : Off Set Password Block Channel Movie Rating TV Rating-Children TV Rating-General Downloadable...
Owner's Manual
Page 41
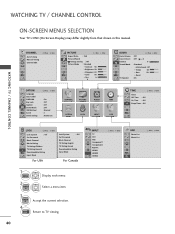
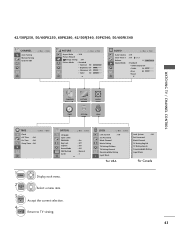
...3 0L : Standard • Infinite Sound: Off • Treble 50 • Bass 50 • Reset E Enter R WATCHING TV / CHANNEL CONTROL CHANNEL PICTURE AUDIO TIME OPTION LOCK TIME Clock Off Time : Off On Time : Off Sleep Timer : Off Move Enter OPTION Move Enter Language Input Label SIMPLINK Key... Lock Caption Demo Mode ISM Method Set ID E : On : Off : Off : Off : Normal : 1 1 MENU Display each menu. 2 ENTER Select a menu item. 3 ENTER Accept the current ...
...3 0L : Standard • Infinite Sound: Off • Treble 50 • Bass 50 • Reset E Enter R WATCHING TV / CHANNEL CONTROL CHANNEL PICTURE AUDIO TIME OPTION LOCK TIME Clock Off Time : Off On Time : Off Sleep Timer : Off Move Enter OPTION Move Enter Language Input Label SIMPLINK Key... Lock Caption Demo Mode ISM Method Set ID E : On : Off : Off : Off : Normal : 1 1 MENU Display each menu. 2 ENTER Select a menu item. 3 ENTER Accept the current ...
Owner's Manual
Page 51
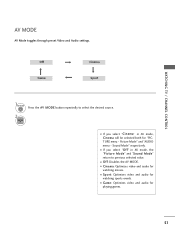
.... I O f f: Disables the AV MODE. WATCHING TV / CHANNEL CONTROL AV MODE AV Mode toggles through preset Video and Audio settings. I G a m e: Optimizes video and audio for watching movies. I If you select "O f f" in AV mode, the "Picture Mode" and "Sound Mode" return to select the desired source. 2 ENTER I If you select "Cinema" in AV mode...
.... I O f f: Disables the AV MODE. WATCHING TV / CHANNEL CONTROL AV MODE AV Mode toggles through preset Video and Audio settings. I G a m e: Optimizes video and audio for watching movies. I If you select "O f f" in AV mode, the "Picture Mode" and "Sound Mode" return to select the desired source. 2 ENTER I If you select "Cinema" in AV mode...

Owner's Manual
Page 60
USB USB G When you select the Set Audio, I APS mode is not supported in Set Video function. Set audio. Sound Mode Auto Volume Clear Voice ll Balance Cinema Off Off 0 L R Prev. 1 ENTER 2 ENTER Show the Sound Mode, Auto Volume, Clear Voice II and Balance. Make appropriate adjustments. G When you select the Set Video, Set video. Make appropriate adjustments. 60 Picture Mode Contrast Brightness Sharpness Color Tint Color Temperature Noise Reduction Reset Vivid 100 50 70 80 0 W C 0 W C Medium Prev. 1 ENTER 2 ENTER Show the Picture Mode.
USB USB G When you select the Set Audio, I APS mode is not supported in Set Video function. Set audio. Sound Mode Auto Volume Clear Voice ll Balance Cinema Off Off 0 L R Prev. 1 ENTER 2 ENTER Show the Sound Mode, Auto Volume, Clear Voice II and Balance. Make appropriate adjustments. G When you select the Set Video, Set video. Make appropriate adjustments. 60 Picture Mode Contrast Brightness Sharpness Color Tint Color Temperature Noise Reduction Reset Vivid 100 50 70 80 0 W C 0 W C Medium Prev. 1 ENTER 2 ENTER Show the Picture Mode.
Owner's Manual
Page 64
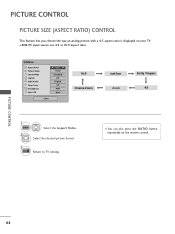
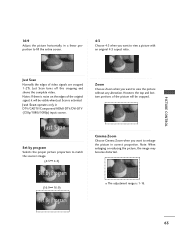
...displayed on the remote control. I You can also press the RATIO button repeatedly on your TV. Select the desired picture format. 3 EXIT Return to TV viewing. Q.Menu Aspect Ratio Picture Mode Sound Mode Caption Multi Audio Sleep Timer CH Del/Add/Fav Eject USB F 16:9 G Vivid Standard Off ...English Off Add Eject Close 16:9 Cinema Zoom Just Scan Zoom Set By Program 4:3 1 Q.MENU 2 Select the Aspect Ratio. I RGB-PC input ...
...displayed on the remote control. I You can also press the RATIO button repeatedly on your TV. Select the desired picture format. 3 EXIT Return to TV viewing. Q.Menu Aspect Ratio Picture Mode Sound Mode Caption Multi Audio Sleep Timer CH Del/Add/Fav Eject USB F 16:9 G Vivid Standard Off ...English Off Add Eject Close 16:9 Cinema Zoom Just Scan Zoom Set By Program 4:3 1 Q.MENU 2 Select the Aspect Ratio. I RGB-PC input ...
Owner's Manual
Page 65
... is noise on the edges of video signals are cropped 1-2%. Just Scan Set by program Selects the proper picture proportion to match the source's image. (4:3 4:3) Set By Program (16:9 16:9) Set By Program Zoom Choose Zoom when you want to enlarge the picture in correct proportion. Cinema Zoom Choose Cinema Zoom when you want to...
... is noise on the edges of video signals are cropped 1-2%. Just Scan Set by program Selects the proper picture proportion to match the source's image. (4:3 4:3) Set By Program (16:9 16:9) Set By Program Zoom Choose Zoom when you want to enlarge the picture in correct proportion. Cinema Zoom Choose Cinema Zoom when you want to...

Owner's Manual
Page 66
... 90 • Brightness 50 • Sharpness 60 • Color 60 • Tint 0R G E 1 MENU Select PICTURE. 2 ENTER ENTER Select Picture Wizard. Low • Color Recommended 50 E E High Previous Next 6 ENTER Adjust C o l o r. Use this to the Recommended sample below . Set the screen above identical to calibrate the screen quality by easily following each step...
... 90 • Brightness 50 • Sharpness 60 • Color 60 • Tint 0R G E 1 MENU Select PICTURE. 2 ENTER ENTER Select Picture Wizard. Low • Color Recommended 50 E E High Previous Next 6 ENTER Adjust C o l o r. Use this to the Recommended sample below . Set the screen above identical to calibrate the screen quality by easily following each step...
Owner's Manual
Page 67
... TV AV1 AV2 Component1 Component2 RGB HDMI1 HDMI2 HDMI3 Warning: The picture quality may vary according to the TV. 67 Close 12 ENTER Finish the Picture Wizard. Low Recommended E • H Sharpness 50 Previous E High Next 8 ENTER Adjust Horizontal S h a r p n e s s. I If you stop the setting before the final step, the changes will not be saved...
... TV AV1 AV2 Component1 Component2 RGB HDMI1 HDMI2 HDMI3 Warning: The picture quality may vary according to the TV. 67 Close 12 ENTER Finish the Picture Wizard. Low Recommended E • H Sharpness 50 Previous E High Next 8 ENTER Adjust Horizontal S h a r p n e s s. I If you stop the setting before the final step, the changes will not be saved...
Owner's Manual
Page 68
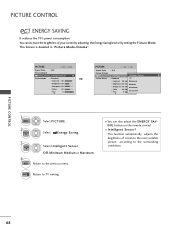
...This function automatically adjusts the brightness of your screen by adjusting the Energy Saving level or by setting the Picture Mode. This feature is disabled in "Picture Mode-Cinema". Return to TV viewing. I You can increase the brightness of screen to the most suitable... Contrast 90 • Brightness 50 • Sharpness 60 • Color 60 • Tint 0R E Enter G PICTURE Move Enter Aspect Ratio : 16:9 Picture Wizard Energy Saving : Intelligent Sensor Picture Mode : Standard • Contrast 90 • Brightness 50 • Sharpness 60 • Color 60 • ...
...This function automatically adjusts the brightness of your screen by adjusting the Energy Saving level or by setting the Picture Mode. This feature is disabled in "Picture Mode-Cinema". Return to TV viewing. I You can increase the brightness of screen to the most suitable... Contrast 90 • Brightness 50 • Sharpness 60 • Color 60 • Tint 0R E Enter G PICTURE Move Enter Aspect Ratio : 16:9 Picture Wizard Energy Saving : Intelligent Sensor Picture Mode : Standard • Contrast 90 • Brightness 50 • Sharpness 60 • Color 60 • ...
Owner's Manual
Page 69
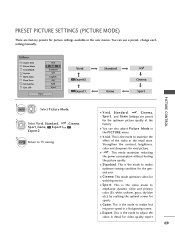
... emphasize dynamic video and primary color (Ex, white, uniform, grass, sky blue etc.) by realizing the optimal screen for picture settings available in the user menus. Standard Game Auto Power Save Cinema Sport PICTURE CONTROL I Expert: This is the video mode to realize optimum viewing condition for watching movies. I S p o r t: This is the mode...
... emphasize dynamic video and primary color (Ex, white, uniform, grass, sky blue etc.) by realizing the optimal screen for picture settings available in the user menus. Standard Game Auto Power Save Cinema Sport PICTURE CONTROL I Expert: This is the video mode to realize optimum viewing condition for watching movies. I S p o r t: This is the mode...
Owner's Manual
Page 70
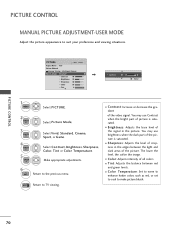
... between the light and dark areas of all colors. I Color: Adjusts intensity of the picture. I Brightness: Adjusts the base level of crispness in the picture. I Sharpness: Adjusts the level of the signal in the edges between red and green levels. I Color Temperature: Set to warm to enhance hotter colors such as red, or...
... between the light and dark areas of all colors. I Color: Adjusts intensity of the picture. I Brightness: Adjusts the base level of crispness in the picture. I Sharpness: Adjusts the level of the signal in the edges between red and green levels. I Color Temperature: Set to warm to enhance hotter colors such as red, or...

Owner's Manual
Page 71
... video value according to each video mode, execute the "Reset" function for each Picture Mode. You can calibrate the screen for each Picture Mode or set the video seeing differently for each input. PICTURE Move E • Contrast 90 • Brightness 50 • Sharpness 60 • Color 60 • Tint 0R • Color Temperature 0 W •...
... video value according to each video mode, execute the "Reset" function for each Picture Mode. You can calibrate the screen for each Picture Mode or set the video seeing differently for each input. PICTURE Move E • Contrast 90 • Brightness 50 • Sharpness 60 • Color 60 • Tint 0R • Color Temperature 0 W •...
Owner's Manual
Page 72
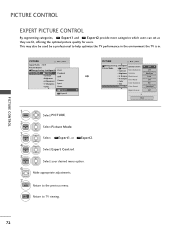
...categories which users can set as they see fit, offering the optimal picture quality for users. This may also be used be a professional to the previous menu. PICTURE Move Enter Aspect Ratio : 16:9 Picture Wizard Energy Saving : Intelligent SenVsoivrid Picture Mode : Expert1 Standard... StandarGd • Expert ContCrolor Gamut E Edge Enhancer F Off G Off Medium Low Off HD Standard Off E Close 1 MENU Select PICTURE. 2 ENTER Select Picture Mode. 3 ENTER Select Expert1, or Expert2. 4 ENTER Select Expert Control. 5 ENTER Select your desired menu option. 6 Make appropriate...
...categories which users can set as they see fit, offering the optimal picture quality for users. This may also be used be a professional to the previous menu. PICTURE Move Enter Aspect Ratio : 16:9 Picture Wizard Energy Saving : Intelligent SenVsoivrid Picture Mode : Expert1 Standard... StandarGd • Expert ContCrolor Gamut E Edge Enhancer F Off G Off Medium Low Off HD Standard Off E Close 1 MENU Select PICTURE. 2 ENTER Select Picture Mode. 3 ENTER Select Expert1, or Expert2. 4 ENTER Select Expert Control. 5 ENTER Select your desired menu option. 6 Make appropriate...


