
Specification (English)
Page 1
...INVISIBLE SPEAKER SYSTEM LG's 2008 line of TVs include a unique invisible speaker system, tuned by increasing the "sweet spot" giving a wider sound field. Speakers are embedded in strategic spots behind the front cabinet and use minute vibrations to near 720p resolution and features LG "Super-Multi...player. The result is the highest performance segment of human voice frequency range to optimize picture and sound settings based on the remote control. 32LG40 LCD HDTV WITH BUILT-IN DVD PLAYER 32" Class (31.5" diagonal) • 720p HD Resolution • 12,000:1 Dynamic Contrast Ratio ...
...INVISIBLE SPEAKER SYSTEM LG's 2008 line of TVs include a unique invisible speaker system, tuned by increasing the "sweet spot" giving a wider sound field. Speakers are embedded in strategic spots behind the front cabinet and use minute vibrations to near 720p resolution and features LG "Super-Multi...player. The result is the highest performance segment of human voice frequency range to optimize picture and sound settings based on the remote control. 32LG40 LCD HDTV WITH BUILT-IN DVD PLAYER 32" Class (31.5" diagonal) • 720p HD Resolution • 12,000:1 Dynamic Contrast Ratio ...
Owner's Manual (English)
Page 1
CAUTION - CLASS 1M VISIBLE AND INVISIBLE LASER RADIATION WHEN OPEN DO NOT VIEW DIRECTLY WITH OPTICAL INSTRUMENTS P/NO : SAC31712401 (0810-REV06) www.lgusa.com / www.lg.ca Write the model number and serial number from the label on the back cabinet on the front or back of this manual carefully before operating your set and retain it for future reference. LCD TV / DVD Combo OWNER'S MANUAL 26LG40 32LG40 Please read this manual.
CAUTION - CLASS 1M VISIBLE AND INVISIBLE LASER RADIATION WHEN OPEN DO NOT VIEW DIRECTLY WITH OPTICAL INSTRUMENTS P/NO : SAC31712401 (0810-REV06) www.lgusa.com / www.lg.ca Write the model number and serial number from the label on the back cabinet on the front or back of this manual carefully before operating your set and retain it for future reference. LCD TV / DVD Combo OWNER'S MANUAL 26LG40 32LG40 Please read this manual.
Owner's Manual (English)
Page 6
...CD 56 MP3 Operation 59 Audio CD Operation 60 JPG File Viewing Options 61 PICTURE CONTROL Picture Size (Aspect Ratio) Control 62 Preset Picture Settings - User Mode 66 - Color Tone - Picture Mode - Channel Editing 40 4 Input List 41 Input Label 42 AV Mode 43 ...Other A/V Source Setup 23 Audio out Connection 24 PC Setup 25 WATCHING TV / CHANNEL CONTROL Remote Control Functions 32 Turning On TV 34 Channel Selection 34 Volume Adjustment 34 Quick Menu / Favorite Channel Setup 35 Initial Setting 36 On-Screen Menus Selection 37 Channel Setup - Preset 64 - ...
...CD 56 MP3 Operation 59 Audio CD Operation 60 JPG File Viewing Options 61 PICTURE CONTROL Picture Size (Aspect Ratio) Control 62 Preset Picture Settings - User Mode 66 - Color Tone - Picture Mode - Channel Editing 40 4 Input List 41 Input Label 42 AV Mode 43 ...Other A/V Source Setup 23 Audio out Connection 24 PC Setup 25 WATCHING TV / CHANNEL CONTROL Remote Control Functions 32 Turning On TV 34 Channel Selection 34 Volume Adjustment 34 Quick Menu / Favorite Channel Setup 35 Initial Setting 36 On-Screen Menus Selection 37 Channel Setup - Preset 64 - ...
Owner's Manual (English)
Page 7
... Auto Clock Setup 87 Manual Clock Setup 88 Auto On/Off Time Setting 89 Sleep Timer Setting 90 Auto Shut-off Setting 91 PARENTAL CONTROL / RATINGS Set Password & Lock System 92 Channel Blocking 95 Movie & TV Rating 96 Downloadable Rating 101 External Input Blocking 102 Key Lock 103 APPENDIX... 111 External Control Through RS-232C 113 Open Source License 120 5 Caption Option 86 TIME SETTING Clock Setting - Analog Broadcasting System Captions 84 - User Mode 77 Balance 78 TV Speakers On/Off Setup 79 Audio Reset 80 Stereo/SAP Broadcasts Setup 81 Audio Language 82 ...
... Auto Clock Setup 87 Manual Clock Setup 88 Auto On/Off Time Setting 89 Sleep Timer Setting 90 Auto Shut-off Setting 91 PARENTAL CONTROL / RATINGS Set Password & Lock System 92 Channel Blocking 95 Movie & TV Rating 96 Downloadable Rating 101 External Input Blocking 102 Key Lock 103 APPENDIX... 111 External Control Through RS-232C 113 Open Source License 120 5 Caption Option 86 TIME SETTING Clock Setting - Analog Broadcasting System Captions 84 - User Mode 77 Balance 78 TV Speakers On/Off Setup 79 Audio Reset 80 Stereo/SAP Broadcasts Setup 81 Audio Language 82 ...
Owner's Manual (English)
Page 14
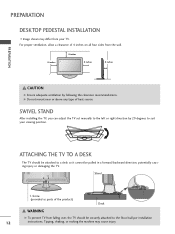
... to the floor/wall per installation 12 instructions. PREPARATION PREPARATION DESKTOP PEDESTAL INSTALLATION I Image shown may cause injury. SWIVEL STAND After installing the TV, you can adjust the TV set manually to the left or right direction by following the clearance recommendations. G Do not mount near or above any type of 4 inches on...
... to the floor/wall per installation 12 instructions. PREPARATION PREPARATION DESKTOP PEDESTAL INSTALLATION I Image shown may cause injury. SWIVEL STAND After installing the TV, you can adjust the TV set manually to the left or right direction by following the clearance recommendations. G Do not mount near or above any type of 4 inches on...
Owner's Manual (English)
Page 16
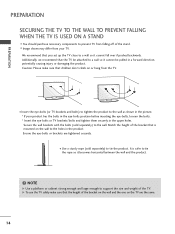
...so it becomes horizontal between the wall and the product. ! Additionally, we recommend that children don't climb on the TV are tightened securely. Caution: Please make sure that you set up the TV close to a wall so it cannot be attached to a wall so it cannot fall over if pushed backwards. ...I You should purchase necessary components to prevent TV from falling off of the bracket on the wall and the ...
...so it becomes horizontal between the wall and the product. ! Additionally, we recommend that children don't climb on the TV are tightened securely. Caution: Please make sure that you set up the TV close to a wall so it cannot be attached to a wall so it cannot fall over if pushed backwards. ...I You should purchase necessary components to prevent TV from falling off of the bracket on the wall and the ...
Owner's Manual (English)
Page 18
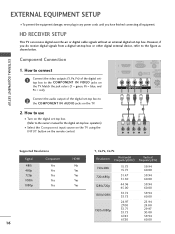
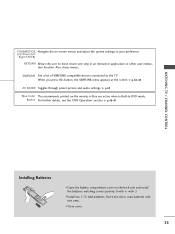
...digital over-the-air or digital cable signals without an external digital set-top box. How to connect 1 Connect the video outputs (Y, PB, PR) of the digital set-top box to use I Select the Component input source on the TV using the INPUT button on the remote control. 1 2 Y PB...= green, PB = blue, and PR = red). operation) I Turn on the digital set-top box. (Refer to the owner's manual for the digital set-top box. Component Connection 1. How to the COMPONENT IN AUDIO jacks on the TV. 2. However, if you have finished connecting all equipment. RGB(PC) AUDIO A (RGB/...
...digital over-the-air or digital cable signals without an external digital set-top box. How to connect 1 Connect the video outputs (Y, PB, PR) of the digital set-top box to use I Select the Component input source on the TV using the INPUT button on the remote control. 1 2 Y PB...= green, PB = blue, and PR = red). operation) I Turn on the digital set-top box. (Refer to the owner's manual for the digital set-top box. Component Connection 1. How to the COMPONENT IN AUDIO jacks on the TV. 2. However, if you have finished connecting all equipment. RGB(PC) AUDIO A (RGB/...
Owner's Manual (English)
Page 19
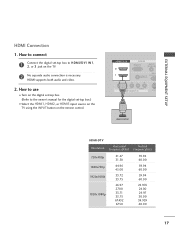
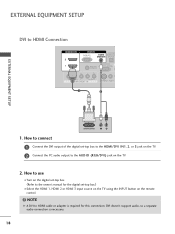
... 60.00 17 How to HDMI/DVI IN1, 2, or 3 jack on the remote control. How to connect 1 Connect the digital set -top box.) I Turn on the digital set-top box. (Refer to the owner's manual for the digital set -top box to use ( ) I Select the HDMI1, HDMI2, or HDMI3 input source on the...
... 60.00 17 How to HDMI/DVI IN1, 2, or 3 jack on the remote control. How to connect 1 Connect the digital set -top box.) I Turn on the digital set-top box. (Refer to the owner's manual for the digital set -top box to use ( ) I Select the HDMI1, HDMI2, or HDMI3 input source on the...
Owner's Manual (English)
Page 20
... the INPUT button on the remote control. ! How to connect 1 Connect the DVI output of the digital set -top box. (Refer to the AUDIO (RGB/DVI) jack on the TV. 2 Connect the PC audio output to the owner's manual for this connection. DVI doesn't support audio, so a separate audio ...connection is required for the digital set-top box.) I Turn on the digital set -top box to the HDMI/DVI IN1, 2, or 3 jack on the TV. 2. EXTERNAL EQUIPMENT SETUP DVI to HDMI cable or adapter is necessary. 18 NOTE G A DVI to...
... the INPUT button on the remote control. ! How to connect 1 Connect the DVI output of the digital set -top box. (Refer to the AUDIO (RGB/DVI) jack on the TV. 2 Connect the PC audio output to the owner's manual for this connection. DVI doesn't support audio, so a separate audio ...connection is required for the digital set-top box.) I Turn on the digital set -top box to the HDMI/DVI IN1, 2, or 3 jack on the TV. 2. EXTERNAL EQUIPMENT SETUP DVI to HDMI cable or adapter is necessary. 18 NOTE G A DVI to...

Owner's Manual (English)
Page 23
... IN OUTPUT SWITCH Wall Jack 2 Antenna 1. How to use I To avoid picture noise (interference), leave an adequate distance between the VCR and TV. This phenomenon is common to all TVs and is used; How to connect 1 Connect the RF antenna out socket of the VCR to the ANTENNA/CABLE IN socket on... is not covered by warranty. the fixed images on the sides of the VCR. 2. I Insert a video tape into the VCR and press PLAY on the TV. 2 Connect the antenna cable to the RF antenna in socket of the screen may remain visible on the screen. EXTERNAL EQUIPMENT SETUP VCR SETUP...
... IN OUTPUT SWITCH Wall Jack 2 Antenna 1. How to use I To avoid picture noise (interference), leave an adequate distance between the VCR and TV. This phenomenon is common to all TVs and is used; How to connect 1 Connect the RF antenna out socket of the VCR to the ANTENNA/CABLE IN socket on... is not covered by warranty. the fixed images on the sides of the VCR. 2. I Insert a video tape into the VCR and press PLAY on the TV. 2 Connect the antenna cable to the RF antenna in socket of the screen may remain visible on the screen. EXTERNAL EQUIPMENT SETUP VCR SETUP...
Owner's Manual (English)
Page 25
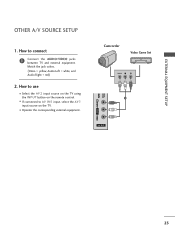
Match the jack colors. (Video = yellow, Audio Left = white, and Audio Right = red) 2. I If connected to AV IN1 input, select the A V 1 input source on the remote control. EXTERNAL EQUIPMENT SETUP OTHER A/V SOURCE SETUP 1. How to connect 1 Connect the AUDIO/VIDEO jacks between TV and external equipment. I Select the A V 2 input source on the TV using the INPUT button on the TV. How to use I Operate the corresponding external equipment. VIDEO L/MONO AUDIO R HDMI IN 3 USB IN Camcorder Video Game Set VIDEO L R 1 AV IN 2 23
Match the jack colors. (Video = yellow, Audio Left = white, and Audio Right = red) 2. I If connected to AV IN1 input, select the A V 1 input source on the remote control. EXTERNAL EQUIPMENT SETUP OTHER A/V SOURCE SETUP 1. How to connect 1 Connect the AUDIO/VIDEO jacks between TV and external equipment. I Select the A V 2 input source on the TV using the INPUT button on the TV. How to use I Operate the corresponding external equipment. VIDEO L/MONO AUDIO R HDMI IN 3 USB IN Camcorder Video Game Set VIDEO L R 1 AV IN 2 23
Owner's Manual (English)
Page 26
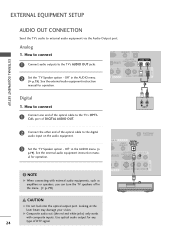
...p.79). EXTERNAL EQUIPMENT SETUP AV IN 1 EXTERNAL EQUIPMENT SETUP AUDIO OUT CONNECTION Send the TV's audio to the TV's AUDIO OUT jacks. ( C) (RGB/DVI) OPTICAL RS-232C IN AUDIO OUT REMOTE (CONTROL & SERVICE) CONTROL IN 2 Set the "TV Speaker option - How to connect L R AUDIO 1 Connect one end of the optical ...cable to the digital audio input on the audio equipment. 3 Set the "TV Speaker option - Looking at the laser beam may damage your vision. How to connect 1 Connect audio outputs to external audio equipment via ...
...p.79). EXTERNAL EQUIPMENT SETUP AV IN 1 EXTERNAL EQUIPMENT SETUP AUDIO OUT CONNECTION Send the TV's audio to the TV's AUDIO OUT jacks. ( C) (RGB/DVI) OPTICAL RS-232C IN AUDIO OUT REMOTE (CONTROL & SERVICE) CONTROL IN 2 Set the "TV Speaker option - How to connect L R AUDIO 1 Connect one end of the optical ...cable to the digital audio input on the audio equipment. 3 Set the "TV Speaker option - Looking at the laser beam may damage your vision. How to connect 1 Connect audio outputs to external audio equipment via ...
Owner's Manual (English)
Page 30
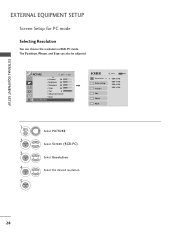
... choose the resolution in RGB-PC mode. Select Resolution. Position Size Phase Reset Move MENU Prev. 1024 x 768 1280 x 768 1360 x 768 1366 x 768 1 MENU/ SET UP 2 ENTER 3 ENTER 4 ENTER 5 ENTER Select PICTURE. Select the desired resolution. 28 EXTERNAL EQUIPMENT SETUP EXTERNAL EQUIPMENT SETUP Screen Setup for PC mode Selecting Resolution...
... choose the resolution in RGB-PC mode. Select Resolution. Position Size Phase Reset Move MENU Prev. 1024 x 768 1280 x 768 1360 x 768 1366 x 768 1 MENU/ SET UP 2 ENTER 3 ENTER 4 ENTER 5 ENTER Select PICTURE. Select the desired resolution. 28 EXTERNAL EQUIPMENT SETUP EXTERNAL EQUIPMENT SETUP Screen Setup for PC mode Selecting Resolution...
Owner's Manual (English)
Page 31
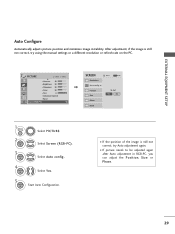
... Size Phase Reset Move MENU Prev. After adjustment, if the image is still not correct, try using the manual settings or a different resolution or refresh rate on the PC. To Set Yes No 1 MENU/ SET UP 2 ENTER 3 ENTER Select PICTURE. EXTERNAL EQUIPMENT SETUP Auto Configure Automatically adjusts picture position and minimizes image instability...
... Size Phase Reset Move MENU Prev. After adjustment, if the image is still not correct, try using the manual settings or a different resolution or refresh rate on the PC. To Set Yes No 1 MENU/ SET UP 2 ENTER 3 ENTER Select PICTURE. EXTERNAL EQUIPMENT SETUP Auto Configure Automatically adjusts picture position and minimizes image instability...
Owner's Manual (English)
Page 32
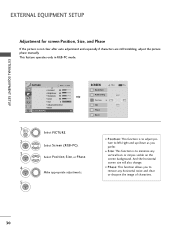
D F G E 1 MENU/ SET UP 2 ENTER 3 ENTER 4 ENTER 5 ENTER Select PICTURE. I S i z e: This function is to remove any vertical bars or stripes visible on the screen background. This feature operates ...
D F G E 1 MENU/ SET UP 2 ENTER 3 ENTER 4 ENTER 5 ENTER Select PICTURE. I S i z e: This function is to remove any vertical bars or stripes visible on the screen background. This feature operates ...
Owner's Manual (English)
Page 33
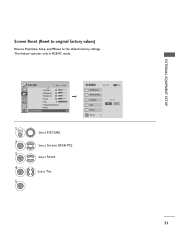
... Enter E • Contrast 50 • Brightness 50 • Sharpness 50 • Color 50 • Tint 0R G • Advanced Control • Reset Screen (RGB-PC) 1 MENU/ SET UP 2 ENTER 3 ENTER 4 ENTER 5 ENTER Select PICTURE. Select Reset. Select Screen (RGB-PC). Position Size Phase Reset G Move MENU Prev. SCREEN Resolution Auto config. Select...
... Enter E • Contrast 50 • Brightness 50 • Sharpness 50 • Color 50 • Tint 0R G • Advanced Control • Reset Screen (RGB-PC) 1 MENU/ SET UP 2 ENTER 3 ENTER 4 ENTER 5 ENTER Select PICTURE. Select Reset. Select Screen (RGB-PC). Position Size Phase Reset G Move MENU Prev. SCREEN Resolution Auto config. Select...
Owner's Manual (English)
Page 34
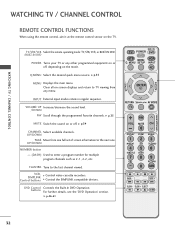
... MENU 32 INPUT External input modes rotate in regular sequence. TV/STB/VCR Select the remote operating mode: TV, STB, VCR, or BUILT-IN DVD. /BUILT-IN DVD POWER Turns your TV or any menu. G p.35 MUTE Switch the sound on -screen displays and return to the next one full set of ...screen information to TV viewing from one . VCR, SIMPLINK Control buttons Control video cassette recorders. DVD Cbuotnttornosl Controls the Built-In DVD Operation. G p.34 CHANNEL Select available ...
... MENU 32 INPUT External input modes rotate in regular sequence. TV/STB/VCR Select the remote operating mode: TV, STB, VCR, or BUILT-IN DVD. /BUILT-IN DVD POWER Turns your TV or any menu. G p.35 MUTE Switch the sound on -screen displays and return to the next one full set of ...screen information to TV viewing from one . VCR, SIMPLINK Control buttons Control video cassette recorders. DVD Cbuotnttornosl Controls the Built-In DVD Operation. G p.34 CHANNEL Select available ...
Owner's Manual (English)
Page 35
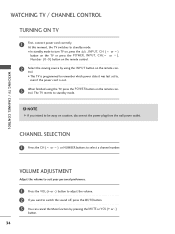
WATCHING TV / CHANNEL CONTROL THUMBSTICK Navigate the on the remote in blue are active when in an interactive application or other user interaction ...appears at the screen. G p.43 Blue Color The recommands printed on -screen menus and adjust the system settings to your preference. (Up/Down/Left Right/ENTER) RETURN Allows the user to the TV. G p.46-61 Installing Batteries I Close cover. 33 I Open the battery compartment cover on the ... For further details, see the 'DVD Operation' section. Also closes menus. G p.44-45 AV MODE Toggles through preset picture and audio settings.
WATCHING TV / CHANNEL CONTROL THUMBSTICK Navigate the on the remote in blue are active when in an interactive application or other user interaction ...appears at the screen. G p.43 Blue Color The recommands printed on -screen menus and adjust the system settings to your preference. (Up/Down/Left Right/ENTER) RETURN Allows the user to the TV. G p.46-61 Installing Batteries I Close cover. 33 I Open the battery compartment cover on the ... For further details, see the 'DVD Operation' section. Also closes menus. G p.44-45 AV MODE Toggles through preset picture and audio settings.
Owner's Manual (English)
Page 36
... the POWER, INPUT, CH( or ), Number (0~9 ) button on the remote control. 2 Select the viewing source by pressing the MUTE or VOL (+ or -) button. 34 I This TV is out. 3 When finished using the INPUT button on the remote con- NOTE G If you want to , even if the power cord is programmed to... remember which power state it was last set to switch the sound off, press the MUTE button. 3 You can cancel the Mute function by using the TV, press the POWER button on vacation, disconnect the power plug from the wall power outlet. trol...
... the POWER, INPUT, CH( or ), Number (0~9 ) button on the remote control. 2 Select the viewing source by pressing the MUTE or VOL (+ or -) button. 34 I This TV is out. 3 When finished using the INPUT button on the remote con- NOTE G If you want to , even if the power cord is programmed to... remember which power state it was last set to switch the sound off, press the MUTE button. 3 You can cancel the Mute function by using the TV, press the POWER button on vacation, disconnect the power plug from the wall power outlet. trol...
Owner's Manual (English)
Page 38
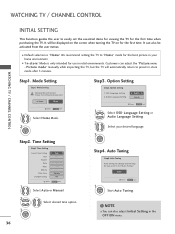
... I "In-store" Mode is "H o m e". WATCHING TV / CHANNEL CONTROL Step1. Mode Setting ! Audio Language Setting F English G French Enter RETURN Exit 1 Select OSD Language Setting or Audio Language Setting. 2 Select your home environment. It can also adjust Initial Setting in -store mode after 5 minutes. Picture mode" manually while inspecting the TV, but the TV will be activated from the user...
... I "In-store" Mode is "H o m e". WATCHING TV / CHANNEL CONTROL Step1. Mode Setting ! Audio Language Setting F English G French Enter RETURN Exit 1 Select OSD Language Setting or Audio Language Setting. 2 Select your home environment. It can also adjust Initial Setting in -store mode after 5 minutes. Picture mode" manually while inspecting the TV, but the TV will be activated from the user...


