
Specification (English)
Page 1
... SCAN DVD PLAYER Save space with a convenient button on "Cinema", "Sports" or "Game" content. AV MODE LG HDTVs include 3 AV Modes, preset to turn the entire front bezel into the speaker system. Speakers are embedded in the US. INVISIBLE SPEAKER SYSTEM LG's 2008 line of the DTV system used in strategic spots behind the front cabinet and use minute vibrations to optimize picture and sound settings based on the remote control. HD RESOLUTION...
... SCAN DVD PLAYER Save space with a convenient button on "Cinema", "Sports" or "Game" content. AV MODE LG HDTVs include 3 AV Modes, preset to turn the entire front bezel into the speaker system. Speakers are embedded in the US. INVISIBLE SPEAKER SYSTEM LG's 2008 line of the DTV system used in strategic spots behind the front cabinet and use minute vibrations to optimize picture and sound settings based on the remote control. HD RESOLUTION...

Specification (English)
Page 2
...; Sound Mode 5 Modes Mute • DVD PLAYER Type Side Loading Vacuum Type Progressive/Interlace Progressive, 720p Upconverting Playable Media DVD R/RW±/RAM, Video CD, Audio CD SPECIAL FEATURES 1080P Source Input - RGB 60p A/V Input Navigation • Auto Navigation • Input Labeling • Quick View (Previous Channel) • Clear Voice (On/Off) • Quick Setup Guide • Parental Control w/V-Chip • Key Lock • Closed Caption • LG SimpLink™ (HDMI CEC...
...; Sound Mode 5 Modes Mute • DVD PLAYER Type Side Loading Vacuum Type Progressive/Interlace Progressive, 720p Upconverting Playable Media DVD R/RW±/RAM, Video CD, Audio CD SPECIAL FEATURES 1080P Source Input - RGB 60p A/V Input Navigation • Auto Navigation • Input Labeling • Quick View (Previous Channel) • Clear Voice (On/Off) • Quick Setup Guide • Parental Control w/V-Chip • Key Lock • Closed Caption • LG SimpLink™ (HDMI CEC...
Owner's Manual (English)
Page 2
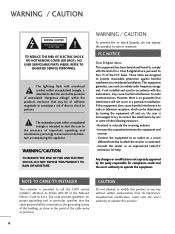
... the receiving antenna. - Any changes or modifications not expressly approved by turning the equipment off and on a circuit different from that interference will not occur in any way without written authorization from LG Electronics. WARNING / CAUTION TO REDUCE THE RISK OF ELECTRIC SHOCK DO NOT REMOVE COVER (OR BACK). NO USER SERVICEABLE PARTS INSIDE. If this product in a particular installation.
... the receiving antenna. - Any changes or modifications not expressly approved by turning the equipment off and on a circuit different from that interference will not occur in any way without written authorization from LG Electronics. WARNING / CAUTION TO REDUCE THE RISK OF ELECTRIC SHOCK DO NOT REMOVE COVER (OR BACK). NO USER SERVICEABLE PARTS INSIDE. If this product in a particular installation.

Owner's Manual (English)
Page 4
... the power cord. Short-circuit Breaker Power Supply 18 DISCONNECTING DEVICE FROM MAINS Mains plug is recommend that appliance and has no additional outlets or branch circuits. SAFETY INSTRUCTIONS 11 Never touch this owner's manual to be connected to dripping or splashing and do not drop onto the screen with an exact replacement part by connecting it , discontinue use a damaged or loose power cord. a TV with the power cord plugged...
... the power cord. Short-circuit Breaker Power Supply 18 DISCONNECTING DEVICE FROM MAINS Mains plug is recommend that appliance and has no additional outlets or branch circuits. SAFETY INSTRUCTIONS 11 Never touch this owner's manual to be connected to dripping or splashing and do not drop onto the screen with an exact replacement part by connecting it , discontinue use a damaged or loose power cord. a TV with the power cord plugged...
Owner's Manual (English)
Page 5
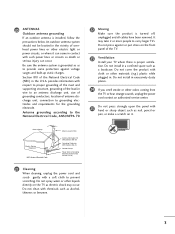
... on the front panel of antenna discharge unit, connection to an antenna discharge unit, size of grounding conductors, location of the TV. 23 Ventilation Install your TV where there is grounded so as to carry larger TVs. Ground Clamp Electric Service Equipment NEC: National Electrical Code Antenna Lead in excessively dusty places. 24 If you smell smoke or other electric light or power circuits, or...
... on the front panel of antenna discharge unit, connection to an antenna discharge unit, size of grounding conductors, location of the TV. 23 Ventilation Install your TV where there is grounded so as to carry larger TVs. Ground Clamp Electric Service Equipment NEC: National Electrical Code Antenna Lead in excessively dusty places. 24 If you smell smoke or other electric light or power circuits, or...
Owner's Manual (English)
Page 6
... 65 Manual Picture Adjustment - Picture Mode - Auto Scan (Auto Tuning 38 - Color Tone - User Mode 66 - Channel Editing 40 4 Input List 41 Input Label 42 AV Mode 43 SIMPLINK 44 DVD OPERATION Notes on a stand 14 Antenna or Cable Connection 15 EXTERNAL EQUIPMENT SETUP HD Receiver Setup 16 DVD Setup 19 VCR Setup 21 Other A/V Source Setup 23 Audio out Connection 24 PC Setup 25 WATCHING TV / CHANNEL CONTROL Remote Control Functions 32 Turning On TV 34 Channel Selection 34 Volume Adjustment 34 Quick Menu / Favorite Channel Setup 35 Initial Setting 36 On-Screen Menus...
... 65 Manual Picture Adjustment - Picture Mode - Auto Scan (Auto Tuning 38 - Color Tone - User Mode 66 - Channel Editing 40 4 Input List 41 Input Label 42 AV Mode 43 SIMPLINK 44 DVD OPERATION Notes on a stand 14 Antenna or Cable Connection 15 EXTERNAL EQUIPMENT SETUP HD Receiver Setup 16 DVD Setup 19 VCR Setup 21 Other A/V Source Setup 23 Audio out Connection 24 PC Setup 25 WATCHING TV / CHANNEL CONTROL Remote Control Functions 32 Turning On TV 34 Channel Selection 34 Volume Adjustment 34 Quick Menu / Favorite Channel Setup 35 Initial Setting 36 On-Screen Menus...
Owner's Manual (English)
Page 7
... TIME SETTING Clock Setting - User Mode 77 Balance 78 TV Speakers On/Off Setup 79 Audio Reset 80 Stereo/SAP Broadcasts Setup 81 Audio Language 82 On-Screen Menus Language Selection 83 Caption Mode - Auto Clock Setup 87 Manual Clock Setup 88 Auto On/Off Time Setting 89 Sleep Timer Setting 90 Auto Shut-off Setting 91 PARENTAL CONTROL / RATINGS Set Password & Lock System 92 Channel Blocking 95 Movie & TV Rating 96 Downloadable Rating 101 External Input Blocking 102 Key Lock 103 APPENDIX Troubleshooting 104 Maintenance 106 Product Specifications 107 Programing...
... TIME SETTING Clock Setting - User Mode 77 Balance 78 TV Speakers On/Off Setup 79 Audio Reset 80 Stereo/SAP Broadcasts Setup 81 Audio Language 82 On-Screen Menus Language Selection 83 Caption Mode - Auto Clock Setup 87 Manual Clock Setup 88 Auto On/Off Time Setting 89 Sleep Timer Setting 90 Auto Shut-off Setting 91 PARENTAL CONTROL / RATINGS Set Password & Lock System 92 Channel Blocking 95 Movie & TV Rating 96 Downloadable Rating 101 External Input Blocking 102 Key Lock 103 APPENDIX Troubleshooting 104 Maintenance 106 Product Specifications 107 Programing...
Owner's Manual (English)
Page 11
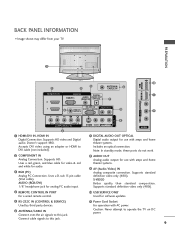
... standby mode, these ports do not work. 2 COMPONENT IN Analog Connection. Accepts DVI video using an adapter or HDMI to this jack. 11 Power Cord Socket For operation with amps and home theater systems. Includes an optical connection. Caution: Never attempt to this jack. Supports HD. Supports standard definition video only (480i). 4 REMOTE CONTROL IN PORT For a wired remote control. 10 USB SERVICE ONLY Used for software updates. 5 RS-232C IN (CONTROL & SERVICE) Used by third party devices. 6 ANTENNA/CABLE IN Connect over-the air signals...
... standby mode, these ports do not work. 2 COMPONENT IN Analog Connection. Accepts DVI video using an adapter or HDMI to this jack. 11 Power Cord Socket For operation with amps and home theater systems. Includes an optical connection. Caution: Never attempt to this jack. Supports HD. Supports standard definition video only (480i). 4 REMOTE CONTROL IN PORT For a wired remote control. 10 USB SERVICE ONLY Used for software updates. 5 RS-232C IN (CONTROL & SERVICE) Used by third party devices. 6 ANTENNA/CABLE IN Connect over-the air signals...
Owner's Manual (English)
Page 18
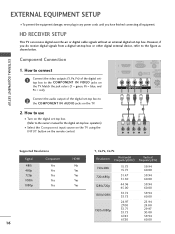
... connecting all equipment. EXTERNAL EQUIPMENT SETUP EXTERNAL EQUIPMENT SETUP I Select the Component input source on the TV using the INPUT button on the TV. Match the jack colors (Y = green, PB = blue, and PR = red). How to use I Turn on the TV. 2. HD RECEIVER SETUP This TV can receive digital over-the-air or digital cable signals without an external digital set -top box to the COMPONENT IN VIDEO jacks on the remote control. 1 2 Y PB PR L R Supported Resolutions Signal 480i 480p 720p 1080i 1080p Component Yes Yes Yes Yes Yes HDMI...
... connecting all equipment. EXTERNAL EQUIPMENT SETUP EXTERNAL EQUIPMENT SETUP I Select the Component input source on the TV using the INPUT button on the TV. Match the jack colors (Y = green, PB = blue, and PR = red). How to use I Turn on the TV. 2. HD RECEIVER SETUP This TV can receive digital over-the-air or digital cable signals without an external digital set -top box to the COMPONENT IN VIDEO jacks on the remote control. 1 2 Y PB PR L R Supported Resolutions Signal 480i 480p 720p 1080i 1080p Component Yes Yes Yes Yes Yes HDMI...
Owner's Manual (English)
Page 19
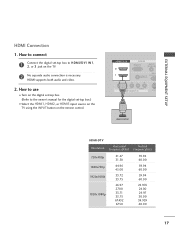
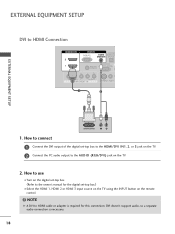
...PC) AUDIO (RGB/DVI) RS-23 REMOTE (CONTROL CONTROL IN VIDEO AUDIO COMPONENT IN S-VID ( ) 1 HDMI-DTV OUTPUT EXTERNAL EQUIPMENT SETUP HDMI-DTV Resolution Horizontal ...HDMI supports both audio and video. 2. How to connect 1 Connect the digital set -top box.) I Turn on the digital set-top box. (Refer to the owner's manual for the digital set -top box to use ( ) I Select the HDMI1, HDMI2, or HDMI3 input source on the TV using the INPUT button on the TV. 2 No separate audio connection is necessary. HDMI Connection 1. How to HDMI/DVI IN1, 2, or 3 jack on the remote control...
...PC) AUDIO (RGB/DVI) RS-23 REMOTE (CONTROL CONTROL IN VIDEO AUDIO COMPONENT IN S-VID ( ) 1 HDMI-DTV OUTPUT EXTERNAL EQUIPMENT SETUP HDMI-DTV Resolution Horizontal ...HDMI supports both audio and video. 2. How to connect 1 Connect the digital set -top box.) I Turn on the digital set-top box. (Refer to the owner's manual for the digital set -top box to use ( ) I Select the HDMI1, HDMI2, or HDMI3 input source on the TV using the INPUT button on the TV. 2 No separate audio connection is necessary. HDMI Connection 1. How to HDMI/DVI IN1, 2, or 3 jack on the remote control...
Owner's Manual (English)
Page 20
... 3 jack on the TV. 2 Connect the PC audio output to connect 1 Connect the DVI output of the digital set -top box.) I Select the HDMI 1, HDMI 2 or HDMI 3 input source on the TV using the INPUT button on the digital set-top box. (Refer to the owner's manual for this connection. How to use I Turn on the remote control. ! NOTE G A DVI to HDMI Connection HDMI/DVI IN 2 1 RGB IN DIGITAL RGB(PC) AUDIO AUDIO OU (RGB/DVI) OPTICA RS-232C IN REMOTE (CONTROL & SERVICE) CONTROL IN VIDEO AUDIO COMPONENT IN S-VIDEO VIDEO ( ) 1 2 EXTERNAL EQUIPMENT SETUP DVI-DTV OUTPUT L R 1.
... 3 jack on the TV. 2 Connect the PC audio output to connect 1 Connect the DVI output of the digital set -top box.) I Select the HDMI 1, HDMI 2 or HDMI 3 input source on the TV using the INPUT button on the digital set-top box. (Refer to the owner's manual for this connection. How to use I Turn on the remote control. ! NOTE G A DVI to HDMI Connection HDMI/DVI IN 2 1 RGB IN DIGITAL RGB(PC) AUDIO AUDIO OU (RGB/DVI) OPTICA RS-232C IN REMOTE (CONTROL & SERVICE) CONTROL IN VIDEO AUDIO COMPONENT IN S-VIDEO VIDEO ( ) 1 2 EXTERNAL EQUIPMENT SETUP DVI-DTV OUTPUT L R 1.
Owner's Manual (English)
Page 21
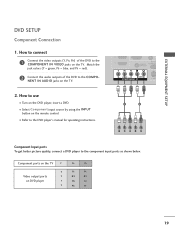
... jack colors (Y = green, PB = blue, and PR = red). 2 Connect the audio outputs of the DVD to the COMPONENT IN VIDEO jacks on DVD player Y Y PB PR PB PR B-Y R-Y Cb Cr Pb Pr 19 How to the COMPONENT IN AUDIO jacks on the DVD player, insert a DVD. I Select Component input source by using the INPUT button on the remote control. EXTERNAL EQUIPMENT SETUP 2 RS-23 1 REMOTE (CONTROL & CONTROL IN VIDEO AUDIO COMPONENT IN S-VIDE ( ) 1 2 Y PB PR L R Component Input ports To get better picture quality, connect a DVD player to the DVD player's manual for operating...
... jack colors (Y = green, PB = blue, and PR = red). 2 Connect the audio outputs of the DVD to the COMPONENT IN VIDEO jacks on DVD player Y Y PB PR PB PR B-Y R-Y Cb Cr Pb Pr 19 How to the COMPONENT IN AUDIO jacks on the DVD player, insert a DVD. I Select Component input source by using the INPUT button on the remote control. EXTERNAL EQUIPMENT SETUP 2 RS-23 1 REMOTE (CONTROL & CONTROL IN VIDEO AUDIO COMPONENT IN S-VIDE ( ) 1 2 Y PB PR L R Component Input ports To get better picture quality, connect a DVD player to the DVD player's manual for operating...
Owner's Manual (English)
Page 22
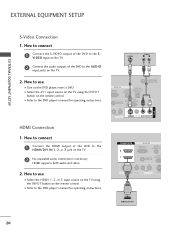
...to the DVD player's manual for operating instructions. EXTERNAL EQUIPMENT SETUP EXTERNAL EQUIPMENT SETUP S-Video Connection 1. I Select the HDMI 1, 2, or 3 input source on the TV using the INPUT button on the TV. 2 No separated audio connection is necessary. HDMI/DVI IN 2 1 RGB IN RGB(PC) AUDIO (RGB/DVI) RS-23 REMOTE (CONTROL CONTROL IN VIDEO AUDIO COMPONENT IN S-VID ( ) 1 HDMI-DVD OUTPUT 20 How to the HDMI/DVI IN 1, 2, or 3 jack on the remote control. S-VIDEO AUDIO L R RGB IN GB(PC) 1 DIGITAL AUDIO AUDIO OUT (RGB/DVI) OPTICAL ANTENNA/ CABLE IN 2 RS...
...to the DVD player's manual for operating instructions. EXTERNAL EQUIPMENT SETUP EXTERNAL EQUIPMENT SETUP S-Video Connection 1. I Select the HDMI 1, 2, or 3 input source on the TV using the INPUT button on the TV. 2 No separated audio connection is necessary. HDMI/DVI IN 2 1 RGB IN RGB(PC) AUDIO (RGB/DVI) RS-23 REMOTE (CONTROL CONTROL IN VIDEO AUDIO COMPONENT IN S-VID ( ) 1 HDMI-DVD OUTPUT 20 How to the HDMI/DVI IN 1, 2, or 3 jack on the remote control. S-VIDEO AUDIO L R RGB IN GB(PC) 1 DIGITAL AUDIO AUDIO OUT (RGB/DVI) OPTICAL ANTENNA/ CABLE IN 2 RS...
Owner's Manual (English)
Page 27
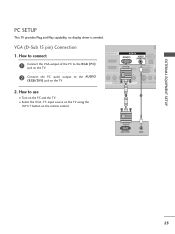
... pin) Connection 1. HDMI/DVI IN RGB IN DIGITAL RGB(PC) AUDIO AUDIO OUT (RGB/DVI) OPTICAL RS-232C IN A REMOTE (CONTROL & SERVICE) CONTROL IN VIDEO AUDIO COMPONENT IN S-VIDEO VIDEO (M ) 1 2 RGB OUTPUT AUDIO ( ) 25 EXTERNAL EQUIPMENT SETUP PC SETUP This TV provides Plug and Play capability, no display driver is needed. How to connect 1 Connect the VGA output of the PC to the RG B (P C) jack on the TV. 2 Connect the PC audio output to use I Select the RGB-PC input source on the TV using the INPUT button on the TV. 2.
... pin) Connection 1. HDMI/DVI IN RGB IN DIGITAL RGB(PC) AUDIO AUDIO OUT (RGB/DVI) OPTICAL RS-232C IN A REMOTE (CONTROL & SERVICE) CONTROL IN VIDEO AUDIO COMPONENT IN S-VIDEO VIDEO (M ) 1 2 RGB OUTPUT AUDIO ( ) 25 EXTERNAL EQUIPMENT SETUP PC SETUP This TV provides Plug and Play capability, no display driver is needed. How to connect 1 Connect the VGA output of the PC to the RG B (P C) jack on the TV. 2 Connect the PC audio output to use I Select the RGB-PC input source on the TV using the INPUT button on the TV. 2.
Owner's Manual (English)
Page 37
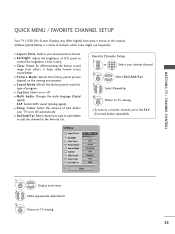
... format. I Caption: Select on the viewing environment. WATCHING TV / CHANNEL CONTROL QUICK MENU / FAVORITE CHANNEL SETUP Your TV's OSD (On Screen Display) may differ slightly from others, it helps make human voices sound better. I Aspect Ratio: Selects your desired channel. 789 0 2Q. I Sound Mode: Selects the factory preset sound for type of time before your TV turns off . I To tune to TV viewing. 35 SAP: Selects MTS sound (Analog signal). MENU Return to a favorite channel, press the F A V (Favorite) button repeatedly. Make appropriate adjustments. 3 Q. I Picture Mode...
... format. I Caption: Select on the viewing environment. WATCHING TV / CHANNEL CONTROL QUICK MENU / FAVORITE CHANNEL SETUP Your TV's OSD (On Screen Display) may differ slightly from others, it helps make human voices sound better. I Aspect Ratio: Selects your desired channel. 789 0 2Q. I Sound Mode: Selects the factory preset sound for type of time before your TV turns off . I To tune to TV viewing. 35 SAP: Selects MTS sound (Analog signal). MENU Return to a favorite channel, press the F A V (Favorite) button repeatedly. Make appropriate adjustments. 3 Q. I Picture Mode...
Owner's Manual (English)
Page 83
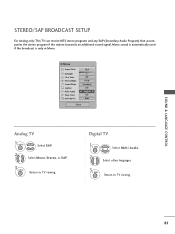
... Voice Picture Mode Sound Mode Caption Multi Audio Sleep Timer CH Del/Add/Fav 16:9 3 Off Vivid Standard Off F English G Off Add Close Analog TV 1Q. Digital TV 1Q. MENU Select Multi Audio. 2 Select other languages. 3 Q. MENU Return to TV viewing. SOUND & LANGUAGE CONTROL STEREO/SAP BROADCAST SETUP For Analog only: This TV can receive MTS stereo programs and any SAP (Secondary Audio Program) that accompanies the stereo program if the station transmits an additional sound signal. Mono sound is automatically used...
... Voice Picture Mode Sound Mode Caption Multi Audio Sleep Timer CH Del/Add/Fav 16:9 3 Off Vivid Standard Off F English G Off Add Close Analog TV 1Q. Digital TV 1Q. MENU Select Multi Audio. 2 Select other languages. 3 Q. MENU Return to TV viewing. SOUND & LANGUAGE CONTROL STEREO/SAP BROADCAST SETUP For Analog only: This TV can receive MTS stereo programs and any SAP (Secondary Audio Program) that accompanies the stereo program if the station transmits an additional sound signal. Mono sound is automatically used...
Owner's Manual (English)
Page 94
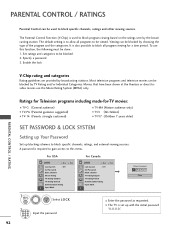
... Channel TV Rating-English TV Rating-French Downloadable Rating Input Block Enter Password **** Close 1 MENU/ SET UP ENTER Select L O C K. 21 2 3 456 789 0 Input the password. 92 I TV-Y7 (Children 7 years older) PARENTAL CONTROL / RATING SET PASSWORD & LOCK SYSTEM Setting up Your Password Set up with the initial password "0-0-0-0". Set ratings and categories to block specific channels, ratings and other viewing sources. Viewing can be used to this function, the following must be blocked by broadcasting stations. Ratings for Television programs...
... Channel TV Rating-English TV Rating-French Downloadable Rating Input Block Enter Password **** Close 1 MENU/ SET UP ENTER Select L O C K. 21 2 3 456 789 0 Input the password. 92 I TV-Y7 (Children 7 years older) PARENTAL CONTROL / RATING SET PASSWORD & LOCK SYSTEM Setting up Your Password Set up with the initial password "0-0-0-0". Set ratings and categories to block specific channels, ratings and other viewing sources. Viewing can be used to this function, the following must be blocked by broadcasting stations. Ratings for Television programs...
Owner's Manual (English)
Page 106
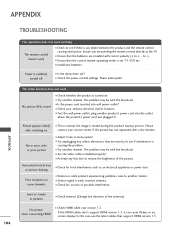
... product's power cord into wall power outlet? I Are the video cables installed properly? I Activate any function to -). I Check the power control settings. The problem may be with the broadcast. or picture shaking Poor reception on . If the HDMI cables don't support HDMI version 1.3, it can cause flickers or no screen display. APPENDIX TROUBLESHOOTING APPENDIX 104 The operation does not work . The remote control doesn't work I Ensure that are pointing the remote control directly at the TV. Ensure...
... product's power cord into wall power outlet? I Are the video cables installed properly? I Activate any function to -). I Check the power control settings. The problem may be with the broadcast. or picture shaking Poor reception on . If the HDMI cables don't support HDMI version 1.3, it can cause flickers or no screen display. APPENDIX TROUBLESHOOTING APPENDIX 104 The operation does not work . The remote control doesn't work I Ensure that are pointing the remote control directly at the TV. Ensure...
Owner's Manual (English)
Page 109
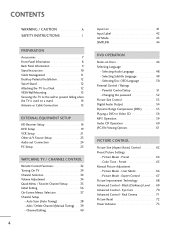
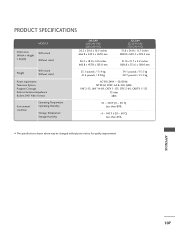
APPENDIX 107 PRODUCT SPECIFICATIONS MODELS Dimensions (Width x Height x Depth) With stand Without stand Weight With stand Without stand Power requirement Television System Program Coverage External Antenna Impedance Built-In DVD Video Format Environment condition Operating Temperature Operating Humidity Storage Temperature Storage Humidity 26LG40 (26LG40-UA) (26LG40-UG) 26.2 x 20.6 x 10.5 inches 666.8 x 524.5 x 267.0 mm 32LG40 (32LG40-UA) (32LG40-UG) 31.8 x 24.8 x 11.7 inches 808.8 x 630.3 x 299.2 mm 26.2 x 18.0 x 4.0 inches 666.8 x 457.8 x 103.0 mm...
APPENDIX 107 PRODUCT SPECIFICATIONS MODELS Dimensions (Width x Height x Depth) With stand Without stand Weight With stand Without stand Power requirement Television System Program Coverage External Antenna Impedance Built-In DVD Video Format Environment condition Operating Temperature Operating Humidity Storage Temperature Storage Humidity 26LG40 (26LG40-UA) (26LG40-UG) 26.2 x 20.6 x 10.5 inches 666.8 x 524.5 x 267.0 mm 32LG40 (32LG40-UA) (32LG40-UG) 31.8 x 24.8 x 11.7 inches 808.8 x 630.3 x 299.2 mm 26.2 x 18.0 x 4.0 inches 666.8 x 457.8 x 103.0 mm...

Owner's Manual (English)
Page 110
... from step 2. The remote control button of other components without programming, turn off. 5 Press the MENU button to store the code. 6 Test the remote control functions to be programmed with the code. 4 Enter a code number using the number buttons on the remote control. Programming code numbers for the corresponding component can be programmed to be programmed, then press the corresponding mode button (such as a S T B) on the remote control, while pointing at the component. Programming a code into a remote mode 1 Testing your remote control can operate other brands. If the...
... from step 2. The remote control button of other components without programming, turn off. 5 Press the MENU button to store the code. 6 Test the remote control functions to be programmed with the code. 4 Enter a code number using the number buttons on the remote control. Programming code numbers for the corresponding component can be programmed to be programmed, then press the corresponding mode button (such as a S T B) on the remote control, while pointing at the component. Programming a code into a remote mode 1 Testing your remote control can operate other brands. If the...


