

Specification (English)
Page 2
...French/Spanish EZ Menus (High Performance Interface) • Channel Add/Delete • Favorite Channel • Auto Clock • Manual Clock • On/Off Timer • Sleep Timer • Auto Off (When no video is a registered trademark of their... RGB In (D-Sub 15pin) - All other trademarks are the property of LG Corp. Component 1080p/1080i/720p - 32LG40 LCD HDTV WITH BUILT-IN DVD PLAYER 32" Class (31.5" diagonal) TECHNICAL SPECIFICATIONS LCD PANEL Native Display Resolution 1366 x 768p Brightness (cd/m2) 500 Dynamic ...
...French/Spanish EZ Menus (High Performance Interface) • Channel Add/Delete • Favorite Channel • Auto Clock • Manual Clock • On/Off Timer • Sleep Timer • Auto Off (When no video is a registered trademark of their... RGB In (D-Sub 15pin) - All other trademarks are the property of LG Corp. Component 1080p/1080i/720p - 32LG40 LCD HDTV WITH BUILT-IN DVD PLAYER 32" Class (31.5" diagonal) TECHNICAL SPECIFICATIONS LCD PANEL Native Display Resolution 1366 x 768p Brightness (cd/m2) 500 Dynamic ...

Owner's Manual (English)
Page 1
Write the model number and serial number from the label on the back cabinet on the front or back of this manual carefully before operating your set and retain it for future reference. LCD TV / DVD Combo OWNER'S MANUAL 26LG40 32LG40 Please read this manual. CAUTION - CLASS 1M VISIBLE AND INVISIBLE LASER RADIATION WHEN OPEN DO NOT VIEW DIRECTLY WITH OPTICAL INSTRUMENTS P/NO : SAC31712401 (0810-REV06) www.lgusa.com / www.lg.ca
Write the model number and serial number from the label on the back cabinet on the front or back of this manual carefully before operating your set and retain it for future reference. LCD TV / DVD Combo OWNER'S MANUAL 26LG40 32LG40 Please read this manual. CAUTION - CLASS 1M VISIBLE AND INVISIBLE LASER RADIATION WHEN OPEN DO NOT VIEW DIRECTLY WITH OPTICAL INSTRUMENTS P/NO : SAC31712401 (0810-REV06) www.lgusa.com / www.lg.ca

Owner's Manual (English)
Page 4
... Never touch this product to rain, moisture or other liquids. Do not install this product near flammable objects such as this owner's manual to be certain. If grounding methods are dangerous. Periodically examine the cord of your appliance, and if its appearance indicates damage or ...mechanical abuse, such as vases, cups, etc. The plug must be placed upon . Pay particular attention to unplug the TV. 15 WARNING - When mounting a TV on or over the apparatus (e.g. Short-circuit Breaker Power Supply 18 DISCONNECTING DEVICE FROM MAINS Mains plug is recommend that ...
... Never touch this product to rain, moisture or other liquids. Do not install this product near flammable objects such as this owner's manual to be certain. If grounding methods are dangerous. Periodically examine the cord of your appliance, and if its appearance indicates damage or ...mechanical abuse, such as vases, cups, etc. The plug must be placed upon . Pay particular attention to unplug the TV. 15 WARNING - When mounting a TV on or over the apparatus (e.g. Short-circuit Breaker Power Supply 18 DISCONNECTING DEVICE FROM MAINS Mains plug is recommend that ...
Owner's Manual (English)
Page 6
... Audio CD Operation 60 JPG File Viewing Options 61 PICTURE CONTROL Picture Size (Aspect Ratio) Control 62 Preset Picture Settings - Preset 65 Manual Picture Adjustment - Selecting Audio Language 48 Selecting Subtitle Language 49 Selecting Disc OSD Language 50 Parental Control / Ratings - Picture Mode - ...DVD Setup 19 VCR Setup 21 Other A/V Source Setup 23 Audio out Connection 24 PC Setup 25 WATCHING TV / CHANNEL CONTROL Remote Control Functions 32 Turning On TV 34 Channel Selection 34 Volume Adjustment 34 Quick Menu / Favorite Channel Setup 35 Initial Setting 36 On-Screen...
... Audio CD Operation 60 JPG File Viewing Options 61 PICTURE CONTROL Picture Size (Aspect Ratio) Control 62 Preset Picture Settings - Preset 65 Manual Picture Adjustment - Selecting Audio Language 48 Selecting Subtitle Language 49 Selecting Disc OSD Language 50 Parental Control / Ratings - Picture Mode - ...DVD Setup 19 VCR Setup 21 Other A/V Source Setup 23 Audio out Connection 24 PC Setup 25 WATCHING TV / CHANNEL CONTROL Remote Control Functions 32 Turning On TV 34 Channel Selection 34 Volume Adjustment 34 Quick Menu / Favorite Channel Setup 35 Initial Setting 36 On-Screen...
Owner's Manual (English)
Page 7
...Broadcasting System Captions 84 - Auto Clock Setup 87 Manual Clock Setup 88 Auto On/Off Time Setting 89 Sleep Timer Setting 90 Auto Shut-off Setting 91 PARENTAL CONTROL / RATINGS Set Password & Lock System 92 Channel Blocking 95 Movie & TV Rating 96 Downloadable Rating 101 External Input Blocking ... Leveler (Auto Volume) 74 Clear Voice 75 Preset Sound Setting (Sound Mode 76 Sound Setting Adjustment - User Mode 77 Balance 78 TV Speakers On/Off Setup 79 Audio Reset 80 Stereo/SAP Broadcasts Setup 81 Audio Language 82 On-Screen Menus Language Selection 83 Caption Mode -
...Broadcasting System Captions 84 - Auto Clock Setup 87 Manual Clock Setup 88 Auto On/Off Time Setting 89 Sleep Timer Setting 90 Auto Shut-off Setting 91 PARENTAL CONTROL / RATINGS Set Password & Lock System 92 Channel Blocking 95 Movie & TV Rating 96 Downloadable Rating 101 External Input Blocking ... Leveler (Auto Volume) 74 Clear Voice 75 Preset Sound Setting (Sound Mode 76 Sound Setting Adjustment - User Mode 77 Balance 78 TV Speakers On/Off Setup 79 Audio Reset 80 Stereo/SAP Broadcasts Setup 81 Audio Language 82 On-Screen Menus Language Selection 83 Caption Mode -
Owner's Manual (English)
Page 9
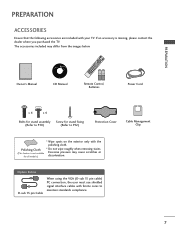
... signal interface cables with the polishing cloth. SLOW + EJECT 0 9 FLASHRBEKTURN SKIP + DISC MENU 1.5V 1.5V Owner's Manual CD Manual Remote Control, Batteries Power Cord x 4 x 4 Bolts for stand assembly Screw for all models.) * Do not wipe roughly... when removing stains. RETURN NTER TE + TE + VOL FAV 1DISPLAY MUTE REPEAT ZOOM 7 4 5 2 3 SUBTITLE A-B ANGLE 8 6 AUDIO TITLE MENU CH P A G E AV MODE 0 9 FLASHRBEKTURN RETURN ROTAT TV...
... signal interface cables with the polishing cloth. SLOW + EJECT 0 9 FLASHRBEKTURN SKIP + DISC MENU 1.5V 1.5V Owner's Manual CD Manual Remote Control, Batteries Power Cord x 4 x 4 Bolts for stand assembly Screw for all models.) * Do not wipe roughly... when removing stains. RETURN NTER TE + TE + VOL FAV 1DISPLAY MUTE REPEAT ZOOM 7 4 5 2 3 SUBTITLE A-B ANGLE 8 6 AUDIO TITLE MENU CH P A G E AV MODE 0 9 FLASHRBEKTURN RETURN ROTAT TV...
Owner's Manual (English)
Page 14
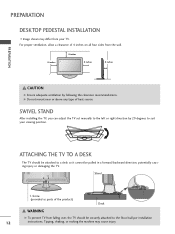
SWIVEL STAND After installing the TV, you can adjust the TV set manually to suit your TV. For proper ventilation, allow a clearance of 4 inches on all four sides from the wall. 4 inches 4 inches 4 inches 4 inches CAUTION G Ensure adequate ventilation by 20 degrees ... not mount near or above any type of the product) Desk WARNING G To prevent TV from falling over, the TV should be pulled in a forward/backward direction, potentially causing injury or damaging the TV. ATTACHING THE TV TO A DESK The TV should be securely attached to a desk so it cannot be attached to the floor...
SWIVEL STAND After installing the TV, you can adjust the TV set manually to suit your TV. For proper ventilation, allow a clearance of 4 inches on all four sides from the wall. 4 inches 4 inches 4 inches 4 inches CAUTION G Ensure adequate ventilation by 20 degrees ... not mount near or above any type of the product) Desk WARNING G To prevent TV from falling over, the TV should be pulled in a forward/backward direction, potentially causing injury or damaging the TV. ATTACHING THE TV TO A DESK The TV should be securely attached to a desk so it cannot be attached to the floor...
Owner's Manual (English)
Page 15
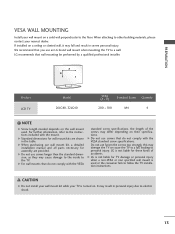
... installed on a ceiling or slanted wall, it may result in the table. LG recommends that do not comply with the mount. A B Product LCD TV Model 26LG40, 32LG40 VESA (A * B) Standard Screw Quantity 200 * 100 M4 4 ! G LG is not liable for assembly are shown in personal injury due to a wall..., the length of accidents. When attaching to personal injury. G When purchasing our wall mount kit, a detailed installation manual and all parts necessary for TV damage or personal injury when a non-VESA or non specified wall mount is used . G Do not use fasten the...
... installed on a ceiling or slanted wall, it may result in the table. LG recommends that do not comply with the mount. A B Product LCD TV Model 26LG40, 32LG40 VESA (A * B) Standard Screw Quantity 200 * 100 M4 4 ! G LG is not liable for assembly are shown in personal injury due to a wall..., the length of accidents. When attaching to personal injury. G When purchasing our wall mount kit, a detailed installation manual and all parts necessary for TV damage or personal injury when a non-VESA or non specified wall mount is used . G Do not use fasten the...
Owner's Manual (English)
Page 18
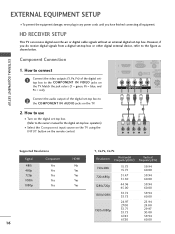
... A (RGB/DVI) 2 RS-232C 1 REMOTE (CONTROL & S CONTROL IN VIDEO AUDIO COMPONENT IN S-VIDEO ( ) 2 Connect the audio output of the digital settop box to the owner's manual for the digital set -top box. How to use I Turn on the digital set-top box. (Refer to the COMPONENT IN VIDEO jacks on the... TV. HD RECEIVER SETUP This TV can receive digital over-the-air or digital cable signals without an external digital set -top box. However, if you have finished connecting...
... A (RGB/DVI) 2 RS-232C 1 REMOTE (CONTROL & S CONTROL IN VIDEO AUDIO COMPONENT IN S-VIDEO ( ) 2 Connect the audio output of the digital settop box to the owner's manual for the digital set -top box. How to use I Turn on the digital set-top box. (Refer to the COMPONENT IN VIDEO jacks on the... TV. HD RECEIVER SETUP This TV can receive digital over-the-air or digital cable signals without an external digital set -top box. However, if you have finished connecting...
Owner's Manual (English)
Page 19
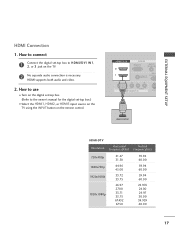
... set -top box.) I Select the HDMI1, HDMI2, or HDMI3 input source on the TV using the INPUT button on the TV. 2 No separate audio connection is necessary. How to connect 1 Connect the digital set-top box to the owner's manual for the digital set -top box. (Refer to HDMI/DVI IN1, 2, or 3 jack...
... set -top box.) I Select the HDMI1, HDMI2, or HDMI3 input source on the TV using the INPUT button on the TV. 2 No separate audio connection is necessary. How to connect 1 Connect the digital set-top box to the owner's manual for the digital set -top box. (Refer to HDMI/DVI IN1, 2, or 3 jack...
Owner's Manual (English)
Page 20
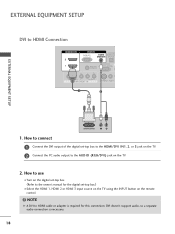
NOTE G A DVI to the owner's manual for this connection. How to use I Select the HDMI 1, HDMI 2 or HDMI 3 input source on the TV using the INPUT button on the remote control. ! EXTERNAL EQUIPMENT SETUP DVI to the AUDIO (RGB/DVI) jack on the TV. 2. DVI doesn't support audio, so a separate audio connection is ... (Refer to HDMI cable or adapter is necessary. 18 How to connect 1 Connect the DVI output of the digital set -top box.) I Turn on the TV. 2 Connect the PC audio output to HDMI Connection HDMI/DVI IN 2 1 RGB IN DIGITAL RGB(PC) AUDIO AUDIO OU (RGB/DVI) OPTICA RS-232C ...
NOTE G A DVI to the owner's manual for this connection. How to use I Select the HDMI 1, HDMI 2 or HDMI 3 input source on the TV using the INPUT button on the remote control. ! EXTERNAL EQUIPMENT SETUP DVI to the AUDIO (RGB/DVI) jack on the TV. 2. DVI doesn't support audio, so a separate audio connection is ... (Refer to HDMI cable or adapter is necessary. 18 How to connect 1 Connect the DVI output of the digital set -top box.) I Turn on the TV. 2 Connect the PC audio output to HDMI Connection HDMI/DVI IN 2 1 RGB IN DIGITAL RGB(PC) AUDIO AUDIO OU (RGB/DVI) OPTICA RS-232C ...
Owner's Manual (English)
Page 21
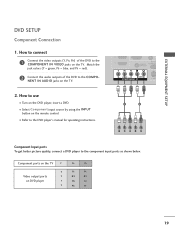
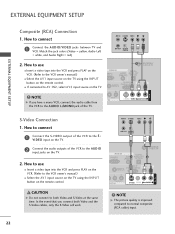
... to the COMPONENT IN AUDIO jacks on the remote control. I Select Component input source by using the INPUT button on the TV. 2. Component ports on the TV Y Y Video output ports Y on the TV. DVD SETUP Component Connection 1. How to connect 1 Connect the video outputs (Y, PB, PR) of the DVD to the COMPONENT IN... (CONTROL & CONTROL IN VIDEO AUDIO COMPONENT IN S-VIDE ( ) 1 2 Y PB PR L R Component Input ports To get better picture quality, connect a DVD player to the DVD player's manual for operating instructions. I Turn on the DVD player, insert a DVD.
... to the COMPONENT IN AUDIO jacks on the remote control. I Select Component input source by using the INPUT button on the TV. 2. Component ports on the TV Y Y Video output ports Y on the TV. DVD SETUP Component Connection 1. How to connect 1 Connect the video outputs (Y, PB, PR) of the DVD to the COMPONENT IN... (CONTROL & CONTROL IN VIDEO AUDIO COMPONENT IN S-VIDE ( ) 1 2 Y PB PR L R Component Input ports To get better picture quality, connect a DVD player to the DVD player's manual for operating instructions. I Turn on the DVD player, insert a DVD.
Owner's Manual (English)
Page 22
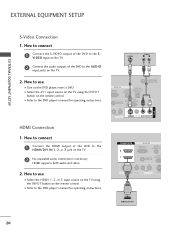
I Refer to the DVD player's manual for operating instructions. HDMI supports both audio and video. ( ) 2. I Turn on the TV. 2 No separated audio connection is necessary. HDMI/DVI IN 2 1 RGB IN RGB(PC) AUDIO (RGB/DVI) RS-23 REMOTE (CONTROL CONTROL IN VIDEO AUDIO ... to connect 1 Connect the S-VIDEO output of the DVD to the S VIDEO input on the TV. 2 Connect the audio outputs of the DVD to use I Refer to the DVD player's manual for operating instructions. S-VIDEO AUDIO L R RGB IN GB(PC) 1 DIGITAL AUDIO AUDIO OUT (RGB/DVI) OPTICAL ANTENNA/ CABLE IN 2 RS-...
I Refer to the DVD player's manual for operating instructions. HDMI supports both audio and video. ( ) 2. I Turn on the TV. 2 No separated audio connection is necessary. HDMI/DVI IN 2 1 RGB IN RGB(PC) AUDIO (RGB/DVI) RS-23 REMOTE (CONTROL CONTROL IN VIDEO AUDIO ... to connect 1 Connect the S-VIDEO output of the DVD to the S VIDEO input on the TV. 2 Connect the audio outputs of the DVD to use I Refer to the DVD player's manual for operating instructions. S-VIDEO AUDIO L R RGB IN GB(PC) 1 DIGITAL AUDIO AUDIO OUT (RGB/DVI) OPTICAL ANTENNA/ CABLE IN 2 RS-...

Owner's Manual (English)
Page 23
How to connect 1 Connect the RF antenna out socket of the VCR to the ANTENNA/CABLE IN socket on the TV. 2 Connect the antenna cable to the same channel number. How to use I Insert a video tape into the VCR and press PLAY on the screen. Antenna ... to all TVs and is not covered by warranty. the fixed images on the sides of the VCR. 2. EXTERNAL EQUIPMENT SETUP VCR SETUP ( ) I If the 4:3 picture format is used; I To avoid picture noise (interference), leave an adequate distance between the VCR and TV. This phenomenon is common to the VCR owner's manual.) ( ) 21...
How to connect 1 Connect the RF antenna out socket of the VCR to the ANTENNA/CABLE IN socket on the TV. 2 Connect the antenna cable to the same channel number. How to use I Insert a video tape into the VCR and press PLAY on the screen. Antenna ... to all TVs and is not covered by warranty. the fixed images on the sides of the VCR. 2. EXTERNAL EQUIPMENT SETUP VCR SETUP ( ) I If the 4:3 picture format is used; I To avoid picture noise (interference), leave an adequate distance between the VCR and TV. This phenomenon is common to the VCR owner's manual.) ( ) 21...
Owner's Manual (English)
Page 24
I If connected to the VCR owner's manual.) I Select the A V 1 input source on the TV using the INPUT button on the TV. 2. NOTE G If you connect both Video and S-Video at the same time. AUDIO T IN S-VIDEO VIDEO (MONO) AUDIO S-Video Connection 1. How to use I Insert a video ..., connect the audio cable from the VCR to the AUDIO L/MONO jack of the VCR to the VCR owner's manual.) I Select the A V 1 input source on the TV using the INPUT button on the TV. 1 RGB IN DIGITAL GB(PC) AUDIO AUDIO OUT (RGB/DVI) OPTICAL ANTENNA/ CABLE IN RS-232C IN AUDIO OUT...
I If connected to the VCR owner's manual.) I Select the A V 1 input source on the TV using the INPUT button on the TV. 2. NOTE G If you connect both Video and S-Video at the same time. AUDIO T IN S-VIDEO VIDEO (MONO) AUDIO S-Video Connection 1. How to use I Insert a video ..., connect the audio cable from the VCR to the AUDIO L/MONO jack of the VCR to the VCR owner's manual.) I Select the A V 1 input source on the TV using the INPUT button on the TV. 1 RGB IN DIGITAL GB(PC) AUDIO AUDIO OUT (RGB/DVI) OPTICAL ANTENNA/ CABLE IN RS-232C IN AUDIO OUT...
Owner's Manual (English)
Page 26
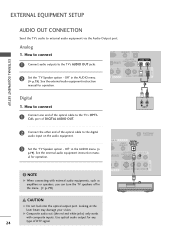
... any 24 type of the optical cable to external audio equipment via the Audio Output port. See the external audio equipment instruction manual for operation. How to connect 1 Connect audio outputs to the TV's AUDIO OUT jacks. ( C) (RGB/DVI) OPTICAL RS-232C IN AUDIO OUT REMOTE (CONTROL & SERVICE) CONTROL IN 2 Set the...
... any 24 type of the optical cable to external audio equipment via the Audio Output port. See the external audio equipment instruction manual for operation. How to connect 1 Connect audio outputs to the TV's AUDIO OUT jacks. ( C) (RGB/DVI) OPTICAL RS-232C IN AUDIO OUT REMOTE (CONTROL & SERVICE) CONTROL IN 2 Set the...
Owner's Manual (English)
Page 31
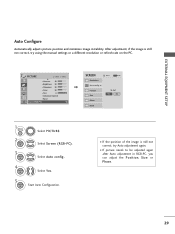
... Reset Move MENU Prev. Select Auto config.. 4 ENTER Select Y e s. 5 ENTER Start Auto Configuration. After adjustment, if the image is still not correct, try using the manual settings or a different resolution or refresh rate on the PC. To Set Yes No 1 MENU/ SET UP 2 ENTER 3 ENTER Select PICTURE. Select Screen (RGB-PC...
... Reset Move MENU Prev. Select Auto config.. 4 ENTER Select Y e s. 5 ENTER Start Auto Configuration. After adjustment, if the image is still not correct, try using the manual settings or a different resolution or refresh rate on the PC. To Set Yes No 1 MENU/ SET UP 2 ENTER 3 ENTER Select PICTURE. Select Screen (RGB-PC...
Owner's Manual (English)
Page 32
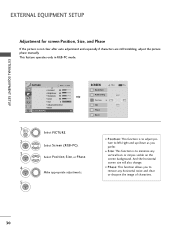
... operates only in RGB-PC mode. I S i z e: This function is not clear after auto adjustment and especially if characters are still trembling, adjust the picture phase manually. PICTURE Move Enter E • Contrast 50 • Brightness 50 • Sharpness 50 • Color 50 • Tint 0R G • Advanced Control • Reset Screen (RGB...
... operates only in RGB-PC mode. I S i z e: This function is not clear after auto adjustment and especially if characters are still trembling, adjust the picture phase manually. PICTURE Move Enter E • Contrast 50 • Brightness 50 • Sharpness 50 • Color 50 • Tint 0R G • Advanced Control • Reset Screen (RGB...
Owner's Manual (English)
Page 37
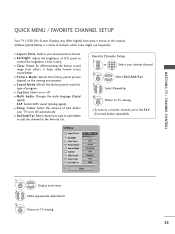
...Off Add Close 1Q. Make appropriate adjustments. 3 Q. I Clear Voice: By differentiating the human sound range from what is a menu of LCD panel to the Favorite List. MENU Return to TV viewing. 35 I To tune to a favorite channel, press the F A V (Favorite) button repeatedly. I Aspect Ratio: Selects your ...Your TV's OSD (On Screen Display) may differ slightly from others, it helps make human voices sound better. I Del/Add/Fav: Select channel you want to add/delete or add the channel to control the brightness of program. Q.Menu (Quick Menu) is shown in this manual....
...Off Add Close 1Q. Make appropriate adjustments. 3 Q. I Clear Voice: By differentiating the human sound range from what is a menu of LCD panel to the Favorite List. MENU Return to TV viewing. 35 I To tune to a favorite channel, press the F A V (Favorite) button repeatedly. I Aspect Ratio: Selects your ...Your TV's OSD (On Screen Display) may differ slightly from others, it helps make human voices sound better. I Del/Add/Fav: Select channel you want to add/delete or add the channel to control the brightness of program. Q.Menu (Quick Menu) is shown in this manual....
Owner's Manual (English)
Page 38
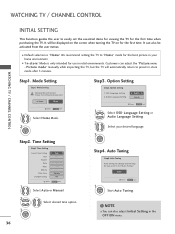
... Exit 1 Select Auto or Manual. 2 Select desired time option. 3 ENTER 36 Step3. Do you want to start Auto Tuning? We recommend setting the TV to "H o m e" mode for use in the OPTION menu. Picture mode" manually while inspecting the TV, but the TV will be activated from the ...user menus. NOTE I You can change channel map. WATCHING TV / CHANNEL CONTROL INITIAL SETTING This Function...
... Exit 1 Select Auto or Manual. 2 Select desired time option. 3 ENTER 36 Step3. Do you want to start Auto Tuning? We recommend setting the TV to "H o m e" mode for use in the OPTION menu. Picture mode" manually while inspecting the TV, but the TV will be activated from the ...user menus. NOTE I You can change channel map. WATCHING TV / CHANNEL CONTROL INITIAL SETTING This Function...


