LG M4710C-BA Support Question
LG M4710C-BA Support Question
Find answers below for this question about LG M4710C-BA - LG - 47" LCD Flat Panel Display.Need a LG M4710C-BA manual? We have 1 online manual for this item!
Question posted by 59hihatsales on April 9th, 2017
Changing The Input Source Without The Remote. Manual
Hello, i would like to know how to change the imput source using the manual buttons in the back of theunit, i don't have the original remote control and i doubt that a universal remote will be able to accessthe correct menu options.Thank you!RAF
Current Answers
Answer #1: Posted by hzplj9 on April 9th, 2017 3:17 AM
hzplj9

Member since:
June 25th, 2012 Points: 4,875,690

Member since:
June 25th, 2012 Points: 4,875,690
On the front panel is a row of buttons used for adjusting the display. The button on the far left enables you to select the source. You can obtain a user guide here:
https://www.manualslib.com/manual/243256/Lg-M4710c.html#product-M4710C-BA
You can probably obtain an Android app for replacing the remote control from this link:
https://play.google.com/store/apps/details?id=com.lge.tv.remoteapps
Related LG M4710C-BA Manual Pages
User Guide - Page 5
Automatically adjusts the image.
Press this button repetitively to set
the intended screen. Press this button repetitively to select an appropriate time duration
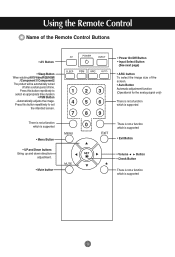
• PSM Button - Using the Remote Control
Name of the Remote Control Buttons
• AV Button
• Sleep Button When watching AV/S-Video/RGB/HDMI
/Component1/ Component2 The product will be automatically turned
off after ...
User Guide - Page 6

... change to prevent environmental pollution.
5 Insert the batteries with correct polarity (+/-). 3. Take out the battery cap. 2. Input
*
Inserting batteries into remote control.
1. Close the battery cap.
• Dispose of used batteries in the recycle bin to
AV
Component1
Component2
RGB
HDMI/DVI
123 456 789
0
• Input Select Button
If you want
using the
button. Using the Remote...
User Guide - Page 7
...Manual).
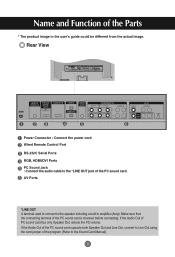
6 AV Ports
*LINE OUT A terminal used to connect to the *LINE OUT jack of the PC sound card is checked before connecting.
Name and Function of the Parts
* The product image in amplifier (Amp). Rear View
REMOTE CONTROL IN
RS-232C (CONTROL...-R
1
2
VIDEO
AV IN L-AUDIO-R
AV OUT
S-VIDEO
REMOTE CONTROL IN
RS-232C (CONTROL& SERVICE)
OUT
HDMI/DVI IN
IN
RGB IN RGB OUT
...
User Guide - Page 8
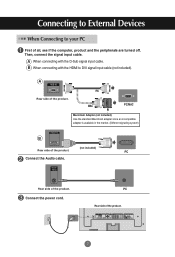
... with the D-Sub signal input cable. PC MAC
PC/MAC
Macintosh Adapter (not included) Use the standard Macintosh adapter since an incompatible adapter is available in the market. (Different signaling system)
HDMI/DVI IN
B
(not included)
Rear side of the product.
PC
Connect the Audio cable. REMOTE CONTROL IN
RS-232C (CONTROL& SERVICE)
OUT
IN...
User Guide - Page 9
... power outlet on the remote control to select the computer to use.
• Directly connect to two computers.
Press the INPUT button on the wall or ...input signal. INPUT
SET
Or, press the SOURCE button on the PC. SOURCE
AUTO/SET
ON/OFF
Power button
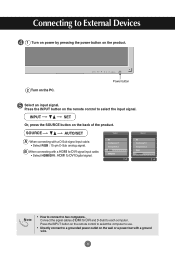
Select an input signal. Press the INPUT button on the remote control to External Devices
1 Turn on power by pressing the power button...
User Guide - Page 11

....
Note • When the BNC cable is connected simultaneously with an BNC cable.
• Select AV.
SOURCE
AUTO/SET
A When connecting with S-Video cable, S-Video input has a priority.
10 INPUT
SET
Input
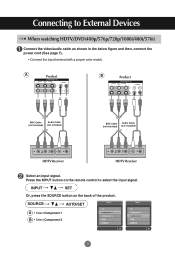
Or, press the SOURCE button on the remote control to watch high image quality movies. Connecting to External Devices
When watching VCR / DVD
Connect the video...
User Guide - Page 12
... the back of the product. Connecting to select the input signal.
INPUT
SET
Or, press the SOURCE button on the remote control to External Devices
When watching HDTV/DVD(480p/576p/720p/1080i/480i/576i)
Connect the video/audio cable as shown in the below figure and ...
User Guide - Page 13
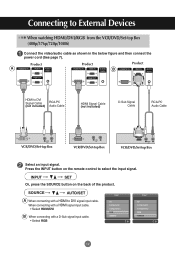
... the video/audio cable as shown in the below figure and then connect the power cord (See page 7).
Connecting to DVI signal input cable. INPUT
SET
Or, press the SOURCE button on the remote control to DVI Signal Cable RCA-PC (not included) Audio Cable
HDMI Signal Cable (not included)
D-Sub Signal Cable
RCA-PC Audio...
User Guide - Page 16
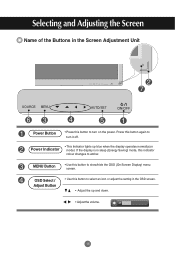
... Select / Adjust Button
• Use this button to turn on mode). If the display is in sleep (Energy Saving) mode, this button again to show/hide the OSD (On Screen Display) menu screen. Press this indicator colour changes to turn it off. Selecting and Adjusting the Screen
Name of the Buttons in the Screen Adjustment Unit
SOURCE
SOURCE
AUTO/SET
ON...
User Guide - Page 17

Selecting and Adjusting the Screen
Name of the Buttons in the Screen Adjustment Unit
AUTO/SET Button [For PC Analog signal]
Auto in progress For opimal display change resolution to 1360 X 768
[When XGA Mode is active and 1360 X768 is selected]
SOURCE Button SOURCE
AUTO/SET
• Select the input signal
Input
AV Component 1 Component 2 RGB HDMI/DVI
Composite Video...
User Guide - Page 19
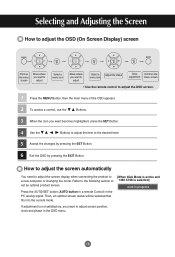
... the main menu of the OSD appears.
2 To access a control, use the
Buttons.
3 When the icon you need to adjust the screen display when connecting the product to [When XGA Mode is active and a new computer or changing the mode. Press the AUTO/SET button (AUTO button in a remote Control) in the OSD menu.
18 If adjustment is selected...
User Guide - Page 24
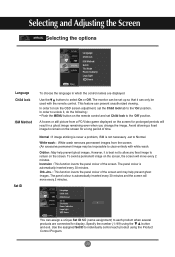
... entirely with the remote control. Orb.+Inv. : This function inverts the panel colour of the screen.
Orbiter : May help prevent ghost images. Specify the number (1~99) using the Product
Control Program.
23 In order to unlock it is not necessary -set the Child lock tab to individually control each product when several
products are displayed.
Use the assigned...
User Guide - Page 28

... corresponding to remove any vertical bars or stripes visible on the screen background. This button is suitable for the automatic adjustment of characters.
This function is for analogue signal input only
Phase
To adjust the focus of the display.
Auto config.
V-Position Moving the screen position vertically. If the picture isn't clear after...
User Guide - Page 30

... out of the vertical or horizontal frequency range of image display per second. To unlock the controls, simultaneously press the Menu button and button for several seconds. (You cannot set this function using the remote control buttons. The unit is the time to display one vertical line. You can be changed tens of times every second like a fluorescent lamp.
Troubleshooting
No...
User Guide - Page 31
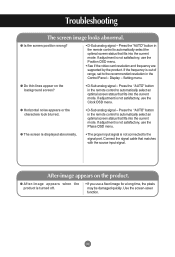
... Control Panel - G Is the screen position wrong?
• D-Sub analog signal - If the frequency is not satisfactory, use the Clock OSD menu. If adjustment is out of range, set to automatically select the optimal screen status that matches with the source input signal. Display -
G Do thin lines appear on the product. Press the "AUTO" button in the remote control...
User Guide - Page 33
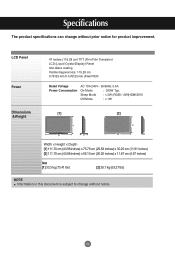
... [1] 33.3 kg (73.41 lbs)
[2] 28.7 kg (63.27 lbs)
NOTE Information in this document is subject to change without notice.
32
LCD Panel Power
47 inches (119.28 cm) TFT (Thin Film Transistor) LCD (Liquid Crystal Display) Panel Anti-Glare coating Visible diagonal size: 119.28 cm 0.76125 mm X 0.76125 mm (Pixel Pitch)
Rated Voltage Power...
User Guide - Page 37
...)
Data Length : 8bits
Parity Bit : None
Stop Bit : 1bit
Flow Control : None
Communication Code : ASCII code
Use a straight cable
A1 You can
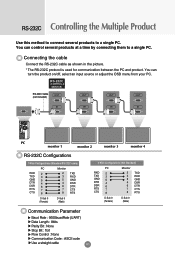
turn the product on/off, select an input source or adjust the OSD menu from your PC. RS-232C Controlling the Multiple Product
Use this method to connect several products at a time by connecting...
User Guide - Page 40

Transmission
[k][a][ ][Set ID][ ][FF][Cr]
Acknowledgement [a][ ][Set ID][ ][OK][Data][x]
Data 0 : Power Off
1 : Power On
L
02. You can also select an input source using the SOURCE button on the remote control. Power(Command : a) To control Power On/Off of Power On/Off. Transmission
[k][a][ ][Set ID][ ][Data][Cr]
Data 0 : Power Off
1 : Power On
Acknowledgement
[a][ ][Set ID][ ][OK...
User Guide - Page 41

...
Transmission / Receiving Protocol
L
03.
You can also adjust the screen format using the ARC (Aspect Ratio Control) button on (Picture off . Transmission [k][c][ ][Set ID][ ][Data][Cr]
Data 1 : Normal Screen (4:3) 2 : Wide Screen (16 :9) 3 : Horizon (Spectacle) 4 : Zoom1
5 : Zoom2 6 : Original 7 : 14 : 9 8 : Full (Europe version only) 9 : 1 : 1 (PC)
Acknowledgement [c][ ][Set ID][ ][OK...
User Guide - Page 45

... the local keys. Transmission
[k][k][ ][Set ID][ ][Data][Cr] Data Min : 00H ~ Max : 64H
(Hexadecimal code)
• Refer to the set . Remote Lock /Key Lock (Command : m) To control Remote Lock on /off to the set . You can also adjust the sharpness in the Picture menu. Acknowledgement [k][ ][Set ID][ ][OK][Data][x]
Data Min : 00H ~ Max...
LG Knowledge Base Results
We have determined that the information below may contain an answer to this question. If you find an answer, please remember to return to this page and add it here using the "I KNOW THE ANSWER!" button above. It's that easy to earn points!-
Channels missing on the HDTV. - LG Consumer Knowledge Base
... received through input sources such as: composite, component, or HDMI. If you receive your broadcasts from an over the air digital television broadcasts, it may be necessary to verify that the TV is on the correct input channel. NOTE: Auto tuning does not find audio/video channels that channel using cable services without the use ? FAQs... -
Digital Converter Box: How do I connect to a VCR? - LG Consumer Knowledge Base
... box to a coaxial input on how to the VCR's output channel. When using coaxial cable, the television will need to be tuned to access the video input. Option B: Connect the digital ...input on the digital converter box. Check the VCR owner's manual for detailed directions on the back of the VCR. NOTE: For timer / programmed recording, program your VCR to record from the input source... -
HDTV: How can I use the television as a PC monitor? - LG Consumer Knowledge Base
... or HDMI) depending on any adjustments to higher settings are recommended only after the initial setup is connected to the original monitor, change the settings to a supported configuration. / LCD TV HDTV: How can I use the television as a computer monitor. Following are a few tips that will be helpful if you opt to connect your PC...
Similar Questions


Changing Inputs
Need to know how to change pcm setting to HDMI and other sources on the LG 49UB8500_UA
Need to know how to change pcm setting to HDMI and other sources on the LG 49UB8500_UA
(Posted by AmosHaughton 9 years ago)

I Need A Stand For My Lg M4201c-ba - Lg - 42' Lcd Flat Panel
I need a stand for my LG M4201C-BA LG 42"
I need a stand for my LG M4201C-BA LG 42"
(Posted by carynb62 9 years ago)
How To Remove The Key Lock Without A Remote
(Posted by dweir2 11 years ago)

Aux Source/input Is Stuck
We have a TV that is stuck on AV2 and we are unable to change the input source to the normal input. ...
We have a TV that is stuck on AV2 and we are unable to change the input source to the normal input. ...
(Posted by davidh 13 years ago)