KM-NET Viewer Operation Guide Rev-5.2-2010.10
Page 75
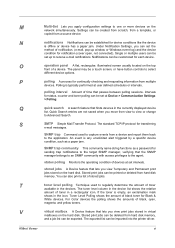
...a source device. If the toner is typically performed at set at Device > Communication Settings > Polling. O operation panel A flat, rectangular, illuminated screen usually located on the top front of black, cyan, magenta, and yellow toners. Intervals for Black & White devices. M Multi-Set Lets you view...Temporary and Permanent print jobs stored on the hard disk. An event is offline or device has a paper jam. Settings can be a touch screen, or have button controls to the agent. V virtual mailbox A Device feature that the SNMP manager belongs to an SNMP community with ...
...a source device. If the toner is typically performed at set at Device > Communication Settings > Polling. O operation panel A flat, rectangular, illuminated screen usually located on the top front of black, cyan, magenta, and yellow toners. Intervals for Black & White devices. M Multi-Set Lets you view...Temporary and Permanent print jobs stored on the hard disk. An event is offline or device has a paper jam. Settings can be a touch screen, or have button controls to the agent. V virtual mailbox A Device feature that the SNMP manager belongs to an SNMP community with ...
Kyocera Command Center Operation Guide Rev 6.3
Page 16
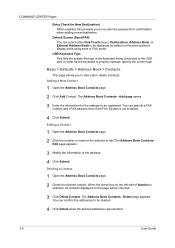
... confirm the addresses to be deleted. 4 Click Delete when the desired addresses are selected. 3-9 User Guide The Address Book Contacts - Default Screen (Send/FAX) You can select either One Touch (keys), Destinations, Address Book, or External Address Book to be displayed by default on the page will be checked. 3 Click Delete Contact...
... confirm the addresses to be deleted. 4 Click Delete when the desired addresses are selected. 3-9 User Guide The Address Book Contacts - Default Screen (Send/FAX) You can select either One Touch (keys), Destinations, Address Book, or External Address Book to be displayed by default on the page will be checked. 3 Click Delete Contact...
Scan To SMB (PC) Setup Guide Rev-3
Page 14
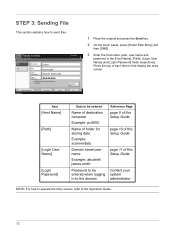
... Book Status Next Dest. Cancel Destination 1 Connection Test OK 10/10/2008 10:10 1 Place the original and press the Send key. 2 On the touch panel, press [Folder Path Entry] and then [SMB]. 3 Enter the host name, path, user name and password in to the domain Reference Page page... FTP Path scannerdata Login User Name abcdnet\ james.smith Login Password Specify the folder on the destination computer. NOTE: For how to operate the entry screen, refer to send files. Item [Host Name] [Path] [Login User Name] [Login Password] Data to be entered Name of destination computer Example: ...
... Book Status Next Dest. Cancel Destination 1 Connection Test OK 10/10/2008 10:10 1 Place the original and press the Send key. 2 On the touch panel, press [Folder Path Entry] and then [SMB]. 3 Enter the host name, path, user name and password in to the domain Reference Page page... FTP Path scannerdata Login User Name abcdnet\ james.smith Login Password Specify the folder on the destination computer. NOTE: For how to operate the entry screen, refer to send files. Item [Host Name] [Path] [Login User Name] [Login Password] Data to be entered Name of destination computer Example: ...
2560/3060 Operation Guide (Advanced Edition)
Page 8
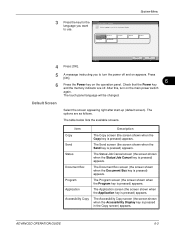
...copying, printing and scanning features in This Guide The following guides are supplied with it. Press the Start key. Indicates the touch panel keys. Used to emphasize a key word, phrase or references to copy is displayed. Indicates the message displayed on the...nature of the description. Convention Bold [Regular] Italic Note Important Caution Description Example Indicates the operation panel key or a computer screen. Indicates supplemental information or operations for reference. Operation Guide Describes how to Sleep and Auto Sleep on page 3-4. Refer to ...
...copying, printing and scanning features in This Guide The following guides are supplied with it. Press the Start key. Indicates the touch panel keys. Used to emphasize a key word, phrase or references to copy is displayed. Indicates the message displayed on the...nature of the description. Convention Bold [Regular] Italic Note Important Caution Description Example Indicates the operation panel key or a computer screen. Indicates supplemental information or operations for reference. Operation Guide Describes how to Sleep and Auto Sleep on page 3-4. Refer to ...
2560/3060 Operation Guide (Advanced Edition)
Page 152
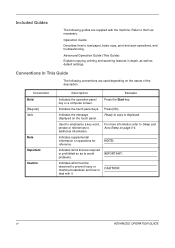
...; FAX • i-FAX • Printer Displaying Status Screens Use the procedure below to be printed. Timer waiting, and Storing Jobs. Screen Printing Jobs Sending Jobs Storing Jobs Job statuses to display the Status screen. 1 Press the Status/Job Cancel key. 5-2 ADVANCED OPERATION... GUIDE Status / Job Cancel Checking Job Status Check the status of jobs are available. The following job statuses are displayed as a list on the touch...
...; FAX • i-FAX • Printer Displaying Status Screens Use the procedure below to be printed. Timer waiting, and Storing Jobs. Screen Printing Jobs Sending Jobs Storing Jobs Job statuses to display the Status screen. 1 Press the Status/Job Cancel key. 5-2 ADVANCED OPERATION... GUIDE Status / Job Cancel Checking Job Status Check the status of jobs are available. The following job statuses are displayed as a list on the touch...

2560/3060 Operation Guide (Advanced Edition)
Page 172
...touch panel. Common Settings - Buzzer Volume: 3 Medium Change Job Finish: Off Change Warning : Off Change End Key Confirmation: Off Ready : On Change Change Return to Top Close 10/10/2007 10:10 NOTE: During the System Menu operation, pressing the System Menu key does not return to the System Menu default screen...; Switching Unit of Language. 6-2 ADVANCED OPERATION GUIDE Press [Return to Top] to return to the System Menu default screen. Common Settings Common settings include; • Switching the Language for Display [Language] Select the language displayed on the System...
...touch panel. Common Settings - Buzzer Volume: 3 Medium Change Job Finish: Off Change Warning : Off Change End Key Confirmation: Off Ready : On Change Change Return to Top Close 10/10/2007 10:10 NOTE: During the System Menu operation, pressing the System Menu key does not return to the System Menu default screen...; Switching Unit of Language. 6-2 ADVANCED OPERATION GUIDE Press [Return to Top] to return to the System Menu default screen. Common Settings Common settings include; • Switching the Language for Display [Language] Select the language displayed on the System...
2560/3060 Operation Guide (Advanced Edition)
Page 173
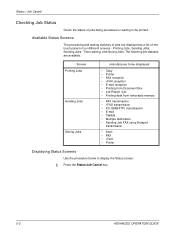
... the key for the language you to use for the touch panel display . English Português Deutsch Nederlands Français Español Italiano Status 4 Press [OK]. The Status/Job Cancel screen (the screen shown when the Status/Job Cancel key is pressed) appears...to use . Accessibility Copy The Accessibility Copy screen (the screen shown when the Accessibility Display key is pressed in the Copy screen) appears. After this, turn the power off . Default Screen Select the screen appearing right after start-up (default screen). The touch panel language will be changed.
... the key for the language you to use for the touch panel display . English Português Deutsch Nederlands Français Español Italiano Status 4 Press [OK]. The Status/Job Cancel screen (the screen shown when the Status/Job Cancel key is pressed) appears...to use . Accessibility Copy The Accessibility Copy screen (the screen shown when the Accessibility Display key is pressed in the Copy screen) appears. After this, turn the power off . Default Screen Select the screen appearing right after start-up (default screen). The touch panel language will be changed.
2560/3060 Operation Guide (Advanced Edition)
Page 238
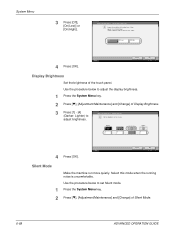
... the machine run more quietly. Select this mode when the running noise is uncomfortable. Adjustment /Maintenance - Correcting Fine Black Line Reduce the visibility of the touch panel. Press [T], [Adjustment/Maintenance] and [Change] of Silent Mode. 6-68 ADVANCED OPERATION GUIDE Lighter) to adjust the display brightness. 1 Press the System Menu key. 2 Press...
... the machine run more quietly. Select this mode when the running noise is uncomfortable. Adjustment /Maintenance - Correcting Fine Black Line Reduce the visibility of the touch panel. Press [T], [Adjustment/Maintenance] and [Change] of Silent Mode. 6-68 ADVANCED OPERATION GUIDE Lighter) to adjust the display brightness. 1 Press the System Menu key. 2 Press...
2560/3060 Operation Guide (Advanced Edition)
Page 254
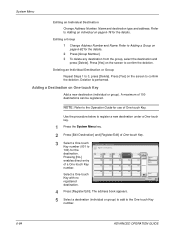
...address. Press [Yes] on the screen to the One-touch Key number. 6-84 ADVANCED OPERATION GUIDE A maximum of One-touch Key. 3 Select a One-touch Key number (001 to 100) for use of a One-touch Key number. 011 012 013 014 Select a One-touch 016 017 018 019 Key with ...System Menu key. 2 Press [Edit Destination] and [Register/Edit] of 100 destinations can be registered. Adding a Destination on the screen to 3, press [Delete]. One-touch Key Register a one-touch key . Register /Edit 010 Delete 015 001/005 020 Detail Close 10/10/2007 10:10 5 Select a destination (individual or...
...address. Press [Yes] on the screen to the One-touch Key number. 6-84 ADVANCED OPERATION GUIDE A maximum of One-touch Key. 3 Select a One-touch Key number (001 to 100) for use of a One-touch Key number. 011 012 013 014 Select a One-touch 016 017 018 019 Key with ...System Menu key. 2 Press [Edit Destination] and [Register/Edit] of 100 destinations can be registered. Adding a Destination on the screen to 3, press [Delete]. One-touch Key Register a one-touch key . Register /Edit 010 Delete 015 001/005 020 Detail Close 10/10/2007 10:10 5 Select a destination (individual or...

2560/3060 Operation Guide (Advanced Edition)
Page 256
... - One-touch Key Register a one-touch key . 001 002 003 004 005 No . AAA BBB CCC Register /Edit 006 007 008 009 010 Delete 011 012 013 014 015 001/005 016 017 018 019 020 Status Detail Close 10/10/2007 10:10 2 Press [Yes] on the screen to add ... System Menu 2 Select a new destination (individual or group). Refer to the Operation Guide for Address List. 3 Press [OK]. 4 Press [Yes] on the screen to the One-touch Key. com ABC DEF GHI JKL MNO PQRS TUV WXYZ 0-9 E-mail Folder 2/3 Group Search(Name) Search (No .) Detail Status Cancel OK 10/10/2007...
... - One-touch Key Register a one-touch key . 001 002 003 004 005 No . AAA BBB CCC Register /Edit 006 007 008 009 010 Delete 011 012 013 014 015 001/005 016 017 018 019 020 Status Detail Close 10/10/2007 10:10 2 Press [Yes] on the screen to add ... System Menu 2 Select a new destination (individual or group). Refer to the Operation Guide for Address List. 3 Press [OK]. 4 Press [Yes] on the screen to the One-touch Key. com ABC DEF GHI JKL MNO PQRS TUV WXYZ 0-9 E-mail Folder 2/3 Group Search(Name) Search (No .) Detail Status Cancel OK 10/10/2007...
2560/3060 Operation Guide (Advanced Edition)
Page 260
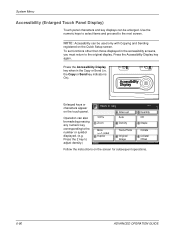
....) Ready to the number or symbol displayed. (e.g. Operation can be used only with Copying and Sending registered on the Quick Setup screen. Press the Accessibility Display key again. Use the numeric keys to select items and proceed to the original display. Press the Accessibility... Display key when in the accessibility screens, you must return to the next screen. the Copy or Send key indicator is On). NOTE: Accessibility can also be enlarged. System Menu Accessibility (Enlarged Touch Panel Display) Touch panel characters and key displays can be made by...
....) Ready to the number or symbol displayed. (e.g. Operation can be used only with Copying and Sending registered on the Quick Setup screen. Press the Accessibility Display key again. Use the numeric keys to select items and proceed to the original display. Press the Accessibility... Display key when in the accessibility screens, you must return to the next screen. the Copy or Send key indicator is On). NOTE: Accessibility can also be enlarged. System Menu Accessibility (Enlarged Touch Panel Display) Touch panel characters and key displays can be made by...
2560/3060 Operation Guide (Advanced Edition)
Page 288
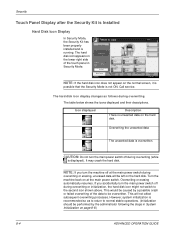
...Paper : - - - Overwriting or erasing automatically resumes. However, system initialization is recommended so as follows during overwriting (while is running. Security Touch Panel Display after the Security Kit is Installed Hard Disk Icon Display In Security Mode, the Security Kit has been properly installed and is displayed...: If the hard disk icon does not appear on the hard disk. Icon displayed Description There is unwanted data on the normal screen, it is possible that the Security Mode is overwritten. Call service. CAUTION: Do not turn the main power switch off during...
...Paper : - - - Overwriting or erasing automatically resumes. However, system initialization is recommended so as follows during overwriting (while is running. Security Touch Panel Display after the Security Kit is Installed Hard Disk Icon Display In Security Mode, the Security Kit has been properly installed and is displayed...: If the hard disk icon does not appear on the hard disk. Icon displayed Description There is unwanted data on the normal screen, it is possible that the Security Mode is overwritten. Call service. CAUTION: Do not turn the main power switch off during...
2560/3060 Operation Guide (Advanced Edition)
Page 310
...Scan Resolution 6-23 Zoom 6-26 Default Gateway Appendix-10 Default Screen 6-3 Density Adjustment Copy 1-43 Send 2-21 Index-2 Destination 6-78 Adding 6-78 Adding a Group 6-82 Adding an individual 6-78 Editing 6-83 One-touch Key 6-84 Device 5-17 Canceling FAX Communication 5-19 Checking ...Status 5-17 Configuring 5-18 Displaying Screen 5-17 Partition List 5-19 USB Memory 5-18 Document Box 4-1 Basic Operation 4-5 Custom Box 4-2, 4-5...
...Scan Resolution 6-23 Zoom 6-26 Default Gateway Appendix-10 Default Screen 6-3 Density Adjustment Copy 1-43 Send 2-21 Index-2 Destination 6-78 Adding 6-78 Adding a Group 6-82 Adding an individual 6-78 Editing 6-83 One-touch Key 6-84 Device 5-17 Canceling FAX Communication 5-19 Checking ...Status 5-17 Configuring 5-18 Displaying Screen 5-17 Partition List 5-19 USB Memory 5-18 Document Box 4-1 Basic Operation 4-5 Custom Box 4-2, 4-5...
2560/3060 Operation Guide (Advanced Edition)
Page 311
...5-14 Checking History 5-10 Checking Status 5-2 Detailed Information 5-7 Detailed Information of Histories 5-11 Details of the Status Screens 5-3 Displaying History Screen 5-10 Displaying Status Screens 5-2 Pause and Resumption 5-13 Reordering 5-15 Job Accounting 7-11 Managing the Copy/Print Counts 7-15 Restricting the ... Setup 6-56 Network Setup Apple Talk 6-58 NetWare 6-57 TCP/IP Setup (Equipped with DHCP Server) 6-57 O One-touch Key Changing the Registered Information 6-85 Deleting the Registered Information 6-86 Editing 6-85 Orientation Confirmation 6-36 Original Orientation 1-11 Document...
...5-14 Checking History 5-10 Checking Status 5-2 Detailed Information 5-7 Detailed Information of Histories 5-11 Details of the Status Screens 5-3 Displaying History Screen 5-10 Displaying Status Screens 5-2 Pause and Resumption 5-13 Reordering 5-15 Job Accounting 7-11 Managing the Copy/Print Counts 7-15 Restricting the ... Setup 6-56 Network Setup Apple Talk 6-58 NetWare 6-57 TCP/IP Setup (Equipped with DHCP Server) 6-57 O One-touch Key Changing the Registered Information 6-85 Deleting the Registered Information 6-86 Editing 6-85 Orientation Confirmation 6-36 Original Orientation 1-11 Document...
2560/3060 Operation Guide (Basic Edition)
Page 4
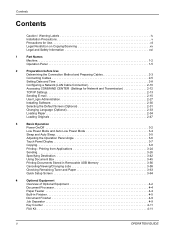
...Printing Documents Stored in Removable USB Memory 3-56 Canceling/Viewing/Changing Jobs 3-58 Checking Remaining Toner and Paper 3-63 Quick Setup Screen 3-64 4 Optional Equipment Overview of Optional Equipment 4-2 Document Processor 4-4 Paper Feeder 4-4 Built-in Finisher 4-5 Document Finisher 4-9 ... 2-12 TCP/IP Settings 2-13 Sending E-mail 2-15 User Login Administration 2-27 Installing Software 2-30 Selecting the Default Screen (Optional 2-31 Changing Language (Optional 2-33 Loading Paper 2-34 Loading Originals 2-47 3 Basic Operation Power On/Off ...
...Printing Documents Stored in Removable USB Memory 3-56 Canceling/Viewing/Changing Jobs 3-58 Checking Remaining Toner and Paper 3-63 Quick Setup Screen 3-64 4 Optional Equipment Overview of Optional Equipment 4-2 Document Processor 4-4 Paper Feeder 4-4 Built-in Finisher 4-5 Document Finisher 4-9 ... 2-12 TCP/IP Settings 2-13 Sending E-mail 2-15 User Login Administration 2-27 Installing Software 2-30 Selecting the Default Screen (Optional 2-31 Changing Language (Optional 2-33 Loading Paper 2-34 Loading Originals 2-47 3 Basic Operation Power On/Off ...
2560/3060 Operation Guide (Basic Edition)
Page 27
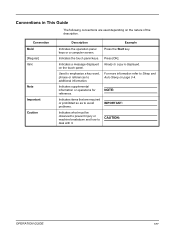
... or machine breakdown and how to deal with it. Press the Start key. on the nature of the description. Indicates the touch panel keys. Used to emphasize a key word, phrase or references to copy is displayed. CAUTION: OPERATION GUIDE xxv Press [OK... or operations for reference. NOTE: Indicates items that are used depending on the touch panel. Convention Bold [Regular] Italic Note Important Caution Description Example Indicates the operation panel keys or a computer screen. Indicates a message displayed Ready to additional information. For more information refer to...
... or machine breakdown and how to deal with it. Press the Start key. on the nature of the description. Indicates the touch panel keys. Used to emphasize a key word, phrase or references to copy is displayed. CAUTION: OPERATION GUIDE xxv Press [OK... or operations for reference. NOTE: Indicates items that are used depending on the touch panel. Convention Bold [Regular] Italic Note Important Caution Description Example Indicates the operation panel keys or a computer screen. Indicates a message displayed Ready to additional information. For more information refer to...
2560/3060 Operation Guide (Basic Edition)
Page 67
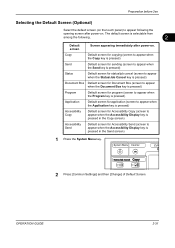
... Selecting the Default Screen (Optional) Select the default screen (on the touch panel) to appear following . 2 Default screen Screen appearing immediately after power-on . OPERATION GUIDE 2-31 The default screen is pressed in the Copy screen) Accessibility Send Default screen for Accessibility Send (screen to appear when the Accessibility Display key is pressed in the Send screen) 1 Press the System...
... Selecting the Default Screen (Optional) Select the default screen (on the touch panel) to appear following . 2 Default screen Screen appearing immediately after power-on . OPERATION GUIDE 2-31 The default screen is pressed in the Copy screen) Accessibility Send Default screen for Accessibility Send (screen to appear when the Accessibility Display key is pressed in the Send screen) 1 Press the System...
2560/3060 Operation Guide (Basic Edition)
Page 89
... • Printing Documents Stored in Removable USB Memory .... 3-56 • Canceling/Viewing/Changing Jobs 3-58 • Checking Remaining Toner and Paper 3-63 • Quick Setup Screen 3-64 OPERATION GUIDE 3-1 3 Basic Operation This chapter explains the following operations. • Power On/Off 3-2 • Low Power Mode and Auto Low Power Mode 3-4 •...
... • Printing Documents Stored in Removable USB Memory .... 3-56 • Canceling/Viewing/Changing Jobs 3-58 • Checking Remaining Toner and Paper 3-63 • Quick Setup Screen 3-64 OPERATION GUIDE 3-1 3 Basic Operation This chapter explains the following operations. • Power On/Off 3-2 • Low Power Mode and Auto Low Power Mode 3-4 •...

2560/3060 Operation Guide (Basic Edition)
Page 95
...Offset Quick Setup Status Org./ Paper / Finishing Image Quality Layout /Edit Advanced Setup 10/10/2007 10:10 Display when the Screen Changes The stand-by Display When System Menu Operation Is Completed When the system menu operation is completed and another function (such ... Quality Negative Image Priority Override Layout /Edit Copies 1 Mirror Image Advanced Setup 10/10/2007 10:10 Stand-by display (icon) may appear when the touch panel screen changes. Zoom : 100% Send : - - - Copy Image Set Original. Ready to copy. Zoom : 100% Paper : - - - Please wait. Preview ...
...Offset Quick Setup Status Org./ Paper / Finishing Image Quality Layout /Edit Advanced Setup 10/10/2007 10:10 Display when the Screen Changes The stand-by Display When System Menu Operation Is Completed When the system menu operation is completed and another function (such ... Quality Negative Image Priority Override Layout /Edit Copies 1 Mirror Image Advanced Setup 10/10/2007 10:10 Stand-by display (icon) may appear when the touch panel screen changes. Zoom : 100% Send : - - - Copy Image Set Original. Ready to copy. Zoom : 100% Paper : - - - Please wait. Preview ...
2560/3060 Operation Guide (Basic Edition)
Page 109
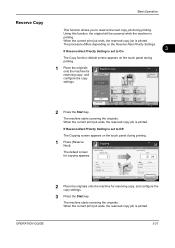
... - - Copying... The procedure differs depending on the touch panel during printing. 1 Place the originals onto the machine for reserving copy, and configure the copy settings. If Reserve Next Priority Setting is set to On 3 The Copy function default screen appears on the Reserve Next Priority Settings. Zoom : 100...Setup 10/10/2007 10:10 2 Press the Start key. If Reserve Next Priority Setting is set to Off The Copying screen appears on the touch panel during printing. When the current print job ends, the reserved copy job is printed. When the current print job ...
... - - Copying... The procedure differs depending on the touch panel during printing. 1 Place the originals onto the machine for reserving copy, and configure the copy settings. If Reserve Next Priority Setting is set to On 3 The Copy function default screen appears on the Reserve Next Priority Settings. Zoom : 100...Setup 10/10/2007 10:10 2 Press the Start key. If Reserve Next Priority Setting is set to Off The Copying screen appears on the touch panel during printing. When the current print job ends, the reserved copy job is printed. When the current print job ...


