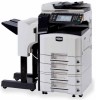
KM 2560 Drum - Kyocera
KM 2560 Drum
Related Manual Pages
Similar Questions

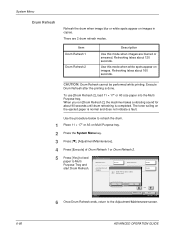
Drum Resetting
step by step way of doing kyocera 2050 drum reset
step by step way of doing kyocera 2050 drum reset
(Posted by vivianjude070 2 years ago)

How To Know If Drum Needs Replaced?
My Kyocera 1820 prints black lines/smidges copies. Tried replacing toner. Drum?
My Kyocera 1820 prints black lines/smidges copies. Tried replacing toner. Drum?
(Posted by brupe 9 years ago)

How To Replace Km1500 Drum
i need to replace my km 1500 drum but i dont know the procedures
i need to replace my km 1500 drum but i dont know the procedures
(Posted by arnoldbutchdiopenes 11 years ago)
Related Terms
The following terms were also used when searching for KM 2560 Drum - Kyocera:- kyocera km 2560
- kyocera km-2560
- kyocera km2560
- km 2560 driver
- kyocera km 2560 driver
- kyocera km 2560 kx
- km 2560 drivers
- kyocera mita km2560
- km 2560 kx
- km-2560 kx
- kyocera km-2560 kx
- km 2560 kyocera
- km 2560 manual
- km 2560 toner
- km-2560 manual
- kyocera km 2560 scanner
- km-2560 brochure
- km-2560 driver
- kyocera km 2560 kx driver
- km 2560 kx driver
- km 2560 price
- km 2560 printer
- km 2560 review
- km 2560 scan
- km-2560 toner
- km2560 toner
- kyocera km 2560 fax
- kyocera km 2560 review
- kyocera km 2560 toner
- kyocera km 2560 user manual
- kyocera km-2560 manual
- km 2560 copier
- km 2560 driver download
- km 2560 drum unit
- km 2560 fax
- km 2560 scanner
- km 2560 service manual
- km-2560 price
- kyocera km-2560 driver
- download driver km 2560
- download driver kyocera km 2560
- km 2560
- km 2560 admin password
- km 2560 advanced operation guide
- km 2560 brochure
- km 2560 brochure pdf
- km 2560 buy
- km 2560 can't send fax
- km 2560 cartridge
- km 2560 cfb30
- km 2560 command center
- km 2560 copier price
- km 2560 cost
- km 2560 default password
- km 2560 driver for mac
- km 2560 driver for windows 8
- km 2560 driver mac
- km 2560 driver windows 10 download
- km 2560 driver windows 8
- km 2560 drivers download
- km 2560 drum
- km 2560 error 1102
- km 2560 error 3101
- km 2560 error code 2101
- km 2560 error codes
- km 2560 fax card
- km 2560 fax confirmation page
- km 2560 fax driver
- km 2560 fax system
- km 2560 firmware
- km 2560 for sale
- km 2560 fuser
- km 2560 kyocera driver
- km 2560 kyocera manual
- km 2560 mac driver
- km 2560 machine
- km 2560 maintenance kit
- km 2560 parts
- km 2560 password
- km 2560 pdf
- km 2560 photocopier
- km 2560 picture
- km 2560 printer driver
- km 2560 printer drivers
- km 2560 problems
- km 2560 reset
- km 2560 reviews
- km 2560 sale
- km 2560 says cassette 1 out of paper
- km 2560 scan to email
- km 2560 scan to folder
- km 2560 scan to folder windows 7
- km 2560 scan to usb
- km 2560 scanner driver
- km 2560 scanner setup
- km 2560 software
- km 2560 spec sheet
- km 2560 specifications
- km 2560 staples
- km 2560 supplies
- km 2560 toner cartridges
- km 2560 touch screen
- km 2560 ui screen
- km 2560 und fax
- km 2560 us brochure
- km 2560 user manual
- km 2560 user name
- km 2560 windows 10 driver
- km-2560
- km-2560 active directory
- km-2560 copier
- km-2560 default admin password
- km-2560 default login
- km-2560 default password
- km-2560 downloads
- km-2560 driver download
- km-2560 driver for windows 7
- km-2560 driver mac os
- km-2560 driver windows 10
- km-2560 driver windows 7
- km-2560 driver windows xp
- km-2560 drivers
- km-2560 drivers download
- km-2560 drum unit
- km-2560 error 1102
- km-2560 error 2101
- km-2560 error c6000
- km-2560 error codes
- km-2560 factory reset
- km-2560 fax card
- km-2560 fax driver
- km-2560 firmware
- km-2560 firmware update
- km-2560 for sale
- km-2560 kx driver
- km-2560 kx driver download
- km-2560 kx drivers
- km-2560 kyocera
- km-2560 kyocera driver
- km-2560 line across page
- km-2560 mac driver
- km-2560 maintenance kit
- km-2560 maintenance kit replacement guide
- km-2560 network setup
- km-2560 photocopier
- km-2560 ppd
- km-2560 printer driver
- km-2560 printer drivers
- km-2560 reset password
- km-2560 review
- km-2560 reviews
- km-2560 scan to folder
- km-2560 scanner driver
- km-2560 scanner drivers
- km-2560 scanner setup
- km-2560 scanning
- km-2560 service manual
- km-2560 software
- km-2560 spec sheet
- km-2560 specifications
- km-2560 toner cartridges
- km-2560 troubleshooting
- km-2560 user guide
- km-2560 user manual
- km-2560 wireless
- km2560
- km2560 cfb30
- km2560 driver
- km2560 drivers
- km2560 hdd location
- km2560 kyocera
- km2560 manual
- km2560 prices
- km2560 printer
- km2560 staple cartridge
- km2560 support
- kyocera copier km2560
- kyocera km 2560 admin password
- kyocera km 2560 advanced operation guide
- kyocera km 2560 brochure
- kyocera km 2560 brochure pdf
- kyocera km 2560 buy
- kyocera km 2560 command center
- kyocera km 2560 copier
- kyocera km 2560 copier price
- kyocera km 2560 cost
- kyocera km 2560 default password
- kyocera km 2560 driver download
- kyocera km 2560 driver for windows 8
- kyocera km 2560 driver mac
- kyocera km 2560 driver windows 10 download
- kyocera km 2560 driver windows 8
- kyocera km 2560 drivers
- kyocera km 2560 drum
- kyocera km 2560 drum unit
- kyocera km 2560 error 1102
- kyocera km 2560 error 3101
- kyocera km 2560 error code 2101
- kyocera km 2560 error codes
- kyocera km 2560 fax confirmation page
- kyocera km 2560 fuser
- kyocera km 2560 maintenance kit
- kyocera km 2560 manual
- kyocera km 2560 parts
- kyocera km 2560 photocopier
- kyocera km 2560 price
- kyocera km 2560 printer driver
- kyocera km 2560 printer drivers
- kyocera km 2560 problems
- kyocera km 2560 reviews
- kyocera km 2560 sale
- kyocera km 2560 says cassette 1 out of paper
- kyocera km 2560 scan to email
- kyocera km 2560 scan to usb
- kyocera km 2560 scanner driver
- kyocera km 2560 scanner setup
- kyocera km 2560 service manual
- kyocera km 2560 specifications
- kyocera km 2560 toner cartridges
- kyocera km 2560 ui screen
- kyocera km 2560 us brochure
- kyocera km 2560 user name
- kyocera km 2560 windows 10 driver
- kyocera km-2560 brochure
- kyocera km-2560 copier
- kyocera km-2560 default admin password
- kyocera km-2560 default login
- kyocera km-2560 default password
- kyocera km-2560 driver download
- kyocera km-2560 driver mac os
- kyocera km-2560 driver windows 7
- kyocera km-2560 driver windows xp
- kyocera km-2560 drivers
- kyocera km-2560 drivers download
- kyocera km-2560 error 1102
- kyocera km-2560 error 2101
- kyocera km-2560 error c6000
- kyocera km-2560 error codes
- kyocera km-2560 factory reset
- kyocera km-2560 fax driver
- kyocera km-2560 firmware update
- kyocera km-2560 for sale
- kyocera km-2560 kx driver
- kyocera km-2560 kx driver download
- kyocera km-2560 kx drivers
- kyocera km-2560 line across page
- kyocera km-2560 mac driver
- kyocera km-2560 photocopier
- kyocera km-2560 price
- kyocera km-2560 printer driver
- kyocera km-2560 printer drivers
- kyocera km-2560 reviews
- kyocera km-2560 scan to folder
- kyocera km-2560 scanner driver
- kyocera km-2560 scanner setup
- kyocera km-2560 service manual
- kyocera km-2560 software
- kyocera km-2560 specifications
- kyocera km-2560 toner
- kyocera km-2560 toner cartridges
- kyocera km-2560 troubleshooting
- kyocera km-2560 user guide
- kyocera km2560 copier
- kyocera km2560 driver
- kyocera km2560 drum
- kyocera km2560 manual
- kyocera km2560 toner
- toner for km 2560
- toner for kyocera km 2560