Installation Manual
Page 1
LVT2199-005A (KN/RN) DDX418 DDX4048BT DDX318 DDX3048 MONITOR WITH DVD RECEIVER INSTALLATION MANUAL MONITEUR AVEC RÉCEPTEUR DVD MANUEL D'INSTALLATION MONITOR CON RECEPTOR DVD MANUAL DE INSTALACIÓN © 2010 Kenwood Corporation All Rights Reserved.
LVT2199-005A (KN/RN) DDX418 DDX4048BT DDX318 DDX3048 MONITOR WITH DVD RECEIVER INSTALLATION MANUAL MONITEUR AVEC RÉCEPTEUR DVD MANUEL D'INSTALLATION MONITOR CON RECEPTOR DVD MANUAL DE INSTALACIÓN © 2010 Kenwood Corporation All Rights Reserved.
Installation Manual
Page 2
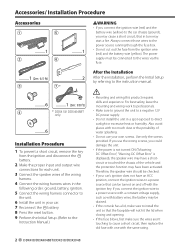
...harness. 4 Connect the wiring harness wires in the following order: ground, battery, ignition. 5 Connect the wiring harness connector to the unit. 6 Install the unit in turn may start a fire. Always connect those wires to direct sunlight or excessive heat or humidity. Use only the screws provided. ... make sure the wires aren't touching to cause a short circuit, then replace the old fuse with one with the same rating. 2 DDX418/DDX4048BT/DDX318/DDX3048 If you use your car. 7 Reconnect the - If you connect the ignition wire to a power source with a constant voltage supply, such...
...harness. 4 Connect the wiring harness wires in the following order: ground, battery, ignition. 5 Connect the wiring harness connector to the unit. 6 Install the unit in turn may start a fire. Always connect those wires to direct sunlight or excessive heat or humidity. Use only the screws provided. ... make sure the wires aren't touching to cause a short circuit, then replace the old fuse with one with the same rating. 2 DDX418/DDX4048BT/DDX318/DDX3048 If you use your car. 7 Reconnect the - If you connect the ignition wire to a power source with a constant voltage supply, such...
Installation Manual
Page 3
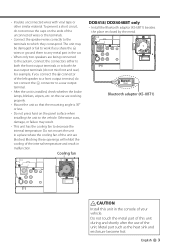
... connectors either to both the front output terminals or to both the rear output terminals (do not remove the caps on the panel surface when installing the unit to which they correspond. Do not touch the metal part of this unit in the car. • When only two speakers are ... 30° or less. • Do not press hard on the ends of the left speaker to a rear output terminal. • After the unit is installed, check whether the brake lamps, blinkers, wipers, etc. • Insulate unconnected wires with vinyl tape or other similar material. Bluetooth adaptor (KS-UBT1) ¤ ...
... connectors either to both the front output terminals or to both the rear output terminals (do not remove the caps on the panel surface when installing the unit to which they correspond. Do not touch the metal part of this unit in the car. • When only two speakers are ... 30° or less. • Do not press hard on the ends of the left speaker to a rear output terminal. • After the unit is installed, check whether the brake lamps, blinkers, wipers, etc. • Insulate unconnected wires with vinyl tape or other similar material. Bluetooth adaptor (KS-UBT1) ¤ ...
Installation Manual
Page 6
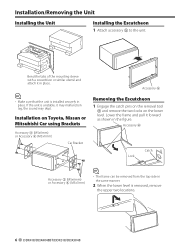
...frame can be removed from the top side in place. Installation/Removing the Unit Installing the Unit Installing the Escutcheon 1 Attach accessory 5 to the unit. If the unit is removed, remove the upper two locations. 6 DDX418/DDX4048BT/DDX318/DDX3048 Bend the tabs of the mounting sleeve with a screwdriver... or similar utensil and attach it in place. ⁄ • Make sure that the unit is installed securely in the same manner. 2 When the lower...
...frame can be removed from the top side in place. Installation/Removing the Unit Installing the Unit Installing the Escutcheon 1 Attach accessory 5 to the unit. If the unit is removed, remove the upper two locations. 6 DDX418/DDX4048BT/DDX318/DDX3048 Bend the tabs of the mounting sleeve with a screwdriver... or similar utensil and attach it in place. ⁄ • Make sure that the unit is installed securely in the same manner. 2 When the lower...
Installation Manual
Page 7
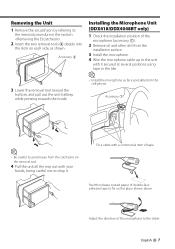
...shown above. Accessory 7 ⁄ • Be careful to avoid injury from the catch pins on each side, as possible from the installation surface. 3 Install the microphone. 4 Wire the microphone cable up to the driver. English 7 Accessory 6 3 Lower the removal tool toward the bottom, and.... Adjust the direction of the microphone (accessory 7). 2 Remove oil and other dirt from the cell-phone. Installing the Microphone Unit (DDX418/DDX4048BT only) 1 Check the installation position of the microphone to the unit with your hands, being careful not to the removal procedure in the...
...shown above. Accessory 7 ⁄ • Be careful to avoid injury from the catch pins on each side, as possible from the installation surface. 3 Install the microphone. 4 Wire the microphone cable up to the driver. English 7 Accessory 6 3 Lower the removal tool toward the bottom, and.... Adjust the direction of the microphone (accessory 7). 2 Remove oil and other dirt from the cell-phone. Installing the Microphone Unit (DDX418/DDX4048BT only) 1 Check the installation position of the microphone to the unit with your hands, being careful not to the removal procedure in the...


