
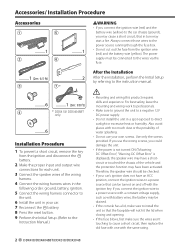
Installation Manual
Page 2
...wire connections for each unit. 3 Connect the speaker wires of the wiring harness. 4 Connect the wiring harness wires in the following order: ground, battery, ignition. 5 Connect the wiring... the ignition wires to a power source that can be connected to the wires via the fuse...circuit, remove the key from the ignition wire (red) and the battery wire (yellow). If you could damage the...wire to a power source with a constant voltage supply, such as with battery wires...sure the wires aren't ...wiring this ...wiring ...you connect the ignition wire (red) and the battery wire (yellow) to ...wire should be ...
...wire connections for each unit. 3 Connect the speaker wires of the wiring harness. 4 Connect the wiring harness wires in the following order: ground, battery, ignition. 5 Connect the wiring... the ignition wires to a power source that can be connected to the wires via the fuse...circuit, remove the key from the ignition wire (red) and the battery wire (yellow). If you could damage the...wire to a power source with a constant voltage supply, such as with battery wires...sure the wires aren't ...wiring this ...wiring ...you connect the ignition wire (red) and the battery wire (yellow) to ...wire should be ...
Installation Manual
Page 3
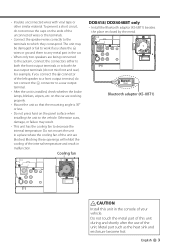
... temperature. Otherwise scars, damage, or failure may be damaged or fail to work if you connect the + connector of the unconnected wires or the terminals. • Connect the speaker wires correctly to the terminals to the vehicle. Blocking these openings will inhibit the cooling of the unit. connector to a rear output terminal... the car. • When only two speakers are blocked. To prevent a short circuit, do not mix front and rear). For example, if you share the wires or ground them to any metal part in a place where the cooling fan of your vehicle. English 3
... temperature. Otherwise scars, damage, or failure may be damaged or fail to work if you connect the + connector of the unconnected wires or the terminals. • Connect the speaker wires correctly to the terminals to the vehicle. Blocking these openings will inhibit the cooling of the unit. connector to a rear output terminal... the car. • When only two speakers are blocked. To prevent a short circuit, do not mix front and rear). For example, if you share the wires or ground them to any metal part in a place where the cooling fan of your vehicle. English 3
Installation Manual
Page 4
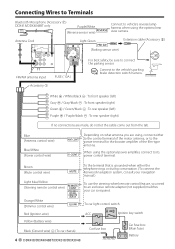
... - : To rear speaker (right) If no connections are using, connect either the telephone rings or during conversation. (To connect the Kenwood navigation system, consult your navigation manual.) To use the steering wheel remote control feature, you need to an exclusive remote adapter (not supplied..., connect to its power control terminal. Orange/White (Dimmer control wire) To car light control switch Red (Ignition wire) ACC Ignition key switch Yellow (Battery wire) Black (Ground wire) - (To car chassis) 4 DDX418/DDX4048BT/DDX318/DDX3048 Car fuse box Car fuse box (Main fuse) Battery
... - : To rear speaker (right) If no connections are using, connect either the telephone rings or during conversation. (To connect the Kenwood navigation system, consult your navigation manual.) To use the steering wheel remote control feature, you need to an exclusive remote adapter (not supplied..., connect to its power control terminal. Orange/White (Dimmer control wire) To car light control switch Red (Ignition wire) ACC Ignition key switch Yellow (Battery wire) Black (Ground wire) - (To car chassis) 4 DDX418/DDX4048BT/DDX318/DDX3048 Car fuse box Car fuse box (Main fuse) Battery
Installation Manual
Page 7
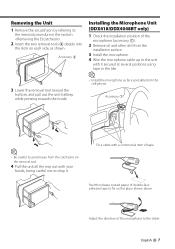
Fix a cable with a commercial item of the microphone (accessory 7). 2 Remove oil and other dirt from the installation surface. 3 Install the microphone. 4 Wire the microphone cable up to the unit with your hands, being careful not to drop it secured at several positions using tape or the like. &#...
Fix a cable with a commercial item of the microphone (accessory 7). 2 Remove oil and other dirt from the installation surface. 3 Install the microphone. 4 Wire the microphone cable up to the unit with your hands, being careful not to drop it secured at several positions using tape or the like. &#...


