Installation Manual
Page 1
LVT2199-005A (KN/RN) DDX418 DDX4048BT DDX318 DDX3048 MONITOR WITH DVD RECEIVER INSTALLATION MANUAL MONITEUR AVEC RÉCEPTEUR DVD MANUEL D'INSTALLATION MONITOR CON RECEPTOR DVD MANUAL DE INSTALACIÓN © 2010 Kenwood Corporation All Rights Reserved.
LVT2199-005A (KN/RN) DDX418 DDX4048BT DDX318 DDX3048 MONITOR WITH DVD RECEIVER INSTALLATION MANUAL MONITEUR AVEC RÉCEPTEUR DVD MANUEL D'INSTALLATION MONITOR CON RECEPTOR DVD MANUAL DE INSTALACIÓN © 2010 Kenwood Corporation All Rights Reserved.
Installation Manual
Page 2
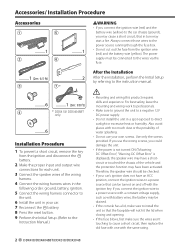
.../DDX4048BT/DDX318/DDX3048 battery. 8 Press the reset button. 9 Perform the Initial Setup. (Refer to the Instruction Manual.) After the Installation After the installation, perform the Initial Setup by referring to the power source running through the fuse box. • Do not cut out the fuse from the ignition and disconnect the battery. 2 Make the proper input and output wire connections for each unit. 3 Connect the speaker wires of the vehicle and the protection function may have...
.../DDX4048BT/DDX318/DDX3048 battery. 8 Press the reset button. 9 Perform the Initial Setup. (Refer to the Instruction Manual.) After the Installation After the installation, perform the Initial Setup by referring to the power source running through the fuse box. • Do not cut out the fuse from the ignition and disconnect the battery. 2 Make the proper input and output wire connections for each unit. 3 Connect the speaker wires of the vehicle and the protection function may have...
Installation Manual
Page 3
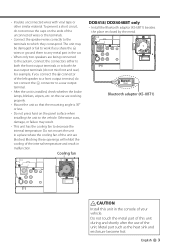
... part in the car. • When only two speakers are blocked. English 3 on the car are working properly. • Mount the unit so that the mounting angle is installed, check whether the brake lamps, blinkers, wipers, etc. Cooling fan DDX418/ DDX4048BT only • Install the Bluetooth adaptor (KS-UBT1) besides the place enclosed by the metal. connector to a rear output terminal. • After the unit...
... part in the car. • When only two speakers are blocked. English 3 on the car are working properly. • Mount the unit so that the mounting angle is installed, check whether the brake lamps, blinkers, wipers, etc. Cooling fan DDX418/ DDX4048BT only • Install the Bluetooth adaptor (KS-UBT1) besides the place enclosed by the metal. connector to a rear output terminal. • After the unit...
Installation Manual
Page 4
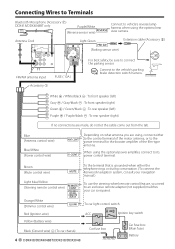
.... When using the optional rear view camera. Brown (Mute control wire) Light blue/Yellow (Steering remote control wire) To the terminal that is required. Blue (Antenna control wire) Blue/White (Power control wire) Depending on what antenna you need to the vehicle's parking brake detection switch harness. Orange/White (Dimmer control wire) To car light control switch Red (Ignition wire) ACC Ignition key switch Yellow (Battery wire) Black (Ground wire) - (To car chassis) 4 DDX418/DDX4048BT/DDX318/DDX3048 Car fuse box Car fuse box (Main fuse) Battery Extension cable...
.... When using the optional rear view camera. Brown (Mute control wire) Light blue/Yellow (Steering remote control wire) To the terminal that is required. Blue (Antenna control wire) Blue/White (Power control wire) Depending on what antenna you need to the vehicle's parking brake detection switch harness. Orange/White (Dimmer control wire) To car light control switch Red (Ignition wire) ACC Ignition key switch Yellow (Battery wire) Black (Ground wire) - (To car chassis) 4 DDX418/DDX4048BT/DDX318/DDX3048 Car fuse box Car fuse box (Main fuse) Battery Extension cable...
Installation Manual
Page 5
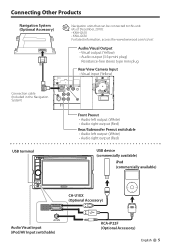
Audio/Visual Output • Visual output (Yellow) • Audio output (3.5φ mini plug) Resistance-free stereo type mini plug Rear View Camera Input • Visual input (Yellow) Connection cable (Included in the Navigation System) USB terminal Front Preout • Audio left output (White) • Audio right output (Red) Rear/Subwoofer Preout switchable • Audio left output (White) • Audio right output (Red) USB device (commercially available) iPod (commercially available) CA-U1EX (Optional Accessory) Audio Visual input (iPod/AV Input switchable) KCA-iP22F (Optional ...
Audio/Visual Output • Visual output (Yellow) • Audio output (3.5φ mini plug) Resistance-free stereo type mini plug Rear View Camera Input • Visual input (Yellow) Connection cable (Included in the Navigation System) USB terminal Front Preout • Audio left output (White) • Audio right output (Red) Rear/Subwoofer Preout switchable • Audio left output (White) • Audio right output (Red) USB device (commercially available) iPod (commercially available) CA-U1EX (Optional Accessory) Audio Visual input (iPod/AV Input switchable) KCA-iP22F (Optional ...
Installation Manual
Page 6
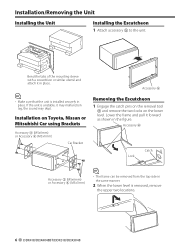
... side in the figure. Installation on Toyota, Nissan or Mitsubishi Car using Brackets Accessory 3 (M5x6mm) or Accessory 4 (M5x7mm) Car Bracket Accessory 5 Removing the Escutcheon 1 Engage the catch pins on the removal tool 6 and remove the two locks on the lower level. If the unit is removed, remove the upper two locations. 6 DDX418/DDX4048BT/DDX318/DDX3048 Bend the tabs of the mounting sleeve with a screwdriver or...
... side in the figure. Installation on Toyota, Nissan or Mitsubishi Car using Brackets Accessory 3 (M5x6mm) or Accessory 4 (M5x7mm) Car Bracket Accessory 5 Removing the Escutcheon 1 Engage the catch pins on the removal tool 6 and remove the two locks on the lower level. If the unit is removed, remove the upper two locations. 6 DDX418/DDX4048BT/DDX318/DDX3048 Bend the tabs of the mounting sleeve with a screwdriver or...
Installation Manual
Page 7
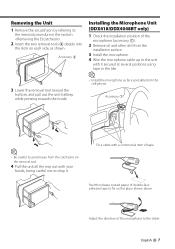
Adjust the direction of double-face adhesive tape to fix on the removal tool. 4 Pull the unit all the way out with a commercial item of tape. Fix a cable with your hands, being careful not to drop it secured at several positions using tape or the like. ⁄ • Install the microphone as far as shown. Peel the release coated...
Adjust the direction of double-face adhesive tape to fix on the removal tool. 4 Pull the unit all the way out with a commercial item of tape. Fix a cable with your hands, being careful not to drop it secured at several positions using tape or the like. ⁄ • Install the microphone as far as shown. Peel the release coated...


