Software Guide
Page 2
... in the Program are owned by Victor Company of Japan, Limited ("JVC") to You only on a HDD or other storage devices incorporated in Your PC. (2) You may make one (1) copy of such defective media. JVC's entire liability and your personal backup or archival purposes. 3 RESTRICTION... Users JVC SOFTWARE LICENSE AGREEMENT IMPORTANT TO CUSTOMERS: PLEASE MAKE SURE TO READ THIS CAREFULLY BEFORE INSTALLING OR USING THE SOFTWARE PROGRAM NAMED "DIGITAL PHOTO NAVIGATOR" ("Program") ON YOUR PC. Should You not agree to the terms hereof, You may not distribute, rent, lease or transfer the Program to use...
... in the Program are owned by Victor Company of Japan, Limited ("JVC") to You only on a HDD or other storage devices incorporated in Your PC. (2) You may make one (1) copy of such defective media. JVC's entire liability and your personal backup or archival purposes. 3 RESTRICTION... Users JVC SOFTWARE LICENSE AGREEMENT IMPORTANT TO CUSTOMERS: PLEASE MAKE SURE TO READ THIS CAREFULLY BEFORE INSTALLING OR USING THE SOFTWARE PROGRAM NAMED "DIGITAL PHOTO NAVIGATOR" ("Program") ON YOUR PC. Should You not agree to the terms hereof, You may not distribute, rent, lease or transfer the Program to use...
Software Guide
Page 3
... any memory in this manual. How to handle a CD-ROM Take care not to soil or scratch the mirror surface (opposite to modify this Agreement. Do not use conventional disc cleaners or cleaning spray. In this event, JVC may claim against You for any countries to which may terminate this software. jvc-victor.co.jp/english/global-e.html 3 Never use any...
... any memory in this manual. How to handle a CD-ROM Take care not to soil or scratch the mirror surface (opposite to modify this Agreement. Do not use conventional disc cleaners or cleaning spray. In this event, JVC may claim against You for any countries to which may terminate this software. jvc-victor.co.jp/english/global-e.html 3 Never use any...
Software Guide
Page 4
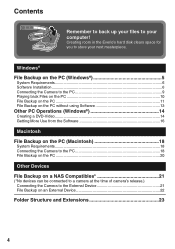
Windows® File Backup on the PC (Windows 5 System Requirements...6 Software Installation...6 Connecting the Camera to the PC 9 Playing back Files on the PC 10 File Backup on the PC 11 File Backup on the PC without using Software 13 Other PC Operations (Windows 14 Creating a DVD-Video 14 Getting More Use from the Software 16 Macintosh File Backup on the PC (Macintosh 18 System Requirements 18 Connecting the Camera to the PC...
Windows® File Backup on the PC (Windows 5 System Requirements...6 Software Installation...6 Connecting the Camera to the PC 9 Playing back Files on the PC 10 File Backup on the PC 11 File Backup on the PC without using Software 13 Other PC Operations (Windows 14 Creating a DVD-Video 14 Getting More Use from the Software 16 Macintosh File Backup on the PC (Macintosh 18 System Requirements 18 Connecting the Camera to the PC...
Software Guide
Page 5
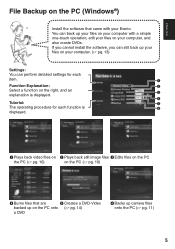
... install the software, you can still back up your files on your computer. (੬ pg. 13) Settings: You can back up your files on your computer with your files on the right, and an explanation is F displayed. C D Tutorial: E The operating procedure for each function is displayed. ENGLISH Windows® File Backup on the PC onto (੬ pg. 14) a DVD...
... install the software, you can still back up your files on your computer. (੬ pg. 13) Settings: You can back up your files on your computer with your files on the right, and an explanation is F displayed. C D Tutorial: E The operating procedure for each function is displayed. ENGLISH Windows® File Backup on the PC onto (੬ pg. 14) a DVD...
Software Guide
Page 6
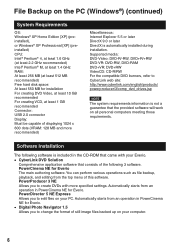
...) Free hard disk space: At least 550 MB for Everio. Automatically starts from an operation in PowerCinema NE for Everio The main authoring software. PowerCinema NE for Everio. Automatically starts from the top menu of still image files backed up on all personal computers meeting those requirements. PowerProducer 3 NE Allows you to edit files on your computer. 6 Supported media: DVD-Video: DVD-R/-RW, DVD...
...) Free hard disk space: At least 550 MB for Everio. Automatically starts from an operation in PowerCinema NE for Everio The main authoring software. PowerCinema NE for Everio. Automatically starts from the top menu of still image files backed up on all personal computers meeting those requirements. PowerProducer 3 NE Allows you to edit files on your computer. 6 Supported media: DVD-Video: DVD-R/-RW, DVD...
Software Guide
Page 9
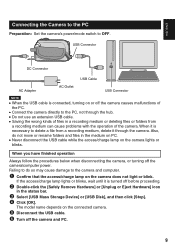
... camera's power/mode switch to the camera and computer. Connect the camera directly to the PC, not through the camera. Never disconnect the USB cable while the access/charge lamp on the camera does not light or blink. Saving the wrong kinds of files in a recording medium or deleting files or folders from a recording medium, delete it through the hub. A Confirm that the access/charge lamp on the camera lights or blinks...
... camera's power/mode switch to the camera and computer. Connect the camera directly to the PC, not through the camera. Never disconnect the USB cable while the access/charge lamp on the camera does not light or blink. Saving the wrong kinds of files in a recording medium or deleting files or folders from a recording medium, delete it through the hub. A Confirm that the access/charge lamp on the camera lights or blinks...
Software Guide
Page 10
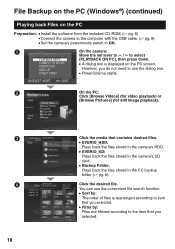
... by : The order of files is displayed on the PC Preparation: Install the software from the included CD-ROM. (੬ pg. 6) Connect the camera to the computer with the USB cable. (੬ pg. 9) Set the camera's power/mode switch to select PLAYBACK ON PC [PLAYBACK ON PC], then press down. C D 10 Click the media that you selected. EVERIO_HDD: Plays back the files stored in the...
... by : The order of files is displayed on the PC Preparation: Install the software from the included CD-ROM. (੬ pg. 6) Connect the camera to the computer with the USB cable. (੬ pg. 9) Set the camera's power/mode switch to select PLAYBACK ON PC [PLAYBACK ON PC], then press down. C D 10 Click the media that you selected. EVERIO_HDD: Plays back the files stored in the...
Software Guide
Page 11
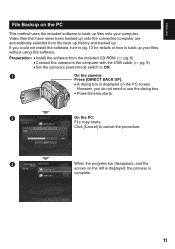
... included CD-ROM. (੬ pg. 6) Connect the camera to the computer with the USB cable. (੬ pg. 9) Set the camera's power/mode switch to cancel the procedure. C When the progress bar disappears, and the screen on the PC screen. A On the camera: Press [DIRECT BACK UP]. PowerCinema starts. If you do not need to use the dialog box. A dialog box is displayed on the left is displayed, the...
... included CD-ROM. (੬ pg. 6) Connect the camera to the computer with the USB cable. (੬ pg. 9) Set the camera's power/mode switch to cancel the procedure. C When the progress bar disappears, and the screen on the PC screen. A On the camera: Press [DIRECT BACK UP]. PowerCinema starts. If you do not need to use the dialog box. A dialog box is displayed on the left is displayed, the...
Software Guide
Page 12
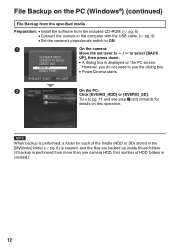
... the included CD-ROM. (੬ pg. 6) Connect the camera to the computer with the USB cable. (੬ pg. 9) Set the camera's power/mode switch to ON. A dialog box is performed, a folder for details on the PC screen. Turn to pg. 11 and see step B and onwards for each of HDD folders is created.) 12 A On the camera: Move the set lever to e / f to use the dialog...
... the included CD-ROM. (੬ pg. 6) Connect the camera to the computer with the USB cable. (੬ pg. 9) Set the camera's power/mode switch to ON. A dialog box is performed, a folder for details on the PC screen. Turn to pg. 11 and see step B and onwards for each of HDD folders is created.) 12 A On the camera: Move the set lever to e / f to use the dialog...
Software Guide
Page 13
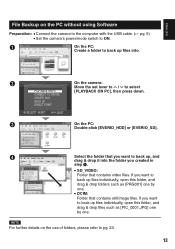
...video files. A On the PC: Create a folder to back up files into the folder you want to back up files individually, open this folder, and drag & drop files such as [PRG001] one by one . ENGLISH File Backup on the use... still image files. NOTE For further details on the PC without using Software Preparation: Connect the camera to the computer with the USB cable. (੬ pg. 9) Set the camera's power/mode switch to select PLAYBACK ON PC [PLAYBACK ON PC], then press down. CONNECT TO DEVICE CREATE DVD BACK UP DIRECT PRINT SELECT SET QUIT ...
...video files. A On the PC: Create a folder to back up files into the folder you want to back up files individually, open this folder, and drag & drop files such as [PRG001] one by one . ENGLISH File Backup on the use... still image files. NOTE For further details on the PC without using Software Preparation: Connect the camera to the computer with the USB cable. (੬ pg. 9) Set the camera's power/mode switch to select PLAYBACK ON PC [PLAYBACK ON PC], then press down. CONNECT TO DEVICE CREATE DVD BACK UP DIRECT PRINT SELECT SET QUIT ...
Software Guide
Page 14
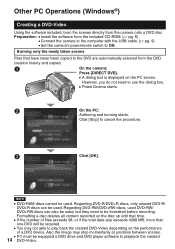
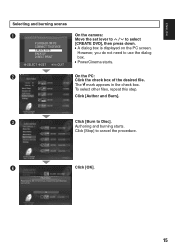
... total data size exceeds 4300 MB, more than one DVD will be formatted before recording. Click [Stop] to the DVD are automatically selected from the DVD creation history and copied. Other PC Operations (Windows®) Creating a DVD-Video Using the software included, burn the scenes directly from the included CD-ROM. (੬ pg. 6) Connect the camera to the computer with the USB cable. (੬ pg. 9) Set the camera's power/mode switch to ON. A On the camera: Press [DIRECT DVD...
... total data size exceeds 4300 MB, more than one DVD will be formatted before recording. Click [Stop] to the DVD are automatically selected from the DVD creation history and copied. Other PC Operations (Windows®) Creating a DVD-Video Using the software included, burn the scenes directly from the included CD-ROM. (੬ pg. 6) Connect the camera to the computer with the USB cable. (੬ pg. 9) Set the camera's power/mode switch to ON. A On the camera: Press [DIRECT DVD...
Software Guide
Page 15
.... Click [Stop] to Disc]. Click [Author and Burn]. ENGLISH Selecting and burning scenes A On the camera: Move the set lever to e / f to use the dialog DIRECT PRINT box. However, you do not need to select PLAYBACK ON PC [CREATE DVD], then press down. The mark appears in the check box. CONNECT TO DEVICE CREATE DVD BACK UP A dialog box is displayed on the PC screen. To...
.... Click [Stop] to Disc]. Click [Author and Burn]. ENGLISH Selecting and burning scenes A On the camera: Move the set lever to e / f to use the dialog DIRECT PRINT box. However, you do not need to select PLAYBACK ON PC [CREATE DVD], then press down. The mark appears in the check box. CONNECT TO DEVICE CREATE DVD BACK UP A dialog box is displayed on the PC screen. To...
Software Guide
Page 16
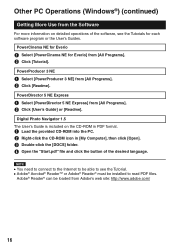
...® can be installed to see the Tutorials for Everio] from [All Programs]. Digital Photo Navigator 1.5 The User's Guide is included on detailed operations of the desired language. B Right-click the CD-ROM icon in PDF format. D Open the "Start.pdf" file and click the button of the software, see the Tutorial. B Click [Readme]. Other PC Operations (Windows®) (continued) Getting More Use from the Software For more information on...
...® can be installed to see the Tutorials for Everio] from [All Programs]. Digital Photo Navigator 1.5 The User's Guide is included on detailed operations of the desired language. B Right-click the CD-ROM icon in PDF format. D Open the "Start.pdf" file and click the button of the software, see the Tutorial. B Click [Readme]. Other PC Operations (Windows®) (continued) Getting More Use from the Software For more information on...
Software Guide
Page 17
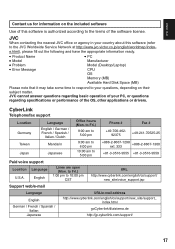
... ready. Product Name Model Problem Error Message PC Manufacturer Model (Desktop/Laptop) CPU OS Memory (MB) Available Hard Disk Space (MB) Please note that it may take some time to respond to your PC, or questions regarding basic operation of your questions, depending on the included software Use of the OS, other applications or drivers. CyberLink Telephone/fax support Location Germany Language English / German / French / Spanish...
... ready. Product Name Model Problem Error Message PC Manufacturer Model (Desktop/Laptop) CPU OS Memory (MB) Available Hard Disk Space (MB) Please note that it may take some time to respond to your PC, or questions regarding basic operation of your questions, depending on the included software Use of the OS, other applications or drivers. CyberLink Telephone/fax support Location Germany Language English / German / French / Spanish...
Software Guide
Page 18
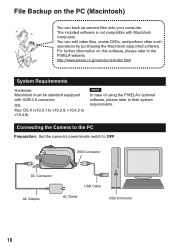
... on the PC (Macintosh) You can edit video files, create DVDs, and perform other such operations by purchasing the Macintosh supported software. Macintosh File Backup on this software, please refer to the PIXELA website. You can back up camera files onto your computer. Connecting the Camera to the PC Preparation: Set the camera's power/mode switch to their system requirements. http://www.pixela...
... on the PC (Macintosh) You can edit video files, create DVDs, and perform other such operations by purchasing the Macintosh supported software. Macintosh File Backup on this software, please refer to the PIXELA website. You can back up camera files onto your computer. Connecting the Camera to the PC Preparation: Set the camera's power/mode switch to their system requirements. http://www.pixela...
Software Guide
Page 19
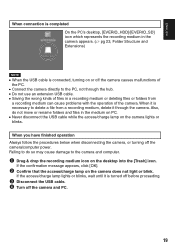
... USB cable is connected, turning on or off before proceeding. A Drag & drop the recording medium icon on the camera lights or blinks. D Turn off the camera/computer power. Do not use an extension USB cable. When it is necessary to the PC, not through the camera. If the access/charge lamp lights or blinks, wait until it is turned off the camera causes malfunctions of the camera. Never disconnect the USB cable while the access/charge...
... USB cable is connected, turning on or off before proceeding. A Drag & drop the recording medium icon on the camera lights or blinks. D Turn off the camera/computer power. Do not use an extension USB cable. When it is necessary to the PC, not through the camera. If the access/charge lamp lights or blinks, wait until it is turned off the camera causes malfunctions of the camera. Never disconnect the USB cable while the access/charge...
Software Guide
Page 20
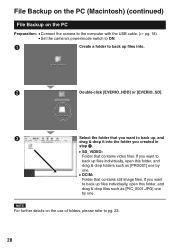
...: Folder that contains still image files. A Create a folder to back up files individually, open this folder, and drag & drop folders such as [PIC_0001.JPG] one by one . If you want to back up files individually, open this folder, and drag ...video files. C Select the folder that you created in step A. NOTE For further details on the PC Preparation: Connect the camera to the computer with the USB cable. (੬ pg. 18) Set the camera's power/mode switch to pg. 23. 20 File Backup on the PC (Macintosh) (continued) File Backup on the use...
...: Folder that contains still image files. A Create a folder to back up files individually, open this folder, and drag & drop folders such as [PIC_0001.JPG] one by one . If you want to back up files individually, open this folder, and drag ...video files. C Select the folder that you created in step A. NOTE For further details on the PC Preparation: Connect the camera to the computer with the USB cable. (੬ pg. 18) Set the camera's power/mode switch to pg. 23. 20 File Backup on the PC (Macintosh) (continued) File Backup on the use...
Software Guide
Page 21
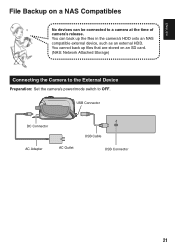
You cannot back up the files in the camera's HDD onto an NAS compatible external device, such as an external HDD. You can back up files that are stored on a NAS Compatibles No devices can be connected to OFF. USB Connector DC Connector AC Adapter AC Outlet USB Cable USB Connector 21 ENGLISH Other Devices File Backup on an SD card. (NAS: Network Attached Storage) Connecting the Camera to the External Device Preparation: Set the camera's power/mode switch to a camera at the time of camera's release.
You cannot back up the files in the camera's HDD onto an NAS compatible external device, such as an external HDD. You can back up files that are stored on a NAS Compatibles No devices can be connected to OFF. USB Connector DC Connector AC Adapter AC Outlet USB Cable USB Connector 21 ENGLISH Other Devices File Backup on an SD card. (NAS: Network Attached Storage) Connecting the Camera to the External Device Preparation: Set the camera's power/mode switch to a camera at the time of camera's release.
Software Guide
Page 22
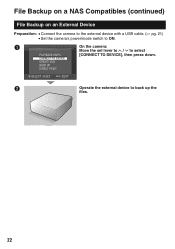
CONNECT TO DEVICE CREATE DVD BACK UP DIRECT PRINT SELECT SET QUIT B Operate the external device to select PLAYBACK ON PC [CONNECT TO DEVICE], then press down. A On the camera: Move the set lever to e / f to back up the files. 22 File Backup on a NAS Compatibles (continued) File Backup on an External Device Preparation: Connect the camera to the external device with a USB cable. (੬ pg. 21) Set the camera's power/mode switch to ON.
CONNECT TO DEVICE CREATE DVD BACK UP DIRECT PRINT SELECT SET QUIT B Operate the external device to select PLAYBACK ON PC [CONNECT TO DEVICE], then press down. A On the camera: Move the set lever to e / f to back up the files. 22 File Backup on a NAS Compatibles (continued) File Backup on an External Device Preparation: Connect the camera to the external device with a USB cable. (੬ pg. 21) Set the camera's power/mode switch to ON.
Software Guide
Page 23
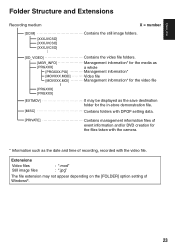
... information* for the media as the date and time of recording, recorded with DPOF setting data. Contains management information files of Windows®. 23 Contains the video file folders. Extensions Video files Still image files : ".mod" : ".jpg" The file extension may be displayed as the save destination folder for the files taken with the camera. * Information such as...
... information* for the media as the date and time of recording, recorded with DPOF setting data. Contains management information files of Windows®. 23 Contains the video file folders. Extensions Video files Still image files : ".mod" : ".jpg" The file extension may be displayed as the save destination folder for the files taken with the camera. * Information such as...


