RS232 Serial Commands (English)
Page 1
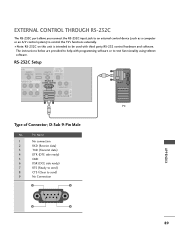
... system) to be used with programming software or to send) 9 No Connection 1 5 APPENDIX 6 9 89 I Note: RS-232C on this unit is intended to control the TV's functions externally. The instructions below are provided to help with third party RS-232 control hardware and software. RS-232C Setup B IN DIGITAL AUDIO REMOTE...
... system) to be used with programming software or to send) 9 No Connection 1 5 APPENDIX 6 9 89 I Note: RS-232C on this unit is intended to control the TV's functions externally. The instructions below are provided to help with third party RS-232 control hardware and software. RS-232C Setup B IN DIGITAL AUDIO REMOTE...
RS232 Serial Commands (English)
Page 2
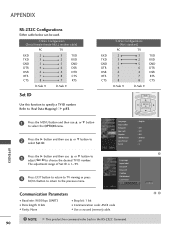
...: None I Stop bit: 1 bit I Communication code: ASCII code I Use a crossed (reverse) cable. ! RXD TXD GND DTR DSR RTS CTS 3-Wire Configurations (Not standard) PC TV 2 3 3 2 5 5 4 6 6 4 7 7 8 8 D-Sub 9 D-Sub 9 TXD RXD GND DTR DSR RTS CTS BRIGHT - Refer to the previous menu. The ... to return to 'Real Data Mapping1'. APPENDIX RS-232C Configurations Either cable below can be used. 7-Wire Configuration (Serial female-female NULL modem cable) PC TV RXD 2 TXD 3 GND 5 DTR 4 DSR 6 RTS 7 CTS 8 3 TXD 2 RXD 5 GND 6 DSR 4 DTR 8 CTS 7 RTS D-Sub...
...: None I Stop bit: 1 bit I Communication code: ASCII code I Use a crossed (reverse) cable. ! RXD TXD GND DTR DSR RTS CTS 3-Wire Configurations (Not standard) PC TV 2 3 3 2 5 5 4 6 6 4 7 7 8 8 D-Sub 9 D-Sub 9 TXD RXD GND DTR DSR RTS CTS BRIGHT - Refer to the previous menu. The ... to return to 'Real Data Mapping1'. APPENDIX RS-232C Configurations Either cable below can be used. 7-Wire Configuration (Serial female-female NULL modem cable) PC TV RXD 2 TXD 3 GND 5 DTR 4 DSR 6 RTS 7 CTS 8 3 TXD 2 RXD 5 GND 6 DSR 4 DTR 8 CTS 7 RTS D-Sub...
RS232 Serial Commands (English)
Page 3
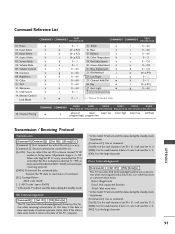
...write mode, it returns the data of command. [Cr]: Carriage Return ASCII code '0x0D' [ ]: ASCII code 'space (0x20)' * In this model, TV will not send the status during the standby mode. * Data Format [Command 2]: Use as Hexa decimal (0x0~0x63) on this time, if the data..., it will send the '0', 'a'. [DATA]: Use the small character, if data is 0 x ab, it indicates present status data. Transmit the 'FF' data to choose desired TV ID number in Setup menu. Input Select x 04. OSD Select k 14. Red Adjustment k e 0~1 20. ISM Method j h 0 ~ 64 23. Volume Mute k 07. Balance k c...
...write mode, it returns the data of command. [Cr]: Carriage Return ASCII code '0x0D' [ ]: ASCII code 'space (0x20)' * In this model, TV will not send the status during the standby mode. * Data Format [Command 2]: Use as Hexa decimal (0x0~0x63) on this time, if the data..., it will send the '0', 'a'. [DATA]: Use the small character, if data is 0 x ab, it indicates present status data. Transmit the 'FF' data to choose desired TV ID number in Setup menu. Input Select x 04. OSD Select k 14. Red Adjustment k e 0~1 20. ISM Method j h 0 ~ 64 23. Volume Mute k 07. Balance k c...
RS232 Serial Commands (English)
Page 4
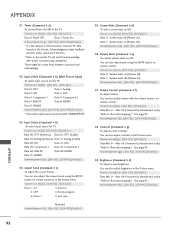
...[f][ ][Set ID][ ][OK/NG][Data][x] 08. See page 93. Input Select (Command: k b) (Main Picture Input) To select input source for TV. Volume Control (Command: k f) To adjust volume. Brightness (Command: k h) To adjust screen brightness. You can also adjust volume with the volume ...Volume off) Data 1: Volume mute off ) Acknowledgement [d][ ][Set ID][ ][OK/NG][Data][x] 06. Power (Command: k a) To control Power On/Off of the TV. Transmission [k][e][ ][Set ID][ ][Data][Cr] Data 0: Volume mute on remote control. Transmission [k][h][ ][Set ID][ ][Data][Cr] Data Min: 0 ~ Max: 64...
...[f][ ][Set ID][ ][OK/NG][Data][x] 08. See page 93. Input Select (Command: k b) (Main Picture Input) To select input source for TV. Volume Control (Command: k f) To adjust volume. Brightness (Command: k h) To adjust screen brightness. You can also adjust volume with the volume ...Volume off) Data 1: Volume mute off ) Acknowledgement [d][ ][Set ID][ ][OK/NG][Data][x] 06. Power (Command: k a) To control Power On/Off of the TV. Transmission [k][e][ ][Set ID][ ][Data][Cr] Data 0: Volume mute on remote control. Transmission [k][h][ ][Set ID][ ][Data][Cr] Data Min: 0 ~ Max: 64...
RS232 Serial Commands (English)
Page 5
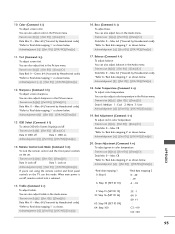
...) on/off Data 1: Lock on Acknowledgement [m][ ][Set ID][ ][OK/NG][Data][x] If you're not using the remote control and front panel controls on the TV, use this mode. Transmission [k][m][ ][Set ID][ ][Data][Cr] Data 0: Lock off . Balance (Command: k t) To adjust balance. You can also adjust sharpness in the Audio menu...
...) on/off Data 1: Lock on Acknowledgement [m][ ][Set ID][ ][OK/NG][Data][x] If you're not using the remote control and front panel controls on the TV, use this mode. Transmission [k][m][ ][Set ID][ ][Data][Cr] Data 0: Lock off . Balance (Command: k t) To adjust balance. You can also adjust sharpness in the Audio menu...
RS232 Serial Commands (English)
Page 6
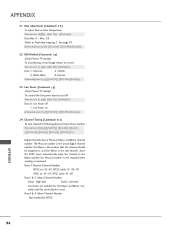
...& 2: Major Channel Number Data1: High byte Data2: Low byte Two bytes are available for NTSC. See page 93. ISM Method (Command: j p) (Only Plasma TV model) To avoid having a fixed image remain on Acknowledgement [q][ ][Set ID][ ][OK/NG][Data][x] 24. Channel Tuning (Command: m a) To tune channel to ... the channel to , and the Minor is used. Acknowledgement [$][ ][Set ID][ ][OK/NG][Data][x] 22. Low Power (Command: j q) (Only Plasma TV model) To control the low power function on/off 1: Low Power on screen. Data3 & 4: Minor Channel Number Not needed for the Major and Minor,...
...& 2: Major Channel Number Data1: High byte Data2: Low byte Two bytes are available for NTSC. See page 93. ISM Method (Command: j p) (Only Plasma TV model) To avoid having a fixed image remain on Acknowledgement [q][ ][Set ID][ ][OK/NG][Data][x] 24. Channel Tuning (Command: m a) To tune channel to ... the channel to , and the Minor is used. Acknowledgement [$][ ][Set ID][ ][OK/NG][Data][x] 22. Low Power (Command: j q) (Only Plasma TV model) To control the low power function on/off 1: Low Power on screen. Data3 & 4: Minor Channel Number Not needed for the Major and Minor,...
RS232 Serial Commands (English)
Page 7
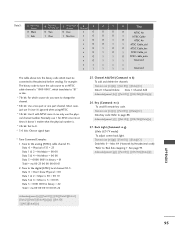
...", which translates to "81" in Hex. * 7th bit: For which must be converted to the digital (ATSC) local channel 30-3. Back Light (Command: m g) (Only LCD TV model) To adjust screen back light. Transmission [m][g][ ][Set ID][ ][Data][Cr] Data Min: 0 ~ Max: 64 (*transmit by Hexadecimal code) *Refer to page 88. Most cases...
...", which translates to "81" in Hex. * 7th bit: For which must be converted to the digital (ATSC) local channel 30-3. Back Light (Command: m g) (Only LCD TV model) To adjust screen back light. Transmission [m][g][ ][Set ID][ ][Data][Cr] Data Min: 0 ~ Max: 64 (*transmit by Hexadecimal code) *Refer to page 88. Most cases...
User Manual (Spanish)
Page 3
.... This symbol indicates that insure reliable operation. This is normal in plasma TVs and does not mean that your plasma TV is present within your plasma TV. This label is designed for reliable and trouble-free performance. www.insignia-products.com 1 Insignia NS-PDP50 50" Plasma TV-720P Contents Introduction 1 Safety information 1 Features 2 Front 3 Back 3 Remote control 4 Setting...
.... This symbol indicates that insure reliable operation. This is normal in plasma TVs and does not mean that your plasma TV is present within your plasma TV. This label is designed for reliable and trouble-free performance. www.insignia-products.com 1 Insignia NS-PDP50 50" Plasma TV-720P Contents Introduction 1 Safety information 1 Features 2 Front 3 Back 3 Remote control 4 Setting...
User Manual (Spanish)
Page 4
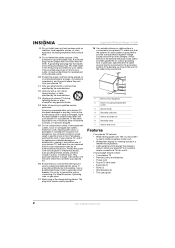
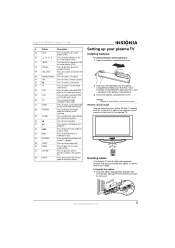
... sure that you connect the earth ground wire to provide some protection against voltage surges and built-up static charges. Insignia NS-PDP50 50" Plasma TV-720P 8 Do not install near any way, such as the power-supply cord or plug is damaged, liquid has been ... service personnel. Your package should contain: • Your plasma TV • Remote control and batteries • Power cord • Round 75 ohm cable • Eye-bolts (2) • Bolts (2) • Wall brackets (2) • This user guide 2 www.insignia-products.com Overloaded wall outlets, loose or damaged wall outlets,...
... sure that you connect the earth ground wire to provide some protection against voltage surges and built-up static charges. Insignia NS-PDP50 50" Plasma TV-720P 8 Do not install near any way, such as the power-supply cord or plug is damaged, liquid has been ... service personnel. Your package should contain: • Your plasma TV • Remote control and batteries • Power cord • Round 75 ohm cable • Eye-bolts (2) • Bolts (2) • Wall brackets (2) • This user guide 2 www.insignia-products.com Overloaded wall outlets, loose or damaged wall outlets,...
User Manual (Spanish)
Page 5
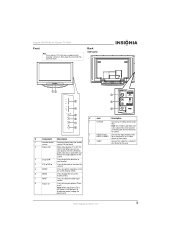
... cable does not carry sound. When you turn your plasma TV on your plasma TV is off, this jack. Note: When your plasma TV stand has a protective film covering, remove it, then wipe the stand with the polishing cloth. www.insignia-products.com 3 To disconnect power, unplug the power cord....device to these jacks. 3 VIDEO Connect the video for a standard A/V device to turn on or off , power is red. Insignia NS-PDP50 50" Plasma TV-720P Front Note If your plasma TV is off . Back Side jacks 12 CH 3 VOL 4 ENTER 5 MENU 6 INPUT 7 8 # Component Description 1 Remote control ...
... cable does not carry sound. When you turn your plasma TV on your plasma TV is off, this jack. Note: When your plasma TV stand has a protective film covering, remove it, then wipe the stand with the polishing cloth. www.insignia-products.com 3 To disconnect power, unplug the power cord....device to these jacks. 3 VIDEO Connect the video for a standard A/V device to turn on or off , power is red. Insignia NS-PDP50 50" Plasma TV-720P Front Note If your plasma TV is off . Back Side jacks 12 CH 3 VOL 4 ENTER 5 MENU 6 INPUT 7 8 # Component Description 1 Remote control ...
User Manual (Spanish)
Page 6
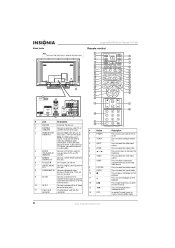
Insignia NS-PDP50 50" Plasma TV-720P Remote control 1 2 MODE TUNER POWER TV 23 3 INPUT DVD 24 4 ZOOM VCR 25 5 6 VIDEO COMP ...sound. Press to start videotape or DVD playback. In analog TV mode, press to select the video input source. Press to select a closed caption mode. 4 www.insignia-products.com If you connect a DVI device, you do ...Video device to these jacks to (PC)/AUDIO IN use . 2 ANTENNA /CABLE IN Connect an antenna, cable TV, or satellite receiver to these jacks. Press to increase or decrease the brightness. Press to make any additional ...
Insignia NS-PDP50 50" Plasma TV-720P Remote control 1 2 MODE TUNER POWER TV 23 3 INPUT DVD 24 4 ZOOM VCR 25 5 6 VIDEO COMP ...sound. Press to start videotape or DVD playback. In analog TV mode, press to select the video input source. Press to select a closed caption mode. 4 www.insignia-products.com If you connect a DVI device, you do ...Video device to these jacks to (PC)/AUDIO IN use . 2 ANTENNA /CABLE IN Connect an antenna, cable TV, or satellite receiver to these jacks. Press to increase or decrease the brightness. Press to make any additional ...
User Manual (Spanish)
Page 7
...of the remote control sensor on the batteries align with both hands, then pull it in the direction shown to set the sleep timer. www.insignia-products.com 5 Press to select the audio format for all the device you are watching. symbols in the battery compartment. 3 Close the ... control range Use the remote control within 23 feet (7 meters) and 30° to the left or right of used batteries as hazardous waste. Insignia NS-PDP50 50" Plasma TV-720P # Button Description 15 EXIT Press to close the on-screen display (OSD). 16 , , , Press to make selections in the on-screen...
...of the remote control sensor on the batteries align with both hands, then pull it in the direction shown to set the sleep timer. www.insignia-products.com 5 Press to select the audio format for all the device you are watching. symbols in the battery compartment. 3 Close the ... control range Use the remote control within 23 feet (7 meters) and 30° to the left or right of used batteries as hazardous waste. Insignia NS-PDP50 50" Plasma TV-720P # Button Description 15 EXIT Press to close the on-screen display (OSD). 16 , , , Press to make selections in the on-screen...
User Manual (Spanish)
Page 8
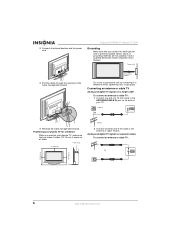
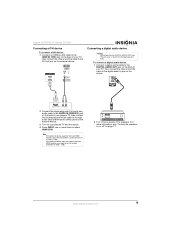
Insignia NS-PDP50 50" Plasma TV-720P Grounding Make sure that you connect the earth ground wire to the ANTENNA/CABLE IN jack on the back of your plasma TV, make sure that you position your TV. Connecting an antenna or cable TV Analog and digital TV signals on all external devices and the power ... the opening on separate cables To connect an antenna or cable TV: OR ANTENNA/ CABLE IN 4" (10.16 cm) 4" (10.16 cm) 6 www.insignia-products.com Analog and digital TV signals on the cable management bracket. Positioning your plasma TV for ventilation When you leave 4 inches (10.16 cm)...
Insignia NS-PDP50 50" Plasma TV-720P Grounding Make sure that you connect the earth ground wire to the ANTENNA/CABLE IN jack on the back of your plasma TV, make sure that you position your TV. Connecting an antenna or cable TV Analog and digital TV signals on all external devices and the power ... the opening on separate cables To connect an antenna or cable TV: OR ANTENNA/ CABLE IN 4" (10.16 cm) 4" (10.16 cm) 6 www.insignia-products.com Analog and digital TV signals on the cable management bracket. Positioning your plasma TV for ventilation When you leave 4 inches (10.16 cm)...
User Manual (Spanish)
Page 9
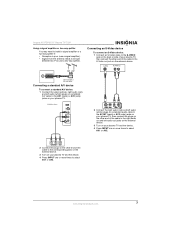
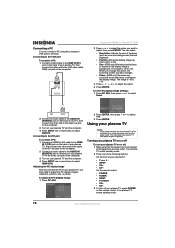
... connect the other end of the cable to the S-Video out jack on your plasma TV and the device. 4 Press INPUT one or more times to select AV1 or AV2. www.insignia-products.com 7 Side jacks shown 2 Connect the right audio (red) and left audio (white) plugs on a standard audio cable to... the device. 4 Press INPUT one or more times to the AV1 (back) or AV2 (side) jacks on your plasma TV. Insignia NS-PDP50 50" Plasma TV-720P Using a signal amplifier or two-way splitter You may need to install a signal amplifier or a two-way splitter if: • Reception is poor (use a ...
... connect the other end of the cable to the S-Video out jack on your plasma TV and the device. 4 Press INPUT one or more times to select AV1 or AV2. www.insignia-products.com 7 Side jacks shown 2 Connect the right audio (red) and left audio (white) plugs on a standard audio cable to... the device. 4 Press INPUT one or more times to the AV1 (back) or AV2 (side) jacks on your plasma TV. Insignia NS-PDP50 50" Plasma TV-720P Using a signal amplifier or two-way splitter You may need to install a signal amplifier or a two-way splitter if: • Reception is poor (use a ...
User Manual (Spanish)
Page 10
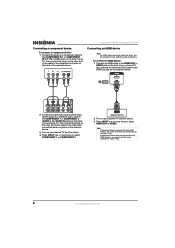
... the plugs on your TV, then connect the plugs on the other end of the external device. Note If the external device supports the Auto HDMI function, the screen resolution is automatically set the screen resolution to 1280 × 720p. 8 www.insignia-products.com You do ...not need to set to make additional audio connections. Connecting an HDMI device Note An HDMI cable carries both video and audio. Insignia NS-PDP50 50" Plasma TV-720P Connecting a component device To connect a component device: 1 Connect the plugs on a component cable to the COMPONENT IN 1 or COMPONENT IN ...
... the plugs on your TV, then connect the plugs on the other end of the external device. Note If the external device supports the Auto HDMI function, the screen resolution is automatically set the screen resolution to 1280 × 720p. 8 www.insignia-products.com You do ...not need to set to make additional audio connections. Connecting an HDMI device Note An HDMI cable carries both video and audio. Insignia NS-PDP50 50" Plasma TV-720P Connecting a component device To connect a component device: 1 Connect the plugs on a component cable to the COMPONENT IN 1 or COMPONENT IN ...
User Manual (Spanish)
Page 11
... digital audio device Warning Do not look into the DIGITAL AUDIO OUT jack. The jack uses a laser that could damage your eyes. www.insignia-products.com 9 Insignia NS-PDP50 50" Plasma TV-720P Connecting a DVI device To connect a DVI device: 1 Connect an HDMI-to-DVI cable to the HDMI IN 1/DVI jack on the... back of your TV, then connect the other end of the cable to the digital audio in jack on the device. 2 Connect the ...
... digital audio device Warning Do not look into the DIGITAL AUDIO OUT jack. The jack uses a laser that could damage your eyes. www.insignia-products.com 9 Insignia NS-PDP50 50" Plasma TV-720P Connecting a DVI device To connect a DVI device: 1 Connect an HDMI-to-DVI cable to the HDMI IN 1/DVI jack on the... back of your TV, then connect the other end of the cable to the digital audio in jack on the device. 2 Connect the ...
User Manual (Spanish)
Page 12
... option, the horizontal screen size also changes. • Phase-(RGB only) Removes any horizontal noise and clears or sharpens the display image. Insignia NS-PDP50 50" Plasma TV-720P 2 Press or to the audio out jack on the computer. 3 Turn on the computer. To adjust the PC display image: 1... right, or left. • Size-(RGB only) Minimizes vertical bars or stripes on the remote control. Your plasma TV enters standby mode. 10 www.insignia-products.com This will protect your plasma TV and the computer. 4 Press INPUT one of the following buttons: On the front of your plasma...
... option, the horizontal screen size also changes. • Phase-(RGB only) Removes any horizontal noise and clears or sharpens the display image. Insignia NS-PDP50 50" Plasma TV-720P 2 Press or to the audio out jack on the computer. 3 Turn on the computer. To adjust the PC display image: 1... right, or left. • Size-(RGB only) Minimizes vertical bars or stripes on the remote control. Your plasma TV enters standby mode. 10 www.insignia-products.com This will protect your plasma TV and the computer. 4 Press INPUT one of the following buttons: On the front of your plasma...
User Manual (Spanish)
Page 13
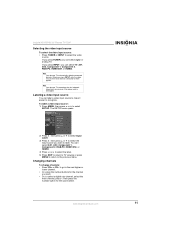
...unplugged. You can label a video input source to make it easier to label. www.insignia-products.com 11 When you press INPUT, only the video sources that have devices connected to the previous menu. Note Your plasma TV automatically detects connected devices. The SETUP menu opens. 2 Press , then press or ... go to the next higher or lower channel. • Or, press the number buttons for the sub-channel. Insignia NS-PDP50 50" Plasma TV-720P Selecting the video input source To select the video input source: • Press TUNER or INPUT to select the video source. Changing ...
...unplugged. You can label a video input source to make it easier to label. www.insignia-products.com 11 When you press INPUT, only the video sources that have devices connected to the previous menu. Note Your plasma TV automatically detects connected devices. The SETUP menu opens. 2 Press , then press or ... go to the next higher or lower channel. • Or, press the number buttons for the sub-channel. Insignia NS-PDP50 50" Plasma TV-720P Selecting the video input source To select the video input source: • Press TUNER or INPUT to select the video source. Changing ...
User Manual (Spanish)
Page 14
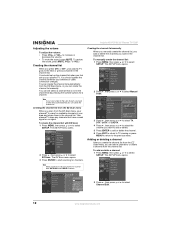
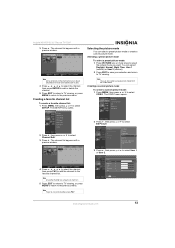
Insignia NS-PDP50 50" Plasma TV-720P Adjusting the volume To adjust the volume: • Press VOL+ or VOL- To restore the sound, press MUTE, VOL+, or VOL-. You can create the channel list automatically from the EZ Scan menu, or you scan from the EZ Scan menu, your plasma TV scans for available ...channels in your plasma TV. You can create the channel list. The SETUP menu opens. 2 Press , then press or to select Channel Edit. 12 www.insignia-products.com The SETUP menu opens. 2 Press , then press or...
Insignia NS-PDP50 50" Plasma TV-720P Adjusting the volume To adjust the volume: • Press VOL+ or VOL- To restore the sound, press MUTE, VOL+, or VOL-. You can create the channel list automatically from the EZ Scan menu, or you scan from the EZ Scan menu, your plasma TV scans for available ...channels in your plasma TV. You can create the channel list. The SETUP menu opens. 2 Press , then press or to select Channel Edit. 12 www.insignia-products.com The SETUP menu opens. 2 Press , then press or...
User Manual (Spanish)
Page 15
... to TV viewing, or press MENU to return to the previous menu. The channel list appears with a preview window. 2 Press , then press or to select EZ Picture. 3 Press , then press or to select User 1 or User 2. 4 Press , , , or to select the channel, then press FAV to add the channel to TV viewing. Insignia NS-PDP50... 50" Plasma TV-720P 3 Press . Note You can also select a preset picture mode from the Video menu.
... to TV viewing, or press MENU to return to the previous menu. The channel list appears with a preview window. 2 Press , then press or to select EZ Picture. 3 Press , then press or to select User 1 or User 2. 4 Press , , , or to select the channel, then press FAV to add the channel to TV viewing. Insignia NS-PDP50... 50" Plasma TV-720P 3 Press . Note You can also select a preset picture mode from the Video menu.


