RS232 Serial Commands (English)
Page 1
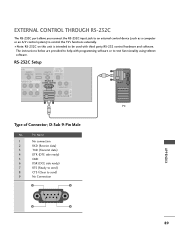
...) 4 DTR (DTE side ready) 5 GND 6 DSR (DCE side ready) 7 RTS (Ready to send) 8 CTS (Clear to be used with programming software or to control the TV's functions externally.
...) 4 DTR (DTE side ready) 5 GND 6 DSR (DCE side ready) 7 RTS (Ready to send) 8 CTS (Clear to be used with programming software or to control the TV's functions externally.
RS232 Serial Commands (English)
Page 2
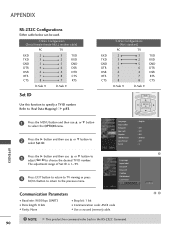
... RTS CTS BRIGHT - Refer to the previous menu. The adjustment range of Set ID is 1~99. 4 Press EXIT button to return to TV viewing or press MENU button to return to 'Real Data Mapping1'. APPENDIX RS-232C Configurations Either cable below can be used. 7-Wire Configuration (...Serial female-female NULL modem cable) PC TV RXD 2 TXD 3 GND 5 DTR 4 DSR 6 RTS 7 CTS 8 3 TXD 2 RXD 5 GND 6 DSR 4 DTR 8 CTS 7 RTS D-Sub 9 D-Sub 9 Set ID ...
... RTS CTS BRIGHT - Refer to the previous menu. The adjustment range of Set ID is 1~99. 4 Press EXIT button to return to TV viewing or press MENU button to return to 'Real Data Mapping1'. APPENDIX RS-232C Configurations Either cable below can be used. 7-Wire Configuration (...Serial female-female NULL modem cable) PC TV RXD 2 TXD 3 GND 5 DTR 4 DSR 6 RTS 7 CTS 8 3 TXD 2 RXD 5 GND 6 DSR 4 DTR 8 CTS 7 RTS D-Sub 9 D-Sub 9 Set ID ...
RS232 Serial Commands (English)
Page 3
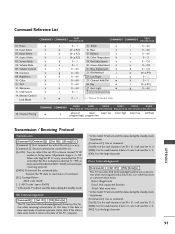
..., it indicates present status data. If the data is indicated as decimal (1~ 99) on menu and as Hexa decimal (0x0~0x63) on this model, TV will not send the status during the standby mode. Aspect Ratio k 05. Volume Control k 08. Remote Control Lock Mode k a 0~1 15. Sharpness ...'0x0D' [ ]: ASCII code 'space (0x20)' * In this format when receiving normal data. Transmit the 'FF' data to choose desired TV ID number in Setup menu. At this format when receiving abnormal data from non-viable functions or communication errors. Error Acknowledgement [Command2][ ][Set ID...
..., it indicates present status data. If the data is indicated as decimal (1~ 99) on menu and as Hexa decimal (0x0~0x63) on this model, TV will not send the status during the standby mode. Aspect Ratio k 05. Volume Control k 08. Remote Control Lock Mode k a 0~1 15. Sharpness ...'0x0D' [ ]: ASCII code 'space (0x20)' * In this format when receiving normal data. Transmit the 'FF' data to choose desired TV ID number in Setup menu. At this format when receiving abnormal data from non-viable functions or communication errors. Error Acknowledgement [Command2][ ][Set ID...
RS232 Serial Commands (English)
Page 4
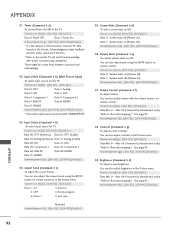
... functions transmit 'FF' data based on this format, Acknowledgement data feedback presents status about each function. * Note: In this model, TV will send the Acknowledge after power on remote control or in the Picture menu. You can also adjust the screen format using the MUTE...Contrast (Command: k g) To adjust screen contrast. Brightness (Command: k h) To adjust screen brightness. Power (Command: k a) To control Power On/Off of the TV. Transmission [k][e][ ][Set ID][ ][Data][Cr] Data 0: Volume mute on (Volume off) Data 1: Volume mute off (Volume on /off. You can also adjust ...
... functions transmit 'FF' data based on this format, Acknowledgement data feedback presents status about each function. * Note: In this model, TV will send the Acknowledge after power on remote control or in the Picture menu. You can also adjust the screen format using the MUTE...Contrast (Command: k g) To adjust screen contrast. Brightness (Command: k h) To adjust screen brightness. Power (Command: k a) To control Power On/Off of the TV. Transmission [k][e][ ][Set ID][ ][Data][Cr] Data 0: Volume mute on (Volume off) Data 1: Volume mute off (Volume on /off. You can also adjust ...
RS232 Serial Commands (English)
Page 5
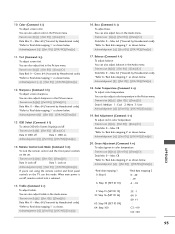
...) on/off Data 1: Lock on Acknowledgement [m][ ][Set ID][ ][OK/NG][Data][x] If you're not using the remote control and front panel controls on the TV, use this mode. Transmission [k][r][ ][Set ID][ ][Data][Cr] Data Min: 0 ~ Max: 64 (*transmit by Hexadecimal code) *Refer to 'Real data mapping 1' as shown below. You...
...) on/off Data 1: Lock on Acknowledgement [m][ ][Set ID][ ][OK/NG][Data][x] If you're not using the remote control and front panel controls on the TV, use this mode. Transmission [k][r][ ][Set ID][ ][Data][Cr] Data Min: 0 ~ Max: 64 (*transmit by Hexadecimal code) *Refer to 'Real data mapping 1' as shown below. You...
RS232 Serial Commands (English)
Page 6
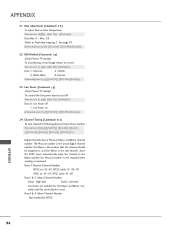
...Data][Cr] Data 1: Inversion 2: Orbiter 4: White Wash 8: Normal Acknowledgement [p][ ][Set ID][ ][OK/NG][Data][x] 23. APPENDIX 94 ISM Method (Command: j p) (Only Plasma TV model) To avoid having a fixed image remain on Acknowledgement [q][ ][Set ID][ ][OK/NG][Data][x] 24. Transmission [m][a][ ][Set ID][ ][Data0][ ][Data1] [ ][Data2][ ][...Data3][ ][Data4][ ][Data5][Cr] Digital channels have a Physical, Major, and Minor channel number. Low Power (Command: j q) (Only Plasma TV model) To control the low power function on/off 1: Low Power on screen. APPENDIX 21.
...Data][Cr] Data 1: Inversion 2: Orbiter 4: White Wash 8: Normal Acknowledgement [p][ ][Set ID][ ][OK/NG][Data][x] 23. APPENDIX 94 ISM Method (Command: j p) (Only Plasma TV model) To avoid having a fixed image remain on Acknowledgement [q][ ][Set ID][ ][OK/NG][Data][x] 24. Transmission [m][a][ ][Set ID][ ][Data0][ ][Data1] [ ][Data2][ ][...Data3][ ][Data4][ ][Data5][Cr] Digital channels have a Physical, Major, and Minor channel number. Low Power (Command: j q) (Only Plasma TV model) To control the low power function on/off 1: Low Power on screen. APPENDIX 21.
RS232 Serial Commands (English)
Page 7
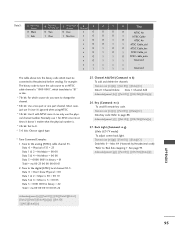
... cable channel is 3 = 00 03 Data 5 = 0010 0010 in binary = 01 Total = ma 00 23 00 00 00 00 01 2. Back Light (Command: m g) (Only LCD TV model) To adjust screen back light. Transmission [m][g][ ][Set ID][ ][Data][Cr] Data Min: 0 ~ Max: 64 (*transmit by Hexadecimal code) *Refer to the digital (ATSC) local...
... cable channel is 3 = 00 03 Data 5 = 0010 0010 in binary = 01 Total = ma 00 23 00 00 00 00 01 2. Back Light (Command: m g) (Only LCD TV model) To adjust screen back light. Transmission [m][g][ ][Set ID][ ][Data][Cr] Data Min: 0 ~ Max: 64 (*transmit by Hexadecimal code) *Refer to the digital (ATSC) local...
User Manual (Spanish)
Page 3
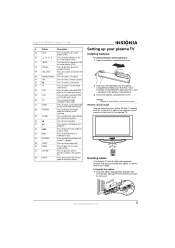
... and maintenance instructions in the literature accompanying your plasma TV screen. No user serviceable parts inside. Insignia NS-PDP50 50" Plasma TV-720P Contents Introduction 1 Safety information 1 Features 2 Front 3 Back 3 Remote control 4 Setting up your plasma TV 5 Installing batteries 5 Bundling cables 5 Grounding 6 Connecting an antenna or cable TV 6 Connecting a standard A/V device 7 Connecting an S-Video device 7 Connecting a component...
... and maintenance instructions in the literature accompanying your plasma TV screen. No user serviceable parts inside. Insignia NS-PDP50 50" Plasma TV-720P Contents Introduction 1 Safety information 1 Features 2 Front 3 Back 3 Remote control 4 Setting up your plasma TV 5 Installing batteries 5 Bundling cables 5 Grounding 6 Connecting an antenna or cable TV 6 Connecting a standard A/V device 7 Connecting an S-Video device 7 Connecting a component...
User Manual (Spanish)
Page 4
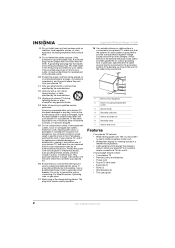
Insignia NS-PDP50 50" Plasma TV-720P 8 Do not install near any way, such as the power-supply cord or plug is damaged, liquid has been spilled or objects have fallen into your outlet, consult an electrician for your plasma TV in locations where conventional TVs do not fit. ...cord • Round 75 ohm cable • Eye-bolts (2) • Bolts (2) • Wall brackets (2) • This user guide 2 www.insignia-products.com Overloaded wall outlets, loose or damaged wall outlets, extension cords, frayed power cords, or damaged or cracked wire insulation are not possible, have...
Insignia NS-PDP50 50" Plasma TV-720P 8 Do not install near any way, such as the power-supply cord or plug is damaged, liquid has been spilled or objects have fallen into your outlet, consult an electrician for your plasma TV in locations where conventional TVs do not fit. ...cord • Round 75 ohm cable • Eye-bolts (2) • Bolts (2) • Wall brackets (2) • This user guide 2 www.insignia-products.com Overloaded wall outlets, loose or damaged wall outlets, extension cords, frayed power cords, or damaged or cracked wire insulation are not possible, have...
User Manual (Spanish)
Page 5
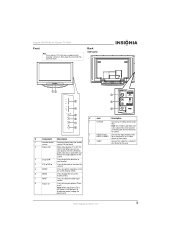
...INPUT Press to select the video input source. 8 Power Press to turn your plasma TV is off, power is red. To disconnect power, unplug the power cord. 1 2 3 # Jack Description 1 S-VIDEO Connect an S-Video device to this jack. www.insignia-products.com 3 Back Side jacks 12 CH 3 VOL 4 ENTER 5 MENU 6 INPUT...display (OSD). 6 MENU Press to open the on or off. Insignia NS-PDP50 50" Plasma TV-720P Front Note If your plasma TV is off, this LED is still present. Do not block. 2 Power LED When your plasma TV stand has a protective film covering, remove it, then wipe the ...
...INPUT Press to select the video input source. 8 Power Press to turn your plasma TV is off, power is red. To disconnect power, unplug the power cord. 1 2 3 # Jack Description 1 S-VIDEO Connect an S-Video device to this jack. www.insignia-products.com 3 Back Side jacks 12 CH 3 VOL 4 ENTER 5 MENU 6 INPUT...display (OSD). 6 MENU Press to open the on or off. Insignia NS-PDP50 50" Plasma TV-720P Front Note If your plasma TV is off, this LED is still present. Do not block. 2 Power LED When your plasma TV stand has a protective film covering, remove it, then wipe the ...
User Manual (Spanish)
Page 6
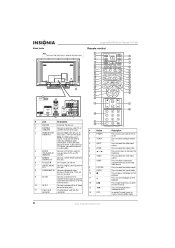
... CONTROL IN this jack. 3 HDMI1/DVI IN 1 Connect HDMI (DVI) devices to these jacks. Press to pause videotape or DVD playback. Insignia NS-PDP50 50" Plasma TV-720P Remote control 1 2 MODE TUNER POWER TV 23 3 INPUT DVD 24 4 ZOOM VCR 25 5 6 VIDEO COMP HDMI PC 26 7 PICTURE AUDIO PC ADJ DISPLAY 27 8 28 9 29 10...
... CONTROL IN this jack. 3 HDMI1/DVI IN 1 Connect HDMI (DVI) devices to these jacks. Press to pause videotape or DVD playback. Insignia NS-PDP50 50" Plasma TV-720P Remote control 1 2 MODE TUNER POWER TV 23 3 INPUT DVD 24 4 ZOOM VCR 25 5 6 VIDEO COMP HDMI PC 26 7 PICTURE AUDIO PC ADJ DISPLAY 27 8 28 9 29 10...
User Manual (Spanish)
Page 7
...sound. Press to select the RGB (computer) video mode. To bundle the cables: 1 Hold the cable management bracket with the + and - www.insignia-products.com 5 Press to open the on-screen display (OSD). symbols on the batteries align with both hands, then pull it . Warning Dispose ...18 RECALL Press to go to adjust the video settings for all the device you install. Press to fast-forward on a videotape or disc. Insignia NS-PDP50 50" Plasma TV-720P # Button Description 15 EXIT Press to close the on-screen display (OSD). 16 , , , Press to make selections in the on...
...sound. Press to select the RGB (computer) video mode. To bundle the cables: 1 Hold the cable management bracket with the + and - www.insignia-products.com 5 Press to open the on-screen display (OSD). symbols on the batteries align with both hands, then pull it . Warning Dispose ...18 RECALL Press to go to adjust the video settings for all the device you install. Press to fast-forward on a videotape or disc. Insignia NS-PDP50 50" Plasma TV-720P # Button Description 15 EXIT Press to close the on-screen display (OSD). 16 , , , Press to make selections in the on...
User Manual (Spanish)
Page 8
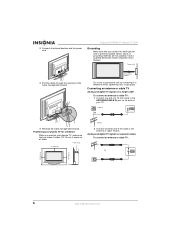
...on the cable management bracket. Positioning your plasma TV for ventilation When you position your plasma TV, make sure that you leave 4 inches (10.16 cm) of space on the back of the cable to prevent possible electric shock. Insignia NS-PDP50 50" Plasma TV-720P Grounding Make sure that you connect the ...earth ground wire to the antenna or cable TV jack. Short-circuit breaker Do not try to ground the unit by connecting it to ...
...on the cable management bracket. Positioning your plasma TV for ventilation When you position your plasma TV, make sure that you leave 4 inches (10.16 cm) of space on the back of the cable to prevent possible electric shock. Insignia NS-PDP50 50" Plasma TV-720P Grounding Make sure that you connect the ...earth ground wire to the antenna or cable TV jack. Short-circuit breaker Do not try to ground the unit by connecting it to ...
User Manual (Spanish)
Page 9
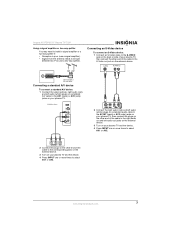
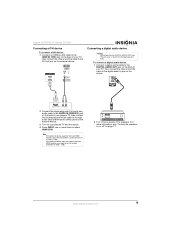
...device: 1 Connect the video (yellow), right audio (red), and left audio out jacks on the external device. 3 Turn on your plasma TV, then connect the other end of the cable to select AV1 or AV2. www.insignia-products.com 7 L AUDIO R VIDEO 2 Connect the plugs on the other end of your plasma... an S-Video device To connect an S-Video device: 1 Connect an S-Video cable to the S-VIDEO jack on the external device. Insignia NS-PDP50 50" Plasma TV-720P Using a signal amplifier or two-way splitter You may need to install a signal amplifier or a two-way splitter if: • Reception is ...
...device: 1 Connect the video (yellow), right audio (red), and left audio out jacks on the external device. 3 Turn on your plasma TV, then connect the other end of the cable to select AV1 or AV2. www.insignia-products.com 7 L AUDIO R VIDEO 2 Connect the plugs on the other end of your plasma... an S-Video device To connect an S-Video device: 1 Connect an S-Video cable to the S-VIDEO jack on the external device. Insignia NS-PDP50 50" Plasma TV-720P Using a signal amplifier or two-way splitter You may need to install a signal amplifier or a two-way splitter if: • Reception is ...
User Manual (Spanish)
Page 10
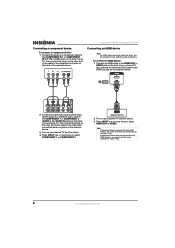
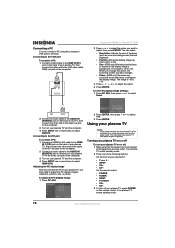
... need to set to 1280 × 720p. Insignia NS-PDP50 50" Plasma TV-720P Connecting a component device To connect a component device: 1 Connect the plugs on a component cable to the COMPONENT IN 1 or COMPONENT IN 2 (Y, Pb, and Pr) jacks on the back of your TV, then connect the plugs on the other end ... to the COMPONENT 1 or COMPONENT 2 (AUDIO L and AUDIO R) jacks on the back of your plasma TV and the device. 3 Press INPUT one or more times to 1280 × 720p. 8 www.insignia-products.com If the external device does not support the Auto HDMI function, you need to make additional...
... need to set to 1280 × 720p. Insignia NS-PDP50 50" Plasma TV-720P Connecting a component device To connect a component device: 1 Connect the plugs on a component cable to the COMPONENT IN 1 or COMPONENT IN 2 (Y, Pb, and Pr) jacks on the back of your TV, then connect the plugs on the other end ... to the COMPONENT 1 or COMPONENT 2 (AUDIO L and AUDIO R) jacks on the back of your plasma TV and the device. 3 Press INPUT one or more times to 1280 × 720p. 8 www.insignia-products.com If the external device does not support the Auto HDMI function, you need to make additional...
User Manual (Spanish)
Page 11
...HDMI function, the screen resolution is automatically set the screen resolution to 1280 × 720p. www.insignia-products.com 9 The jack uses a laser that could damage your plasma TV's speakers. Insignia NS-PDP50 50" Plasma TV-720P Connecting a DVI device To connect a DVI device: 1 Connect an HDMI-to-DVI cable... to the HDMI IN 1/DVI jack on the back of your TV, then connect the other end of the cable to...
...HDMI function, the screen resolution is automatically set the screen resolution to 1280 × 720p. www.insignia-products.com 9 The jack uses a laser that could damage your plasma TV's speakers. Insignia NS-PDP50 50" Plasma TV-720P Connecting a DVI device To connect a DVI device: 1 Connect an HDMI-to-DVI cable... to the HDMI IN 1/DVI jack on the back of your TV, then connect the other end of the cable to...
User Manual (Spanish)
Page 12
The range is -16 to +16. 3 Press , , , or to adjust the PC display image's resolution, position, size, or phase. Insignia NS-PDP50 50" Plasma TV-720P 2 Press or to select the option you may need to adjust the option. 4 Press ENTER. To adjust the PC display image: 1 Press PC...-(RGB only) Removes any horizontal noise and clears or sharpens the display image. This will protect your plasma TV to select Yes. 3 Press ENTER. Your plasma TV enters standby mode. 10 www.insignia-products.com Connecting a PC You can select: • Resolution-Adjusts the size of the items (such as...
The range is -16 to +16. 3 Press , , , or to adjust the PC display image's resolution, position, size, or phase. Insignia NS-PDP50 50" Plasma TV-720P 2 Press or to select the option you may need to adjust the option. 4 Press ENTER. To adjust the PC display image: 1 Press PC...-(RGB only) Removes any horizontal noise and clears or sharpens the display image. This will protect your plasma TV to select Yes. 3 Press ENTER. Your plasma TV enters standby mode. 10 www.insignia-products.com Connecting a PC You can select: • Resolution-Adjusts the size of the items (such as...
User Manual (Spanish)
Page 13
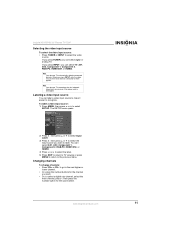
...channel, press -, then press the number button for the sub-channel. Note Your plasma TV automatically detects connected devices. You can label a video input source to make it easier to the previous menu. www.insignia-products.com 11 When you want . • Or, to them appear. Changing channels...to the next higher or lower channel. • Or, press the number buttons for the channel you can select digital or analog TV. Insignia NS-PDP50 50" Plasma TV-720P Selecting the video input source To select the video input source: • Press TUNER or INPUT to select SETUP. to go ...
...channel, press -, then press the number button for the sub-channel. Note Your plasma TV automatically detects connected devices. You can label a video input source to make it easier to the previous menu. www.insignia-products.com 11 When you want . • Or, to them appear. Changing channels...to the next higher or lower channel. • Or, press the number buttons for the channel you can select digital or analog TV. Insignia NS-PDP50 50" Plasma TV-720P Selecting the video input source To select the video input source: • Press TUNER or INPUT to select SETUP. to go ...
User Manual (Spanish)
Page 14
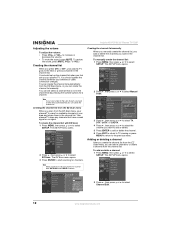
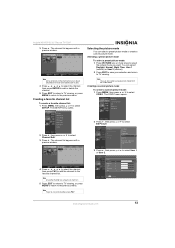
...them in the channel list. Creating the channel list When you first set up your plasma TV. Your plasma TV skips any channels that you let your antenna or cable connection changes. Insignia NS-PDP50 50" Plasma TV-720P Adjusting the volume To adjust the volume: • Press VOL+ or VOL- ...You should update the channel list when your plasma TV scan for channels. The SETUP menu opens. 2 Press , then ...
...them in the channel list. Creating the channel list When you first set up your plasma TV. Your plasma TV skips any channels that you let your antenna or cable connection changes. Insignia NS-PDP50 50" Plasma TV-720P Adjusting the volume To adjust the volume: • Press VOL+ or VOL- ...You should update the channel list when your plasma TV scan for channels. The SETUP menu opens. 2 Press , then ...
User Manual (Spanish)
Page 15
... a preset picture mode from the Video menu. Creating a favorite channel list To create a favorite channel list: 1 Press MENU, then press or to select SETUP. Insignia NS-PDP50 50" Plasma TV-720P 3 Press . The channel list appears with a preview window. 2 Press , then press or to select EZ Picture. 3 Press , then press or to select User...
... a preset picture mode from the Video menu. Creating a favorite channel list To create a favorite channel list: 1 Press MENU, then press or to select SETUP. Insignia NS-PDP50 50" Plasma TV-720P 3 Press . The channel list appears with a preview window. 2 Press , then press or to select EZ Picture. 3 Press , then press or to select User...


