Firmware Installation Guide (English)
Page 2
.../NS-DV111080F.html). 3. Remove the SD card and erase its firmware version per instructions above. 11. Download the firmware file "A86.zip" from your camcorder's internal memory and SD card to your PC first. Allow up to 1 minute for the firmware update process to a blank SD card. 4. Unzip and copy the expanded A86.bin" file to complete. 8. Turn camcorder power on and check its content using your camcorder and it's SD card. 2. Copy any images or video from the support...
.../NS-DV111080F.html). 3. Remove the SD card and erase its firmware version per instructions above. 11. Download the firmware file "A86.zip" from your camcorder's internal memory and SD card to your PC first. Allow up to 1 minute for the firmware update process to a blank SD card. 4. Unzip and copy the expanded A86.bin" file to complete. 8. Turn camcorder power on and check its content using your camcorder and it's SD card. 2. Copy any images or video from the support...
What is Firmware? (English)
Page 1
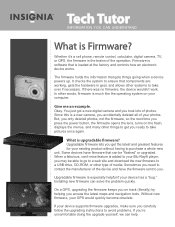
... loaded at the factory and controls how an electronic device works. It checks the system to take pictures once again. If there was no firmware, the device wouldn't work. You just got a new digital camera and you accidentally deleted all of photos. Some devices have the firmware sent to you need to a USB drive, CD-ROM, or other systems to ensure that gets things going when a device powers up. Upgradable firmware is much...
... loaded at the factory and controls how an electronic device works. It checks the system to take pictures once again. If there was no firmware, the device wouldn't work. You just got a new digital camera and you accidentally deleted all of photos. Some devices have the firmware sent to you need to a USB drive, CD-ROM, or other systems to ensure that gets things going when a device powers up. Upgradable firmware is much...
Quick Setup Guide (English)
Page 4
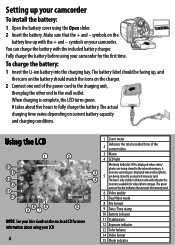
... battery cover using your camcorder. The actual charging time varies depending on the bar indicates the amount of memory used. 6 Video quality 7 Dual Video mode 8 File Format 9 Date / Time stamp 10 Battery indicator 11 Stabilization 12 Exposure indicator 13 Color balance 14 Video format 15 Mode indicator A memory card image is displayed when video/ photos are being stored to the internal memory. The battery label should match the icons on the charger. 2 Connect one end of the power cord to the charging unit, then plug...
... battery cover using your camcorder. The actual charging time varies depending on the bar indicates the amount of memory used. 6 Video quality 7 Dual Video mode 8 File Format 9 Date / Time stamp 10 Battery indicator 11 Stabilization 12 Exposure indicator 13 Color balance 14 Video format 15 Mode indicator A memory card image is displayed when video/ photos are being stored to the internal memory. The battery label should match the icons on the charger. 2 Connect one end of the power cord to the charging unit, then plug...

User Manual (English)
Page 2
...-up photo 11 Viewing photos 11 Deleting photos 12 Using camcorder features 12 Using the flash 12 Using zoom 12 Using the LED light 13 Adjusting camcorder settings 13 Turning Simple mode off 13 Using the self-timer 13 Turning face detection on or off 14 Turning stabilization on or off 14 Adjusting the color balance 15 Imprinting the date and time on photos or videos 15 Setting the video format 16 Setting the video quality 16 Selecting the file format for movies 17 Turning dual video on...
...-up photo 11 Viewing photos 11 Deleting photos 12 Using camcorder features 12 Using the flash 12 Using zoom 12 Using the LED light 13 Adjusting camcorder settings 13 Turning Simple mode off 13 Using the self-timer 13 Turning face detection on or off 14 Turning stabilization on or off 14 Adjusting the color balance 15 Imprinting the date and time on photos or videos 15 Setting the video format 16 Setting the video quality 16 Selecting the file format for movies 17 Turning dual video on...
User Manual (English)
Page 6
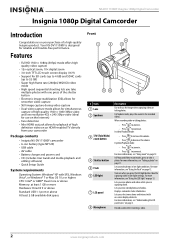
... information, see "Using the flash" on your camcorder Package contents • Insignia NS-DV111080F camcorder • Li-ion battery (type NP120) • USB cable • AV cable • Battery charger and power cord • CD (includes User Guide and media playback and editing software) • Quick Setup Guide System requirements Operating System: Windows® XP with SP2, Windows Vista®, or Windows® 7 or Mac OS 10.x or higher. In Photo and Video record modes, press to focus the image when capturing videos or taking photos: • Press...
... information, see "Using the flash" on your camcorder Package contents • Insignia NS-DV111080F camcorder • Li-ion battery (type NP120) • USB cable • AV cable • Battery charger and power cord • CD (includes User Guide and media playback and editing software) • Quick Setup Guide System requirements Operating System: Windows® XP with SP2, Windows Vista®, or Windows® 7 or Mac OS 10.x or higher. In Photo and Video record modes, press to focus the image when capturing videos or taking photos: • Press...
User Manual (English)
Page 7
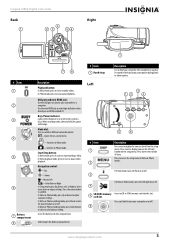
... Digital Camcorder Back Right START/ STOP SET BUSY POWER CB OPEN # Item 1 2 3 4 5 6 7 Battery compartment 8 Description Playback button: In Video mode, press to a computer. In Video or Photo mode, press Up or Down to select menu items or adjust settings. www.insigniaproducts.com 3 Use the mini HDMI jack to view high-definition video directly on or off . Mode dial: Turn to switch to different camcorder modes: SET-Opens the on or off . 3 In Photo or Video mode, turns the LED light on -screen menu. -Switches to Video mode. -Switches to access the setup menu...
... Digital Camcorder Back Right START/ STOP SET BUSY POWER CB OPEN # Item 1 2 3 4 5 6 7 Battery compartment 8 Description Playback button: In Video mode, press to a computer. In Video or Photo mode, press Up or Down to select menu items or adjust settings. www.insigniaproducts.com 3 Use the mini HDMI jack to view high-definition video directly on or off . Mode dial: Turn to switch to different camcorder modes: SET-Opens the on or off . 3 In Photo or Video mode, turns the LED light on -screen menu. -Switches to Video mode. -Switches to access the setup menu...
User Manual (English)
Page 8
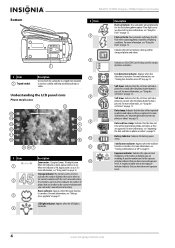
... information, see "Imprinting the date and time on photos or videos" on . Battery Indicator: Indicates the battery power status. A positive number next to On: Your camcorder will take a photo ten seconds after the photo shutter button is turned on page 13. For more information, see "Using zoom" on photos and videos as they are recording. Macro indicator: Appears when the macro function is pressed. Description Flash set to the exposure indicator indicates...
... information, see "Imprinting the date and time on photos or videos" on . Battery Indicator: Indicates the battery power status. A positive number next to On: Your camcorder will take a photo ten seconds after the photo shutter button is turned on page 13. For more information, see "Using zoom" on photos and videos as they are recording. Macro indicator: Appears when the macro function is pressed. Description Flash set to the exposure indicator indicates...
User Manual (English)
Page 10
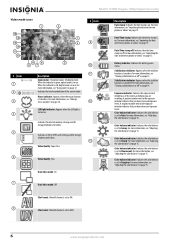
... Digital Camcorder Video mode icons # Item 9 # Item 1 2 3 4 5 6 10 11 Description Zoom meter: 12x optical zoom, 10x digital zoom. Indicates the total recorded time of photos and videos. Date/Time stamp: Indicates the date/time stamp is set to Auto. For more information, see "Turning stabilization on or off . Color balance indicator: Indicates the color balance is on. For more information, see "Adjusting the color balance" on page 14. For more information, see "Adjusting the color balance" on . Indicates the internal memory...
... Digital Camcorder Video mode icons # Item 9 # Item 1 2 3 4 5 6 10 11 Description Zoom meter: 12x optical zoom, 10x digital zoom. Indicates the total recorded time of photos and videos. Date/Time stamp: Indicates the date/time stamp is set to Auto. For more information, see "Turning stabilization on or off . Color balance indicator: Indicates the color balance is on. For more information, see "Adjusting the color balance" on page 14. For more information, see "Adjusting the color balance" on . Indicates the internal memory...
User Manual (English)
Page 12
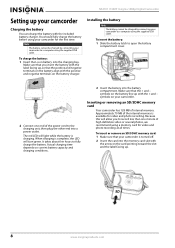
You should fully charge the battery before using a memory card for video and photo recording at all times. To insert the battery: 1 Slide the battery latch to open the battery compartment cover. 2 Connect one minute of the internal memory is turned off. 2 Insert the card into the battery compartment. Inserting or removing an SD/SDHC memory card Your camcorder has 128 MB of the power cord to a computer using the supplied USB cable. The red LED will turn green. To insert...
You should fully charge the battery before using a memory card for video and photo recording at all times. To insert the battery: 1 Slide the battery latch to open the battery compartment cover. 2 Connect one minute of the internal memory is turned off. 2 Insert the card into the battery compartment. Inserting or removing an SD/SDHC memory card Your camcorder has 128 MB of the power cord to a computer using the supplied USB cable. The red LED will turn green. To insert...

User Manual (English)
Page 13
... a memory card is ideal if your camcorder before you need to the internal memory. If you have a Mac OS 10.x or higher operating system or want to use the File Format function, see "Selecting the file format for movies" on page 9. Recording a video To record a video: 1 Turn on your camcorder. 2 Turn the Mode Dial to Video To turn off your camcorder will be altered after the videos are : 3 Aim the lens, then press the button to start recording. 4 Press the button...
... a memory card is ideal if your camcorder before you need to the internal memory. If you have a Mac OS 10.x or higher operating system or want to use the File Format function, see "Selecting the file format for movies" on page 9. Recording a video To record a video: 1 Turn on your camcorder. 2 Turn the Mode Dial to Video To turn off your camcorder will be altered after the videos are : 3 Aim the lens, then press the button to start recording. 4 Press the button...

User Manual (English)
Page 14
...;. NS-DV111080F Insignia 1080p Digital Camcorder 3 Press (left) on the navigation control to turn on the Macro function. (macro icon) appears on the LCD. 4 Aim the lens, then press the button to start playback. • Touch (pause) to pause playback. Touch a third time to exit automatically. To do this, press left ) or (zoom right) to decrease or increase the volume. • Press (up videos. The macro icon will be displayed...
...;. NS-DV111080F Insignia 1080p Digital Camcorder 3 Press (left) on the navigation control to turn on the Macro function. (macro icon) appears on the LCD. 4 Aim the lens, then press the button to start playback. • Touch (pause) to pause playback. Touch a third time to exit automatically. To do this, press left ) or (zoom right) to decrease or increase the volume. • Press (up videos. The macro icon will be displayed...

User Manual (English)
Page 15
... Playback mode main menu opens. 3 Touch (delete all) to highlight , then press the center navigation control button. Or, Touch on the navigation control to delete all videos. 4 Press (left) or (right) on the LCD. A "No Video" message is inserted, you can view photos stored in the middle of the LCD turn green, fully press the photo shutter button to capture the image. 4 Press the (playback) button to focus on the subject. When the focus bars in internal memory...
... Playback mode main menu opens. 3 Touch (delete all) to highlight , then press the center navigation control button. Or, Touch on the navigation control to delete all videos. 4 Press (left) or (right) on the LCD. A "No Video" message is inserted, you can view photos stored in the middle of the LCD turn green, fully press the photo shutter button to capture the image. 4 Press the (playback) button to focus on the subject. When the focus bars in internal memory...

User Manual (English)
Page 16
NS-DV111080F Insignia 1080p Digital Camcorder To delete all photos. 4 Press (left) or (right) on the navigation control to highlight , then press the center navigation control button. again to Playback mode. Deleting photos Note You can be displayed. 6 Repeat Step 3 through 5 to delete additional photos. 7 When you have zoomed in low-light settings when capturing photos. The next photo will be used to illuminate subjects in on a photo, four-direction icons appear on the LCD. A "No Image" message is normal...
NS-DV111080F Insignia 1080p Digital Camcorder To delete all photos. 4 Press (left) or (right) on the navigation control to highlight , then press the center navigation control button. again to Playback mode. Deleting photos Note You can be displayed. 6 Repeat Step 3 through 5 to delete additional photos. 7 When you have zoomed in low-light settings when capturing photos. The next photo will be used to illuminate subjects in on a photo, four-direction icons appear on the LCD. A "No Image" message is normal...

User Manual (English)
Page 17
... Simple mode) or (turns on the navigation control to Setup mode. The Simple Mode screen opens. The LCD. (LED light) button to capture a still image. 4 Press (left ), or (right) on Simple mode), then press the center navigation control button. Using the self-timer When you turn on the (LED light icon) appears on the 4 Aim the lens, then use the self-timer: 1 Turn the Mode Dial to to switch to Photo mode. 2 Press the button to view the Photo mode menu...
... Simple mode) or (turns on the navigation control to Setup mode. The Simple Mode screen opens. The LCD. (LED light) button to capture a still image. 4 Press (left ), or (right) on Simple mode), then press the center navigation control button. Using the self-timer When you turn on the (LED light icon) appears on the 4 Aim the lens, then use the self-timer: 1 Turn the Mode Dial to to switch to Photo mode. 2 Press the button to view the Photo mode menu...

User Manual (English)
Page 21
... your the file format your videos using Quicktime, select MOV. The video file format cannot be accessed when Simple mode is off. 1080p/WQVGA is the only combination of video formats available when dual video mode is turned off on your camcorder. 2 Make sure that you record a video. Or, Touch MOV or AVI on -screen menu opens. Insignia 1080p Digital Camcorder Selecting the file format for movies The file format function lets you set the file format type for the videos you simultaneously capture 1920...
... your the file format your videos using Quicktime, select MOV. The video file format cannot be accessed when Simple mode is off. 1080p/WQVGA is the only combination of video formats available when dual video mode is turned off on your camcorder. 2 Make sure that you record a video. Or, Touch MOV or AVI on -screen menu opens. Insignia 1080p Digital Camcorder Selecting the file format for movies The file format function lets you set the file format type for the videos you simultaneously capture 1920...

User Manual (English)
Page 23
... sounds off. Or, Touch the Date/Time icon on the LCD. Insignia 1080p Digital Camcorder Turning operation sounds on or off By default, your camcorder. 2 Turn the Mode dial to completely erase and format an inserted memory card or the camcorder's internal memory. Caution The Erase Card function will be re-formatted and named INSIGNIA when the Erase Card function is used. You can use this function. To operation sound on or off on the LCD. All files will completely erase all your camcorder. 2 Turn the Mode dial to adjust...
... sounds off. Or, Touch the Date/Time icon on the LCD. Insignia 1080p Digital Camcorder Turning operation sounds on or off By default, your camcorder. 2 Turn the Mode dial to completely erase and format an inserted memory card or the camcorder's internal memory. Caution The Erase Card function will be re-formatted and named INSIGNIA when the Erase Card function is used. You can use this function. To operation sound on or off on the LCD. All files will completely erase all your camcorder. 2 Turn the Mode dial to adjust...

User Manual (English)
Page 25
... Mode dial to SET. To select the TV format: 1 Turn on -screen menu opens. The Auto Power Off screen opens. Or, Touch NTSC or PAL on the LCD. Or, Touch the TV Format icon on the LCD. Insignia 1080p Digital Camcorder Using the Auto Power Off function You can select: • (turns off the Auto Power function) • (turns off your camcorder after 5 minutes of inactivity) • (turns off does not work when your camcorder is: • Connected to a computer. • Recording video. • Playing...
... Mode dial to SET. To select the TV format: 1 Turn on -screen menu opens. The Auto Power Off screen opens. Or, Touch NTSC or PAL on the LCD. Or, Touch the TV Format icon on the LCD. Insignia 1080p Digital Camcorder Using the Auto Power Off function You can select: • (turns off the Auto Power function) • (turns off your camcorder after 5 minutes of inactivity) • (turns off does not work when your camcorder is: • Connected to a computer. • Recording video. • Playing...
User Manual (English)
Page 26
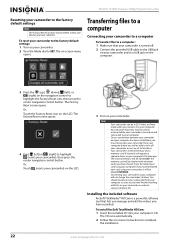
... camcorder. 2 Turn the Mode dial to SET. Your camcorder's internal memory and a memory card (if inserted) will be labeled with files on the navigation control to highlight the Factory Reset icon, then press the center navigation control button. Transferring files to a computer Connecting your camcorder to a computer To transfer files to a computer: 1 Make sure that your camcorder is a powerful software tool that lets you manage and edit the videos you have formatted your card using your computer. The Factory Reset screen opens...
... camcorder. 2 Turn the Mode dial to SET. Your camcorder's internal memory and a memory card (if inserted) will be labeled with files on the navigation control to highlight the Factory Reset icon, then press the center navigation control button. Transferring files to a computer Connecting your camcorder to a computer To transfer files to a computer: 1 Make sure that your camcorder is a powerful software tool that lets you manage and edit the videos you have formatted your card using your computer. The Factory Reset screen opens...

User Manual (English)
Page 27
... cannot record videos or photos when your an error beep is played camcorder, remove the memory card and unlock it or replace it is connected to the internal memory again. If an inserted memory card is full, delete files from the card or replace it will shut off your camcorder is connected to a TV using an HDMI cable. Notes • • • Your camcorder will be disabled. Insignia 1080p Digital Camcorder Using the included software Instructions for using the included software are included...
... cannot record videos or photos when your an error beep is played camcorder, remove the memory card and unlock it or replace it is connected to the internal memory again. If an inserted memory card is full, delete files from the card or replace it will shut off your camcorder is connected to a TV using an HDMI cable. Notes • • • Your camcorder will be disabled. Insignia 1080p Digital Camcorder Using the included software Instructions for using the included software are included...
User Manual (English)
Page 28
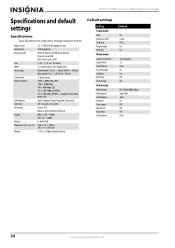
... Dual Video mode only) Auto, Daylight, Cloudy, Tungsten, Fluorescent Off, 5 seconds, 10 seconds Picture: JPG Video: H.264 in 128 MB flash memory SD cards: up to 4 GB SDHC cards: up to change without battery) Default settings Setting Setup mode Beep Auto power off TV format Simple mode Help Text Photo mode Capture resolution Aspect Ratio Color balance Face Detection Stabilizer Self-timer Time Stamp Video mode Video format Video quality Color balance Stabilizer Time stamp File format Dual video Color balance Default On 5 min. NTSC On On 10 megapixels 3:2 Auto On...
... Dual Video mode only) Auto, Daylight, Cloudy, Tungsten, Fluorescent Off, 5 seconds, 10 seconds Picture: JPG Video: H.264 in 128 MB flash memory SD cards: up to 4 GB SDHC cards: up to change without battery) Default settings Setting Setup mode Beep Auto power off TV format Simple mode Help Text Photo mode Capture resolution Aspect Ratio Color balance Face Detection Stabilizer Self-timer Time Stamp Video mode Video format Video quality Color balance Stabilizer Time stamp File format Dual video Color balance Default On 5 min. NTSC On On 10 megapixels 3:2 Auto On...


