
Quick Setup Guide (English)
Page 1
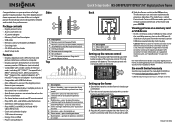
...; Compatible with USB flash drives • Mini-USB port to connect the digital picture frame to play. To turn off Demo mode, point the remote control at the same time in portrait orientation. 3 Plug the AC power adapter into the frame's DC power connector and into sleep mode. Some cards require an adapter to put unit into an AC power outlet. For more information on supported memory cards, see the User Guide on the frame's orientation • On-frame button controls...
...; Compatible with USB flash drives • Mini-USB port to connect the digital picture frame to play. To turn off Demo mode, point the remote control at the same time in portrait orientation. 3 Plug the AC power adapter into the frame's DC power connector and into sleep mode. Some cards require an adapter to put unit into an AC power outlet. For more information on supported memory cards, see the User Guide on the frame's orientation • On-frame button controls...
User Manual (English)
Page 3
www.insigniaproducts.com 1 NS-DPF8PR/NS-DPF10PR Digital Picture Frames Contents Introduction 1 Safety information 2 Features 3 Setting up your frame 9 Using your frame 13 Maintaining 41 Troubleshooting 42 Specifications 44 Legal notices 45 6-month limited warranty 47 Introduction Congratulations on your purchase of a high-quality Insignia product. Your new digital picture frame is designed for reliable and trouble-free performance.
www.insigniaproducts.com 1 NS-DPF8PR/NS-DPF10PR Digital Picture Frames Contents Introduction 1 Safety information 2 Features 3 Setting up your frame 9 Using your frame 13 Maintaining 41 Troubleshooting 42 Specifications 44 Legal notices 45 6-month limited warranty 47 Introduction Congratulations on your purchase of a high-quality Insignia product. Your new digital picture frame is designed for reliable and trouble-free performance.

User Manual (English)
Page 4
... ventilation and proper operation, never cover or block the slots and openings with the instructions and illustrations provided in this manual. To prevent it on an unstable cart, stand, tripod, bracket, or table. Do not spill or spray liquid of any kind into the digital picture frame through openings. Disassembly-Do not attempt to qualified personnel. NS-DPF8PR/NS-DPF10PR Safety information...
... ventilation and proper operation, never cover or block the slots and openings with the instructions and illustrations provided in this manual. To prevent it on an unstable cart, stand, tripod, bracket, or table. Do not spill or spray liquid of any kind into the digital picture frame through openings. Disassembly-Do not attempt to qualified personnel. NS-DPF8PR/NS-DPF10PR Safety information...
User Manual (English)
Page 5
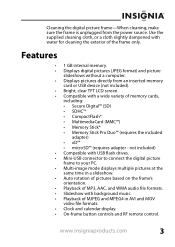
... connect the digital picture frame to your PC. • Multi-image mode displays multiple pictures at the same time in AVI and MOV video file formats. • Clock and calendar display. • On-frame button controls and RF remote control. Cleaning the digital picture frame-When cleaning, make sure the frame is unplugged from an inserted memory card or USB device (not included). • Bright, clear TFT LCD screen. • Compatible with background music. • Playback of MJPEG and MPEG4 in a slideshow. • Auto rotation of pictures...
... connect the digital picture frame to your PC. • Multi-image mode displays multiple pictures at the same time in AVI and MOV video file formats. • Clock and calendar display. • On-frame button controls and RF remote control. Cleaning the digital picture frame-When cleaning, make sure the frame is unplugged from an inserted memory card or USB device (not included). • Bright, clear TFT LCD screen. • Compatible with background music. • Playback of MJPEG and MPEG4 in a slideshow. • Auto rotation of pictures...

User Manual (English)
Page 8
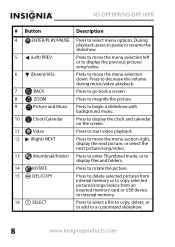
Press and hold for copying, deleting, or viewing requires the remote control, and the instructions in this guide refer to remote control buttons (except where noted). # Button Description 1 MENU Press to previous selection or screen. 6 www.insigniaproducts.com Selecting files for three seconds to enter standby mode. 2 Left arrow Press to move the menu selection left or to display the previous picture. 3 Right arrow Press to move the menu selection right...
Press and hold for copying, deleting, or viewing requires the remote control, and the instructions in this guide refer to remote control buttons (except where noted). # Button Description 1 MENU Press to previous selection or screen. 6 www.insigniaproducts.com Selecting files for three seconds to enter standby mode. 2 Left arrow Press to move the menu selection left or to display the previous picture. 3 Right arrow Press to move the menu selection right...
User Manual (English)
Page 10
... internal memory. Press to move the menu selection left or to select menu options. Press to move the menu section right, display the next picture, or select the next picture/song/video. Press to magnify the picture. Press to begin a slideshow with background music. Press to rotate the picture. Press to display files and folders. Press to enter Thumbnail mode, or to display the clock and calendar on the screen. NS-DPF8PR/NS-DPF10PR # Button 4 ENTER/PLAY...
... internal memory. Press to move the menu selection left or to select menu options. Press to move the menu section right, display the next picture, or select the next picture/song/video. Press to magnify the picture. Press to begin a slideshow with background music. Press to rotate the picture. Press to display files and folders. Press to enter Thumbnail mode, or to display the clock and calendar on the screen. NS-DPF8PR/NS-DPF10PR # Button 4 ENTER/PLAY...
User Manual (English)
Page 12
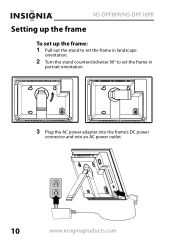
NS-DPF8PR/NS-DPF10PR Setting up the frame To set up the frame: 1 Pull out the stand to set the frame in landscape orientation. 2 Turn the stand counterclockwise 90° to set the frame in portrait orientation. 3 Plug the AC power adapter into the frame's DC power connector and into an AC power outlet. 10 www.insigniaproducts.com
NS-DPF8PR/NS-DPF10PR Setting up the frame To set up the frame: 1 Pull out the stand to set the frame in landscape orientation. 2 Turn the stand counterclockwise 90° to set the frame in portrait orientation. 3 Plug the AC power adapter into the frame's DC power connector and into an AC power outlet. 10 www.insigniaproducts.com
User Manual (English)
Page 13
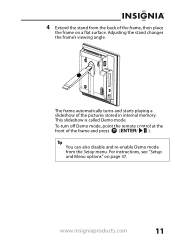
To turn off Demo mode, point the remote control at the front of the frame, then place the frame on page 37. Tip You can also disable and re-enable Demo mode from the back of the frame and press (ENTER/ ). 4 Extend the stand from the Setup menu. The frame automatically turns and starts playing a slideshow of the pictures stored in internal memory. For instructions, see "Setup and Menu options" on a flat surface. www.insigniaproducts.com 11 Adjusting the stand changes the frame's viewing angle. This slideshow is called Demo mode.
To turn off Demo mode, point the remote control at the front of the frame, then place the frame on page 37. Tip You can also disable and re-enable Demo mode from the back of the frame and press (ENTER/ ). 4 Extend the stand from the Setup menu. The frame automatically turns and starts playing a slideshow of the pictures stored in internal memory. For instructions, see "Setup and Menu options" on a flat surface. www.insigniaproducts.com 11 Adjusting the stand changes the frame's viewing angle. This slideshow is called Demo mode.
User Manual (English)
Page 15
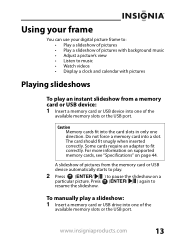
... music • Watch videos • Display a clock and calendar with pictures Playing slideshows To play an instant slideshow from the memory card or USB device automatically starts to play a slideshow: 1 Insert a memory card or USB drive into one of the available memory slots or the USB port. Do not force a memory card into the card slots in only one of the available memory slots or the USB port. For more information on supported memory cards, see "Specifications" on a particular picture. Some cards require an adapter...
... music • Watch videos • Display a clock and calendar with pictures Playing slideshows To play an instant slideshow from the memory card or USB device automatically starts to play a slideshow: 1 Insert a memory card or USB drive into one of the available memory slots or the USB port. Do not force a memory card into the card slots in only one of the available memory slots or the USB port. For more information on supported memory cards, see "Specifications" on a particular picture. Some cards require an adapter...
User Manual (English)
Page 18
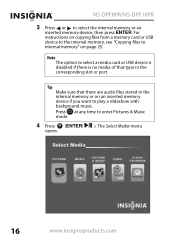
... are audio files stored in the corresponding slot or port. For instructions on copying files from a memory card or USB device to the internal memory, see "Copying files to internal memory" on an inserted memory device if you want to select the internal memory or an inserted memory device, then press ENTER. The Select Media menu 16 www.insigniaproducts.com NS-DPF8PR/NS-DPF10PR 3 Press or to play a slideshow with background music. Tip Make sure that type in the internal memory or...
... are audio files stored in the corresponding slot or port. For instructions on copying files from a memory card or USB device to the internal memory, see "Copying files to internal memory" on an inserted memory device if you want to select the internal memory or an inserted memory device, then press ENTER. The Select Media menu 16 www.insigniaproducts.com NS-DPF8PR/NS-DPF10PR 3 Press or to play a slideshow with background music. Tip Make sure that type in the internal memory or...
User Manual (English)
Page 31
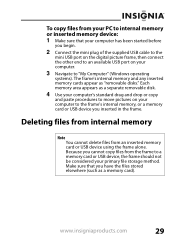
... internal memory Note You cannot delete files from the frame to a memory card or USB device, the frame should not be considered your primary file storage method. Each memory area appears as a separate removable disk. 4 Use your computer's standard drag and drop or copy and paste procedures to move pictures on your computer. 3 Navigate to "My Computer" (Windows operating systems). Make sure that your computer has been started before you begin. 2 Connect...
... internal memory Note You cannot delete files from the frame to a memory card or USB device, the frame should not be considered your primary file storage method. Each memory area appears as a separate removable disk. 4 Use your computer's standard drag and drop or copy and paste procedures to move pictures on your computer. 3 Navigate to "My Computer" (Windows operating systems). Make sure that your computer has been started before you begin. 2 Connect...
User Manual (English)
Page 33
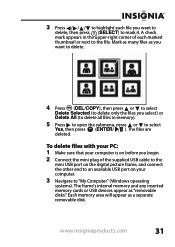
... supplied USB cable to the mini USB port on the digital picture frame, and connect the other end to an available USB port on before you begin. 2 Connect the mini plug of each file you select) or Delete All (to delete all files in memory). 5 Press to open the submenu, press or to select Yes, then press (ENTER/ ). The frame's internal memory and any inserted memory cards or USB devices appear as a separate removable disk. The files...
... supplied USB cable to the mini USB port on the digital picture frame, and connect the other end to an available USB port on before you begin. 2 Connect the mini plug of each file you select) or Delete All (to delete all files in memory). 5 Press to open the submenu, press or to select Yes, then press (ENTER/ ). The frame's internal memory and any inserted memory cards or USB devices appear as a separate removable disk. The files...
User Manual (English)
Page 34
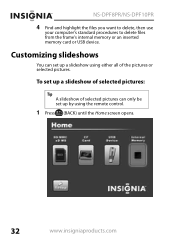
Customizing slideshows You can only be set up by using either all of the pictures or selected pictures. To set up a slideshow of selected pictures: Tip A slideshow of selected pictures can set up a slideshow using the remote control. 1 Press (BACK) until the Home screen opens. 32 www.insigniaproducts.com NS-DPF8PR/NS-DPF10PR 4 Find and highlight the files you want to delete, then use your computer's standard procedures to delete files from the frame's internal memory or an inserted memory card or USB device.
Customizing slideshows You can only be set up by using either all of the pictures or selected pictures. To set up a slideshow of selected pictures: Tip A slideshow of selected pictures can set up a slideshow using the remote control. 1 Press (BACK) until the Home screen opens. 32 www.insigniaproducts.com NS-DPF8PR/NS-DPF10PR 4 Find and highlight the files you want to delete, then use your computer's standard procedures to delete files from the frame's internal memory or an inserted memory card or USB device.
User Manual (English)
Page 37
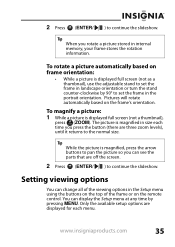
... orientation or turn the stand counter-clockwise by pressing MENU. Tip While the picture is displayed full screen (not as a thumbnail), use the adjustable stand to set the frame in the portrait orientation. Tip When you press the button (there are displayed for each time you rotate a picture stored in the Setup menu using the buttons on the top of the viewing options in internal memory, your frame stores the rotation information. To rotate a picture automatically...
... orientation or turn the stand counter-clockwise by pressing MENU. Tip While the picture is displayed full screen (not as a thumbnail), use the adjustable stand to set the frame in the portrait orientation. Tip When you press the button (there are displayed for each time you rotate a picture stored in the Setup menu using the buttons on the top of the viewing options in internal memory, your frame stores the rotation information. To rotate a picture automatically...
User Manual (English)
Page 42
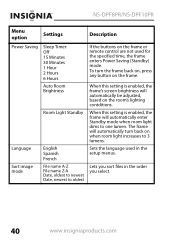
... room's lighting contditions. Sets the language used for the specified time, the frame enters Power Saving (Standby) mode. NS-DPF8PR/NS-DPF10PR Menu option Settings Description Power Saving Language Sort image mode Sleep Timer: Off 15 Minutes 30 Minutes 1 Hour 2 Hours 6 Hours Auto Room Brightness Room Light Standby English Spanish French File name A-Z File name Z-A Date, oldest to newest Date, newest to oldest If the buttons on the frame or remote control are not used in...
... room's lighting contditions. Sets the language used for the specified time, the frame enters Power Saving (Standby) mode. NS-DPF8PR/NS-DPF10PR Menu option Settings Description Power Saving Language Sort image mode Sleep Timer: Off 15 Minutes 30 Minutes 1 Hour 2 Hours 6 Hours Auto Room Brightness Room Light Standby English Spanish French File name A-Z File name Z-A Date, oldest to newest Date, newest to oldest If the buttons on the frame or remote control are not used in...
User Manual (English)
Page 43
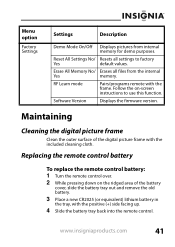
... area of the digital picture frame with the included cleaning cloth. Menu option Factory Settings Settings Description Demo Mode On/Off Displays pictures from the internal Yes memory. RF Learn mode Pairs/programs remote with the positive (+) side facing up. 4 Slide the battery tray back into the remote control. Reset All Settings No/ Resets all files from internal memory for demo purposes. Software Version Displays the firmware version. Erase All Memory No/ Erases all settings to use this function.
... area of the digital picture frame with the included cleaning cloth. Menu option Factory Settings Settings Description Demo Mode On/Off Displays pictures from the internal Yes memory. RF Learn mode Pairs/programs remote with the positive (+) side facing up. 4 Slide the battery tray back into the remote control. Reset All Settings No/ Resets all files from internal memory for demo purposes. Software Version Displays the firmware version. Erase All Memory No/ Erases all settings to use this function.
User Manual (English)
Page 44
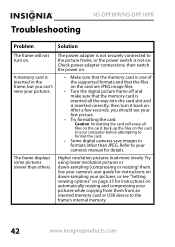
... digital cameras save images in the frame, but you should see "Setting viewing options" on page 35 for instructions on automatically resizing and compressing your camera's user guide for details. Troubleshooting NS-DPF8PR/NS-DPF10PR Problem Solution The frame will erase all the way into the card slot and is not on. The power adapter is inserted in formats other than others. Higher resolution pictures load more slowly. A memory card is not securely connected to the frame's internal memory...
... digital cameras save images in the frame, but you should see "Setting viewing options" on page 35 for instructions on automatically resizing and compressing your camera's user guide for details. Troubleshooting NS-DPF8PR/NS-DPF10PR Problem Solution The frame will erase all the way into the card slot and is not on. The power adapter is inserted in formats other than others. Higher resolution pictures load more slowly. A memory card is not securely connected to the frame's internal memory...
User Manual (English)
Page 45
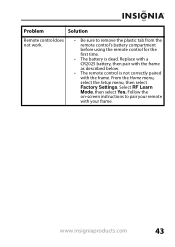
From the Home menu, select the Setup menu, then select Factory Settings. www.insigniaproducts.com 43 Select RF Learn Mode, then select Yes. Follow the on-screen instructions to remove the plastic tab from the remote control's battery compartment before using the remote control for the first time. • The battery is not correctly paired with your remote with the frame. Replace with a CR2025 battery, then pair with the frame as described below. • The remote control is dead. Problem Solution Remote control does not work. • Be sure to pair your frame.
From the Home menu, select the Setup menu, then select Factory Settings. www.insigniaproducts.com 43 Select RF Learn Mode, then select Yes. Follow the on-screen instructions to remove the plastic tab from the remote control's battery compartment before using the remote control for the first time. • The battery is not correctly paired with your remote with the frame. Replace with a CR2025 battery, then pair with the frame as described below. • The remote control is dead. Problem Solution Remote control does not work. • Be sure to pair your frame.
User Manual (English)
Page 50
... warranty does not cover: • Customer instruction • Installation • Set up adjustments • Cosmetic damage • Damage due to service the Product • Products sold as fuses or batteries • Products where the factory applied serial number has been altered or removed REPAIR REPLACEMENT AS PROVIDED UNDER THIS WARRANTY IS YOUR EXCLUSIVE REMEDY. INSIGNIA SHALL NOT BE LIABLE FOR ANY...
... warranty does not cover: • Customer instruction • Installation • Set up adjustments • Cosmetic damage • Damage due to service the Product • Products sold as fuses or batteries • Products where the factory applied serial number has been altered or removed REPAIR REPLACEMENT AS PROVIDED UNDER THIS WARRANTY IS YOUR EXCLUSIVE REMEDY. INSIGNIA SHALL NOT BE LIABLE FOR ANY...
Warranty (English)
Page 2
...-3645 © 2008 Best Buy Enterprise Services, Inc. All rights reserved. INSIGNIA is or with all faults • Consumables, such as fuses or batteries • Products where the factory applied serial number has been altered or removed REPAIR REPLACEMENT AS PROVIDED UNDER THIS WARRANTY IS YOUR EXCLUSIVE REMEDY. THIS WARRANTY GIVES YOU SPECIFIC LEGAL RIGHTS, AND YOU MAY ALSO...
...-3645 © 2008 Best Buy Enterprise Services, Inc. All rights reserved. INSIGNIA is or with all faults • Consumables, such as fuses or batteries • Products where the factory applied serial number has been altered or removed REPAIR REPLACEMENT AS PROVIDED UNDER THIS WARRANTY IS YOUR EXCLUSIVE REMEDY. THIS WARRANTY GIVES YOU SPECIFIC LEGAL RIGHTS, AND YOU MAY ALSO...


