
User Manual (English)
Page 3
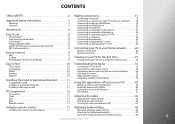
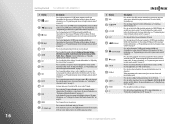
... VCR 23 Connecting a computer 24 Connecting headphones 25 Connecting a digital audio receiver 25 Connecting an analog audio receiver 26 Connecting your TV to your home network 26 Wireless connection 26 Wired connection 27 Turning on your TV for the first time 27 Programming your universal Insignia remote control 29 Easy to find 10 TiVo Search 10 CinemaNow 10 Netflix 10 Pandora 10 Napster 10 Installing the stand or wall-mount bracket 11 Installing the stand 11 Installing a wall-mount bracket 11 Installing a Kensington lock 12 TV components...
... VCR 23 Connecting a computer 24 Connecting headphones 25 Connecting a digital audio receiver 25 Connecting an analog audio receiver 26 Connecting your TV to your home network 26 Wireless connection 26 Wired connection 27 Turning on your TV for the first time 27 Programming your universal Insignia remote control 29 Easy to find 10 TiVo Search 10 CinemaNow 10 Netflix 10 Pandora 10 Napster 10 Installing the stand or wall-mount bracket 11 Installing the stand 11 Installing a wall-mount bracket 11 Installing a Kensington lock 12 TV components...

User Manual (English)
Page 4
... mode 93 Labeling an input source 94 Turning the source sensor on or off 95 Resetting all options on the Devices menu 96 Resetting all options on the Appearance menu 97 Maintaining 100 Cleaning the TV cabinet 100 Cleaning the LED-LCD screen 100 Updating your TV software 100 Troubleshooting 100 Using the on-screen help 100 Resetting your TV to the factory defaults 103 Specifications 104 Setting up your Z-Wave remote control...
... mode 93 Labeling an input source 94 Turning the source sensor on or off 95 Resetting all options on the Devices menu 96 Resetting all options on the Appearance menu 97 Maintaining 100 Cleaning the TV cabinet 100 Cleaning the LED-LCD screen 100 Updating your TV software 100 Troubleshooting 100 Using the on-screen help 100 Resetting your TV to the factory defaults 103 Specifications 104 Setting up your Z-Wave remote control...

User Manual (English)
Page 6
.../NS-42E859A11 f CHILD SAFETY It makes a difference how and where you use your flat panel display As you enjoy your new product, keep these safety tips in this manual, or otherwise listed by an independent laboratory as a chest of drawers. • Remember that children can be heavy. Tune into safety • One size of TV stand does not fit all cords...
.../NS-42E859A11 f CHILD SAFETY It makes a difference how and where you use your flat panel display As you enjoy your new product, keep these safety tips in this manual, or otherwise listed by an independent laboratory as a chest of drawers. • Remember that children can be heavy. Tune into safety • One size of TV stand does not fit all cords...
User Manual (English)
Page 15
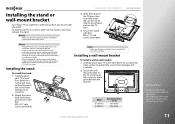
... stand or wall-mount bracket, make sure that you unplug the power cord before you can install the stand or wall-mount bracket, consult a professional installer or service personnel. Installing a wall-mount bracket To install a wall-mount bracket: 1 Carefully place your TV screen face-down on the TV base. 4 Secure the stand with four M4 × L17 mm screws (provided). Model NS-32E859A11 NS-42E859A11 Vesa mount pattern (H x V) 200 x 100 mm 200 x 200 mm Did you to install the stand or a wall-mount bracket. Visit the Best Buy...
... stand or wall-mount bracket, make sure that you unplug the power cord before you can install the stand or wall-mount bracket, consult a professional installer or service personnel. Installing a wall-mount bracket To install a wall-mount bracket: 1 Carefully place your TV screen face-down on the TV base. 4 Secure the stand with four M4 × L17 mm screws (provided). Model NS-32E859A11 NS-42E859A11 Vesa mount pattern (H x V) 200 x 100 mm 200 x 200 mm Did you to install the stand or a wall-mount bracket. Visit the Best Buy...
User Manual (English)
Page 17
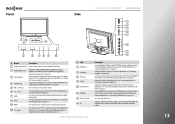
... again to close the menu. 10 (power) Press to control the soundbar's volume. 13 When your TV in standby mode. Connect an analog sound system to this your TV remote control will be able to turn on mode you select, lights red or purple when your TV. Do not use the Game mode feature for a computer to this jack. An HDMI cable carries both video and sound. For more information, see "Connecting an HDMI device" on...
... again to close the menu. 10 (power) Press to control the soundbar's volume. 13 When your TV in standby mode. Connect an analog sound system to this your TV remote control will be able to turn on mode you select, lights red or purple when your TV. Do not use the Game mode feature for a computer to this jack. An HDMI cable carries both video and sound. For more information, see "Connecting an HDMI device" on...
User Manual (English)
Page 19
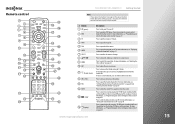
... "Programming your universal Insignia remote control" on page 29. Press to enter slow motion playback in TV mode. For more information, see "Adjusting the video settings" on page 45. Press to control a DVD player. www.insigniaproducts.com 15 Remote control NS-32E859A11/NS-42E859A11 Getting Started Note If you see a low battery message or the power button blinks five times after your press a button, the remote control batteries need to be changed. # Button 1 (power) 2 DVD 3 TV 4 APPS 5 TiVo 6 GUIDE 7 SELECT 8 STWX...
... "Programming your universal Insignia remote control" on page 29. Press to enter slow motion playback in TV mode. For more information, see "Adjusting the video settings" on page 45. Press to control a DVD player. www.insigniaproducts.com 15 Remote control NS-32E859A11/NS-42E859A11 Getting Started Note If you see a low battery message or the power button blinks five times after your press a button, the remote control batteries need to be changed. # Button 1 (power) 2 DVD 3 TV 4 APPS 5 TiVo 6 GUIDE 7 SELECT 8 STWX...
User Manual (English)
Page 20
..., see "Programming your universal Insignia remote control" on page 76. 16 Getting Started NS-32E859A11/NS-42E859A11 # Button 17 (pause) 18 (fast-reverse) 19 (stop playback in TV VOD mode (watching Netflix and CinemaNow) or when using a DVD player or Blu-ray player. Press to see "Turning closed captioning on or off " on page 29. In menu mode, press to return to enter device and programming codes. In the channel list, press to...
..., see "Programming your universal Insignia remote control" on page 76. 16 Getting Started NS-32E859A11/NS-42E859A11 # Button 17 (pause) 18 (fast-reverse) 19 (stop playback in TV VOD mode (watching Netflix and CinemaNow) or when using a DVD player or Blu-ray player. Press to see "Turning closed captioning on or off " on page 29. In menu mode, press to return to enter device and programming codes. In the channel list, press to...
User Manual (English)
Page 31
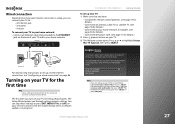
... based on using the remote control. NS-32E859A11/NS-42E859A11 Getting Started To set up a wired Internet connection, see "Configuring a wired connection" on page 86. www.insigniaproducts.com 27 The Setup Wizard guides you turn on your TV. 3 The Welcome screen opens. Welcome You are setting up in retail mode Skip for now Note If you have: • Installed the remote control batteries. (See page 17 for details). • Connected an antenna, cable...
... based on using the remote control. NS-32E859A11/NS-42E859A11 Getting Started To set up a wired Internet connection, see "Configuring a wired connection" on page 86. www.insigniaproducts.com 27 The Setup Wizard guides you turn on your TV. 3 The Welcome screen opens. Welcome You are setting up in retail mode Skip for now Note If you have: • Installed the remote control batteries. (See page 17 for details). • Connected an antenna, cable...
User Manual (English)
Page 33
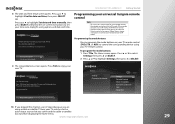
... your TV remote control (DVD, STB, or AUX) to control the corresponding device using a cable or satellite TV box, your remote control to set them. Congratulations! You TV is not in Step 6 because you are not correct, you try to before displaying the Home menu. Follow the on -screen setup for updates Account & system info Help Sleep timer Press TIVO to watch television. To program the mode buttons: 1 Press TiVo. NS-32E859A11/NS-42E859A11 Getting Started...
... your TV remote control (DVD, STB, or AUX) to control the corresponding device using a cable or satellite TV box, your remote control to set them. Congratulations! You TV is not in Step 6 because you are not correct, you try to before displaying the Home menu. Follow the on -screen setup for updates Account & system info Help Sleep timer Press TIVO to watch television. To program the mode buttons: 1 Press TiVo. NS-32E859A11/NS-42E859A11 Getting Started...
User Manual (English)
Page 36
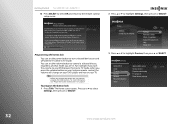
... the remote is now successfully set the volume button to TV mode, when you are in TV mode. OK 10:00pm Programming the button lock You can set up to control the DVD (or other device) connected to turn selected devices on this TV. You can set the power button to HDMI 1 [HDMI 1] on and off with the TV while in . Home Settings Connect to the Internet 10:00pm Settings Parental Controls Check for updates Account & system info Help Sleep timer...
... the remote is now successfully set the volume button to TV mode, when you are in TV mode. OK 10:00pm Programming the button lock You can set up to control the DVD (or other device) connected to turn selected devices on this TV. You can set the power button to HDMI 1 [HDMI 1] on and off with the TV while in . Home Settings Connect to the Internet 10:00pm Settings Parental Controls Check for updates Account & system info Help Sleep timer...
User Manual (English)
Page 46
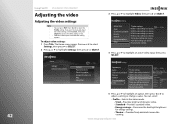
... cinema-like viewing. Home Settings Connect to the Internet 10:00pm Settings Parental Controls Check for updates Account & system info Help Sleep timer 3 Press S or T to highlight Settings, then press X or SELECT. Settings Appearance Audio Channels & providers Devices Network Recommendations Video TV video settings HDMI 1 video settings (no device) HDMI 2 video settings (no device) HDMI 3 video settings (no device) HDMI 4 video settings (no device) Comp video settings (no device) VGA video settings (no device) Reset all video settings for the HDMI 3 input. (This input currently does...
... cinema-like viewing. Home Settings Connect to the Internet 10:00pm Settings Parental Controls Check for updates Account & system info Help Sleep timer 3 Press S or T to highlight Settings, then press X or SELECT. Settings Appearance Audio Channels & providers Devices Network Recommendations Video TV video settings HDMI 1 video settings (no device) HDMI 2 video settings (no device) HDMI 3 video settings (no device) HDMI 4 video settings (no device) Comp video settings (no device) VGA video settings (no device) Reset all video settings for the HDMI 3 input. (This input currently does...
User Manual (English)
Page 47
... the edges, but maintains a good aspect ratio at the center of the picture. You can select Low, Middle, High, or Off. • Overscan-Adjusts the picture's display range. NS-32E859A11/NS-42E859A11 Using Your TV • Insignia motion-Selects the Insignia motion mode to the previous screen. • Reset video settings-Resets the video settings of the picture. • Color saturation-Adjusts color intensity. • Color tint-Adjusts the picture hue (red, green). • Color temperature-Selects the color temperature. • Cool-Produces...
... the edges, but maintains a good aspect ratio at the center of the picture. You can select Low, Middle, High, or Off. • Overscan-Adjusts the picture's display range. NS-32E859A11/NS-42E859A11 Using Your TV • Insignia motion-Selects the Insignia motion mode to the previous screen. • Reset video settings-Resets the video settings of the picture. • Color saturation-Adjusts color intensity. • Color tint-Adjusts the picture hue (red, green). • Color temperature-Selects the color temperature. • Cool-Produces...
User Manual (English)
Page 90
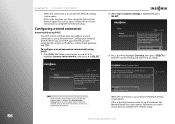
..., and DNS. Home Settings Connect to network settings is successful, the Network settings screen opens. 86 Using Your TV NS-32E859A11/NS-42E859A11 When the connection is using Dynamic Host Configuration Protocol (DHCP). Follow the on demand and play web videos. Simply plug an Ethernet cable into the back of the most common ways to use DHCP, your network settings. 10:00 PM Continue Change network settings When the connection is highlighted, press SELECT. www.insigniaproducts...
..., and DNS. Home Settings Connect to network settings is successful, the Network settings screen opens. 86 Using Your TV NS-32E859A11/NS-42E859A11 When the connection is using Dynamic Host Configuration Protocol (DHCP). Follow the on demand and play web videos. Simply plug an Ethernet cable into the back of the most common ways to use DHCP, your network settings. 10:00 PM Continue Change network settings When the connection is highlighted, press SELECT. www.insigniaproducts...
User Manual (English)
Page 105
... "Programming the mode buttons" on the TV or remote control. • Make sure that the incoming signal is compatible. • Make sure the antenna or cable TV is not assigned to a different mode. Try entering the sequence again. • Make sure that the video cables are connected securely to the back of digital TV and movies are black bars around the picture. • Change the aspect ratio. Problem No picture Solution...
... "Programming the mode buttons" on the TV or remote control. • Make sure that the incoming signal is compatible. • Make sure the antenna or cable TV is not assigned to a different mode. Try entering the sequence again. • Make sure that the video cables are connected securely to the back of digital TV and movies are black bars around the picture. • Change the aspect ratio. Problem No picture Solution...

User Manual (English)
Page 106
See "Adjusting the video settings" on page 62. • Make sure that the video cables are using an antenna, the digital channel signal may be experiencing problems. • Make sure the antenna or cable TV is low, adjust the antenna or use a highly directional outdoor antenna or set . • Adjust the color saturation. See "Playing TV audio only" on page 42. • Try another channel. See "Adjusting the video settings" on the screen. • Try another channel. Turn off one device...
See "Adjusting the video settings" on page 62. • Make sure that the video cables are using an antenna, the digital channel signal may be experiencing problems. • Make sure the antenna or cable TV is low, adjust the antenna or use a highly directional outdoor antenna or set . • Adjust the color saturation. See "Playing TV audio only" on page 42. • Try another channel. See "Adjusting the video settings" on the screen. • Try another channel. Turn off one device...
User Manual (English)
Page 107
... the digital channel signal strength, see "Checking the signal strength" on page 46. • Make sure that the audio cables are having trouble with that box to the factory defaults and repeat the setup process that you went through when you must manually set up INlink HDMI control" on enabling DHCP. See "Manually adjusting audio settings" on page 70. • The audio cable(s) you have the correct input selected to the factory defaults You can reset...
... the digital channel signal strength, see "Checking the signal strength" on page 46. • Make sure that the audio cables are having trouble with that box to the factory defaults and repeat the setup process that you went through when you must manually set up INlink HDMI control" on enabling DHCP. See "Manually adjusting audio settings" on page 70. • The audio cable(s) you have the correct input selected to the factory defaults You can reset...
User Manual (English)
Page 116
... existing one long flash instead, replace the batteries. To program a mode-dependent macro: 1 Press the device mode button (DVD, STB, or AUX). 2 Press and hold the A and D buttons at the same time until the LED blinks twice, then release. 2 Enter 9 7 6. If the remote control continues to display one button press. To delete all learned buttons in TV mode. You can use a macro to control a home theater operation, to set a favorite channel, or for...
... existing one long flash instead, replace the batteries. To program a mode-dependent macro: 1 Press the device mode button (DVD, STB, or AUX). 2 Press and hold the A and D buttons at the same time until the LED blinks twice, then release. 2 Enter 9 7 6. If the remote control continues to display one button press. To delete all learned buttons in TV mode. You can use a macro to control a home theater operation, to set a favorite channel, or for...
Quick Setup Guide (English)
Page 1
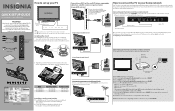
... your wired network using a WiFi Protected Setup (WPS) router select Option 3, which allows you want, then press SELECT. 32" & 42" 120Hz 1080p LED-LCD Connected TV QUICK SETUP GUIDE NS-32E859A11 / NS-42E859A11 TThhaannkkYYoouu!! The power indicator turns red. TV Neck Stand , TV Base, and 8 screws Quick Setup Guide COMPONENT / AV-IN ANT/ CABLE IN ETHERNET Y/ Video L R SPDIF Model NS-32E859A11 NS-42E859A11 Hole Pattern (H x V) 200 x 100 mm 200 x 200 mm TV Stand Screw Size M4 x L17 mm M4 x L17 mm Connecting an antenna/cable wall jack Connect a coaxial cable (not...
... your wired network using a WiFi Protected Setup (WPS) router select Option 3, which allows you want, then press SELECT. 32" & 42" 120Hz 1080p LED-LCD Connected TV QUICK SETUP GUIDE NS-32E859A11 / NS-42E859A11 TThhaannkkYYoouu!! The power indicator turns red. TV Neck Stand , TV Base, and 8 screws Quick Setup Guide COMPONENT / AV-IN ANT/ CABLE IN ETHERNET Y/ Video L R SPDIF Model NS-32E859A11 NS-42E859A11 Hole Pattern (H x V) 200 x 100 mm 200 x 200 mm TV Stand Screw Size M4 x L17 mm M4 x L17 mm Connecting an antenna/cable wall jack Connect a coaxial cable (not...
Quick Setup Guide (English)
Page 2
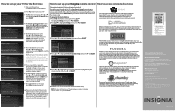
... updates Account & system info Help Sleep timer 3 Press ▲ or ▼ to use RF (radio frequency) to 332211 2 Install the Best Buy Mobile App on your network connection type, then press SELECT and follow the on -screen instructions to nish remote setup. 10 If you selected in stunning HD. Remote Control Setup DVD button STB button AUX button Power button in TV mode Volume button Backlight Reset all in step 6 Channel Scan to skip the channel scan because you were setting up your remote control to use the remote setup...
... updates Account & system info Help Sleep timer 3 Press ▲ or ▼ to use RF (radio frequency) to 332211 2 Install the Best Buy Mobile App on your network connection type, then press SELECT and follow the on -screen instructions to nish remote setup. 10 If you selected in stunning HD. Remote Control Setup DVD button STB button AUX button Power button in TV mode Volume button Backlight Reset all in step 6 Channel Scan to skip the channel scan because you were setting up your remote control to use the remote setup...
Information Brochure (English)
Page 2
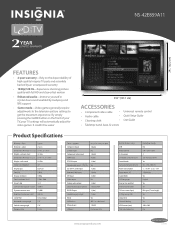
...Contrast ratio (typical)-panel 4,000 : 1 Dynamic contrast ratio 12,000:1 Brightness (center typ.) cd/m2 450 nits Comb filter 3d y/c digital Horizontal viewing angle 178° Vertical viewing angle 178° Response time 5.5 ms Tuner-supports: Composite inputs S-Video inputs Component video inputs HDMI input PC/VGA inputs Shared audio inputs component & composite) 3.5 mm PC audio input Antenna/Cable Input DVI input Video output Analog audio output Digital audio output (optical) RS232 Output Headphone jack output INlink WiFi built-in Ethernet port USB port NTSC...
...Contrast ratio (typical)-panel 4,000 : 1 Dynamic contrast ratio 12,000:1 Brightness (center typ.) cd/m2 450 nits Comb filter 3d y/c digital Horizontal viewing angle 178° Vertical viewing angle 178° Response time 5.5 ms Tuner-supports: Composite inputs S-Video inputs Component video inputs HDMI input PC/VGA inputs Shared audio inputs component & composite) 3.5 mm PC audio input Antenna/Cable Input DVI input Video output Analog audio output Digital audio output (optical) RS232 Output Headphone jack output INlink WiFi built-in Ethernet port USB port NTSC...


