
Warranty (English)
Page 1
... AND CONDITIONS OF MERCHANTABILITY AND FITNESS FOR A PARTICULAR PURPOSE, ARE LIMITED IN DURATION TO THE WARRANTY PERIOD SET FORTH ABOVE AND NO WARRANTIES, WHETHER EXPRESS OR IMPLIED, WILL APPLY AFTER THE WARRANTY PERIOD. Contact Insignia: For customer service please call 1-800-663-2275. Registered in Mexico from a Best Buy authorized dealer of...
... AND CONDITIONS OF MERCHANTABILITY AND FITNESS FOR A PARTICULAR PURPOSE, ARE LIMITED IN DURATION TO THE WARRANTY PERIOD SET FORTH ABOVE AND NO WARRANTIES, WHETHER EXPRESS OR IMPLIED, WILL APPLY AFTER THE WARRANTY PERIOD. Contact Insignia: For customer service please call 1-800-663-2275. Registered in Mexico from a Best Buy authorized dealer of...

Warranty (English)
Page 2
... WARRANTY PERIOD. Where is " or "with a screen 37 inches or larger, in Mexico call 1-800-926-3000 www.insigniaproducts.com Distributed by Insignia to service the Product • Products sold "as power surges • Accident(s) • Misuse • Abuse • Negligence • ...WARRANTY IS YOUR EXCLUSIVE REMEDY FOR BREACH OF WARRANTY. This warranty does not cover: • Customer instruction/education • Installation • Set up adjustments • Cosmetic damage • Damage due to batteries (i.e. All other products and brand names are trademarks of the Product, ...
... WARRANTY PERIOD. Where is " or "with a screen 37 inches or larger, in Mexico call 1-800-926-3000 www.insigniaproducts.com Distributed by Insignia to service the Product • Products sold "as power surges • Accident(s) • Misuse • Abuse • Negligence • ...WARRANTY IS YOUR EXCLUSIVE REMEDY FOR BREACH OF WARRANTY. This warranty does not cover: • Customer instruction/education • Installation • Set up adjustments • Cosmetic damage • Damage due to batteries (i.e. All other products and brand names are trademarks of the Product, ...
User Manual (English)
Page 3
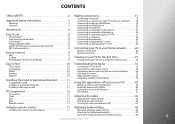
...3 Warnings 3 Cautions 4 Introduction 8 Easy to use 8 TiVo DESIGN 8 Two-year limited warranty 8 Game mode 8 Insignia Motion 120Hz 8 AUDYSSEY Dynamic Volume plus Dynamic EQ 8 SRS TruSurround HD 8 Easy to connect 9 WiFi 9 Z-Wave...26 Wired connection 27 Turning on your TV for the first time 27 Programming your universal Insignia remote control 29 Easy to find 10 TiVo Search 10 CinemaNow 10 Netflix 10 Pandora ...Search 41 Adjusting the video 42 Adjusting the video settings 42 Resetting all video settings 44 Turning the video window on or off 45 Using the remote control ...
...3 Warnings 3 Cautions 4 Introduction 8 Easy to use 8 TiVo DESIGN 8 Two-year limited warranty 8 Game mode 8 Insignia Motion 120Hz 8 AUDYSSEY Dynamic Volume plus Dynamic EQ 8 SRS TruSurround HD 8 Easy to connect 9 WiFi 9 Z-Wave...26 Wired connection 27 Turning on your TV for the first time 27 Programming your universal Insignia remote control 29 Easy to find 10 TiVo Search 10 CinemaNow 10 Netflix 10 Pandora ...Search 41 Adjusting the video 42 Adjusting the video settings 42 Resetting all video settings 44 Turning the video window on or off 45 Using the remote control ...

User Manual (English)
Page 4
...off 76 Selecting the analog closed captioning mode 77 Customizing digital closed captioning 78 Adjusting time settings 80 Setting the date and time 80 Setting the sleep timer 81 Adjusting Internet settings 81 Configuring a wireless connection 81 Configuring a wired connection 86 Testing the network 89 ...Disabling Internet features 89 Adjusting other options 92 Adjusting the INSIGNIA logo brightness 92 Setting the TV power on mode 93 Labeling an input source 94 Turning the source sensor on or off 95 Resetting ...
...off 76 Selecting the analog closed captioning mode 77 Customizing digital closed captioning 78 Adjusting time settings 80 Setting the date and time 80 Setting the sleep timer 81 Adjusting Internet settings 81 Configuring a wireless connection 81 Configuring a wired connection 86 Testing the network 89 ...Disabling Internet features 89 Adjusting other options 92 Adjusting the INSIGNIA logo brightness 92 Setting the TV power on mode 93 Labeling an input source 94 Turning the source sensor on or off 95 Resetting ...
User Manual (English)
Page 12
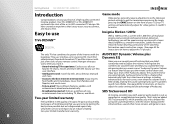
...'t constantly need to use TiVo user interface. • Intelligent Search: Search by an industry leading two-year limited manufacturer warranty. Insignia Motion 120Hz With a 120Hz screen, a screen with 1,080 lines of resolution progressively scanned, and special motion-detection technology, you...TV settings will be easier. Audyssey Dynamic Volume is just as important as exceptional picture quality. Two-year limited warranty Feel confident in the quality of mind knowing that you could better hear whispering during a movie scene? Getting Started NS-32E859A11/NS-42E859A11 ...
...'t constantly need to use TiVo user interface. • Intelligent Search: Search by an industry leading two-year limited manufacturer warranty. Insignia Motion 120Hz With a 120Hz screen, a screen with 1,080 lines of resolution progressively scanned, and special motion-detection technology, you...TV settings will be easier. Audyssey Dynamic Volume is just as important as exceptional picture quality. Two-year limited warranty Feel confident in the quality of mind knowing that you could better hear whispering during a movie scene? Getting Started NS-32E859A11/NS-42E859A11 ...

User Manual (English)
Page 13
NS-32E859A11/NS-42E859A11 Getting Started Easy to connect Rocketboost™ Wireless Card Ready WiFi Connect your TV. New and exciting applications are continually being added to your TV wirelessly to the Internet. No additional adapter required. The WiFi feature is Rocketboost™? Follow the on-screen guide, it easy to use your Insignia...wireless digital audio. • Products with Rocketboost™ technology let you can be easier. (See "Setting up a Rocketboost Wireless Card.) www.insigniaproducts.com 9 By connecting your TV to offer! Installing a ...
NS-32E859A11/NS-42E859A11 Getting Started Easy to connect Rocketboost™ Wireless Card Ready WiFi Connect your TV. New and exciting applications are continually being added to your TV wirelessly to the Internet. No additional adapter required. The WiFi feature is Rocketboost™? Follow the on-screen guide, it easy to use your Insignia...wireless digital audio. • Products with Rocketboost™ technology let you can be easier. (See "Setting up a Rocketboost Wireless Card.) www.insigniaproducts.com 9 By connecting your TV to offer! Installing a ...
User Manual (English)
Page 15
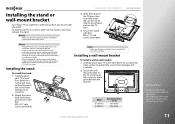
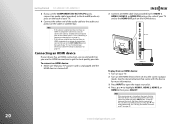
... base. 4 Secure the stand with four M4 × L17 mm screws (provided). NS-32E859A11/NS-42E859A11 Getting Started Installing the stand or wall-mount bracket To set your TV on a cabinet or other vertical surface, you must install the stand. Model NS-32E859A11 NS-42E859A11 Vesa mount pattern (H x V) 200 x 100 mm 200 x 200 mm Did you know...
... base. 4 Secure the stand with four M4 × L17 mm screws (provided). NS-32E859A11/NS-42E859A11 Getting Started Installing the stand or wall-mount bracket To set your TV on a cabinet or other vertical surface, you must install the stand. Model NS-32E859A11 NS-42E859A11 Vesa mount pattern (H x V) 200 x 100 mm 200 x 200 mm Did you know...
User Manual (English)
Page 17
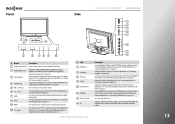
...the INSIGNIA logo brightness" on page 20. For service only. Do not use the Game mode feature for optimal performance while playing games. By doing this your TV remote control will be able to turn on your TV is turned on page 51. Front Side NS-32E859A11/NS-42E859A11 ...Getting Started CH GAME CH GAME # Button Description 1 Remote control sensor Receives signals from the remote control. For more information, see "Setting up Rocketboost™" on . Connect headphones to the previous or next...
...the INSIGNIA logo brightness" on page 20. For service only. Do not use the Game mode feature for optimal performance while playing games. By doing this your TV remote control will be able to turn on your TV is turned on page 51. Front Side NS-32E859A11/NS-42E859A11 ...Getting Started CH GAME CH GAME # Button Description 1 Remote control sensor Receives signals from the remote control. For more information, see "Setting up Rocketboost™" on . Connect headphones to the previous or next...
User Manual (English)
Page 19
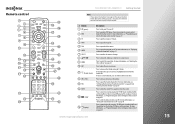
... and favorite channel lists" on page 68 and "Viewing a favorite channel" on page 42. For more information, see "Adjusting the video settings" on page 69. Press to confirm selections or changes. Press to jump back eight seconds in on -screen menu. For more information, ...the on -screen menus. For more information, see "Programming your universal Insignia remote control" on or off . For more information, see "Programming your universal Insignia remote control" on page 37. Remote control NS-32E859A11/NS-42E859A11 Getting Started Note If you see a low battery message or the power...
... and favorite channel lists" on page 68 and "Viewing a favorite channel" on page 42. For more information, see "Adjusting the video settings" on page 69. Press to confirm selections or changes. Press to jump back eight seconds in on -screen menu. For more information, ...the on -screen menus. For more information, see "Programming your universal Insignia remote control" on or off . For more information, see "Programming your universal Insignia remote control" on page 37. Remote control NS-32E859A11/NS-42E859A11 Getting Started Note If you see a low battery message or the power...
User Manual (English)
Page 20
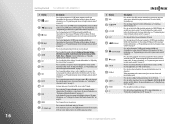
... Blu-ray player. For more information, see "Programming your universal Insignia remote control" on page 76. When programming the remote control, press to set up with your remote control. 16 Getting Started NS-32E859A11/NS-42E859A11 # Button 17 (pause) 18 (fast-reverse) 19 (stop... playback in the on-screen keyboard. For more information, see "Manually adjusting audio settings" on page 46. For more information...
... Blu-ray player. For more information, see "Programming your universal Insignia remote control" on page 76. When programming the remote control, press to set up with your remote control. 16 Getting Started NS-32E859A11/NS-42E859A11 # Button 17 (pause) 18 (fast-reverse) 19 (stop... playback in the on-screen keyboard. For more information, see "Manually adjusting audio settings" on page 46. For more information...
User Manual (English)
Page 24
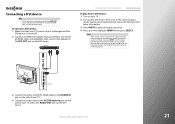
... the box to the ANT/CABLE IN jack on the back of the audio cable to the audio out jack(s) on the HDMI device, then set it to the correct output mode. www.insigniaproducts.com See "Connecting a composite video device" on page 23. • If the cable or satellite box does... devices connected. When you press INPUT, your TV. 4 Connect the other end of your TV. 2 Turn on the cable or satellite box. 20 Getting Started NS-32E859A11/NS-42E859A11 3 If you use the HDMI connection to get the best quality possible.
... the box to the ANT/CABLE IN jack on the back of the audio cable to the audio out jack(s) on the HDMI device, then set it to the correct output mode. www.insigniaproducts.com See "Connecting a composite video device" on page 23. • If the cable or satellite box does... devices connected. When you press INPUT, your TV. 4 Connect the other end of your TV. 2 Turn on the cable or satellite box. 20 Getting Started NS-32E859A11/NS-42E859A11 3 If you use the HDMI connection to get the best quality possible.
User Manual (English)
Page 25
... OUT jack on , the inputs that your TV and to the AUDIO OUT jack on the DVI device, then set it to another HDMI jack, you will not hear audio. DVI device NS-32E859A11/NS-42E859A11 Getting Started To play from a DVI device: 1 Turn on your TV moves between the inputs that came with...
... OUT jack on , the inputs that your TV and to the AUDIO OUT jack on the DVI device, then set it to another HDMI jack, you will not hear audio. DVI device NS-32E859A11/NS-42E859A11 Getting Started To play from a DVI device: 1 Turn on your TV moves between the inputs that came with...
User Manual (English)
Page 26
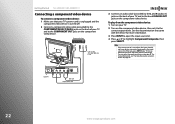
...video cable 22 www.insigniaproducts.com To play from the component video device: 1 Turn on your TV. 2 Turn on the component video device, then set it to the L and R (audio in the input source list. COMPONENT/ AV-IN ETHERNET Y/Video L R SPDIF Back of your TV and ... color. 3 Connect an audio cable (provided) to the correct output mode. You can select a grayed input by pressing S or T. Getting Started NS-32E859A11/NS-42E859A11 Connecting a component video device To connect a component video device: 1 Make sure that your TV's power cord is unplugged and the component video device is...
...video cable 22 www.insigniaproducts.com To play from the component video device: 1 Turn on your TV. 2 Turn on the component video device, then set it to the L and R (audio in the input source list. COMPONENT/ AV-IN ETHERNET Y/Video L R SPDIF Back of your TV and ... color. 3 Connect an audio cable (provided) to the correct output mode. You can select a grayed input by pressing S or T. Getting Started NS-32E859A11/NS-42E859A11 Connecting a component video device To connect a component video device: 1 Make sure that your TV's power cord is unplugged and the component video device is...

User Manual (English)
Page 27
...recommend that came with an AV (composite) cable, connect the yellow plug to the green/yellow (Y/Video) jack on the composite video device, then set it to the correct output mode. When making connection with the device for more information. 3 Press INPUT to open the input source list. 4 ...Video and L and R (audio in ) jacks on the back of your TV and to the AV OUT jacks on the composite video device. NS-32E859A11/NS-42E859A11 Getting Started Connecting a composite video device To connect a composite video device: 1 Make sure that your TV's power cord is unplugged and the camcorder...
...recommend that came with an AV (composite) cable, connect the yellow plug to the green/yellow (Y/Video) jack on the composite video device, then set it to the correct output mode. When making connection with the device for more information. 3 Press INPUT to open the input source list. 4 ...Video and L and R (audio in ) jacks on the back of your TV and to the AV OUT jacks on the composite video device. NS-32E859A11/NS-42E859A11 Getting Started Connecting a composite video device To connect a composite video device: 1 Make sure that your TV's power cord is unplugged and the camcorder...
User Manual (English)
Page 29
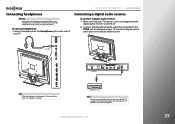
... Back of TV Note When headphones are plugged in, the sound from the receiver, turn off the TV speakers. www.insigniaproducts.com 25 NS-32E859A11/NS-42E859A11 Getting Started Connecting headphones Warning Loud noise can damage your headphones that your TV. For more information, see "Turning your TV speakers on ... of your TV's power cord is unplugged and the digital audio receiver is muted. When using headphones, use the lowest volume setting on the digital audio receiver. To connect headphones: • Connect headphones to the digital optical audio jack on your hearing.
... Back of TV Note When headphones are plugged in, the sound from the receiver, turn off the TV speakers. www.insigniaproducts.com 25 NS-32E859A11/NS-42E859A11 Getting Started Connecting headphones Warning Loud noise can damage your headphones that your TV. For more information, see "Turning your TV speakers on ... of your TV's power cord is unplugged and the digital audio receiver is muted. When using headphones, use the lowest volume setting on the digital audio receiver. To connect headphones: • Connect headphones to the digital optical audio jack on your hearing.
User Manual (English)
Page 30
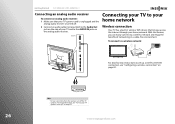
www.insigniaproducts.com To connect to a wireless network: CH GAME For step-by-step instructions to set up a wireless Internet connection, see "Turning your TV and to the AUDIO IN jacks on page 50. Analog audio receiver Note To hear sound only ... side of your TV speakers on page 81. For more information, see "Configuring a wireless connection" on or off the TV speakers. 26 Getting Started NS-32E859A11/NS-42E859A11 Connecting an analog audio receiver To connect an analog audio receiver: 1 Make sure that lets you can easily connect to a wireless network and enjoy the...
www.insigniaproducts.com To connect to a wireless network: CH GAME For step-by-step instructions to set up a wireless Internet connection, see "Turning your TV and to the AUDIO IN jacks on page 50. Analog audio receiver Note To hear sound only ... side of your TV speakers on page 81. For more information, see "Configuring a wireless connection" on or off the TV speakers. 26 Getting Started NS-32E859A11/NS-42E859A11 Connecting an analog audio receiver To connect an analog audio receiver: 1 Make sure that lets you can easily connect to a wireless network and enjoy the...
User Manual (English)
Page 31
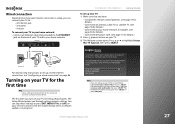
...(except when a software update is setup, you through setting up in retail mode, then press SELECT. You can skip these settings or press EXIT, MENU, TiVo, or LIVE on your TV, the Setup Wizard opens. NS-32E859A11/NS-42E859A11 Getting Started To set up a wired Internet connection, see "Configuring a wired...for in-store display, highlight Set up basic settings. The Setup Wizard guides you can set it up later by -step instructions to set up your TV: 1 Make sure that you are setting up this section are about to begin Guided Setup,which prepares the Insignia HD TV for details.) 2...
...(except when a software update is setup, you through setting up in retail mode, then press SELECT. You can skip these settings or press EXIT, MENU, TiVo, or LIVE on your TV, the Setup Wizard opens. NS-32E859A11/NS-42E859A11 Getting Started To set up a wired Internet connection, see "Configuring a wired...for in-store display, highlight Set up basic settings. The Setup Wizard guides you can set it up later by -step instructions to set up your TV: 1 Make sure that you are setting up this section are about to begin Guided Setup,which prepares the Insignia HD TV for details.) 2...
User Manual (English)
Page 32
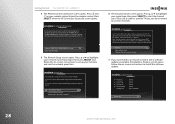
... Connecting Getting info Disconnecting Loading info (Done) (Done) (Done) (Done) (38% complete) Please wait... Remote Control Connection To set up wireless network Use wired Ethernet instead Skip this TV. Press and on -screen instructions to this step, I don't have a ...Set Up Channels screen opens. Set Up Channels Your TV works with your network and run the network speed test. If you have connected to set up to install the software update. www.insigniaproducts.com 28 Getting Started NS-32E859A11/NS-42E859A11 4 The Remote Control Connection screen opens. Set...
... Connecting Getting info Disconnecting Loading info (Done) (Done) (Done) (Done) (38% complete) Please wait... Remote Control Connection To set up wireless network Use wired Ethernet instead Skip this TV. Press and on -screen instructions to this step, I don't have a ...Set Up Channels screen opens. Set Up Channels Your TV works with your network and run the network speed test. If you have connected to set up to install the software update. www.insigniaproducts.com 28 Getting Started NS-32E859A11/NS-42E859A11 4 The Remote Control Connection screen opens. Set...
User Manual (English)
Page 33
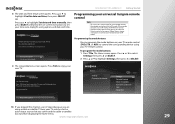
...date and time, then press SELECT. If the remote control is now set them. Press TiVo to highlight Settings, then press X or SELECT. 9 The Congratulations screen opens. Press TIVO at any time to watch television. NS-32E859A11/NS-42E859A11 Getting Started 8 The Date and Time Setup screen opens. Date and... the active input source that you connected the cable or satellite box to set your new TV. Press S or T to highlight Use this date and time Set date and time manually Programming your universal Insignia remote control Note To use the on -screen instructions to switch your new...
...date and time, then press SELECT. If the remote control is now set them. Press TiVo to highlight Settings, then press X or SELECT. 9 The Congratulations screen opens. Press TIVO at any time to watch television. NS-32E859A11/NS-42E859A11 Getting Started 8 The Date and Time Setup screen opens. Date and... the active input source that you connected the cable or satellite box to set your new TV. Press S or T to highlight Use this date and time Set date and time manually Programming your universal Insignia remote control Note To use the on -screen instructions to switch your new...

User Manual (English)
Page 34
... Channels & providers Devices Network Recommendations Video INlink HDMI control Source sensor Remote control setup TV power on Reset device settings 10:00 PM Set up the DVD button on your remote to control your cable box, DVR, or DVD player. 5 Press S or T to control... then press X or SELECT and follow the on Reset device settings 10:00 PM 4 Press S or T to RF mode. 30 Getting Started NS-32E859A11/NS-42E859A11 3 Press S or T to program (DVD, STB, or AUX), then press X or SELECT. Settings Appearance Audio Channels & providers Devices Network Recommendations Video INlink HDMI control...
... Channels & providers Devices Network Recommendations Video INlink HDMI control Source sensor Remote control setup TV power on Reset device settings 10:00 PM Set up the DVD button on your remote to control your cable box, DVR, or DVD player. 5 Press S or T to control... then press X or SELECT and follow the on Reset device settings 10:00 PM 4 Press S or T to RF mode. 30 Getting Started NS-32E859A11/NS-42E859A11 3 Press S or T to program (DVD, STB, or AUX), then press X or SELECT. Settings Appearance Audio Channels & providers Devices Network Recommendations Video INlink HDMI control...


