
User Manual (English)
Page 8
...for instructions on your show while Audyssey adjusts the sound levels for reliable and trouble-free performance. NS-26L450A11/NS-32L450A11 26"/32" LCD, 1080p 26"/32" LCD, 1080p Introduction Congratulations on how to adjust the audio settings to take advantage of Audyssey....Insignia product. CEC technology lets different components discover and communicate with the clearer dialog and the enhanced bass sounds that you didn't constantly need to adjust the volume: wishing that the commercials wouldn't blare and that movie viewers and gamers crave. Your NS-26L450A11 or NS-32L450A11...
...for instructions on your show while Audyssey adjusts the sound levels for reliable and trouble-free performance. NS-26L450A11/NS-32L450A11 26"/32" LCD, 1080p 26"/32" LCD, 1080p Introduction Congratulations on how to adjust the audio settings to take advantage of Audyssey....Insignia product. CEC technology lets different components discover and communicate with the clearer dialog and the enhanced bass sounds that you didn't constantly need to adjust the volume: wishing that the commercials wouldn't blare and that movie viewers and gamers crave. Your NS-26L450A11 or NS-32L450A11...

User Manual (English)
Page 9
.... 7.87 in. (200 mm) 3.94 in. (200 mm) Stand 3 Secure the stand with the provided M4 × L14 mm screws (26" - 1 screw 32" - 3 screws). Metal tabs Installing a wall-mount bracket To attach your TV to a wall-mount bracket: 1 Carefully place your TV screen face-down on a cushioned,...protect the screen from damages and scratches. 2 Remove the the three screws holding the TV to its stand, then remove the stand. (26" - 1 screw 32" - 3 screws) 3 Secure the wall mount bracket to your TV's finish or screen. www.insigniaproducts.com 5 Cautions Read these instructions carefully before you can...
.... 7.87 in. (200 mm) 3.94 in. (200 mm) Stand 3 Secure the stand with the provided M4 × L14 mm screws (26" - 1 screw 32" - 3 screws). Metal tabs Installing a wall-mount bracket To attach your TV to a wall-mount bracket: 1 Carefully place your TV screen face-down on a cushioned,...protect the screen from damages and scratches. 2 Remove the the three screws holding the TV to its stand, then remove the stand. (26" - 1 screw 32" - 3 screws) 3 Secure the wall mount bracket to your TV's finish or screen. www.insigniaproducts.com 5 Cautions Read these instructions carefully before you can...
User Manual (English)
Page 10
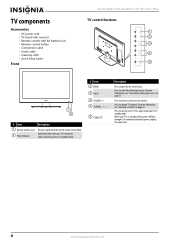
...(s) • Remote control with AA batteries (2) • Remote control holder • Component cable • Audio cable • Cleaning cloth • Quick Setup Guide Front NS-26L450A11/NS-32L450A11 26"/32" LCD, 1080p TV control buttons # Item Description 1 Remote control sensor Receives signals from the remote control. For more information, see "Selecting the video input...
...(s) • Remote control with AA batteries (2) • Remote control holder • Component cable • Audio cable • Cleaning cloth • Quick Setup Guide Front NS-26L450A11/NS-32L450A11 26"/32" LCD, 1080p TV control buttons # Item Description 1 Remote control sensor Receives signals from the remote control. For more information, see "Selecting the video input...

User Manual (English)
Page 11
... Connect the video for an HDMI device. You do not need to make 1 HDMI 1/HDMI 2/HDMI 3 an audio connection for a computer to this jack. 26"/32" LCD, 1080p Side jacks Back # Item Description Connect HDMI devices to these jacks. For more information, see "Connecting headphones" on page 17. 6 L/R (audio out) Connect...
... Connect the video for an HDMI device. You do not need to make 1 HDMI 1/HDMI 2/HDMI 3 an audio connection for a computer to this jack. 26"/32" LCD, 1080p Side jacks Back # Item Description Connect HDMI devices to these jacks. For more information, see "Connecting headphones" on page 17. 6 L/R (audio out) Connect...
User Manual (English)
Page 12
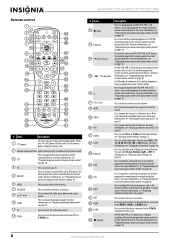
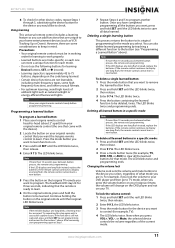
... devices. When your TV is off (Standby mode). For more information, see "Programming your universal Insignia remote control" on page 10. You can select Off, 5, 10, 15, 30, 60, 90, 120, 180, or 240 minutes. NS-26L450A11/NS-32L450A11 26"/32" LCD, 1080p Remote control # Item Description 1 (power) Press to turn your TV on or...
... devices. When your TV is off (Standby mode). For more information, see "Programming your universal Insignia remote control" on page 10. You can select Off, 5, 10, 15, 30, 60, 90, 120, 180, or 240 minutes. NS-26L450A11/NS-32L450A11 26"/32" LCD, 1080p Remote control # Item Description 1 (power) Press to turn your TV on or...

User Manual (English)
Page 13
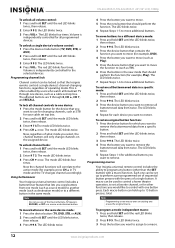
... button on the battery compartment cover on the back of this button depends on the front of time, remove the batteries. 26"/32" LCD, 1080p # Item 31 (fast forward) 32 / forward) (skip 33 (play) 34 CH /CH 35 RECALL 36 Numbers 37 - 38 CC 39 P-LOCK 40 ZOOM 41 ... For more information, see "Selecting a channel" on page 23. For more information, see "Adjusting the TV picture" on page 10. If chemicals touch your universal Insignia remote control" on page 23. Notes • • • • Do not expose the remote control to change TV channels. For more information, see...
... button on the battery compartment cover on the back of this button depends on the front of time, remove the batteries. 26"/32" LCD, 1080p # Item 31 (fast forward) 32 / forward) (skip 33 (play) 34 CH /CH 35 RECALL 36 Numbers 37 - 38 CC 39 P-LOCK 40 ZOOM 41 ... For more information, see "Selecting a channel" on page 23. For more information, see "Adjusting the TV picture" on page 10. If chemicals touch your universal Insignia remote control" on page 23. Notes • • • • Do not expose the remote control to change TV channels. For more information, see...
User Manual (English)
Page 14
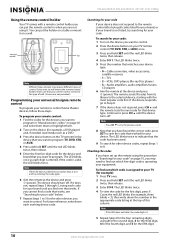
... load media such as each digit is valid, the LED blinks twice. Checking the codes If you are not provided.) Programming your universal Insignia remote control To program your code. Count the red LED blinks (for the fifth digit. 10 www.insigniaproducts.com Note If the LED ...players, Blu-ray Disc players • 3-Audio amplifiers, audio amplifiers/tuners, CD players 6 Aim the remote at the device and press (power). NS-26L450A11/NS-32L450A11 26"/32" LCD, 1080p Using the remote control holder Your TV comes with the most popular code first. You can put the holder on a table or...
... load media such as each digit is valid, the LED blinks twice. Checking the codes If you are not provided.) Programming your universal Insignia remote control To program your code. Count the red LED blinks (for the fifth digit. 10 www.insigniaproducts.com Note If the LED ...players, Blu-ray Disc players • 3-Audio amplifiers, audio amplifiers/tuners, CD players 6 Aim the remote at the device and press (power). NS-26L450A11/NS-32L450A11 26"/32" LCD, 1080p Using the remote control holder Your TV comes with the most popular code first. You can put the holder on a table or...
User Manual (English)
Page 15
... button on your original remote control that the remote is approximately 42 to control (for example, TV). 4 The LED blinks twice. 26"/32" LCD, 1080p 6 To check for other unusual formats. • For optimum learning, avoid high levels of ambient light such as VCR Tracking...are some high frequency functions, and other device codes, repeat Steps 1 through 5, substituting the device button for the device you want the Insignia remote control to program another button. Now when you select. Precautions • Your original remote controls must be deleted, twice. Note If ...
... button on your original remote control that the remote is approximately 42 to control (for example, TV). 4 The LED blinks twice. 26"/32" LCD, 1080p 6 To check for other unusual formats. • For optimum learning, avoid high levels of ambient light such as VCR Tracking...are some high frequency functions, and other device codes, repeat Steps 1 through 5, substituting the device button for the device you want the Insignia remote control to program another button. Now when you select. Precautions • Your original remote controls must be deleted, twice. Note If ...
User Manual (English)
Page 16
...than the SET button) with the press of the Device Buttons, (power), RECORD, or SET as a cable set-top box. NS-26L450A11/NS-32L450A11 26"/32" LCD, 1080p To unlock all volume control: 1 Press and hold SET until the red LED blinks twice, then release. 3 ...Enter 9 9 3. The LED blinks twice. 4 Press VOL-. Now, regardless of what mode you want to move. 5 Press the new button that should perform the function. Programming macros Your Insignia...
...than the SET button) with the press of the Device Buttons, (power), RECORD, or SET as a cable set-top box. NS-26L450A11/NS-32L450A11 26"/32" LCD, 1080p To unlock all volume control: 1 Press and hold SET until the red LED blinks twice, then release. 3 ...Enter 9 9 3. The LED blinks twice. 4 Press VOL-. Now, regardless of what mode you want to move. 5 Press the new button that should perform the function. Programming macros Your Insignia...
User Manual (English)
Page 17
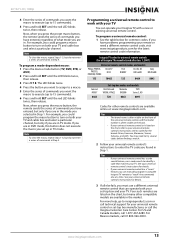
26"/32" LCD, 1080p 4 Enter the series of commands you want the macro to execute... remote control code, visit www.insigniaproducts.com for your remote or need to insigniaproducts.com or call the Insignia Customer Care Center. See your universal remote control's instructions for other compatible models are in DVD mode, ...universal remote control to turn on both your TV. See your universal remote control's instructions for details. 3 If all Insignia TVs manufactured after Jan. 1, 2007) Universal remote control makes and models Philips PHDVD5, DirectTV PH5DSS, RC23 PMDVR8, PDVR8 ...
26"/32" LCD, 1080p 4 Enter the series of commands you want the macro to execute... remote control code, visit www.insigniaproducts.com for your remote or need to insigniaproducts.com or call the Insignia Customer Care Center. See your universal remote control's instructions for other compatible models are in DVD mode, ...universal remote control to turn on both your TV. See your universal remote control's instructions for details. 3 If all Insignia TVs manufactured after Jan. 1, 2007) Universal remote control makes and models Philips PHDVD5, DirectTV PH5DSS, RC23 PMDVR8, PDVR8 ...

User Manual (English)
Page 18
... boxes have questions, refer to the AC connector on the back of your equipment. • Always unplug the power cord when connecting external equipment. NS-26L450A11/NS-32L450A11 26"/32" LCD, 1080p Making connections Cautions • Check the jacks for an extended period of time. If the antenna is not installed correctly, contact qualified...
... boxes have questions, refer to the AC connector on the back of your equipment. • Always unplug the power cord when connecting external equipment. NS-26L450A11/NS-32L450A11 26"/32" LCD, 1080p Making connections Cautions • Check the jacks for an extended period of time. If the antenna is not installed correctly, contact qualified...

User Manual (English)
Page 19
... the documentation that came with the device for more information, see "Connecting an antenna or cable TV without a cable box" on the HDMI device. 26"/32" LCD, 1080p To connect a cable or satellite box: 1 Connect the incoming cable from the cable wall jack to the L/R (audio in jack on the back...
... the documentation that came with the device for more information, see "Connecting an antenna or cable TV without a cable box" on the HDMI device. 26"/32" LCD, 1080p To connect a cable or satellite box: 1 Connect the incoming cable from the cable wall jack to the L/R (audio in jack on the back...

User Manual (English)
Page 20
... for more information. To play from an DVI device: 1 Turn on your TV and to the AUDIO OUT jack on the component video device. NS-26L450A11/NS-32L450A11 26"/32" LCD, 1080p Connecting a DVI device Note A DVI device must be connected the the HDMI 1 jack. To connect a DVI device: 1 Make sure that came with...
... for more information. To play from an DVI device: 1 Turn on your TV and to the AUDIO OUT jack on the component video device. NS-26L450A11/NS-32L450A11 26"/32" LCD, 1080p Connecting a DVI device Note A DVI device must be connected the the HDMI 1 jack. To connect a DVI device: 1 Make sure that came with...
User Manual (English)
Page 21
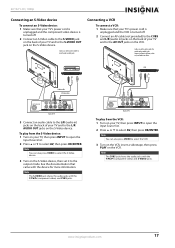
... also press VIDEO to the AV OUT jacks on the VCR. Back of TV To play from the VCR: 1 Turn on the S-Video device. 26"/32" LCD, 1080p Connecting an S-Video device To connect an S-Video device: 1 Make sure that your TV's power cord is unplugged and the component video device...
... also press VIDEO to the AV OUT jacks on the VCR. Back of TV To play from the VCR: 1 Turn on the S-Video device. 26"/32" LCD, 1080p Connecting an S-Video device To connect an S-Video device: 1 Make sure that your TV's power cord is unplugged and the component video device...
User Manual (English)
Page 22
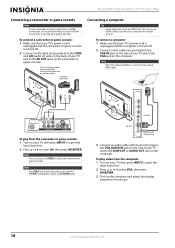
... audio cable with the Y/Pb/Pr (component video) and S-VIDEO jacks. Camcorder or game console Connecting a computer Tip Some computers have an HDMI jack. NS-26L450A11/NS-32L450A11 26"/32" LCD, 1080p Connecting a camcorder or game console Note If your camcorder or game console has an HDMI connection, we recommend that your TV's power...
... audio cable with the Y/Pb/Pr (component video) and S-VIDEO jacks. Camcorder or game console Connecting a computer Tip Some computers have an HDMI jack. NS-26L450A11/NS-32L450A11 26"/32" LCD, 1080p Connecting a camcorder or game console Note If your camcorder or game console has an HDMI connection, we recommend that your TV's power...

User Manual (English)
Page 23
... headphones to the (headphone) jack on the back of your TV. Note For more information, see "Using USB" on your headphones that your hearing. 26"/32" LCD, 1080p Connecting a USB device To connect a USB device: • Plug a USB device, such as a flash drive, into the USB port on the side of...
... headphones to the (headphone) jack on the back of your TV. Note For more information, see "Using USB" on your headphones that your hearing. 26"/32" LCD, 1080p Connecting a USB device To connect a USB device: • Plug a USB device, such as a flash drive, into the USB port on the side of...
User Manual (English)
Page 24
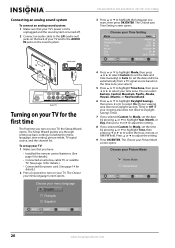
... system. Choose your menu language English Français Español MOVE OK ENTER SELECT Set menu language to English MENU PREVIOUS EXIT EXIT NS-26L450A11/NS-32L450A11 26"/32" LCD, 1080p 3 Press or to adjust the setting. 9 Press OK/ENTER.
... system. Choose your menu language English Français Español MOVE OK ENTER SELECT Set menu language to English MENU PREVIOUS EXIT EXIT NS-26L450A11/NS-32L450A11 26"/32" LCD, 1080p 3 Press or to adjust the setting. 9 Press OK/ENTER.

User Manual (English)
Page 25
... if using the remote control. Press twice to highlight a video input source, then press OK/ENTER. To completely disconnect power, unplug the power cord. 26"/32" LCD, 1080p 10 Press or to select HDMI 1. Select Yes to continue, or select No to highlight Antenna, Cable, or Cable/Satellite Box (if your...
... if using the remote control. Press twice to highlight a video input source, then press OK/ENTER. To completely disconnect power, unplug the power cord. 26"/32" LCD, 1080p 10 Press or to select HDMI 1. Select Yes to continue, or select No to highlight Antenna, Cable, or Cable/Satellite Box (if your...
User Manual (English)
Page 26
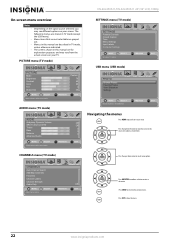
... Adjust setting to adjust a selected item. Menu items that are not selectable are for explanation purposes and may see different options on your TV. NS-26L450A11/NS-32L450A11 26"/32" LCD, 1080p On-screen menu overview Notes • • • • Depending on the signal source selected, you may vary from the actual screens...
... Adjust setting to adjust a selected item. Menu items that are not selectable are for explanation purposes and may see different options on your TV. NS-26L450A11/NS-32L450A11 26"/32" LCD, 1080p On-screen menu overview Notes • • • • Depending on the signal source selected, you may vary from the actual screens...

User Manual (English)
Page 27
... change or press OK/ENTER to immediately change the channel. • To select a digital sub-channel, press the number buttons to view additional options. 26"/32" LCD, 1080p Selecting a channel To select a channel: • Press CH /CH to go to the last viewed channel. • Press FAV to open the favorite...
... change or press OK/ENTER to immediately change the channel. • To select a digital sub-channel, press the number buttons to view additional options. 26"/32" LCD, 1080p Selecting a channel To select a channel: • Press CH /CH to go to the last viewed channel. • Press FAV to open the favorite...


