

User Manual (English)
Page 2
... 10 Programming a universal remote control to work with your TV 13 Making connections 14 Connecting power 14 Connecting an antenna or cable TV without a cable box 14 Connecting a cable or satellite box 14 Connecting an HDMI device 15 Connecting a DVI device 16 Connecting a component video device 16 Connecting an S-Video device 17 Connecting a VCR 17 Connecting a camcorder or game console 18 Connecting a computer 18 Connecting a USB device 19 Connecting headphones 19 Connecting a digital sound system 19 Connecting an analog sound system 20 Turning on your TV for the first time...
... 10 Programming a universal remote control to work with your TV 13 Making connections 14 Connecting power 14 Connecting an antenna or cable TV without a cable box 14 Connecting a cable or satellite box 14 Connecting an HDMI device 15 Connecting a DVI device 16 Connecting a component video device 16 Connecting an S-Video device 17 Connecting a VCR 17 Connecting a camcorder or game console 18 Connecting a computer 18 Connecting a USB device 19 Connecting headphones 19 Connecting a digital sound system 19 Connecting an analog sound system 20 Turning on your TV for the first time...

User Manual (English)
Page 3
...29 Locking control buttons 30 Blocking unrated TV 31 Setting parental control levels 31 Downloading rating information 33 Using closed captioning 33 Turning closed captioning on or off 33 Selecting the analog closed captioning mode 34 Customizing digital closed captioning styles 34 Adjusting time settings 35 Setting the time 35 Setting the sleep timer 36 Adjusting menu settings 37 Selecting the menu language and transparency 37 Labeling an input source 37 Turning Auto Input Sensor on or off 38 Using INlink 38 Restoring settings to the defaults 40 Using USB 40 Switching to USB...
...29 Locking control buttons 30 Blocking unrated TV 31 Setting parental control levels 31 Downloading rating information 33 Using closed captioning 33 Turning closed captioning on or off 33 Selecting the analog closed captioning mode 34 Customizing digital closed captioning styles 34 Adjusting time settings 35 Setting the time 35 Setting the sleep timer 36 Adjusting menu settings 37 Selecting the menu language and transparency 37 Labeling an input source 37 Turning Auto Input Sensor on or off 38 Using INlink 38 Restoring settings to the defaults 40 Using USB 40 Switching to USB...

User Manual (English)
Page 5
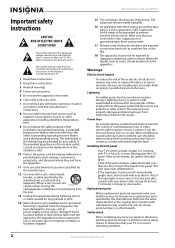
... blocks. Some wall mounts are committed to safely wall mount your TV. • Follow all . However, TVs are unsure, ask a professional installer. • TVs can easily be pushed, pulled over and cause injury. Use only a wall mount rated for the weight of TV stand does not fit all instructions supplied by this TV manufacturer, listed in mind The issue The home theater entertainment experience...
... blocks. Some wall mounts are committed to safely wall mount your TV. • Follow all . However, TVs are unsure, ask a professional installer. • TVs can easily be pushed, pulled over and cause injury. Use only a wall mount rated for the weight of TV stand does not fit all instructions supplied by this TV manufacturer, listed in mind The issue The home theater entertainment experience...
User Manual (English)
Page 6
... uses replacement parts specified by the manufacturer, or sold with three-prong, grounding-type plug is made of electric shock is required when the apparatus has been damaged in correct operating condition. 2 www.insigniaproducts.com A polarized plug has two blades with your doctor after rinsing for your TV or hit, jolt, or press hard against the LCD panel. NS-26L450A11/NS-32L450A11...
... uses replacement parts specified by the manufacturer, or sold with three-prong, grounding-type plug is made of electric shock is required when the apparatus has been damaged in correct operating condition. 2 www.insigniaproducts.com A polarized plug has two blades with your doctor after rinsing for your TV or hit, jolt, or press hard against the LCD panel. NS-26L450A11/NS-32L450A11...

User Manual (English)
Page 9
... TV base, then insert the metal tabs on the stand into the designated slots on a soft cushion or covering to prevent scratching or damage to mishandling or incorrect assembly. 26"/32" LCD, 1080p Install the stand or wall-mount bracket To set your TV on a wall or other flat surface, you try to the back of your TV using the four screws provided...
... TV base, then insert the metal tabs on the stand into the designated slots on a soft cushion or covering to prevent scratching or damage to mishandling or incorrect assembly. 26"/32" LCD, 1080p Install the stand or wall-mount bracket To set your TV on a wall or other flat surface, you try to the back of your TV using the four screws provided...
User Manual (English)
Page 12
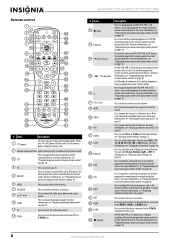
... "Programming your universal Insignia remote control" on -screen menu. 7 OK/ENTER 8 9 GUIDE 10 TV Press to confirm selections or changes. Press to pause playback on page 10. 4 TV Press to control a connected Blu-ray or DVD player. NS-26L450A11/NS-32L450A11 26"/32" LCD, 1080p Remote control # Item Description 1 (power) Press to turn your TV is off (Standby mode). Press to control connected devices. You need to program the remote control to select TV as the channel number, channel name (if available), or signal...
... "Programming your universal Insignia remote control" on -screen menu. 7 OK/ENTER 8 9 GUIDE 10 TV Press to confirm selections or changes. Press to pause playback on page 10. 4 TV Press to control a connected Blu-ray or DVD player. NS-26L450A11/NS-32L450A11 26"/32" LCD, 1080p Remote control # Item Description 1 (power) Press to turn your TV is off (Standby mode). Press to control connected devices. You need to program the remote control to select TV as the channel number, channel name (if available), or signal...
User Manual (English)
Page 15
... original remote until the LED blinks twice, then release. 3 Enter 9 7 6. The LED blinks twice. 3 Press a mode button twice (for example, TV, DVD, STB, or AUX) to check. Note If more than 10 seconds pass between button presses, the remote exits programming. Note If the red LED displays one long flash instead, replace the batteries. You can add functions that mode. Now when you select. Changing the volume lock Volume Lock sets the volume and mute buttons...
... original remote until the LED blinks twice, then release. 3 Enter 9 7 6. The LED blinks twice. 3 Press a mode button twice (for example, TV, DVD, STB, or AUX) to check. Note If more than 10 seconds pass between button presses, the remote exits programming. Note If the red LED displays one long flash instead, replace the batteries. You can add functions that mode. Now when you select. Changing the volume lock Volume Lock sets the volume and mute buttons...
User Manual (English)
Page 17
... identify a code that can operate both your universal remote control has a "Learn" feature, you can operate your TV. For more help, go to insigniaproducts.com or call the Insignia Customer Care Center. To program a mode-dependent macro: 1 Press the device mode button (TV, DVD, STB, or AUX). 2 Press and hold SET until the red LED blinks twice, then release. To program a universal remote control: 1 See the table below for your universal remote control's instructions for...
... identify a code that can operate both your universal remote control has a "Learn" feature, you can operate your TV. For more help, go to insigniaproducts.com or call the Insignia Customer Care Center. To program a mode-dependent macro: 1 Press the device mode button (TV, DVD, STB, or AUX). 2 Press and hold SET until the red LED blinks twice, then release. To program a universal remote control: 1 See the table below for your universal remote control's instructions for...

User Manual (English)
Page 19
... has an HDMI connection, we recommend that you use the HDMI connection to select HDMI 1, HDMI 2, or HDMI 3, then press OK/ENTER. Side of your TV, then press INPUT to open the Input Source list. 2 Press or to get the best quality possible. Note If the cable or satellite TV box does not have an HDMI, component, or composite jack, connect the cable or satellite TV box to the output mode. www.insigniaproducts...
... has an HDMI connection, we recommend that you use the HDMI connection to select HDMI 1, HDMI 2, or HDMI 3, then press OK/ENTER. Side of your TV, then press INPUT to open the Input Source list. 2 Press or to get the best quality possible. Note If the cable or satellite TV box does not have an HDMI, component, or composite jack, connect the cable or satellite TV box to the output mode. www.insigniaproducts...

User Manual (English)
Page 23
... Input Source list. 2 Press or to select USB, then press OK/ENTER. Side of TV Connecting a digital sound system To connect a digital sound system: 1 Make sure that still lets you hear the sound. To connect headphones: • Connect headphones to SPDIF jack on page 40. Side of TV Connecting headphones The TV speakers are muted when headphones are attached. USB device Caution Never remove the USB device or turn off . 2 Connect a digital optical audio cable to the (headphone) jack on the digital sound...
... Input Source list. 2 Press or to select USB, then press OK/ENTER. Side of TV Connecting a digital sound system To connect a digital sound system: 1 Make sure that still lets you hear the sound. To connect headphones: • Connect headphones to SPDIF jack on page 40. Side of TV Connecting headphones The TV speakers are muted when headphones are attached. USB device Caution Never remove the USB device or turn off . 2 Connect a digital optical audio cable to the (headphone) jack on the digital sound...
User Manual (English)
Page 24
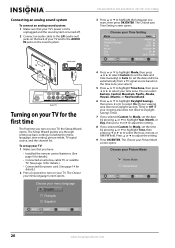
... time automatically from a TV signal source based on your Picture Mode screen opens. The Choose your TV. Connecting an analog sound system To connect an analog sound system: 1 Make sure that you have: • Installed the remote control batteries. (See page 9 for details). • Connected an antenna, cable TV, or satellite TV. (See page 14 for details.) • Connected the power cord. (See page 14 for details.) 2 Press (power) to the AUDIO IN jacks...
... time automatically from a TV signal source based on your Picture Mode screen opens. The Choose your TV. Connecting an analog sound system To connect an analog sound system: 1 Make sure that you have: • Installed the remote control batteries. (See page 9 for details). • Connected an antenna, cable TV, or satellite TV. (See page 14 for details.) • Connected the power cord. (See page 14 for details.) 2 Press (power) to the AUDIO IN jacks...

User Manual (English)
Page 25
... select TV. • Press VIDEO to select AV. • Press HDMI once to turn off To turn on or off: 1 Make sure that the power cord is not realized." Your TV enters Standby mode and the power indicator LED turns red. The Choose your TV, then press INPUT. MOVE OK ENTER SELECT MENU PREVIOUS Select Antenna if using the remote control. Press three times to stop the auto channel search, but you chose Cable/Satellite box...
... select TV. • Press VIDEO to select AV. • Press HDMI once to turn off To turn on or off: 1 Make sure that the power cord is not realized." Your TV enters Standby mode and the power indicator LED turns red. The Choose your TV, then press INPUT. MOVE OK ENTER SELECT MENU PREVIOUS Select Antenna if using the remote control. Press three times to stop the auto channel search, but you chose Cable/Satellite box...
User Manual (English)
Page 26
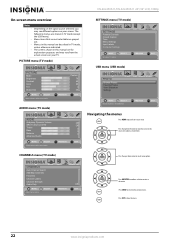
... Contrast Color Tint Sharpness PICTURE AUDIO CHANNELS SETTINGS USB Custom 70 40 60 0 40 MOVE OK ENTER SELECT Adjust settings to affect picture quality MENU PREVIOUS EXIT EXIT AUDIO menu (TV mode) AUDIO PICTURE Audyssey Dynamic Volume SRS TruSurround HD Treble Bass Balance Advanced Audio AUDIO CHANNELS SETTINGS USB Off Off 0 0 0 MOVE OK ENTER SELECT Adjust setting to affect sound quality MENU PREVIOUS EXIT EXIT SETTINGS menu (TV mode) SETTINGS Parental Controls Closed Caption Time Menu Settings Input Labels Computer Settings PICTURE AUDIO CHANNELS SETTINGS USB MOVE...
... Contrast Color Tint Sharpness PICTURE AUDIO CHANNELS SETTINGS USB Custom 70 40 60 0 40 MOVE OK ENTER SELECT Adjust settings to affect picture quality MENU PREVIOUS EXIT EXIT AUDIO menu (TV mode) AUDIO PICTURE Audyssey Dynamic Volume SRS TruSurround HD Treble Bass Balance Advanced Audio AUDIO CHANNELS SETTINGS USB Off Off 0 0 0 MOVE OK ENTER SELECT Adjust setting to affect sound quality MENU PREVIOUS EXIT EXIT SETTINGS menu (TV mode) SETTINGS Parental Controls Closed Caption Time Menu Settings Input Labels Computer Settings PICTURE AUDIO CHANNELS SETTINGS USB MOVE...

User Manual (English)
Page 27
... Color Tint Sharpness PICTURE AUDIO CHANNELS SETTINGS USB Custom 70 40 60 0 40 MOVE OK ENTER SELECT MENU PREVIOUS Adjust picture mode to change the channel. • To select a digital sub-channel, press the number buttons to turn off the sound. You can select: • Mode-Selects the picture mode. Note If a list has more than one page, press or to view an information banner. The information banner shows the current program information such as channel number, video input source, and resolution. • Digital channel...
... Color Tint Sharpness PICTURE AUDIO CHANNELS SETTINGS USB Custom 70 40 60 0 40 MOVE OK ENTER SELECT MENU PREVIOUS Adjust picture mode to change the channel. • To select a digital sub-channel, press the number buttons to turn off the sound. You can select: • Mode-Selects the picture mode. Note If a list has more than one page, press or to view an information banner. The information banner shows the current program information such as channel number, video input source, and resolution. • Digital channel...

User Manual (English)
Page 30
...ENTER. The CHANNELS-Auto Channel Search screen opens. NS-26L450A11/NS-32L450A11 26"/32" LCD, 1080p Selecting the audio mode To select the audio mode for channels. Changing channel settings Note Unless otherwise noted, all tasks in this section are based on your TV source Antenna 0 Analog Channels Cable Cable/Satellite Box 0 Digital Channels Scan for Digital Channels MOVE OK ENTER SELECT MENU PREVIOUS Antenna if using the remote control. Automatically scanning for channels When you need to scan for an analog channel: • See "Adjusting sound settings" on -screen menu...
...ENTER. The CHANNELS-Auto Channel Search screen opens. NS-26L450A11/NS-32L450A11 26"/32" LCD, 1080p Selecting the audio mode To select the audio mode for channels. Changing channel settings Note Unless otherwise noted, all tasks in this section are based on your TV source Antenna 0 Analog Channels Cable Cable/Satellite Box 0 Digital Channels Scan for Digital Channels MOVE OK ENTER SELECT MENU PREVIOUS Antenna if using the remote control. Automatically scanning for channels When you need to scan for an analog channel: • See "Adjusting sound settings" on -screen menu...

User Manual (English)
Page 33
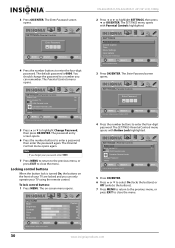
.... SETTINGS Parental Controls Closed Caption Time Menu Settings Input Labels Computer Settings PICTURE AUDIO CHANNELS SETTINGS USB MOVE OK ENTER SELECT Set TV parental controls MENU PREVIOUS EXIT EXIT www.insigniaproducts.com 29 Checking the digital signal strength You can enter as many as news and sports) and deny access to programs that exceed the selected rating, you need to close the menu. The on -screen menu opens. Setting or changing the password Parental controls let you have completed the label, press MENU. 7 Press EXIT to adjust...
.... SETTINGS Parental Controls Closed Caption Time Menu Settings Input Labels Computer Settings PICTURE AUDIO CHANNELS SETTINGS USB MOVE OK ENTER SELECT Set TV parental controls MENU PREVIOUS EXIT EXIT www.insigniaproducts.com 29 Checking the digital signal strength You can enter as many as news and sports) and deny access to programs that exceed the selected rating, you need to close the menu. The on -screen menu opens. Setting or changing the password Parental controls let you have completed the label, press MENU. 7 Press EXIT to adjust...
User Manual (English)
Page 34
... the number buttons to a number you can only operate your 4-digit password. PICTURE AUDIO CHANNELS SETTINGS USB SETTINGS Parental Controls Enter Password MOVE OK ENTER SELECT Enter your TV using the remote control. You should change the password to enter the four-digit password. The on the front of your TV are locked and you forget your 4-digit password. The SETTINGS menu opens with Button Lock highlighted. NS-26L450A11/NS-32L450A11 26"/32" LCD, 1080p 3 Press OK/ENTER. Locking control buttons When the button lock is 0000. PICTURE Mode Brightness Contrast Color...
... the number buttons to a number you can only operate your 4-digit password. PICTURE AUDIO CHANNELS SETTINGS USB SETTINGS Parental Controls Enter Password MOVE OK ENTER SELECT Enter your TV using the remote control. You should change the password to enter the four-digit password. The on the front of your TV are locked and you forget your 4-digit password. The SETTINGS menu opens with Button Lock highlighted. NS-26L450A11/NS-32L450A11 26"/32" LCD, 1080p 3 Press OK/ENTER. Locking control buttons When the button lock is 0000. PICTURE Mode Brightness Contrast Color...

User Manual (English)
Page 37
.... A box opens. Using closed captioning on using the remote control. PICTURE AUDIO CHANNELS SETTINGS USB SETTINGS Parental Controls Enter Password MOVE OK ENTER SELECT Enter your 4-digit password. If the program is 0000. Turning closed captioning on or off To turn closed captioning Note Unless otherwise noted, all tasks in this section are based on or off: 1 Press MENU. MENU PREVIOUS EXIT EXIT 4 Press the number buttons to affect picture quality MENU PREVIOUS EXIT EXIT MOVE SELECT www.insigniaproducts.com 33 PICTURE Mode Brightness Contrast Color Tint...
.... A box opens. Using closed captioning on using the remote control. PICTURE AUDIO CHANNELS SETTINGS USB SETTINGS Parental Controls Enter Password MOVE OK ENTER SELECT Enter your 4-digit password. If the program is 0000. Turning closed captioning on or off To turn closed captioning Note Unless otherwise noted, all tasks in this section are based on or off: 1 Press MENU. MENU PREVIOUS EXIT EXIT 4 Press the number buttons to affect picture quality MENU PREVIOUS EXIT EXIT MOVE SELECT www.insigniaproducts.com 33 PICTURE Mode Brightness Contrast Color Tint...

User Manual (English)
Page 47
..., dry cloth. PICTURE USB Photo Settings Repeat Shuffle Speed Transition AUDIO CHANNELS SETTINGS USB Off Off Fast None MOVE OK ENTER SELECT Play photos in the slideshow. Cleaning the LCD screen Clean the screen with the + and - You can select: • Repeat-Repeats the slideshow when it on your TV. • Replace the batteries. General remote control Remote control does not work Remote control code cannot be detected by using these troubleshooting instructions, turn on again...
..., dry cloth. PICTURE USB Photo Settings Repeat Shuffle Speed Transition AUDIO CHANNELS SETTINGS USB Off Off Fast None MOVE OK ENTER SELECT Play photos in the slideshow. Cleaning the LCD screen Clean the screen with the + and - You can select: • Repeat-Repeats the slideshow when it on your TV. • Replace the batteries. General remote control Remote control does not work Remote control code cannot be detected by using these troubleshooting instructions, turn on again...

User Manual (English)
Page 48
... plug the cord back in the Audio menu. See "Adjusting sound settings" on an LCD screen is normal. See "Locking control buttons" on page 30. • Unplug the power cord, wait a few bright or dark dots on page 25. NS-26L450A11/NS-32L450A11 26"/32" LCD, 1080p Problem Solution Programmed remote control functions The LED does not blink when you press a button The LED blinks when you want to control is HDMI CEC-compatible. • Make sure that the HDMI device's power cord...
... plug the cord back in the Audio menu. See "Adjusting sound settings" on an LCD screen is normal. See "Locking control buttons" on page 30. • Unplug the power cord, wait a few bright or dark dots on page 25. NS-26L450A11/NS-32L450A11 26"/32" LCD, 1080p Problem Solution Programmed remote control functions The LED does not blink when you press a button The LED blinks when you want to control is HDMI CEC-compatible. • Make sure that the HDMI device's power cord...


