
User Manual (English)
Page 1
User Guide 26" LED TV NS-26E340A13
User Guide 26" LED TV NS-26E340A13

User Manual (English)
Page 2
...Package contents 5 Front 5 Side 6 Back 6 Remote control 7 Making connections 8 What connection should I use 8 Connecting power 9 Connecting a cable or satellite box 9 Connecting an antenna or cable TV (no box 12 Connecting a DVD or Blu-ray player 12 Connecting a VCR 14 Connecting a camcorder or game console 15 Connecting a computer 15 Connecting a USB flash... theater system with multiple devices 18 Using the remote control 18 Installing remote control batteries 18 Aiming the remote control 18 Turning on your TV for the first time 19 Understanding the basics 21 Turning your...
...Package contents 5 Front 5 Side 6 Back 6 Remote control 7 Making connections 8 What connection should I use 8 Connecting power 9 Connecting a cable or satellite box 9 Connecting an antenna or cable TV (no box 12 Connecting a DVD or Blu-ray player 12 Connecting a VCR 14 Connecting a camcorder or game console 15 Connecting a computer 15 Connecting a USB flash... theater system with multiple devices 18 Using the remote control 18 Installing remote control batteries 18 Aiming the remote control 18 Turning on your TV for the first time 19 Understanding the basics 21 Turning your...

User Manual (English)
Page 3
...Selecting a channel 22 Adjusting the volume 22 Viewing channel information 22 Viewing system information 23 Adjusting the picture 23 Adjusting the TV picture 23 Adjusting the computer image 24 Adjusting the sound 25 Adjusting sound settings 25 Selecting the device connected to the ...Checking the digital signal strength 29 Setting parental controls 30 Setting or changing the password 30 Locking control buttons 31 Blocking unrated TV 31 Setting parental control levels 32 Downloading rating information 33 Using closed captioning 34 Turning closed captioning on or off 34 Selecting...
...Selecting a channel 22 Adjusting the volume 22 Viewing channel information 22 Viewing system information 23 Adjusting the picture 23 Adjusting the TV picture 23 Adjusting the computer image 24 Adjusting the sound 25 Adjusting sound settings 25 Selecting the device connected to the ...Checking the digital signal strength 29 Setting parental controls 30 Setting or changing the password 30 Locking control buttons 31 Blocking unrated TV 31 Setting parental control levels 32 Downloading rating information 33 Using closed captioning 34 Turning closed captioning on or off 34 Selecting...

User Manual (English)
Page 4
Insignia Televisions 47 Definitions 47 How long does the coverage last 47 What does this warranty cover 47 How to USB mode 39 Browsing photos 39 Viewing favorite photos 40 Viewing photos in a slideshow 40 Customizing slideshow settings 41 Maintaining 41 Cleaning the TV cabinet 41 Cleaning the TV screen 41 Troubleshooting 41 Video...
Insignia Televisions 47 Definitions 47 How long does the coverage last 47 What does this warranty cover 47 How to USB mode 39 Browsing photos 39 Viewing favorite photos 40 Viewing photos in a slideshow 40 Customizing slideshow settings 41 Maintaining 41 Cleaning the TV cabinet 41 Cleaning the TV screen 41 Troubleshooting 41 Video...

User Manual (English)
Page 5
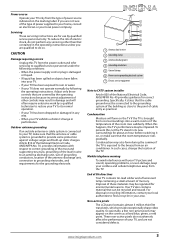
...placed on dressers, bookcases, shelves, desks, speakers, chests, or carts may fall over and cause injury. Make sure that you place or install the TV where it cannot be pulled or grabbed by curious children. If you are committed to making home entertainment enjoyable and safe. Tune into safety •...that children can easily be heavy. f CHILD SAFETY It makes a difference how and where you use of this manual, or otherwise listed by the TV and wall mount manufacturers. • If you have any doubts about your ability to safely wall mount your new product, keep these safety tips ...
...placed on dressers, bookcases, shelves, desks, speakers, chests, or carts may fall over and cause injury. Make sure that you place or install the TV where it cannot be pulled or grabbed by curious children. If you are committed to making home entertainment enjoyable and safe. Tune into safety •...that children can easily be heavy. f CHILD SAFETY It makes a difference how and where you use of this manual, or otherwise listed by the TV and wall mount manufacturers. • If you have any doubts about your ability to safely wall mount your new product, keep these safety tips ...

User Manual (English)
Page 6
... and a third grounding prong. When installing an outside antenna system should not be fatal. If the screen breaks, be careful of your TV. 1 Read these instructions. 2 Keep these instructions. 3 Heed all warnings. 4 Follow all servicing to qualified service personnel. The wide ...When replacement parts are provided for long periods of overhead power lines or other . Safety check After completing any ventilation openings. NS-26E340A13 Important Safety Instructions CAUTION RISK OF ELECTRIC SHOCK DO NOT OPEN This symbol indicates that you connect the Class I apparatus which...
... and a third grounding prong. When installing an outside antenna system should not be fatal. If the screen breaks, be careful of your TV. 1 Read these instructions. 2 Keep these instructions. 3 Heed all warnings. 4 Follow all servicing to qualified service personnel. The wide ...When replacement parts are provided for long periods of overhead power lines or other . Safety check After completing any ventilation openings. NS-26E340A13 Important Safety Instructions CAUTION RISK OF ELECTRIC SHOCK DO NOT OPEN This symbol indicates that you connect the Class I apparatus which...
User Manual (English)
Page 7
... conductors, location of the antenna-discharge unit, connection to CATV system installer Article 820 of power source indicated on the TV if the TV is exposed to provide some protection against voltage surges and built-up static charges. These non-active pixels do so. ...or red point. Adjust only those controls that contained in the operating instructions unless you are for environmental reasons. To prevent this happens, the TV's performance may result in wire 2 Grounding clamp 3 Antenna discharge unit 4 Grounding conductors 5 Ground clamps 6 Power service grounding electrode system 7...
... conductors, location of the antenna-discharge unit, connection to CATV system installer Article 820 of power source indicated on the TV if the TV is exposed to provide some protection against voltage surges and built-up static charges. These non-active pixels do so. ...or red point. Adjust only those controls that contained in the operating instructions unless you are for environmental reasons. To prevent this happens, the TV's performance may result in wire 2 Grounding clamp 3 Antenna discharge unit 4 Grounding conductors 5 Ground clamps 6 Power service grounding electrode system 7...
User Manual (English)
Page 8
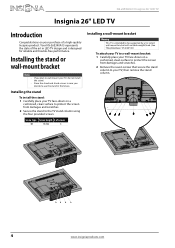
.... Store the stand and stand screws in case you plan to a wall-mount bracket: 1 Carefully place your TV, then remove the stand column. 4 www.insigniaproducts.com NS-26E340A13 Insignia 26" LED TV Insignia 26" LED TV Introduction Congratulations on your TV, do not install the stand. Installing the stand or wall-mount bracket Notes • • If you...
.... Store the stand and stand screws in case you plan to a wall-mount bracket: 1 Carefully place your TV, then remove the stand column. 4 www.insigniaproducts.com NS-26E340A13 Insignia 26" LED TV Insignia 26" LED TV Introduction Congratulations on your TV, do not install the stand. Installing the stand or wall-mount bracket Notes • • If you...

User Manual (English)
Page 9
...). 2 Remote control sensor Receives signals from the remote control. To completely disconnect power, unplug the power cord. Insignia 26" LED TV 3 Attach the wall-mount bracket to your TV using the mounting holes on . See the instructions that came with the wall-mount bracket for screw lengths. &#... the instructions that came with the wall-mount bracket for information about how to correctly hang your TV is on the back of your TV take type M5 screws. 7.88 in. (200 mm) TV components Package contents • Remote control and batteries (2 AAA) • Stand and screws (4) •...
...). 2 Remote control sensor Receives signals from the remote control. To completely disconnect power, unplug the power cord. Insignia 26" LED TV 3 Attach the wall-mount bracket to your TV using the mounting holes on . See the instructions that came with the wall-mount bracket for screw lengths. &#... the instructions that came with the wall-mount bracket for information about how to correctly hang your TV is on the back of your TV take type M5 screws. 7.88 in. (200 mm) TV components Package contents • Remote control and batteries (2 AAA) • Stand and screws (4) •...

User Manual (English)
Page 10
...more information, see "Using composite video (good)" on page 12. 6 www.insigniaproducts.com For more information, see "Connecting an antenna or cable TV (no box)" on page 11 or 14. The component video jacks (COMPONENT IN VIDEO/Y, PB, and PR) share these jacks. For more ... OR Connect the video for a component video device to this jack. For more information, see "Connecting a computer" on page 10 or 13. Side Back NS-26E340A13 Insignia 26" LED TV USB / AUDIO OUT HDMI 3 PR PB COMPONENT IN HDMI 1 HDMI 2 / DVI PC / DVI AUDIO IN VGA DIGITAL OUTPUT ANT / CABLE VIDEO ...
...more information, see "Using composite video (good)" on page 12. 6 www.insigniaproducts.com For more information, see "Connecting an antenna or cable TV (no box)" on page 11 or 14. The component video jacks (COMPONENT IN VIDEO/Y, PB, and PR) share these jacks. For more ... OR Connect the video for a component video device to this jack. For more information, see "Connecting a computer" on page 10 or 13. Side Back NS-26E340A13 Insignia 26" LED TV USB / AUDIO OUT HDMI 3 PR PB COMPONENT IN HDMI 1 HDMI 2 / DVI PC / DVI AUDIO IN VGA DIGITAL OUTPUT ANT / CABLE VIDEO ...

User Manual (English)
Page 11
...VIDEO/Y, PB, and PR jacks or the AV IN VIDEO/Y jack. You can select Vivid, Standard, Energy Savings, Theater, Game, or Custom. In TV mode, press to return to set the sleep timer. ACC-This button has no function. 7 Press to open the Favorite channel list. Press to open... select the sound mode. For more information, see "Viewing channel information" on page 25. Press to turn your TV on the remote control to select the video input source, then press ENTER. Insignia 26" LED TV Remote control * # Button 10 /MUTE 11 VOL+/- 12 SLEEP 13 ZOOM 14 (return) 15 S T W X ...
...VIDEO/Y, PB, and PR jacks or the AV IN VIDEO/Y jack. You can select Vivid, Standard, Energy Savings, Theater, Game, or Custom. In TV mode, press to return to set the sleep timer. ACC-This button has no function. 7 Press to open the Favorite channel list. Press to open... select the sound mode. For more information, see "Viewing channel information" on page 25. Press to turn your TV on the remote control to select the video input source, then press ENTER. Insignia 26" LED TV Remote control * # Button 10 /MUTE 11 VOL+/- 12 SLEEP 13 ZOOM 14 (return) 15 S T W X ...

User Manual (English)
Page 12
... can use ? For the best video quality, you have HDMI) Connection type and jack Optical digital/SPDIF audio Analog audio NS-26E340A13 Insignia 26" LED TV Cable connectors Component video (requires an audio connection) Better than composite or coaxial Composite video (requires an audio connection) Better than... the HDMI cable that all connections are tight and secure. • The external audio/video equipment shown may be different from your TV. If you should I use the HDMI 2/DVI jack on your equipment. • Always unplug the power cord when connecting external equipment...
... can use ? For the best video quality, you have HDMI) Connection type and jack Optical digital/SPDIF audio Analog audio NS-26E340A13 Insignia 26" LED TV Cable connectors Component video (requires an audio connection) Better than composite or coaxial Composite video (requires an audio connection) Better than... the HDMI cable that all connections are tight and secure. • The external audio/video equipment shown may be different from your TV. If you should I use the HDMI 2/DVI jack on your equipment. • Always unplug the power cord when connecting external equipment...

User Manual (English)
Page 13
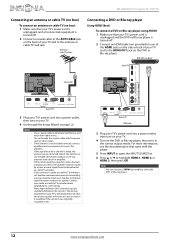
...when you should use ?" R Back of TV HDMI 1 HDMI 2 / DVI PC / DVI AUDIO IN VGA DIGITAL OUTPUT ANT / CABLE HDMI cable 4 Plug your TV's power cord into a power outlet, turn on your TV into a power outlet. www.insigniaproducts.com 9 Insignia 26" LED TV Connecting power To connect the power: •... Plug the AC power cord on the back of your TV, then turn on the cable or satellite...
...when you should use ?" R Back of TV HDMI 1 HDMI 2 / DVI PC / DVI AUDIO IN VGA DIGITAL OUTPUT ANT / CABLE HDMI cable 4 Plug your TV's power cord into a power outlet, turn on your TV into a power outlet. www.insigniaproducts.com 9 Insignia 26" LED TV Connecting power To connect the power: •... Plug the AC power cord on the back of your TV, then turn on the cable or satellite...

User Manual (English)
Page 14
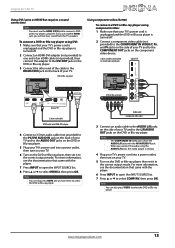
... jacks. Cable or satellite box Using component video (better) To connect a cable or satellite box using component video: 1 Make sure that your TV's power cord is unplugged, and all connected equipment is turned off. 2 Connect the incoming cable from the cable wall jack to the cable-in.... 7 Go through the Setup Wizard on the cable or satellite box. 4 Connect the other end of TV / AUDIO OUT HDMI 3 USB PR PB COMPONENT IN VIDEO / Y AV IN L - NS-26E340A13 Insignia 26" LED TV Using DVI (same as HDMI but requires a sound connection) Note You must use another HDMI jack, you ...
... jacks. Cable or satellite box Using component video (better) To connect a cable or satellite box using component video: 1 Make sure that your TV's power cord is unplugged, and all connected equipment is turned off. 2 Connect the incoming cable from the cable wall jack to the cable-in.... 7 Go through the Setup Wizard on the cable or satellite box. 4 Connect the other end of TV / AUDIO OUT HDMI 3 USB PR PB COMPONENT IN VIDEO / Y AV IN L - NS-26E340A13 Insignia 26" LED TV Using DVI (same as HDMI but requires a sound connection) Note You must use another HDMI jack, you ...

User Manual (English)
Page 15
...AUDIO IN VGA DIGITAL OUTPUT ANT / CABLE Back of TV 4 Plug your TV's power cord into a power outlet, turn on your TV, then turn on the cable or satellite TV box. 5 Go through the Setup Wizard on the cable or satellite box. Insignia 26" LED TV Using composite video (good) To connect a cable ...or satellite box using composite video: 1 Make sure that your TV's power cord is unplugged, and all connected equipment is turned off . 2 Connect the incoming cable ...
...AUDIO IN VGA DIGITAL OUTPUT ANT / CABLE Back of TV 4 Plug your TV's power cord into a power outlet, turn on your TV, then turn on the cable or satellite TV box. 5 Go through the Setup Wizard on the cable or satellite box. Insignia 26" LED TV Using composite video (good) To connect a cable ...or satellite box using composite video: 1 Make sure that your TV's power cord is unplugged, and all connected equipment is turned off . 2 Connect the incoming cable ...
User Manual (English)
Page 16
...to cable or satellite TV without a set it would be if the content was originally recorded in amplifier. Note You can also press HDMI repeatedly to select the DVD or Blu-ray player. 12 www.insigniaproducts.com NS-26E340A13 Insignia 26" LED TV Connecting an antenna or cable TV (no box) To ...connect an antenna or cable TV (no box) Connecting a DVD or Blu-ray player Using HDMI (best) To connect a DVD...
...to cable or satellite TV without a set it would be if the content was originally recorded in amplifier. Note You can also press HDMI repeatedly to select the DVD or Blu-ray player. 12 www.insigniaproducts.com NS-26E340A13 Insignia 26" LED TV Connecting an antenna or cable TV (no box) To ...connect an antenna or cable TV (no box) Connecting a DVD or Blu-ray player Using HDMI (best) To connect a DVD...
User Manual (English)
Page 17
... cable Component video cable 3 Connect an audio cable to the AUDIO L/R jacks on the component video device. For more times to match color-coded jacks. Insignia 26" LED TV Using DVI (same as HDMI but requires a sound connection) Note You must use another HDMI jack, you will not hear sound from the... IN VIDEO/Y jack. DVD or Blu-ray player Using component video (better) To connect a DVD or Blu-ray player using DVI: 1 Make sure that your TV's power cord is unplugged and the DVD or Blu-ray player is turned off . 2 Connect a component video cable (not provided) to the COMPONENT IN VIDEO...
... cable Component video cable 3 Connect an audio cable to the AUDIO L/R jacks on the component video device. For more times to match color-coded jacks. Insignia 26" LED TV Using DVI (same as HDMI but requires a sound connection) Note You must use another HDMI jack, you will not hear sound from the... IN VIDEO/Y jack. DVD or Blu-ray player Using component video (better) To connect a DVD or Blu-ray player using DVI: 1 Make sure that your TV's power cord is unplugged and the DVD or Blu-ray player is turned off . 2 Connect a component video cable (not provided) to the COMPONENT IN VIDEO...

User Manual (English)
Page 18
...cable (not provided) to the AV IN Y/VIDEO jack and AUDIO L/R jacks on the side of your TV and to the AV OUT jacks on your TV and the VCR. 4 Press INPUT to open the INPUT SOURCE list. 6 Press S or T to ... VCR, then press PLAY on the AV cable connects to the green video jack. NS-26E340A13 Insignia 26" LED TV Using composite video (good) To connect a DVD or Blu-ray player using composite video: 1 Make sure that ...Connect an AV cable (not provided) to the AV IN VIDEO and L/R AUDIO jacks on the side of your TV and to the AV OUT jacks on the DVD or Blu-ray player, then set it to the correct output ...
...cable (not provided) to the AV IN Y/VIDEO jack and AUDIO L/R jacks on the side of your TV and to the AV OUT jacks on your TV and the VCR. 4 Press INPUT to open the INPUT SOURCE list. 6 Press S or T to ... VCR, then press PLAY on the AV cable connects to the green video jack. NS-26E340A13 Insignia 26" LED TV Using composite video (good) To connect a DVD or Blu-ray player using composite video: 1 Make sure that ...Connect an AV cable (not provided) to the AV IN VIDEO and L/R AUDIO jacks on the side of your TV and to the AV OUT jacks on the DVD or Blu-ray player, then set it to the correct output ...

User Manual (English)
Page 19
...5 Press INPUT to open the INPUT SOURCE list. 6 Press S or T to select VGA, then press OK. 7 Adjust the display properties on the computer, if necessary. Insignia 26" LED TV Connecting a camcorder or game console Note If your camcorder or game console has an HDMI connection, we recommend that your... COMP/AV, then press OK. Cables are often color-coded to select the camcorder or game console. For more information, see the documentation that your TV's power cord is unplugged and the camcorder or game console is turned off . 2 Connect an AV cable (not provided) to the AV IN Y/...
...5 Press INPUT to open the INPUT SOURCE list. 6 Press S or T to select VGA, then press OK. 7 Adjust the display properties on the computer, if necessary. Insignia 26" LED TV Connecting a camcorder or game console Note If your camcorder or game console has an HDMI connection, we recommend that your... COMP/AV, then press OK. Cables are often color-coded to select the camcorder or game console. For more information, see the documentation that your TV's power cord is unplugged and the camcorder or game console is turned off . 2 Connect an AV cable (not provided) to the AV IN Y/...

User Manual (English)
Page 20
AUDIO - NS-26E340A13 Insignia 26" LED TV Using HDMI To connect a computer using the USB flash drive. R HDMI 1 HDMI 2 / DVI PC / DVI AUDIO IN VGA DIGITAL OUTPUT ANT / CABLE Back of your TV. 3 Press INPUT to open the INPUT SOURCE list. 5 Press S or T to highlight HDMI1, HDMI2, or HDMI3, then press OK. ...Caution Do not remove the USB flash drive or turn on the side of TV HDMI cable 3 Plug your TV's power cord into the USB port on your TV and the computer. 4 Press INPUT to open the INPUT SOURCE list. 4 Press S or T to select the computer...
AUDIO - NS-26E340A13 Insignia 26" LED TV Using HDMI To connect a computer using the USB flash drive. R HDMI 1 HDMI 2 / DVI PC / DVI AUDIO IN VGA DIGITAL OUTPUT ANT / CABLE Back of your TV. 3 Press INPUT to open the INPUT SOURCE list. 5 Press S or T to highlight HDMI1, HDMI2, or HDMI3, then press OK. ...Caution Do not remove the USB flash drive or turn on the side of TV HDMI cable 3 Plug your TV's power cord into the USB port on your TV and the computer. 4 Press INPUT to open the INPUT SOURCE list. 4 Press S or T to select the computer...


