

English Manual
Page 1
...;-12 p.m. Write the serial number in this manual before using this manual for reference. MT Please do not contact the store. www.imagefitness.com Model No. Serial Number Decal (under frame) ACTIVATE YOUR WARRANTY To register your product and activate your warranty today, go to www.workoutwarehouse.com/ registration. USER’'S MANUAL CAUTION Read all precautions and instructions in the space above for future...
...;-12 p.m. Write the serial number in this manual before using this manual for reference. MT Please do not contact the store. www.imagefitness.com Model No. Serial Number Decal (under frame) ACTIVATE YOUR WARRANTY To register your product and activate your warranty today, go to www.workoutwarehouse.com/ registration. USER’'S MANUAL CAUTION Read all precautions and instructions in the space above for future...
English Manual
Page 2
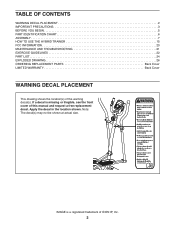
... at actual size. Apply the decal in the location shown. TABLE OF CONTENTS WARNING DECAL PLACEMENT 2 IMPORTANT PRECAUTIONS 3 BEFORE YOU BEGIN 5 PART IDENTIFICATION CHART 6 ASSEMBLY 7 HOW TO USE THE HYBRID TRAINER 15 FCC INFORMATION 20 MAINTENANCE AND TROUBLESHOOTING 21 EXERCISE GUIDELINES 22 PART LIST 24 EXPLODED DRAWING 26 ORDERING REPLACEMENT PARTS Back Cover LIMITED WARRANTY Back Cover WARNING DECAL PLACEMENT This drawing shows the location(s) of this manual and request a free replacement decal...
... at actual size. Apply the decal in the location shown. TABLE OF CONTENTS WARNING DECAL PLACEMENT 2 IMPORTANT PRECAUTIONS 3 BEFORE YOU BEGIN 5 PART IDENTIFICATION CHART 6 ASSEMBLY 7 HOW TO USE THE HYBRID TRAINER 15 FCC INFORMATION 20 MAINTENANCE AND TROUBLESHOOTING 21 EXERCISE GUIDELINES 22 PART LIST 24 EXPLODED DRAWING 26 ORDERING REPLACEMENT PARTS Back Cover LIMITED WARRANTY Back Cover WARNING DECAL PLACEMENT This drawing shows the location(s) of this manual and request a free replacement decal...
English Manual
Page 3
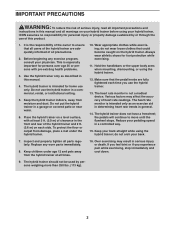
... health problems. 3. Always wear athletic shoes for personal injury or property damage sustained by persons weighing more than 250 lbs. (113 kg). 3 The heart rate monitor is intended only as described in a controlled way. 15. do not wear loose clothes that the pedal knobs are adequately informed of heart rate readings. Over exercising may affect the accuracy of all parts regularly. Use the hybrid trainer...
... health problems. 3. Always wear athletic shoes for personal injury or property damage sustained by persons weighing more than 250 lbs. (113 kg). 3 The heart rate monitor is intended only as described in a controlled way. 15. do not wear loose clothes that the pedal knobs are adequately informed of heart rate readings. Over exercising may affect the accuracy of all parts regularly. Use the hybrid trainer...
English Manual
Page 5
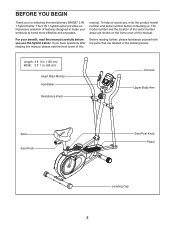
... front cover of this manual. For your workouts at home more effective and enjoyable. manual. BEFORE YOU BEGIN Thank you , note the product model number and serial number before you have questions after reading this manual, please see the front cover of this Before reading further, please familiarize yourself with the parts that are labeled in . (64 cm) Heart Rate Monitor Handlebar Resistance Knob Console Upper Body Arm Seat Seat Knob Seat Post Knob Pedal Leveling...
... front cover of this manual. For your workouts at home more effective and enjoyable. manual. BEFORE YOU BEGIN Thank you , note the product model number and serial number before you have questions after reading this manual, please see the front cover of this Before reading further, please familiarize yourself with the parts that are labeled in . (64 cm) Heart Rate Monitor Handlebar Resistance Knob Console Upper Body Arm Seat Seat Knob Seat Post Knob Pedal Leveling...
English Manual
Page 6
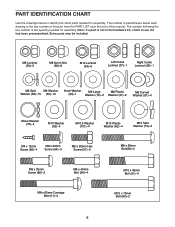
...number following the key number is the quantity needed for assembly. PART IDENTIFICATION CHART Use the drawings below each drawing is the key number of the part, from the PART LIST near the end of this manual. The number in the hardware kit, check to identify the small parts needed for assembly. Note: If a part ... (74)–-2 M4 x 12mm Screw (66)–-4 M8 x 20mm Screw (54)–-3 M8 x 20mm Hex Screw (57)–-2 M8 x 60mm Bolt(90)–-2 M8 x 35mm Screw (86)–-2 M8 x 40mm Bolt (56)–-4 M8 x 65mm Carriage Bolt (51)–-4 M10 x 48mm Bolt (91)–-4 M10 x 70mm...
...number following the key number is the quantity needed for assembly. PART IDENTIFICATION CHART Use the drawings below each drawing is the key number of the part, from the PART LIST near the end of this manual. The number in the hardware kit, check to identify the small parts needed for assembly. Note: If a part ... (74)–-2 M4 x 12mm Screw (66)–-4 M8 x 20mm Screw (54)–-3 M8 x 20mm Hex Screw (57)–-2 M8 x 60mm Bolt(90)–-2 M8 x 35mm Screw (86)–-2 M8 x 40mm Bolt (56)–-4 M8 x 65mm Carriage Bolt (51)–-4 M10 x 48mm Bolt (91)–-4 M10 x 70mm...
English Manual
Page 7
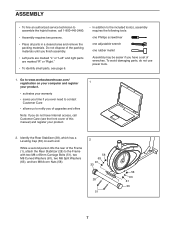
... an authorized service technician to assemble the hybrid trainer, call Customer Care (see page 6. •• In addition to the included tool(s), assembly requires the following tools: one Phillips screwdriver one adjustable wrench one rubber mallet Assembly may be easier if you do not use power tools. 1. To avoid damaging parts, do not have a set of the Frame (1), attach the Rear Stabilizer...
... an authorized service technician to assemble the hybrid trainer, call Customer Care (see page 6. •• In addition to the included tool(s), assembly requires the following tools: one Phillips screwdriver one adjustable wrench one rubber mallet Assembly may be easier if you do not use power tools. 1. To avoid damaging parts, do not have a set of the Frame (1), attach the Rear Stabilizer...
English Manual
Page 8
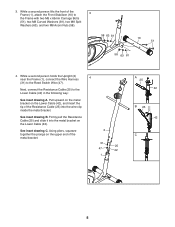
Next, connect the Resistance Cable (25) to the Reed Switch Wire (47). 3. Pull upward on the metal bracket on the upper end of the metal bracket. 2 31 25 47 42 1 A 25 42 B 25 42 C 8 See inset drawing B. Using pliers, squeeze together the prongs on the Lower Cable (42), and insert the tip of the Frame (1), attach the Front Stabilizer (10) to...
Next, connect the Resistance Cable (25) to the Reed Switch Wire (47). 3. Pull upward on the metal bracket on the upper end of the metal bracket. 2 31 25 47 42 1 A 25 42 B 25 42 C 8 See inset drawing B. Using pliers, squeeze together the prongs on the Lower Cable (42), and insert the tip of the Frame (1), attach the Front Stabilizer (10) to...
English Manual
Page 12
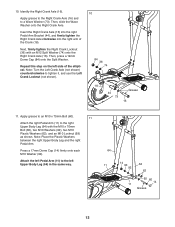
... 74 18 44 73 Grease 16 11. Insert the Right Crank Axle (16) into the right Pedal Arm Bracket (44), and firmly tighten the Right Crank Axle clockwise into the right arm of the elliptical. Then, press a 19mm Dome Cap (84) onto the Split Washer. Next, firmly tighten the Right Crank Locknut (36) with the M10 x 70mm Bolt (60), two M10 Washers...
... 74 18 44 73 Grease 16 11. Insert the Right Crank Axle (16) into the right Pedal Arm Bracket (44), and firmly tighten the Right Crank Axle clockwise into the right arm of the elliptical. Then, press a 19mm Dome Cap (84) onto the Split Washer. Next, firmly tighten the Right Crank Locknut (36) with the M10 x 70mm Bolt (60), two M10 Washers...
English Manual
Page 13
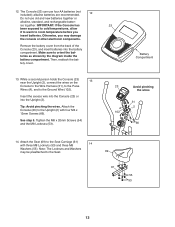
... the Upright (2), connect the wires on the 13 Console to the Wire Harness (31), to the Pulse Wires (A), and to the Upright (2) with three M8 Locknuts (53) and three M8 14 Washers (55). Attach the Console (23) to the Ground Wire (102). Attach the Seat (69) to room temperature before you may be preattached to orient the batteries as shown by the diagram inside the battery...
... the Upright (2), connect the wires on the 13 Console to the Wire Harness (31), to the Pulse Wires (A), and to the Upright (2) with three M8 Locknuts (53) and three M8 14 Washers (55). Attach the Console (23) to the Ground Wire (102). Attach the Seat (69) to room temperature before you may be preattached to orient the batteries as shown by the diagram inside the battery...
English Manual
Page 15
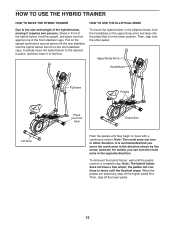
... Body Arms Handlebars Pull here Pedals Lift here Place your foot here Crank Arm Push the pedals until the pedals come to a complete stop. however, for variety, you move the crank arms in the opposite direction. When the pedals are stationary, step off the lower pedal. 15 HOW TO USE THE HYBRID TRAINER HOW TO MOVE THE HYBRID TRAINER HOW TO USE THE ELLIPTICAL MODE Due to the size and weight of the hybrid trainer, moving it...
... Body Arms Handlebars Pull here Pedals Lift here Place your foot here Crank Arm Push the pedals until the pedals come to a complete stop. however, for variety, you move the crank arms in the opposite direction. When the pedals are stationary, step off the lower pedal. 15 HOW TO USE THE HYBRID TRAINER HOW TO MOVE THE HYBRID TRAINER HOW TO USE THE ELLIPTICAL MODE Due to the size and weight of the hybrid trainer, moving it...

English Manual
Page 16
... tighten the seat knob. HOW TO USE THE UPRIGHT BIKE MODE To use the hybrid trainer as an upright bike, adjust the position of the seat post and the position of the seat, first loosen the seat knob a few turns. For effective exercise, the seat should be at the proper height. Insert the seat post knob into one of the seat, first loosen and remove the seat post knob. Seat Post Knob To adjust the position of the seat. Seat Knob...
... tighten the seat knob. HOW TO USE THE UPRIGHT BIKE MODE To use the hybrid trainer as an upright bike, adjust the position of the seat post and the position of the seat, first loosen the seat knob a few turns. For effective exercise, the seat should be at the proper height. Insert the seat post knob into one of the seat, first loosen and remove the seat post knob. Seat Post Knob To adjust the position of the seat. Seat Knob...
English Manual
Page 17
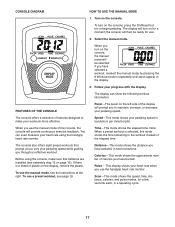
... use the handgrip heart rate monitor. Speed—-This mode shows your pedaling speed. CONSOLE DIAGRAM HOW TO USE THE MANUAL MODE 1. The display can even measure your pedaling speed while guiding you to vary your heart rate using the console, make your progress with the display. Before using the handgrip heart rate monitor. Distance—-This mode shows the distance you use a preset workout, see the instructions at the right. Scan—-This mode shows the speed, time, distance, calories, and pulse modes, for a moment; To turn...
... use the handgrip heart rate monitor. Speed—-This mode shows your pedaling speed. CONSOLE DIAGRAM HOW TO USE THE MANUAL MODE 1. The display can even measure your pedaling speed while guiding you to vary your heart rate using the console, make your progress with the display. Before using the handgrip heart rate monitor. Distance—-This mode shows the distance you use a preset workout, see the instructions at the right. Scan—-This mode shows the speed, time, distance, calories, and pulse modes, for a moment; To turn...
English Manual
Page 18
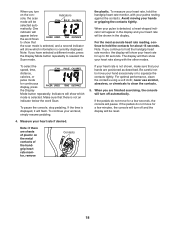
... modes. If the pedals do not move your heart rate along with your heart rate is detected, a heart-shaped indicator will appear in the display. the plastic. To select the speed, time, distance, calories, or pulse mode for about 15 seconds. To continue your hands or gripping the contacts tightly. For the most accurate heart rate reading, continue to squeeze the contacts tightly. Indicators will turn...
... modes. If the pedals do not move your heart rate along with your heart rate is detected, a heart-shaped indicator will appear in the display. the plastic. To select the speed, time, distance, calories, or pulse mode for about 15 seconds. To continue your hands or gripping the contacts tightly. For the most accurate heart rate reading, continue to squeeze the contacts tightly. Indicators will turn...

English Manual
Page 19
... keep your heart rate if desired. If you stop pedaling for a few seconds, the workout will pause and the time will prompt you . If the pedals do not move for a few seconds after you are finished exercising, the console will turn on for use. 2. Make sure to pedal at a speed that is intended only to start the workout. The display will be reset. 19 The display will pause...
... keep your heart rate if desired. If you stop pedaling for a few seconds, the workout will pause and the time will prompt you . If the pedals do not move for a few seconds after you are finished exercising, the console will turn on for use. 2. Make sure to pedal at a speed that is intended only to start the workout. The display will be reset. 19 The display will pause...

English Manual
Page 20
...installed and used in accordance with the limits for help. FCC INFORMATION This equipment has been tested and found to comply with the instructions, may cause harmful interference to radio communications. If this equipment does cause harmful interference to operate the equipment. 20 This equipment generates, uses, and can be determined by turning... by ICON could void the user’'s authority to radio or television reception, which the receiver is connected. •• Consult the dealer or an experienced radio/TV technician for a Class B digital device, pursuant to part 15 of...
...installed and used in accordance with the limits for help. FCC INFORMATION This equipment has been tested and found to comply with the instructions, may cause harmful interference to radio communications. If this equipment does cause harmful interference to operate the equipment. 20 This equipment generates, uses, and can be determined by turning... by ICON could void the user’'s authority to radio or television reception, which the receiver is connected. •• Consult the dealer or an experienced radio/TV technician for a Class B digital device, pursuant to part 15 of...
English Manual
Page 21
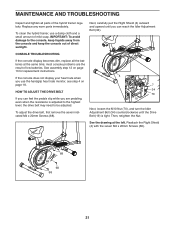
... the pedals slip while you can reach the Idler Adjustment Bolt (34). If the console does not display your heart rate when you use a damp cloth and a small amount of the hybrid trainer regularly. See assembly step 12 on page 18. MAINTENANCE AND TROUBLESHOOTING Inspect and tighten all the batteries at the left. To clean the hybrid trainer, use the handgrip heart rate monitor, see step 4 on page 13 for replacement instructions. Replace any worn parts...
... the pedals slip while you can reach the Idler Adjustment Bolt (34). If the console does not display your heart rate when you use a damp cloth and a small amount of the hybrid trainer regularly. See assembly step 12 on page 18. MAINTENANCE AND TROUBLESHOOTING Inspect and tighten all the batteries at the left. To clean the hybrid trainer, use the handgrip heart rate monitor, see step 4 on page 13 for replacement instructions. Replace any worn parts...

English Manual
Page 22
... fat burning, exercise with 5 to prevent post-exercise problems. EXERCISE FREQUENCY To maintain or improve your everyday life. 22 Cooling Down—-Finish with your heart rate near the lowest number in general. Stretching increases the flexibility of the chart (ages are essential for successful results. EXERCISE GUIDELINES WARNING: Before beginning this or any exercise program, consult your body uses carbohydrate calories for...
... fat burning, exercise with 5 to prevent post-exercise problems. EXERCISE FREQUENCY To maintain or improve your everyday life. 22 Cooling Down—-Finish with your heart rate near the lowest number in general. Stretching increases the flexibility of the chart (ages are essential for successful results. EXERCISE GUIDELINES WARNING: Before beginning this or any exercise program, consult your body uses carbohydrate calories for...
English Manual
Page 24
... Stabilizer Pedal Arm Right Pedal Left Pedal 17mm Dome Cap Left Crank Axle Right Crank Axle Flywheel Crank Drive Belt Crank Bearing Assembly Front Stabilizer Cap Frame Sleeve Console Seat Post Resistance Control/Cable Upright Spacer M8 Plastic Washer Rear Stabilizer Large Flywheel Bearing Seat Post Sleeve Wire Harness Pulley Leveling Cap Idler Adjustment Bolt C-magnet Assembly Right Crank Locknut Left Crank Locknut Flywheel Axle M5 Nut Upper Body Arm Bushing Pedal Arm Bushing Lower Cable Large Flywheel Axle Nut Pedal Arm Bracket Magnet Model...
... Stabilizer Pedal Arm Right Pedal Left Pedal 17mm Dome Cap Left Crank Axle Right Crank Axle Flywheel Crank Drive Belt Crank Bearing Assembly Front Stabilizer Cap Frame Sleeve Console Seat Post Resistance Control/Cable Upright Spacer M8 Plastic Washer Rear Stabilizer Large Flywheel Bearing Seat Post Sleeve Wire Harness Pulley Leveling Cap Idler Adjustment Bolt C-magnet Assembly Right Crank Locknut Left Crank Locknut Flywheel Axle M5 Nut Upper Body Arm Bushing Pedal Arm Bushing Lower Cable Large Flywheel Axle Nut Pedal Arm Bracket Magnet Model...

English Manual
Page 25
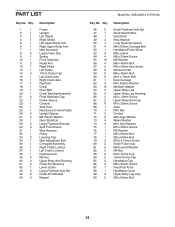
Key No. Qty. For information about ordering replacement parts, see the back cover of this manual. *These parts are subject to change without notice. Qty. Description Key No. Description 91 4 M10 x 48mm Bolt 92 4 M10 Washer 93 6 M10 Locknut 94 1 Knob Washer 95 1 Short Flywheel Spacer 96 2 Crank Cover 97 2 Seat Carriage Cap 98 1 M8 x 40mm Socket Bolt 99 1 100 2 101 4 102 1 * –- * –- * –- Grommet Small Curved Washer M10.5 Washer Ground Wire User·s Manual Assembly Tool DVD Note: Specifications are not illustrated. 25
Key No. Qty. For information about ordering replacement parts, see the back cover of this manual. *These parts are subject to change without notice. Qty. Description Key No. Description 91 4 M10 x 48mm Bolt 92 4 M10 Washer 93 6 M10 Locknut 94 1 Knob Washer 95 1 Short Flywheel Spacer 96 2 Crank Cover 97 2 Seat Carriage Cap 98 1 M8 x 40mm Socket Bolt 99 1 100 2 101 4 102 1 * –- * –- * –- Grommet Small Curved Washer M10.5 Washer Ground Wire User·s Manual Assembly Tool DVD Note: Specifications are not illustrated. 25

English Manual
Page 28
... front cover of this manual) •• the key number and description of the replacement part(s) (see the PART LIST and the EXPLODED DRAWING near the end of this manual. ICON Health & Fitness, Inc. (ICON) warrants this warranty is in connection with respect to any economic loss, loss of property, loss of revenues or prots, loss of enjoyment or use, or costs of removal or installation; All repairs...
... front cover of this manual) •• the key number and description of the replacement part(s) (see the PART LIST and the EXPLODED DRAWING near the end of this manual. ICON Health & Fitness, Inc. (ICON) warrants this warranty is in connection with respect to any economic loss, loss of property, loss of revenues or prots, loss of enjoyment or use, or costs of removal or installation; All repairs...


